# Site Editor Drag-n-Drop Features
# How to Add Heading to Your Page ?
**Through this document , you will uncover the 'Heading' feature properties in site editor page through two key elements:**
**[1. Adding a Heading](https://kb.salerise.com/link/14#bkmrk-adding-heading)**
**[2. Feature Settings Window](https://kb.salerise.com/link/14#bkmrk-feature-settings-win)**
### **Adding a Heading**
- Drag the Heading icon from the available features
[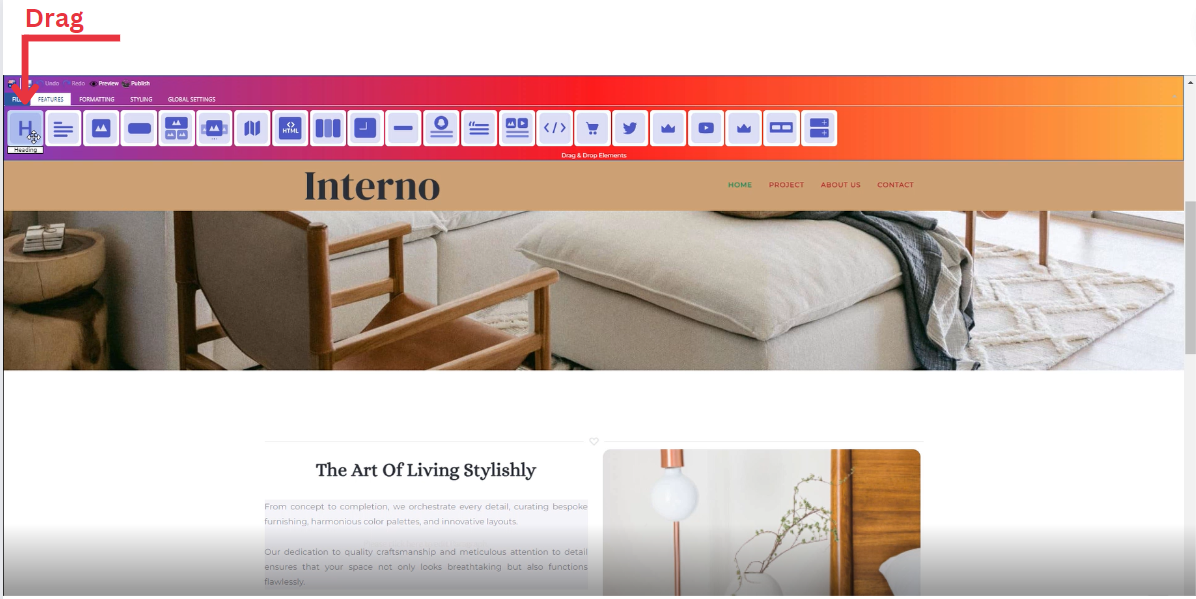](https://kb.salerise.com/uploads/images/gallery/2023-11/j0vimage.png)
- Drop the Heading icon into the desired location on your website page
[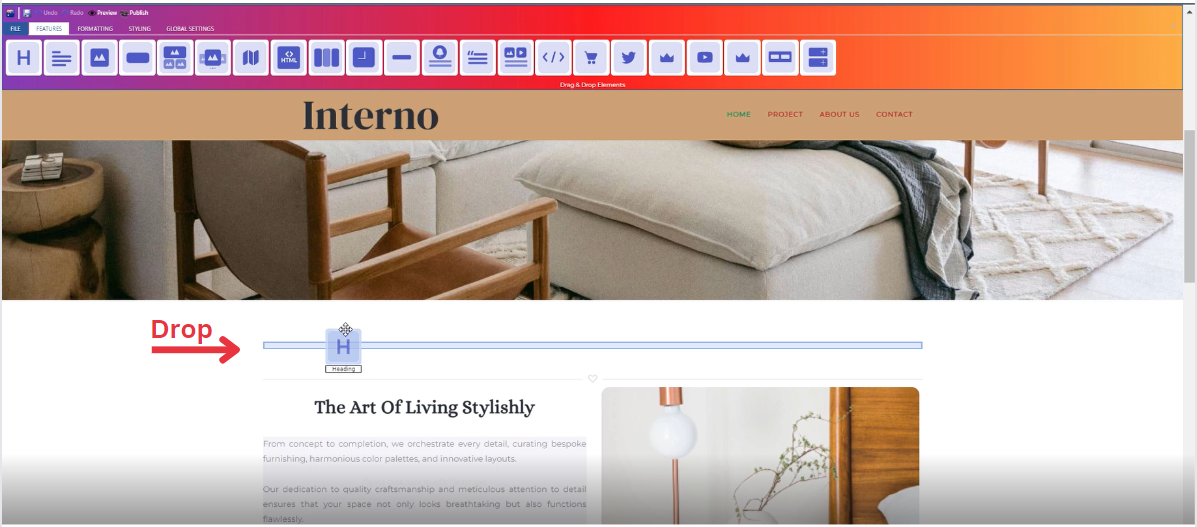](https://kb.salerise.com/uploads/images/gallery/2023-11/iHzimage.png)
### **Feature Settings Window**
Upon dropping the heading, a settings window will appear, offering four main features:
- **Theme**
- Explore different themes for your heading to align with your website's aesthetic
\_\_\_\_\_\_\_\_\_\_\_\_\_\_\_\_\_\_\_\_\_\_\_\_\_\_\_\_\_\_\_\_\_\_\_\_\_\_\_\_\_\_\_\_\_\_\_\_\_\_\_\_\_\_\_\_\_\_\_\_\_\_\_\_\_\_\_\_\_\_\_\_\_\_\_\_
- **Settings**
- Customize and enter your own text
- Add several classes from a long list of options
- Select heading level (H1,H2,H3,H4,H5)
- Determine how your heading is visible on devices (Mobile , Tablet , Desktop , Large desktop)
\_\_\_\_\_\_\_\_\_\_\_\_\_\_\_\_\_\_\_\_\_\_\_\_\_\_\_\_\_\_\_\_\_\_\_\_\_\_\_\_\_\_\_\_\_\_\_\_\_\_\_\_\_\_\_\_\_\_\_\_\_\_\_\_\_\_\_\_\_\_\_\_\_\_\_\_\_
- **Design**
- Determine the font type
- Determine font color with gradient
\_\_\_\_\_\_\_\_\_\_\_\_\_\_\_\_\_\_\_\_\_\_\_\_\_\_\_\_\_\_\_\_\_\_\_\_\_\_\_\_\_\_\_\_\_\_\_\_\_\_\_\_\_\_\_\_\_\_\_\_\_\_\_\_\_\_\_\_\_\_\_\_\_\_\_\_\_
- **Animation**
- Add animation to your text from a long list of animation options
- Enhance your animated text by incorporating timing in seconds
# How to Add Free Text to Your Page ?
**Through this document , you will uncover the 'Text' feature properties in site editor page through these key elements:
[1. Adding a Free Text](https://kb.salerise.com/link/15#bkmrk-adding-heading)
[2. Feature Settings Window](https://kb.salerise.com/link/15#bkmrk-feature-settings-win)
[3. Style Settings Window](https://kb.salerise.com/link/15#bkmrk-style-settings)**
### **Adding a Free Text**
- Drag the text icon from the available features
[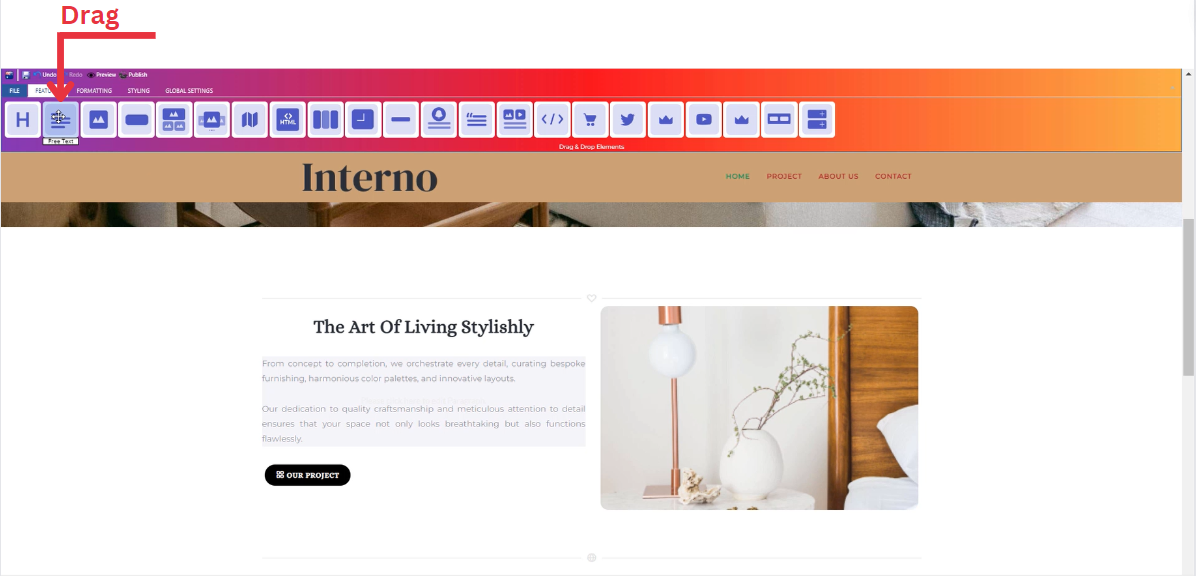](https://kb.salerise.com/uploads/images/gallery/2023-11/hkrimage.png)
- Drop the text icon into the desired location on your website page
[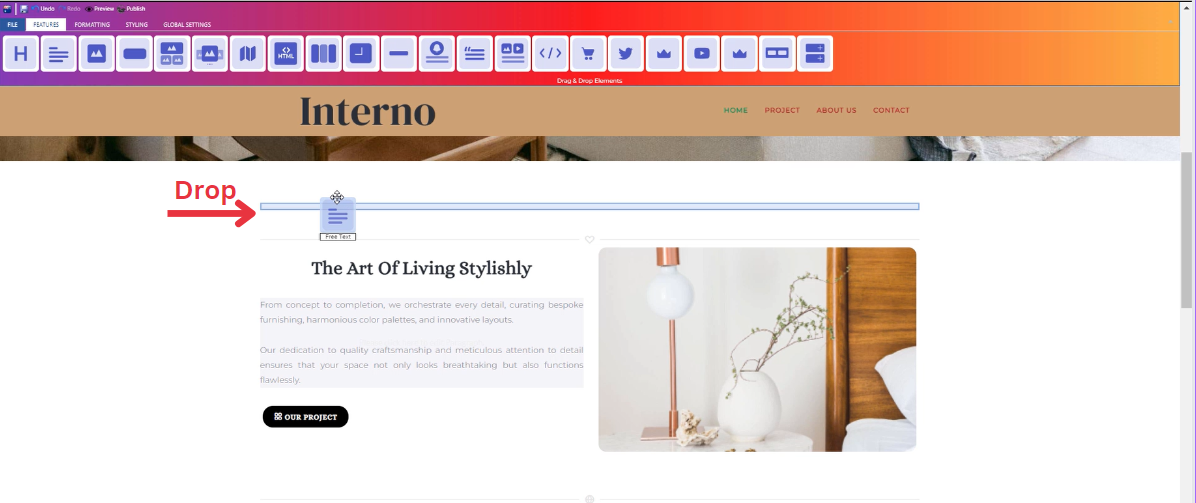](https://kb.salerise.com/uploads/images/gallery/2023-11/p99image.png)
### **Feature Settings**Once the text icon is activated, you can start entering your desired text directly into the text field. And upon entering text, a feature settings window will appear, providing options for customization.
[](https://kb.salerise.com/uploads/images/gallery/2023-11/CJ5image.png)
This window includes :
- **Customize Font:** In the feature settings, customize your text by selecting from various font families, adjusting font sizes, and choosing different headers.
- **Text Alignment:** Modify the alignment of your text as needed, whether it's left-aligned, center-aligned, right-aligned, or justified.
- **Lists:** Utilize numbered and bullet lists to organize your text content efficiently.
- **Insert/Edit Links:** Add hyperlinks to your text by using the insert/edit link option, allowing users to navigate to external pages or resources.
- **Remove Links:** If needed, easily remove any existing links within your text.
- **Subscript and Superscript:** Apply subscript or superscript formatting to specific text elements for a more dynamic presentation.
- **Text Color:** Customize the color of your text to match your website's design or emphasize specific information.
- **Background Color:** Enhance the visibility of your text by adjusting the background color to create a visually appealing contrast.
- **Special Characters:** Access a range of special characters to enhance the richness of your text content.
- **Additional Features:** Explore other available features to further enhance your text, ensuring a comprehensive and polished appearance.
### **Style Settings**
**Design Features**
- Access the "Design" feature to customize your text appearance. Within this feature, you can determine the following properties:
- **Margin**: Set the spacing around your text to control its placement on the page.
- **Border**: Define a border for your text to add a distinct visual element.
- **Color**: Choose the color that best complements your website's theme or design.
- **Style**: Apply different styles to your text, enhancing its visual appeal.
- **Gradient**: Add gradient effects to your text for a more dynamic and modern look.
**Background Features**
- Navigate to the "Background" feature to enhance the backdrop of your text.
- **Upload Images**: Insert images as a background for your text, providing visual interest.
- **Sample Images**: Explore pre-loaded image samples for quick and easy background selection.
- **Background Styling**: Customize the text background further with options like:
\- Background Repeat: Control how the background image repeats.
\- Background Fill: Adjust how the background fills the space around the text.
\- Background Position: Define the positioning of the background image for optimal display.
**Style Customization**
- Within the "Style" section, further refine your text presentation by adding classes from a dropdown list with a plethora of options
- Determine how your text is visible on devices (Mobile , Tablet , Desktop , Large desktop)
# How to Add Image to Your Page ?
**Through this document , you will uncover the 'Image' feature properties in site editor page through these key elements:
[1. Adding an Image](https://kb.salerise.com/link/16#bkmrk-adding-heading)
[2. Feature Settings Window](https://kb.salerise.com/link/16#bkmrk-feature-settings)[3. Style Settings Window](https://kb.salerise.com/link/16#bkmrk-style-settings)**
### **Adding an Image**
- Drag the Image icon from the available features
[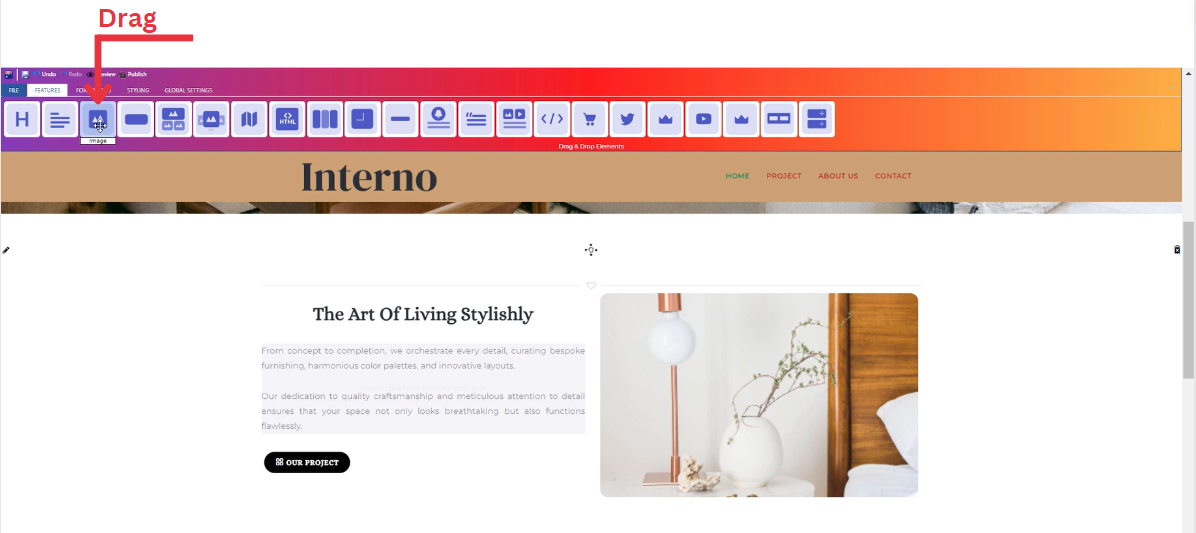](https://kb.salerise.com/uploads/images/gallery/2023-11/2UGimage.png)
- Drop the Image icon into the desired location on your website page
[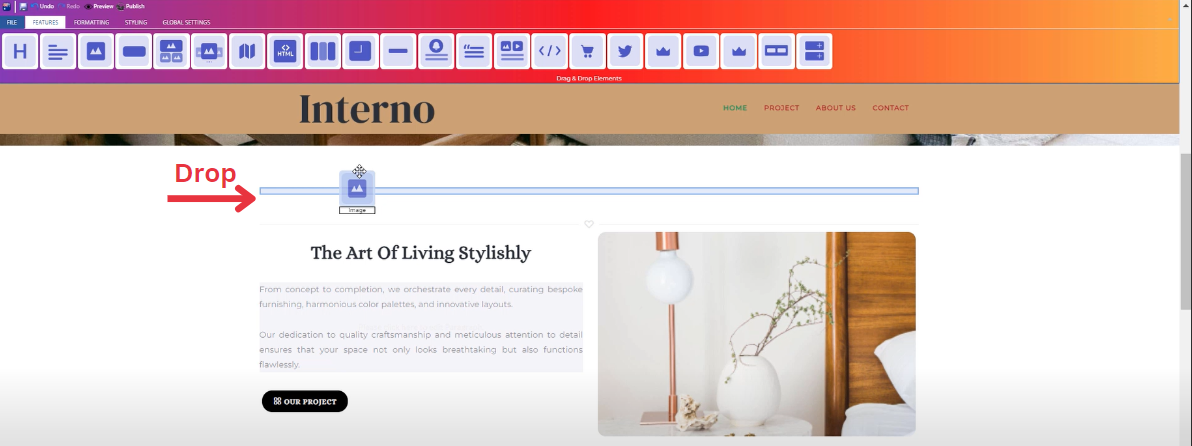](https://kb.salerise.com/uploads/images/gallery/2023-11/3Thimage.png)
### **Feature Settings**
Upon dropping the image , a settings window will appear, offering three main features:
- **Images**
- Include an image on your website by choosing from three options: select from your uploaded images, use sample images from the website, or upload a new image.
\_\_\_\_\_\_\_\_\_\_\_\_\_\_\_\_\_\_\_\_\_\_\_\_\_\_\_\_\_\_\_\_\_\_\_\_\_\_\_\_\_\_\_\_\_\_\_\_\_\_\_\_\_\_\_\_\_\_\_\_\_\_\_\_\_\_\_\_\_\_\_\_\_\_\_\_
- **Settings**
- Customize your image dimensions (Width , Height).
- Determine how your image is visible on devices (Mobile , Tablet , Desktop , Large desktop).
\_\_\_\_\_\_\_\_\_\_\_\_\_\_\_\_\_\_\_\_\_\_\_\_\_\_\_\_\_\_\_\_\_\_\_\_\_\_\_\_\_\_\_\_\_\_\_\_\_\_\_\_\_\_\_\_\_\_\_\_\_\_\_\_\_\_\_\_\_\_\_\_\_\_\_\_
- **Animations**
- Add animation to your image from a long list of animation options.
- Enhance your animated image by incorporating timing in seconds.
### **Style Settings**
**Design Features**
- Access the "Design" feature to customize your image appearance. Within this feature, you can determine the following properties:
- **Margin**: Set the spacing around your image to control its placement on the page.
- **Border**: Define a border for your image to add a distinct visual element.
- **Color**: Choose the color that best complements your website's theme or design.
- **Style**: Apply different styles to your image, enhancing its visual appeal.
- **Gradient**: Add gradient effects to your button for a more dynamic and modern look.
**Background Features**
- Navigate to the "Background" feature to enhance the backdrop of your image.
- **Upload Images**: Insert images as a background for your image, providing visual interest.
- **Sample Images**: Explore pre-loaded image samples for quick and easy background selection.
- **Background Styling**: Customize the image background further with options like:
\- Background Repeat: Control how the background image repeats.
\- Background Fill: Adjust how the background fills the space around the image.
\- Background Position: Define the positioning of the background image for optimal display.
**Style Customization**
- Within the "Style" section, further refine your button presentation by adding classes from a dropdown list with a plethora of options.
- Determine how your image is visible on devices (Mobile , Tablet , Desktop , Large desktop).
# How to Add Button to Your Page ?
**Through this document , you will uncover the 'Button' feature properties in site editor page through these key elements:
[1. Adding a Button](https://kb.salerise.com/link/18#bkmrk-adding-heading)[2. Feature Settings Window](https://kb.salerise.com/link/18#bkmrk-feature-settings)[3. Style Settings Window](https://kb.salerise.com/link/18#bkmrk-style-settings)**
### **Adding a Button**
- Drag the Button icon from the available features
[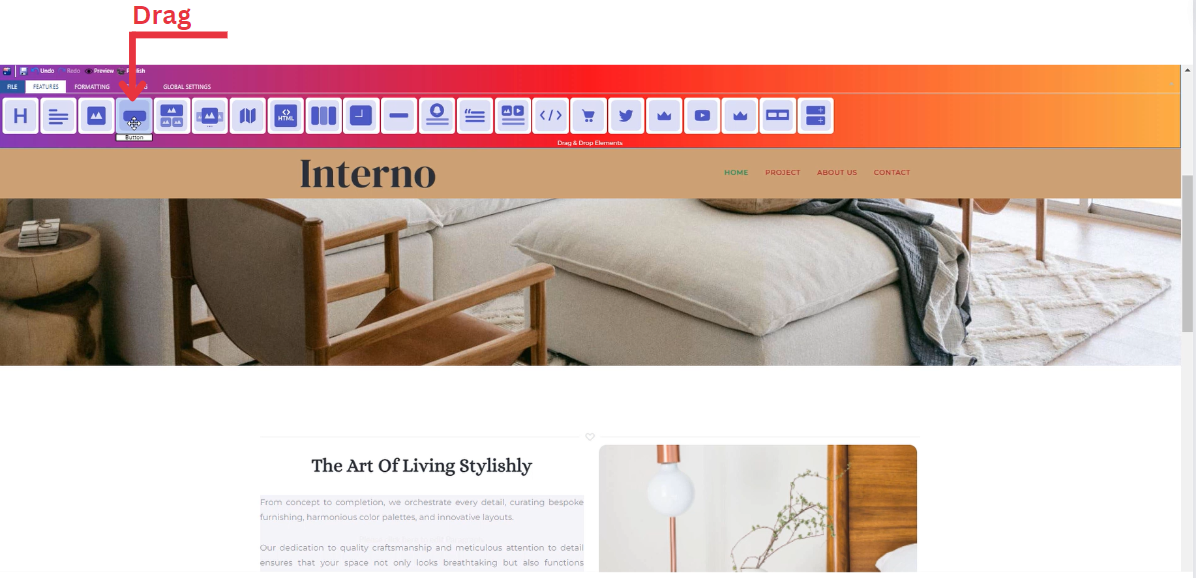](https://kb.salerise.com/uploads/images/gallery/2023-11/eGAimage.png)
- Drop the Heading icon into the desired location on your website page
[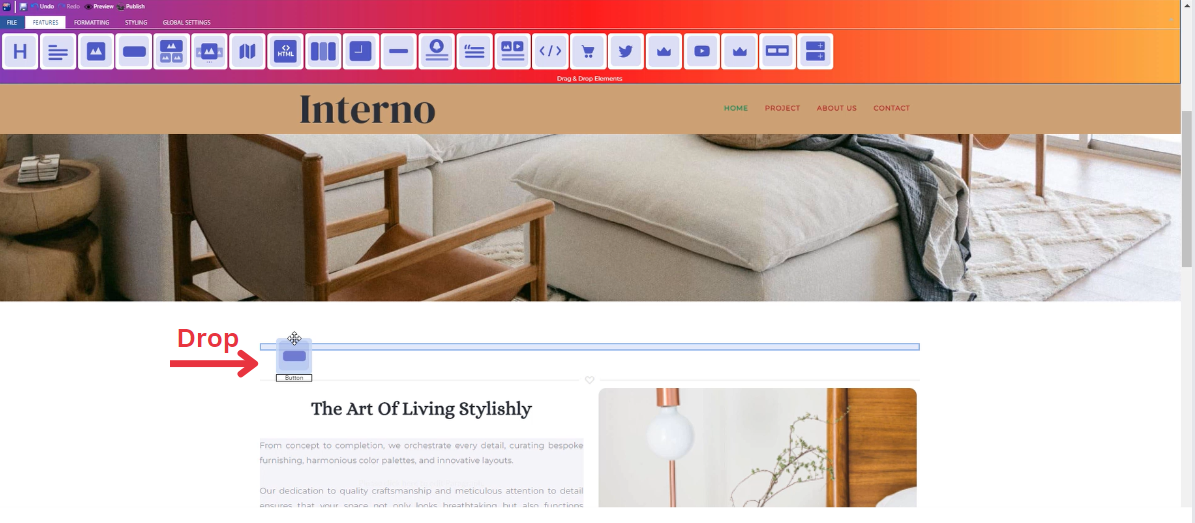](https://kb.salerise.com/uploads/images/gallery/2023-11/65Qimage.png)
### **Feature Settings**
Upon dropping the button, a settings window will appear, offering four main features:
- **Theme**
- Explore different themes for your button to align with your website's aesthetic.
\_\_\_\_\_\_\_\_\_\_\_\_\_\_\_\_\_\_\_\_\_\_\_\_\_\_\_\_\_\_\_\_\_\_\_\_\_\_\_\_\_\_\_\_\_\_\_\_\_\_\_\_\_\_\_\_\_\_\_\_\_\_\_\_\_\_\_\_\_\_\_\_\_\_\_\_
- **Settings**
- Customize and enter your own text/title and long description.
- Select the button size (Normal , Mini , Small , Large , Extra Large).
- Add several classes from a long list of options.
- Determine how your button is visible on devices (Mobile , Tablet , Desktop , Large desktop).
\_\_\_\_\_\_\_\_\_\_\_\_\_\_\_\_\_\_\_\_\_\_\_\_\_\_\_\_\_\_\_\_\_\_\_\_\_\_\_\_\_\_\_\_\_\_\_\_\_\_\_\_\_\_\_\_\_\_\_\_\_\_\_\_\_\_\_\_\_\_\_\_\_\_\_\_
- **Design**
- Customize the font type of your title and description
\_\_\_\_\_\_\_\_\_\_\_\_\_\_\_\_\_\_\_\_\_\_\_\_\_\_\_\_\_\_\_\_\_\_\_\_\_\_\_\_\_\_\_\_\_\_\_\_\_\_\_\_\_\_\_\_\_\_\_\_\_\_\_\_\_\_\_\_\_\_\_\_\_\_\_\_
### **Style Settings**
**Design Features**
- Access the "Design" feature to customize your button appearance. Within this feature, you can determine the following properties:
- **Margin**: Set the spacing around your button to control its placement on the page.
- **Border**: Define a border for your button to add a distinct visual element.
- **Color**: Choose the color that best complements your website's theme or design.
- **Style**: Apply different styles to your button, enhancing its visual appeal.
- **Gradient**: Add gradient effects to your button for a more dynamic and modern look.
**Background Features**
- Navigate to the "Background" feature to enhance the backdrop of your button.
- **Upload Images**: Insert images as a background for your button, providing visual interest.
- **Sample Images**: Explore pre-loaded image samples for quick and easy background selection.
- **Background Styling**: Customize the button background further with options like:
\- Background Repeat: Control how the background image repeats.
\- Background Fill: Adjust how the background fills the space around the button.
\- Background Position: Define the positioning of the background image for optimal display.
**Style Customization**
- Within the "Style" section, further refine your button presentation by adding classes from a dropdown list with a plethora of options.
- Determine how your button is visible on devices (Mobile , Tablet , Desktop , Large desktop).
# How to Add Gallery to Your Page ?
**Through this document , you will uncover the 'Gallery' feature properties in site editor page through these key elements:[1. Adding a Gallery](https://kb.salerise.com/link/19#bkmrk-adding-heading)[2. Feature Settings Window](https://kb.salerise.com/link/19#bkmrk-feature-settings)[3. Style Settings Window](https://kb.salerise.com/link/19#bkmrk-style-settings)**
### **Adding a Gallery**
- Drag the Gallery icon from the available features
[](https://kb.salerise.com/uploads/images/gallery/2023-11/Lzaimage.png)
- Drop the Gallery icon into the desired location on your website page
[](https://kb.salerise.com/uploads/images/gallery/2023-11/46bimage.png)
### **Feature Settings**
Upon dropping the gallery, a settings window will appear, offering four main features:
- **Images**
- Include images for your gallery on your website by choosing from three options: select from your uploaded images, use sample images from the website, or upload new images.
\_\_\_\_\_\_\_\_\_\_\_\_\_\_\_\_\_\_\_\_\_\_\_\_\_\_\_\_\_\_\_\_\_\_\_\_\_\_\_\_\_\_\_\_\_\_\_\_\_\_\_\_\_\_\_\_\_\_\_\_\_\_\_\_\_\_\_\_\_\_\_\_\_\_\_\_
- **Settings**
- Customize your gallery global settings through selecting the number of columns.
- Determine how your image is visible on devices (Mobile , Tablet , Desktop , Large desktop).
\_\_\_\_\_\_\_\_\_\_\_\_\_\_\_\_\_\_\_\_\_\_\_\_\_\_\_\_\_\_\_\_\_\_\_\_\_\_\_\_\_\_\_\_\_\_\_\_\_\_\_\_\_\_\_\_\_\_\_\_\_\_\_\_\_\_\_\_\_\_\_\_\_\_\_\_
- **Design**
- Customize the design of each image in your gallery in terms of :
\- Margin
\- Padding
\- Border
\- Color
\- Style
\_\_\_\_\_\_\_\_\_\_\_\_\_\_\_\_\_\_\_\_\_\_\_\_\_\_\_\_\_\_\_\_\_\_\_\_\_\_\_\_\_\_\_\_\_\_\_\_\_\_\_\_\_\_\_\_\_\_\_\_\_\_\_\_\_\_\_\_\_\_\_\_\_\_\_\_
- **Animations**
- Add animation to your gallery's title and long text from a long list of animation options.
- Enhance your animations image by incorporating timing in seconds
### **Style Settings**
**Design Features**
- Access the "Design" feature to customize your gallery appearance. Within this feature, you can determine the following properties:
- **Margin**: Set the spacing around your gallery to control its placement on the page.
- **Border**: Define a border for your gallery to add a distinct visual element.
- **Color**: Choose the color that best complements your website's theme or design.
- **Style**: Apply different styles to your gallery, enhancing its visual appeal.
- **Gradient**: Add gradient effects to your gallery for a more dynamic and modern look.
**Background Features**
- Navigate to the "Background" feature to enhance the backdrop of your gallery.
- **Upload Images**: Insert images as a background for your gallery, providing visual interest.
- **Sample Images**: Explore pre-loaded image samples for quick and easy background selection.
- **Background Styling**: Customize the gallery background further with options like:
\- Background Repeat: Control how the background image repeats.
\- Background Fill: Adjust how the background fills the space around the gallery.
\- Background Position: Define the positioning of the background image for optimal display.
**Style Customization**
- Within the "Style" section, further refine your button presentation by adding classes from a dropdown list with a plethora of options.
- Determine how your gallery is visible on devices (Mobile , Tablet , Desktop , Large desktop).
# How to Add Map to Your Page ?
**Through this document , you will uncover the 'Map' feature properties in site editor page through these key elements:[1. Adding a Map](https://kb.salerise.com/link/21#bkmrk-adding-heading)[2. Feature Settings Window](https://kb.salerise.com/link/21#bkmrk-feature-settings)[3. Style Settings Window](https://kb.salerise.com/link/21#bkmrk-style-settings)**
### **Adding a Map**
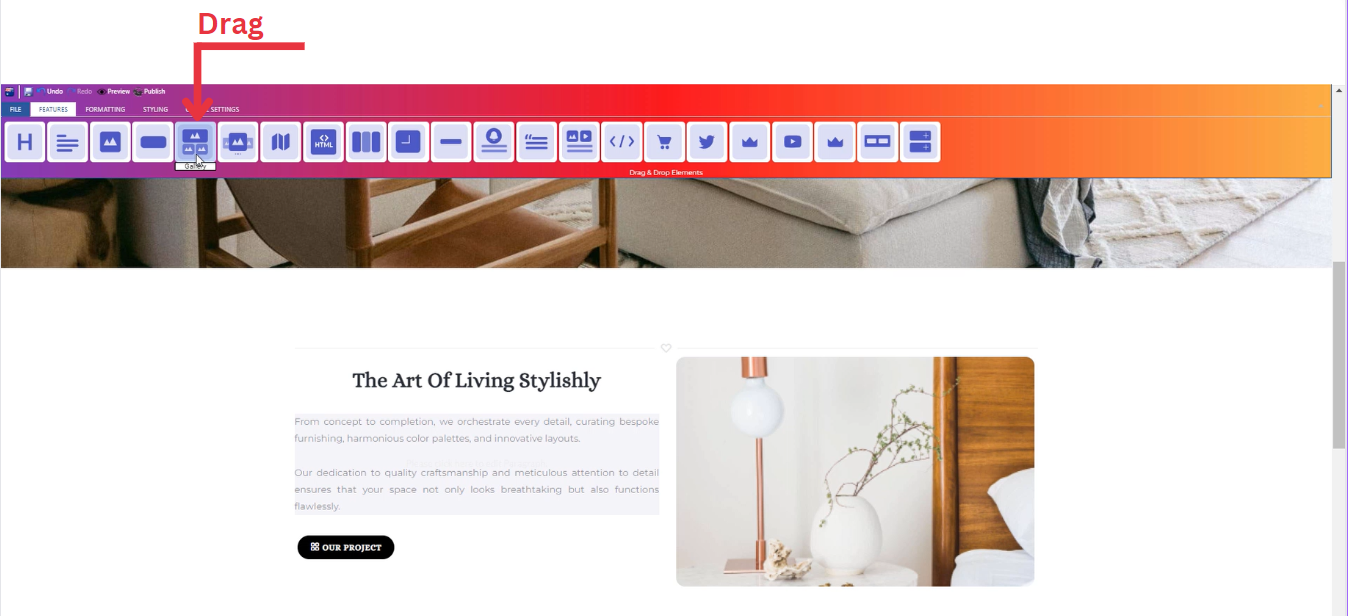
- Drag the map icon from the available features
[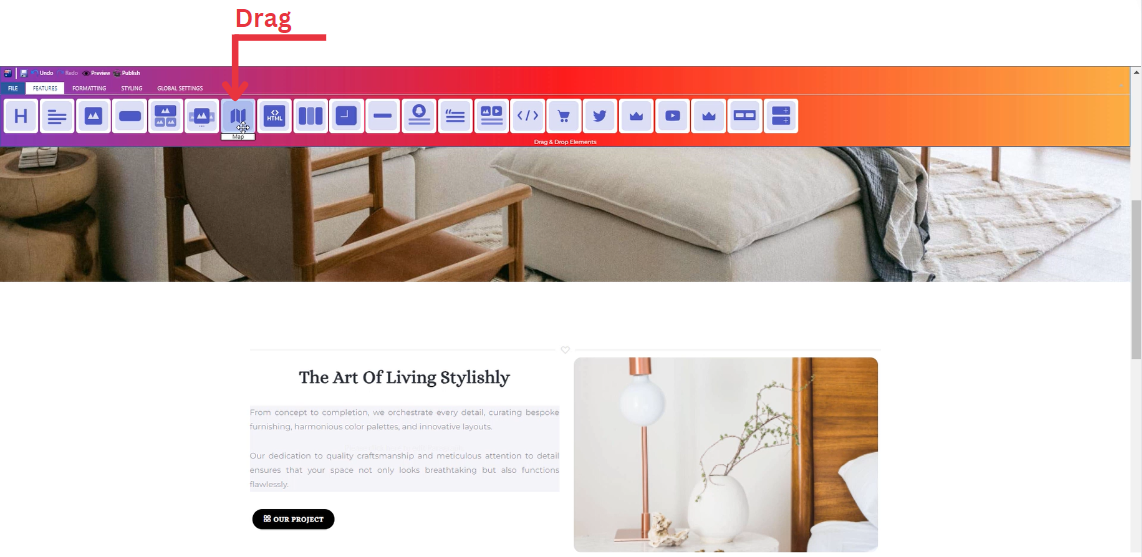](https://kb.salerise.com/uploads/images/gallery/2023-11/w8dimage.png)
- Drop the map icon into the desired location on your website page
[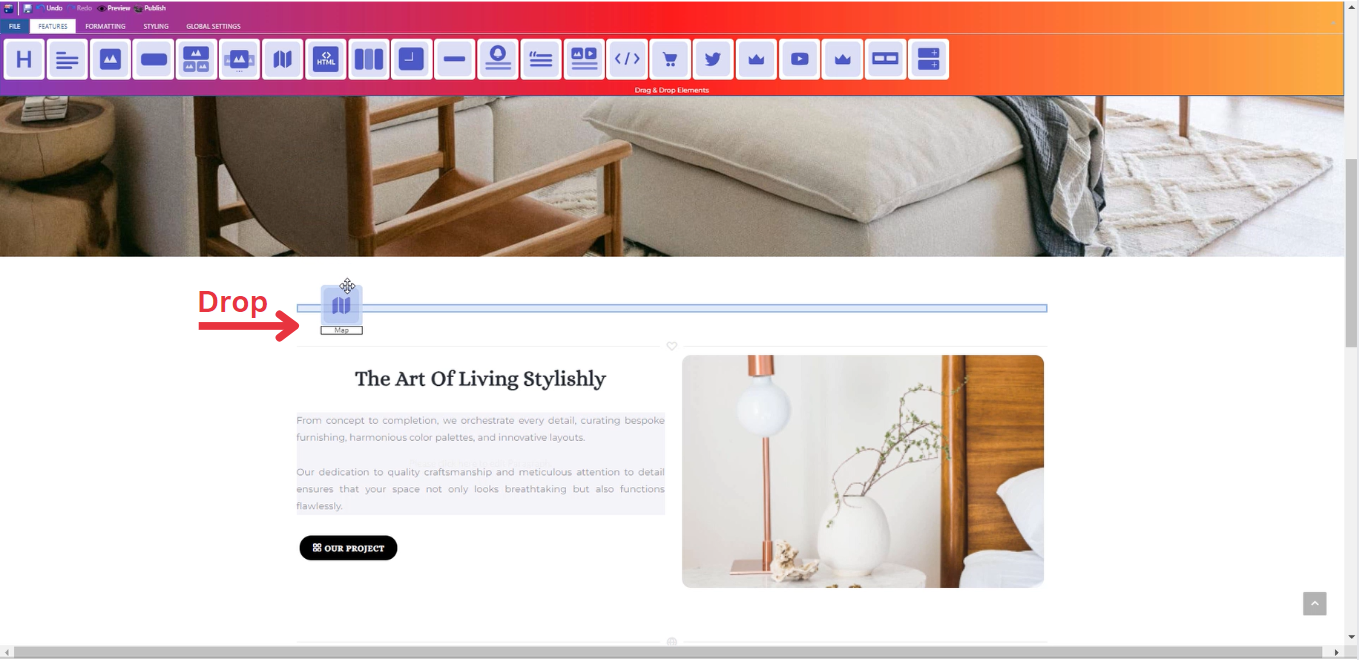](https://kb.salerise.com/uploads/images/gallery/2023-11/Kthimage.png)
### **Feature Settings**
- **Settings**
- Determine your address and description details.
- Determine how your map is visible on devices (Mobile , Tablet , Desktop , Large desktop).
**\_\_\_\_\_\_\_\_\_\_\_\_\_\_\_\_\_\_\_\_\_\_\_\_\_\_\_\_\_\_\_\_\_\_\_\_\_\_\_\_\_\_\_\_\_\_\_\_\_\_\_\_\_\_\_\_\_\_\_\_\_\_\_\_\_\_\_\_\_\_\_\_\_\_\_\_
**
- **Design**
- Customize your map dimensions (Width , Height).
\_\_\_\_\_\_\_\_\_\_\_\_\_\_\_\_\_\_\_\_\_\_\_\_\_\_\_\_\_\_\_\_\_\_\_\_\_\_\_\_\_\_\_\_\_\_\_\_\_\_\_\_\_\_\_\_\_\_\_\_\_\_\_\_\_\_\_\_\_\_\_\_\_\_\_\_
- **Animations**
- Add animation to your map from a long list of animation options.
- Enhance your animated map by incorporating timing in seconds.
### **Style Settings**
**Design Features**
- Access the "Design" feature to customize your map appearance. Within this feature, you can determine the following properties:
- **Margin**: Set the spacing around your map to control its placement on the page.
- **Border**: Define a border for your map to add a distinct visual element.
- **Color**: Choose the color that best complements your website's theme or design.
- **Style**: Apply different styles to your map, enhancing its visual appeal.
- **Gradient**: Add gradient effects to your map for a more dynamic and modern look.
**Background Features**
- Navigate to the "Background" feature to enhance the backdrop of your map.
- **Upload Images**: Insert images as a background for your map, providing visual interest.
- **Sample Images**: Explore pre-loaded image samples for quick and easy background selection.
- **Background Styling**: Customize the map background further with options like:
\- Background Repeat: Control how the background image repeats.
\- Background Fill: Adjust how the background fills the space around the map.
\- Background Position: Define the positioning of the background image for optimal display.
**Style Customization**
- Within the "Style" section, further refine your map presentation by adding classes from a dropdown list with a plethora of options.
- Determine how your map is visible on devices (Mobile , Tablet , Desktop , Large desktop.
# How to Add Text Containers to Your Page ?
**Through this document , you will uncover the 'Container' feature properties in site editor page through these key elements:
[1. Adding a Container](https://kb.salerise.com/link/22#bkmrk-adding-heading)[2. Feature Settings Window](https://kb.salerise.com/link/22#bkmrk-feature-settings)[3. Style Settings Window](https://kb.salerise.com/link/22#bkmrk-style-settings)**
### **Adding a Container**Container feature allows you to add several numbers of text containers from (1 - 4).
- **One container :** Add one block of paragraph/text.
- **Two containers :** Add two blocks of paragraph/text.
- **Three containers :** Add three blocks of paragraph/text.
- **Four containers :** Add four blocks of paragraph/text.
### **Feature Settings**
Once the container icon is activated, you can start entering your desired text directly into the text block. And upon entering text, a feature settings window will appear, providing options for customization.
[](https://kb.salerise.com/uploads/images/gallery/2023-11/CJ5image.png)
This window includes :
- **Customize Font:** In the feature settings, customize your text by selecting from various font families, adjusting font sizes, and choosing different headers.
- **Text Alignment:** Modify the alignment of your text as needed, whether it's left-aligned, center-aligned, right-aligned, or justified.
- **Lists:** Utilize numbered and bullet lists to organize your text content efficiently.
- **Insert/Edit Links:** Add hyperlinks to your text by using the insert/edit link option, allowing users to navigate to external pages or resources.
- **Remove Links:** If needed, easily remove any existing links within your text.
- **Subscript and Superscript:** Apply subscript or superscript formatting to specific text elements for a more dynamic presentation.
- **Text Color:** Customize the color of your text to match your website's design or emphasize specific information.
- **Background Color:** Enhance the visibility of your text by adjusting the background color to create a visually appealing contrast.
- **Special Characters:** Access a range of special characters to enhance the richness of your text content.
- **Additional Features:** Explore other available features to further enhance your text, ensuring a comprehensive and polished appearance.
### **Style Settings**
**Design Features**
- Access the "Design" feature to customize your container appearance. Within this feature, you can determine the following properties:
- **Margin**: Set the spacing around your container to control its placement on the page.
- **Border**: Define a border for your container to add a distinct visual element.
- **Color**: Choose the color that best complements your website's theme or design.
- **Style**: Apply different styles to your container, enhancing its visual appeal.
- **Gradient**: Add gradient effects to your container for a more dynamic and modern look.
**Background Features**
- Navigate to the "Background" feature to enhance the backdrop of your container.
- **Upload Images**: Insert images as a background for your container, providing visual interest.
- **Sample Images**: Explore pre-loaded image samples for quick and easy background selection.
- **Background Styling**: Customize the container background further with options like:
\- Background Repeat: Control how the background image repeats.
\- Background Fill: Adjust how the background fills the space around the container.
\- Background Position: Define the positioning of the background image for optimal display.
**Style Customization**
- Within the "Style" section, further refine your container presentation by adding classes from a dropdown list with a plethora of options.
- Determine how your container is visible on devices (Mobile , Tablet , Desktop , Large desktop.
# How to Add Counter to Your Page ?
**Through this document , you will uncover the 'Counter' feature properties in site editor page through these key elements:
[1. Adding a Counter](https://kb.salerise.com/link/24#bkmrk-adding-a-slideshow)
[2. Feature Settings Window](https://kb.salerise.com/link/24#bkmrk-feature-settings)
[3. Style Settings Window](https://kb.salerise.com/link/24#bkmrk-style-settings)**
### **Adding a Counter**
- Drag the counter icon from the available features
[](https://kb.salerise.com/uploads/images/gallery/2023-11/HsSimage.png)
- Drop the counter icon into the desired location on your website page
[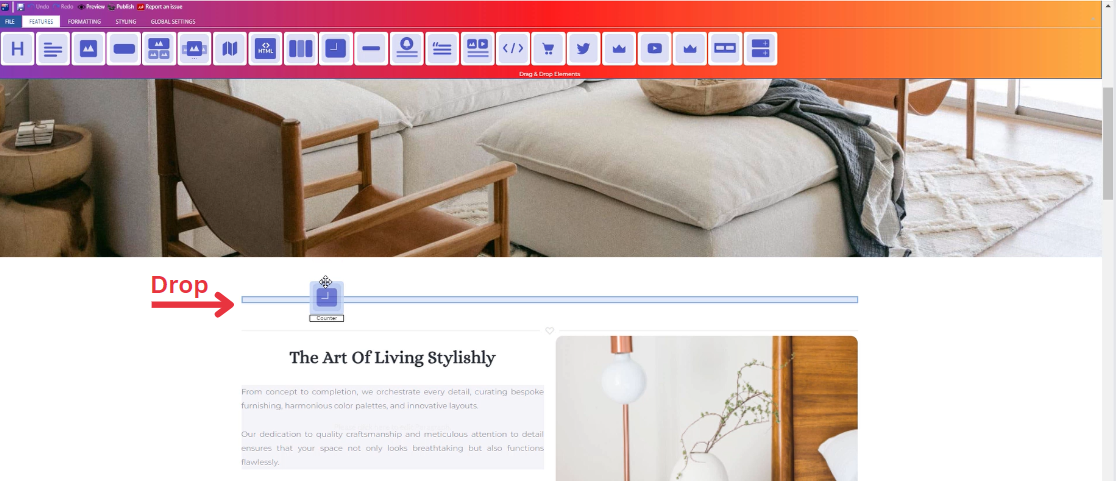](https://kb.salerise.com/uploads/images/gallery/2023-11/P2Mimage.png)
### **Feature Settings**
Upon dropping the counter, a settings window will appear, offering three main features:
- **Settings**
- **Settings :** Customize the start number, end number, step, and speed for your counter.
- **Start Number:** Input the desired start number value.
- **End Number:** Input the desired end number value.
- **Step**: Input the desired values to define the counting range and interval.
\- **Speed :** Adjust the speed setting to control how fast the counter increments.
\_\_\_\_\_\_\_\_\_\_\_\_\_\_\_\_\_\_\_\_\_\_\_\_\_\_\_\_\_\_\_\_\_\_\_\_\_\_\_\_\_\_\_\_\_\_\_\_\_\_\_\_\_\_\_\_\_\_\_\_\_\_\_\_\_\_\_\_\_\_\_\_\_\_\_\_
- **Design**
- Select your title font type from a long list of options
\_\_\_\_\_\_\_\_\_\_\_\_\_\_\_\_\_\_\_\_\_\_\_\_\_\_\_\_\_\_\_\_\_\_\_\_\_\_\_\_\_\_\_\_\_\_\_\_\_\_\_\_\_\_\_\_\_\_\_\_\_\_\_\_\_\_\_\_\_\_\_\_\_\_\_\_
- **Animations**
- Add animation to your title from a long list of animation options.
- Enhance your animated title by incorporating timing in seconds.
### **Style Settings**
**Design Features**
- Access the "Design" feature to customize your counter appearance. Within this feature, you can determine the following properties:
- **Margin**: Set the spacing around your counter to control its placement on the page.
- **Border**: Define a border for your counter to add a distinct visual element.
- **Color**: Choose the color that best complements your website's theme or design.
- **Style**: Apply different styles to your counter, enhancing its visual appeal.
- **Gradient**: Add gradient effects to your counter for a more dynamic and modern look.
**Background Features**
- Navigate to the "Background" feature to enhance the backdrop of your counter.
- **Upload Images**: Insert images as a background for your counter, providing visual interest.
- **Sample Images**: Explore pre-loaded image samples for quick and easy background selection.
- **Background Styling**: Customize the counter background further with options like:
\- Background Repeat: Control how the background image repeats.
\- Background Fill: Adjust how the background fills the space around the counter.
\- Background Position: Define the positioning of the background image for optimal display.
**Style Customization**
- Within the "Style" section, further refine your counter presentation by adding classes from a dropdown list with a plethora of options.
- Determine how your counter is visible on devices (Mobile , Tablet , Desktop , Large desktop.
# How to Add Divider to Your Page ?
**Through this document , you will uncover the 'Divider' feature properties in site editor page through these key elements:
[1. Adding a Divider](https://kb.salerise.com/link/25#bkmrk-adding-a-slideshow)[2. Feature Settings Window](https://kb.salerise.com/link/25#bkmrk-feature-settings)[3. Style Settings Window](https://kb.salerise.com/link/25#bkmrk-style-settings)**
### **Adding a Divider**
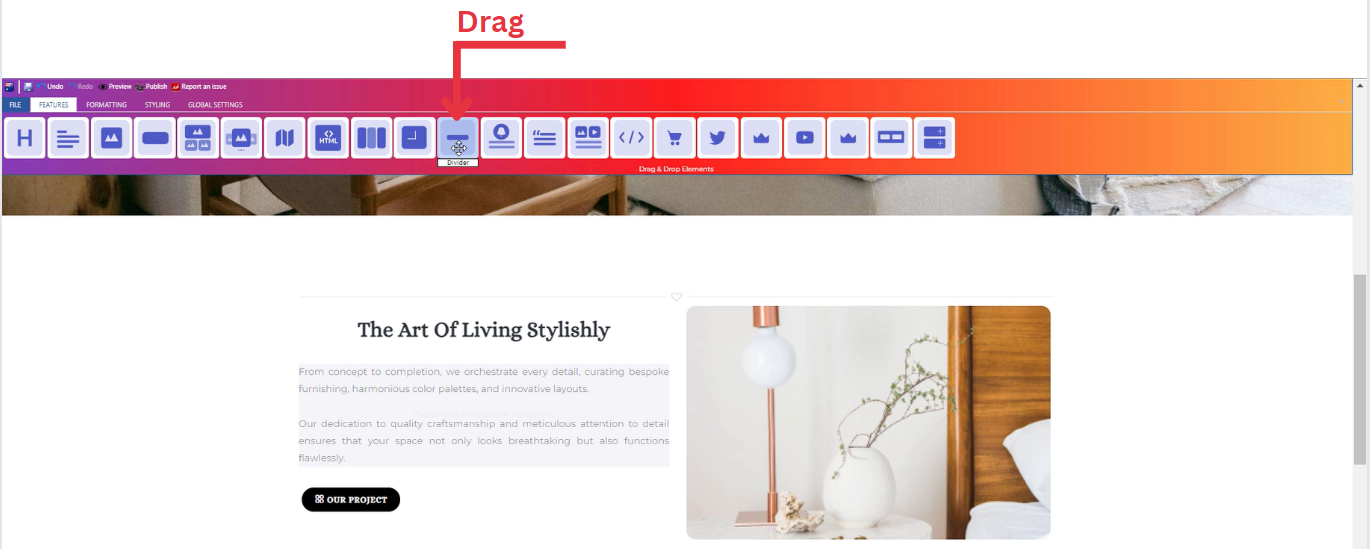
- Drag the divider icon from the available features
[](https://kb.salerise.com/uploads/images/gallery/2023-11/Y93image.png)
- Drop the divider icon into the desired location on your website page
[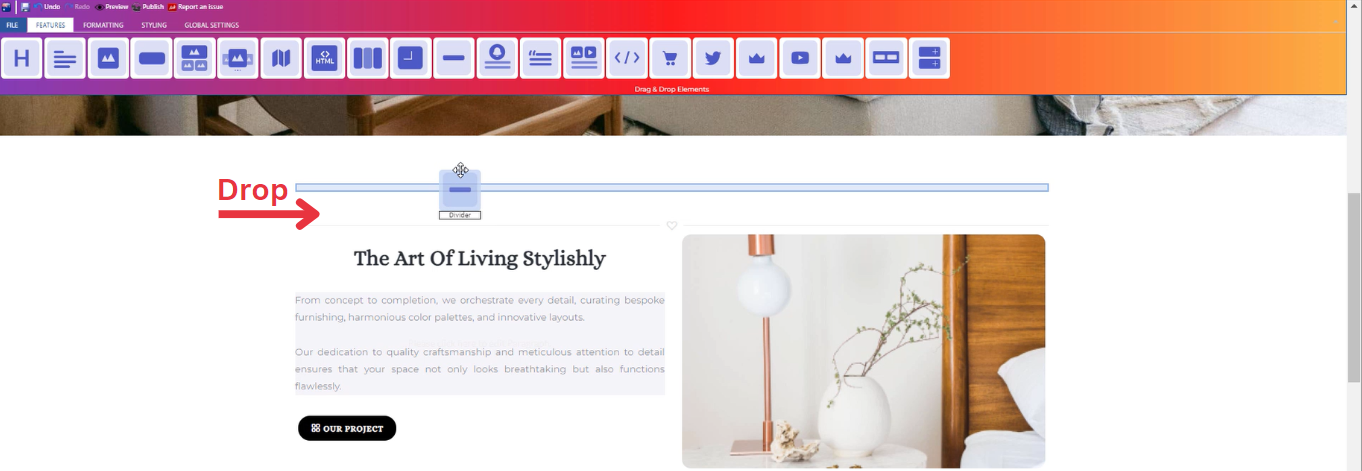](https://kb.salerise.com/uploads/images/gallery/2023-11/2rEimage.png)
### **Feature Settings**
Upon dropping the divider, a settings window will appear, offering four main features:
- **Themes**
- Explore different themes for your divider to align with your website's aesthetic.
\_\_\_\_\_\_\_\_\_\_\_\_\_\_\_\_\_\_\_\_\_\_\_\_\_\_\_\_\_\_\_\_\_\_\_\_\_\_\_\_\_\_\_\_\_\_\_\_\_\_\_\_\_\_\_\_\_\_\_\_\_\_\_\_\_\_\_\_\_\_\_\_\_\_\_\_
- **Settings**
- Determine how your divider is visible on devices (Mobile , Tablet , Desktop , Large desktop).
\_\_\_\_\_\_\_\_\_\_\_\_\_\_\_\_\_\_\_\_\_\_\_\_\_\_\_\_\_\_\_\_\_\_\_\_\_\_\_\_\_\_\_\_\_\_\_\_\_\_\_\_\_\_\_\_\_\_\_\_\_\_\_\_\_\_\_\_\_\_\_\_\_\_\_\_
- **Icons**
- Select the icon of your divider that align with your website.
\_\_\_\_\_\_\_\_\_\_\_\_\_\_\_\_\_\_\_\_\_\_\_\_\_\_\_\_\_\_\_\_\_\_\_\_\_\_\_\_\_\_\_\_\_\_\_\_\_\_\_\_\_\_\_\_\_\_\_\_\_\_\_\_\_\_\_\_\_\_\_\_\_\_\_\_
- **Animations**
- Add animation to your title from a long list of animation options.
- Enhance your animated title by incorporating timing in seconds.
### **Style Settings**
**Design Features**
- Access the "Design" feature to customize your divider appearance. Within this feature, you can determine the following properties:
- **Margin**: Set the spacing around your divider to control its placement on the page.
- **Border**: Define a border for your divider to add a distinct visual element.
- **Color**: Choose the color that best complements your website's theme or design.
- **Style**: Apply different styles to your divider, enhancing its visual appeal.
- **Gradient**: Add gradient effects to your divider for a more dynamic and modern look.
**Background Features**
- Navigate to the "Background" feature to enhance the backdrop of your divider.
- **Upload Images**: Insert images as a background for your divider, providing visual interest.
- **Sample Images**: Explore pre-loaded image samples for quick and easy background selection.
- **Background Styling**: Customize the divider background further with options like:
\- Background Repeat: Control how the background image repeats.
\- Background Fill: Adjust how the background fills the space around the divider.
\- Background Position: Define the positioning of the background image for optimal display.
**Style Customization**
- Within the "Style" section, further refine your divider presentation by adding classes from a dropdown list with a plethora of options.
- Determine how your divider is visible on devices (Mobile , Tablet , Desktop , Large desktop.
# How to Add Testimonial to Your Page ?
**Through this document , you will uncover the 'Testimonial' feature properties in site editor page through these key elements:
[1. Adding a Testimonial](https://kb.salerise.com/link/27#bkmrk-adding-a-slideshow)
[2. Feature Settings Window](https://kb.salerise.com/link/27#bkmrk-feature-settings)
[3. Style Settings Window](https://kb.salerise.com/link/27#bkmrk-style-settings)**
### **Adding a Testimonial**
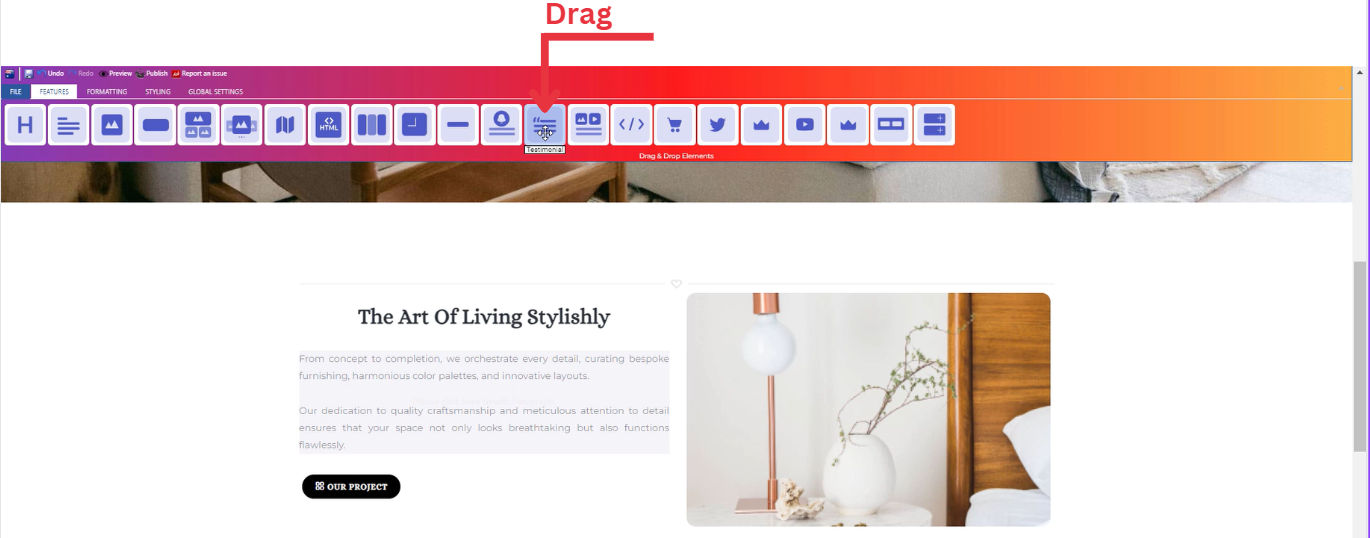
- Drag the testimonial icon from the available features
[](https://kb.salerise.com/uploads/images/gallery/2023-11/QJEimage.png)
- Drop the testimonial icon into the desired location on your website page
[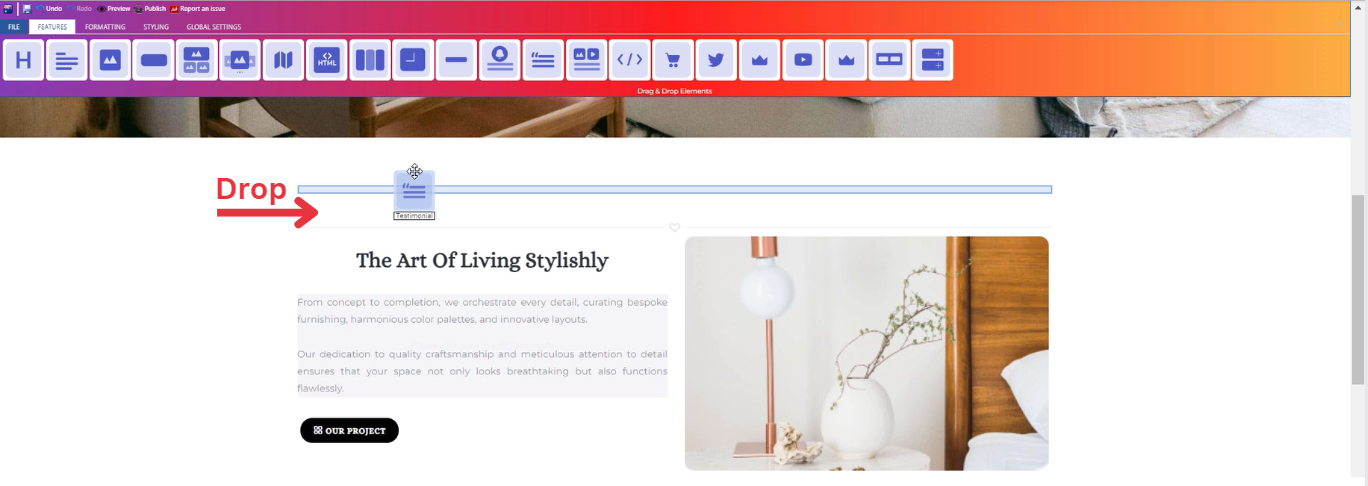](https://kb.salerise.com/uploads/images/gallery/2023-11/l9kimage.png)
### **Feature Settings**
Upon dropping the testimonial, a settings window will appear, offering four main features:
- **Images**
- Include images for your testimonial on your website by choosing from three options: select from your uploaded images, use sample images from the website, or upload new images.
\_\_\_\_\_\_\_\_\_\_\_\_\_\_\_\_\_\_\_\_\_\_\_\_\_\_\_\_\_\_\_\_\_\_\_\_\_\_\_\_\_\_\_\_\_\_\_\_\_\_\_\_\_\_\_\_\_\_\_\_\_\_\_\_\_\_\_\_\_\_\_\_\_\_\_\_
- **Settings**
- Enter the person name , description ,and company name.
- Determine how your testimonial is visible on devices (Mobile , Tablet , Desktop , Large desktop).
\_\_\_\_\_\_\_\_\_\_\_\_\_\_\_\_\_\_\_\_\_\_\_\_\_\_\_\_\_\_\_\_\_\_\_\_\_\_\_\_\_\_\_\_\_\_\_\_\_\_\_\_\_\_\_\_\_\_\_\_\_\_\_\_\_\_\_\_\_\_\_\_\_\_\_\_
- **Design**
- Select your texts font type from a long list of options.
- Determine different design features of your testimonial (Margin , Padding , Border , Color , Style , Font)
\_\_\_\_\_\_\_\_\_\_\_\_\_\_\_\_\_\_\_\_\_\_\_\_\_\_\_\_\_\_\_\_\_\_\_\_\_\_\_\_\_\_\_\_\_\_\_\_\_\_\_\_\_\_\_\_\_\_\_\_\_\_\_\_\_\_\_\_\_\_\_\_\_\_\_\_
- **Animations**
- Add animation to your person name and description from a long list of animation options.
- Enhance your animated texts by incorporating timing in seconds.
### **Style Settings**
**Design Features**
- Access the "Design" feature to customize your testimonial appearance. Within this feature, you can determine the following properties:
- **Margin**: Set the spacing around your testimonial to control its placement on the page.
- **Border**: Define a border for your testimonial to add a distinct visual element.
- **Color**: Choose the color that best complements your website's theme or design.
- **Style**: Apply different styles to your testimonial, enhancing its visual appeal.
- **Gradient**: Add gradient effects to your testimonial for a more dynamic and modern look.
**Background Features**
- Navigate to the "Background" feature to enhance the backdrop of your testimonial.
- **Upload Images**: Insert images as a background for your testimonial, providing visual interest.
- **Sample Images**: Explore pre-loaded image samples for quick and easy background selection.
- **Background Styling**: Customize the testimonial background further with options like:
\- Background Repeat: Control how the background image repeats.
\- Background Fill: Adjust how the background fills the space around the testimonial.
\- Background Position: Define the positioning of the background image for optimal display.
**Style Customization**
- Within the "Style" section, further refine your testimonial presentation by adding classes from a dropdown list with a plethora of options.
- Determine how your testimonial is visible on devices (Mobile , Tablet , Desktop , Large desktop.
# How to Add Sections to Your Page ?
**Through this document , you will uncover the 'Sections' feature properties in site editor page through these key elements:[1. Adding Sections](https://kb.salerise.com/link/28#bkmrk-adding-a-slideshow)[2. Feature Settings Window](https://kb.salerise.com/link/28#bkmrk-feature-settings)[3. Style Settings Window](https://kb.salerise.com/link/28#bkmrk-style-settings)**
### **Adding Sections**
- Drag the sections icon from the available features
[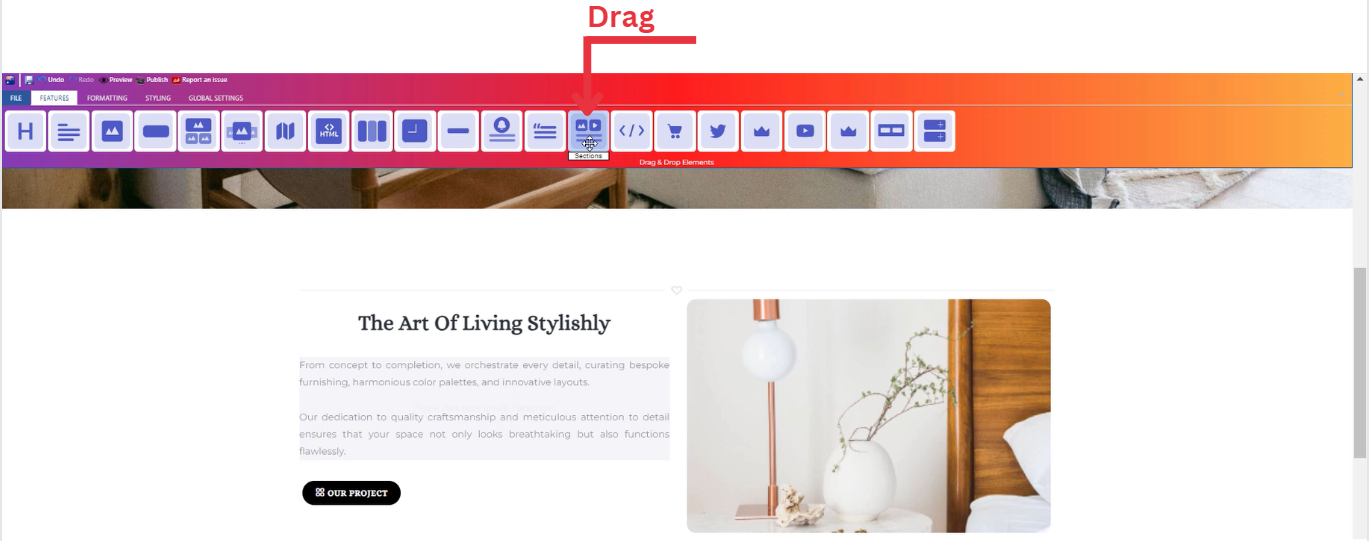](https://kb.salerise.com/uploads/images/gallery/2023-11/ELYimage.png)
- Drop the sections icon into the desired location on your website page
[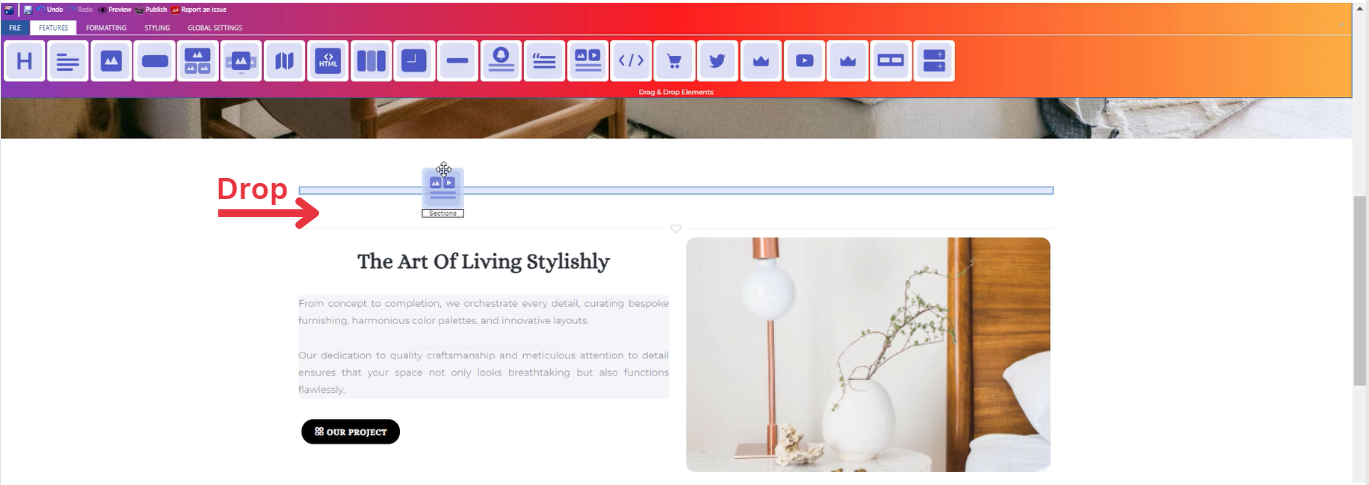](https://kb.salerise.com/uploads/images/gallery/2023-11/d5Bimage.png)
### **Feature Settings**
Upon dropping the sections, a settings window will appear, offering four main features:
- **Themes**
- Explore different themes for your sections to align with your website's aesthetic.
\_\_\_\_\_\_\_\_\_\_\_\_\_\_\_\_\_\_\_\_\_\_\_\_\_\_\_\_\_\_\_\_\_\_\_\_\_\_\_\_\_\_\_\_\_\_\_\_\_\_\_\_\_\_\_\_\_\_\_\_\_\_\_\_\_\_\_\_\_\_\_\_\_\_\_\_
- **Settings**
- Enter your texts (title and long text) and add several classes from a long list of options.
- Select heading level (H1,H2,H3,H4,H5)
- Determine how your sections are visible on devices (Mobile , Tablet , Desktop , Large desktop).
\_\_\_\_\_\_\_\_\_\_\_\_\_\_\_\_\_\_\_\_\_\_\_\_\_\_\_\_\_\_\_\_\_\_\_\_\_\_\_\_\_\_\_\_\_\_\_\_\_\_\_\_\_\_\_\_\_\_\_\_\_\_\_\_\_\_\_\_\_\_\_\_\_\_\_\_
- **Design**
- Customize the font type of your title and description.
- Add gradient to your title and description.
\_\_\_\_\_\_\_\_\_\_\_\_\_\_\_\_\_\_\_\_\_\_\_\_\_\_\_\_\_\_\_\_\_\_\_\_\_\_\_\_\_\_\_\_\_\_\_\_\_\_\_\_\_\_\_\_\_\_\_\_\_\_\_\_\_\_\_\_\_\_\_\_\_\_\_\_
- **Animations**
- Add animation to your title and description from a long list of animation options.
- Enhance your animated title and description by incorporating timing in seconds.
### **Style Settings**
**Design Features**
- Access the "Design" feature to customize your sections appearance. Within this feature, you can determine the following properties:
- **Margin**: Set the spacing around your sections to control its placement on the page.
- **Border**: Define a border for your sections to add a distinct visual element.
- **Color**: Choose the color that best complements your website's theme or design.
- **Style**: Apply different styles to your sections, enhancing its visual appeal.
- **Gradient**: Add gradient effects to your sections for a more dynamic and modern look.
**Background Features**
- Navigate to the "Background" feature to enhance the backdrop of your sections.
- **Upload Images**: Insert images as a background for your sections, providing visual interest.
- **Sample Images**: Explore pre-loaded image samples for quick and easy background selection.
- **Background Styling**: Customize the sections background further with options like:
\- Background Repeat: Control how the background image repeats.
\- Background Fill: Adjust how the background fills the space around the sections.
\- Background Position: Define the positioning of the background image for optimal display.
**Style Customization**
- Within the "Style" section, further refine your sections presentation by adding classes from a dropdown list with a plethora of options.
- Determine how your sections are visible on devices (Mobile , Tablet , Desktop , Large desktop).
# How to Add Div Container to Your Page?
**Through this document , you will uncover the 'Div Container' feature properties in site editor page through these key elements:
[1. Adding a Div Container](https://kb.salerise.com/link/29#bkmrk-adding-a-slideshow)
[2. Feature Settings Window](https://kb.salerise.com/link/29#bkmrk-feature-settings)
[3. Section Test Settings Window](https://kb.salerise.com/link/29#bkmrk-style-settings)**
### **Adding a Div Container**
- Drag the div container icon from the available features
[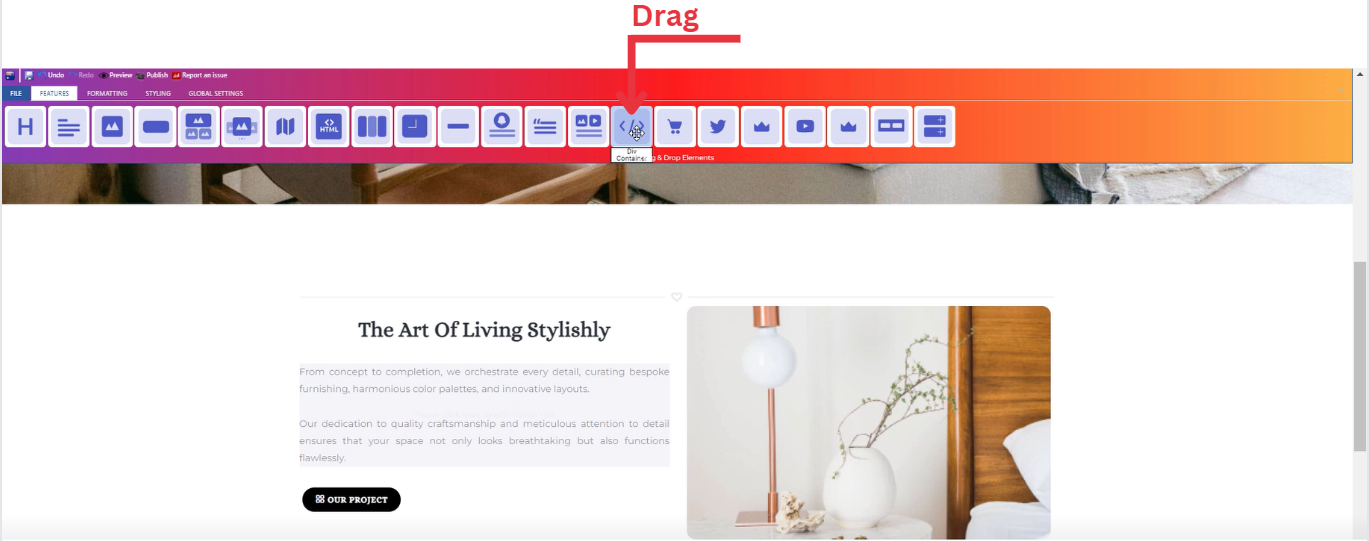](https://kb.salerise.com/uploads/images/gallery/2023-11/qAOimage.png)
- Drop the div container icon into the desired location on your website page
[](https://kb.salerise.com/uploads/images/gallery/2023-11/DUnimage.png)
### **Feature Settings**
Upon dropping the div container, a settings window will appear, offering three main features:
- **Settings**
- Add several classes from a long list of options.
- Determine how your heading is visible on devices (Mobile , Tablet , Desktop , Large desktop).
- **Design**
- Include images for your div container on your website by choosing from three options: select from your uploaded images, use sample images from the website, or upload new images.
- **Animations**
- Add animation to your div container from a long list of animation options.
- Enhance your animated div container by incorporating timing in seconds.
### **Section Test Settings**
Once the div container icon is activated, you can start entering your desired text directly into the section test. And upon entering text, a window will appear, providing options for customization.
[](https://kb.salerise.com/uploads/images/gallery/2023-11/CJ5image.png)
This window includes :
- **Customize Font:** In the feature settings, customize your text by selecting from various font families, adjusting font sizes, and choosing different headers.
- **Text Alignment:** Modify the alignment of your text as needed, whether it's left-aligned, center-aligned, right-aligned, or justified.
- **Lists:** Utilize numbered and bullet lists to organize your text content efficiently.
- **Insert/Edit Links:** Add hyperlinks to your text by using the insert/edit link option, allowing users to navigate to external pages or resources.
- **Remove Links:** If needed, easily remove any existing links within your text.
- **Subscript and Superscript:** Apply subscript or superscript formatting to specific text elements for a more dynamic presentation.
- **Text Color:** Customize the color of your text to match your website's design or emphasize specific information.
- **Background Color:** Enhance the visibility of your text by adjusting the background color to create a visually appealing contrast.
- **Special Characters:** Access a range of special characters to enhance the richness of your text content.
- **Additional Features:** Explore other available features to further enhance your text, ensuring a comprehensive and polished appearance.
# How to Add Video to Your Page ?
**Through this document , you will uncover the 'Video' feature properties in site editor page .****[Vimeo](https://kb.salerise.com/link/34#bkmrk-portfolio-blocks)** [**YouTube**](https://kb.salerise.com/link/34#bkmrk-youtube)
**[Daily Motion](https://kb.salerise.com/link/34#bkmrk-daily-motion)**
**[HTML 5 Video](https://kb.salerise.com/link/34#bkmrk-daily-motion)
[Sound Cloud](https://kb.salerise.com/link/34#bkmrk-sound-cloud)**
### **Vimeo**
#### **Feature Settings**Upon dropping the Vimeo icon , a settings window will appear, offering three main features:
- **Settings**
- - Add your video link
- Determine how your video is visible on devices (Mobile , Tablet , Desktop , Large desktop).\_\_\_\_\_\_\_\_\_\_\_\_\_\_\_\_\_\_\_\_\_\_\_\_\_\_\_\_\_\_\_\_\_\_\_\_\_\_\_\_\_\_\_\_\_\_\_\_\_\_\_\_\_\_\_\_\_\_\_\_\_\_\_\_\_\_\_\_\_\_\_\_\_\_\_\_
- **Video**
- Include videos on your website by choosing from two options: select from your uploaded videos or upload new videos\_\_\_\_\_\_\_\_\_\_\_\_\_\_\_\_\_\_\_\_\_\_\_\_\_\_\_\_\_\_\_\_\_\_\_\_\_\_\_\_\_\_\_\_\_\_\_\_\_\_\_\_\_\_\_\_\_\_\_\_\_\_\_\_\_\_\_\_\_\_\_\_\_\_\_\_
- **Animations**
- Add animation to your video box from a long list of animation options.
- Enhance your animated video box by incorporating timing in seconds.
#### **Style Settings****Design Features**
- Access the "Design" feature to customize your video box appearance. Within this feature, you can determine the following properties:
- **Margin**: Set the spacing around your video box to control its placement on the page.
- **Border**: Define a border for your video box to add a distinct visual element.
- **Color**: Choose the color that best complements your website's theme or design.
- **Style**: Apply different styles to your video box, enhancing its visual appeal.
- **Gradient**: Add gradient effects to your video box for a more dynamic and modern look.**Background Features**
- Navigate to the "Background" feature to enhance the backdrop of your video box.
- **Upload Images**: Insert images as a background for your video box, providing visual interest.
- **Sample Images**: Explore pre-loaded image samples for quick and easy background selection.
- **Background Styling**: Customize the video box background further with options like:- Background Repeat: Control how the background image repeats.- Background Fill: Adjust how the background fills the space around the video box.- Background Position: Define the positioning of the background image for optimal display.**Style Customization**
- Within the "Style" section, further refine your video box presentation by adding classes from a dropdown list with a plethora of options.
- Determine how your video box are visible on devices (Mobile , Tablet , Desktop , Large desktop).
### **YouTube**
#### **Feature Settings**Upon dropping the Youtube icon , a settings window will appear, offering three main features:
- **Settings**
- - Add your video link
- Determine how your video is visible on devices (Mobile , Tablet , Desktop , Large desktop).\_\_\_\_\_\_\_\_\_\_\_\_\_\_\_\_\_\_\_\_\_\_\_\_\_\_\_\_\_\_\_\_\_\_\_\_\_\_\_\_\_\_\_\_\_\_\_\_\_\_\_\_\_\_\_\_\_\_\_\_\_\_\_\_\_\_\_\_\_\_\_\_\_\_\_\_
- **Video**
- Include videos on your website by choosing from two options: select from your uploaded videos or upload new videos\_\_\_\_\_\_\_\_\_\_\_\_\_\_\_\_\_\_\_\_\_\_\_\_\_\_\_\_\_\_\_\_\_\_\_\_\_\_\_\_\_\_\_\_\_\_\_\_\_\_\_\_\_\_\_\_\_\_\_\_\_\_\_\_\_\_\_\_\_\_\_\_\_\_\_\_
- **Animations**
- Add animation to your video box from a long list of animation options.
- Enhance your animated video box by incorporating timing in seconds.
#### **Style Settings****Design Features**
- Access the "Design" feature to customize your video box appearance. Within this feature, you can determine the following properties:
- **Margin**: Set the spacing around your video box to control its placement on the page.
- **Border**: Define a border for your video box to add a distinct visual element.
- **Color**: Choose the color that best complements your website's theme or design.
- **Style**: Apply different styles to your video box, enhancing its visual appeal.
- **Gradient**: Add gradient effects to your video box for a more dynamic and modern look.**Background Features**
- Navigate to the "Background" feature to enhance the backdrop of your video box.
- **Upload Images**: Insert images as a background for your video box, providing visual interest.
- **Sample Images**: Explore pre-loaded image samples for quick and easy background selection.
- **Background Styling**: Customize the video box background further with options like:- Background Repeat: Control how the background image repeats.- Background Fill: Adjust how the background fills the space around the video box.- Background Position: Define the positioning of the background image for optimal display.**Style Customization**
- Within the "Style" section, further refine your video box presentation by adding classes from a dropdown list with a plethora of options.
- Determine how your video box are visible on devices (Mobile , Tablet , Desktop , Large desktop).
### **Daily Motion**
#### **Feature Settings**Upon dropping the Daily Motion icon , a settings window will appear, offering three main features:
- **Settings**
- - Add your video link
- Determine how your video is visible on devices (Mobile , Tablet , Desktop , Large desktop).\_\_\_\_\_\_\_\_\_\_\_\_\_\_\_\_\_\_\_\_\_\_\_\_\_\_\_\_\_\_\_\_\_\_\_\_\_\_\_\_\_\_\_\_\_\_\_\_\_\_\_\_\_\_\_\_\_\_\_\_\_\_\_\_\_\_\_\_\_\_\_\_\_\_\_\_
- **Video**
- Include videos on your website by choosing from two options: select from your uploaded videos or upload new videos\_\_\_\_\_\_\_\_\_\_\_\_\_\_\_\_\_\_\_\_\_\_\_\_\_\_\_\_\_\_\_\_\_\_\_\_\_\_\_\_\_\_\_\_\_\_\_\_\_\_\_\_\_\_\_\_\_\_\_\_\_\_\_\_\_\_\_\_\_\_\_\_\_\_\_\_
- **Animations**
- Add animation to your video box from a long list of animation options.
- Enhance your animated video box by incorporating timing in seconds.
#### **Style Settings****Design Features**
- Access the "Design" feature to customize your video box appearance. Within this feature, you can determine the following properties:
- **Margin**: Set the spacing around your video box to control its placement on the page.
- **Border**: Define a border for your video box to add a distinct visual element.
- **Color**: Choose the color that best complements your website's theme or design.
- **Style**: Apply different styles to your video box, enhancing its visual appeal.
- **Gradient**: Add gradient effects to your video box for a more dynamic and modern look.**Background Features**
- Navigate to the "Background" feature to enhance the backdrop of your video box.
- **Upload Images**: Insert images as a background for your video box, providing visual interest.
- **Sample Images**: Explore pre-loaded image samples for quick and easy background selection.
- **Background Styling**: Customize the video box background further with options like:- Background Repeat: Control how the background image repeats.- Background Fill: Adjust how the background fills the space around the video box.- Background Position: Define the positioning of the background image for optimal display.**Style Customization**
- Within the "Style" section, further refine your video box presentation by adding classes from a dropdown list with a plethora of options.
- Determine how your video box are visible on devices (Mobile , Tablet , Desktop , Large desktop).
### **HTML 5 Video**
#### **Feature Settings**Upon dropping the HTML 5 video icon , a settings window will appear, offering three main features:
- **Settings**
- - Add your video link
- Determine how your video is visible on devices (Mobile , Tablet , Desktop , Large desktop).\_\_\_\_\_\_\_\_\_\_\_\_\_\_\_\_\_\_\_\_\_\_\_\_\_\_\_\_\_\_\_\_\_\_\_\_\_\_\_\_\_\_\_\_\_\_\_\_\_\_\_\_\_\_\_\_\_\_\_\_\_\_\_\_\_\_\_\_\_\_\_\_\_\_\_\_
- **Video**
- Include videos on your website by choosing from two options: select from your uploaded videos or upload new videos\_\_\_\_\_\_\_\_\_\_\_\_\_\_\_\_\_\_\_\_\_\_\_\_\_\_\_\_\_\_\_\_\_\_\_\_\_\_\_\_\_\_\_\_\_\_\_\_\_\_\_\_\_\_\_\_\_\_\_\_\_\_\_\_\_\_\_\_\_\_\_\_\_\_\_\_
- **Animations**
- Add animation to your video box from a long list of animation options.
- Enhance your animated video box by incorporating timing in seconds.
#### **Style Settings****Design Features**
- Access the "Design" feature to customize your video box appearance. Within this feature, you can determine the following properties:
- **Margin**: Set the spacing around your video box to control its placement on the page.
- **Border**: Define a border for your video box to add a distinct visual element.
- **Color**: Choose the color that best complements your website's theme or design.
- **Style**: Apply different styles to your video box, enhancing its visual appeal.
- **Gradient**: Add gradient effects to your video box for a more dynamic and modern look.**Background Features**
- Navigate to the "Background" feature to enhance the backdrop of your video box.
- **Upload Images**: Insert images as a background for your video box, providing visual interest.
- **Sample Images**: Explore pre-loaded image samples for quick and easy background selection.
- **Background Styling**: Customize the video box background further with options like:- Background Repeat: Control how the background image repeats.- Background Fill: Adjust how the background fills the space around the video box.- Background Position: Define the positioning of the background image for optimal display.**Style Customization**
- Within the "Style" section, further refine your video box presentation by adding classes from a dropdown list with a plethora of options.
- Determine how your video box are visible on devices (Mobile , Tablet , Desktop , Large desktop).
### **Sound Cloud**
#### **Feature Settings**Upon dropping the Sound Cloud icon , a settings window will appear, offering three main features:
- **Settings**
- - Add your video link
- Determine how your video is visible on devices (Mobile , Tablet , Desktop , Large desktop).\_\_\_\_\_\_\_\_\_\_\_\_\_\_\_\_\_\_\_\_\_\_\_\_\_\_\_\_\_\_\_\_\_\_\_\_\_\_\_\_\_\_\_\_\_\_\_\_\_\_\_\_\_\_\_\_\_\_\_\_\_\_\_\_\_\_\_\_\_\_\_\_\_\_\_\_
- **Video**
- Include videos on your website by choosing from two options: select from your uploaded videos or upload new videos\_\_\_\_\_\_\_\_\_\_\_\_\_\_\_\_\_\_\_\_\_\_\_\_\_\_\_\_\_\_\_\_\_\_\_\_\_\_\_\_\_\_\_\_\_\_\_\_\_\_\_\_\_\_\_\_\_\_\_\_\_\_\_\_\_\_\_\_\_\_\_\_\_\_\_\_
- **Animations**
- Add animation to your video box from a long list of animation options.
- Enhance your animated video box by incorporating timing in seconds.
#### **Style Settings****Design Features**
- Access the "Design" feature to customize your video box appearance. Within this feature, you can determine the following properties:
- **Margin**: Set the spacing around your video box to control its placement on the page.
- **Border**: Define a border for your video box to add a distinct visual element.
- **Color**: Choose the color that best complements your website's theme or design.
- **Style**: Apply different styles to your video box, enhancing its visual appeal.
- **Gradient**: Add gradient effects to your video box for a more dynamic and modern look.**Background Features**
- Navigate to the "Background" feature to enhance the backdrop of your video box.
- **Upload Images**: Insert images as a background for your video box, providing visual interest.
- **Sample Images**: Explore pre-loaded image samples for quick and easy background selection.
- **Background Styling**: Customize the video box background further with options like:- Background Repeat: Control how the background image repeats.- Background Fill: Adjust how the background fills the space around the video box.- Background Position: Define the positioning of the background image for optimal display.**Style Customization**
- Within the "Style" section, further refine your video box presentation by adding classes from a dropdown list with a plethora of options.
- Determine how your video box are visible on devices (Mobile , Tablet , Desktop , Large desktop).
# How to Add Tabs to Your Page ?
**Through this document , you will uncover the 'Tabs' feature properties in site editor page through these key elements:[1. Adding Tabs](https://kb.salerise.com/link/35#bkmrk-adding-a-slideshow)[2. Feature Settings Window](https://kb.salerise.com/link/35#bkmrk-feature-settings)[3. Style Settings Window](https://kb.salerise.com/link/35#bkmrk-style-settings)**
### **Adding Tabs**
- Drag the tabs icon from the available features[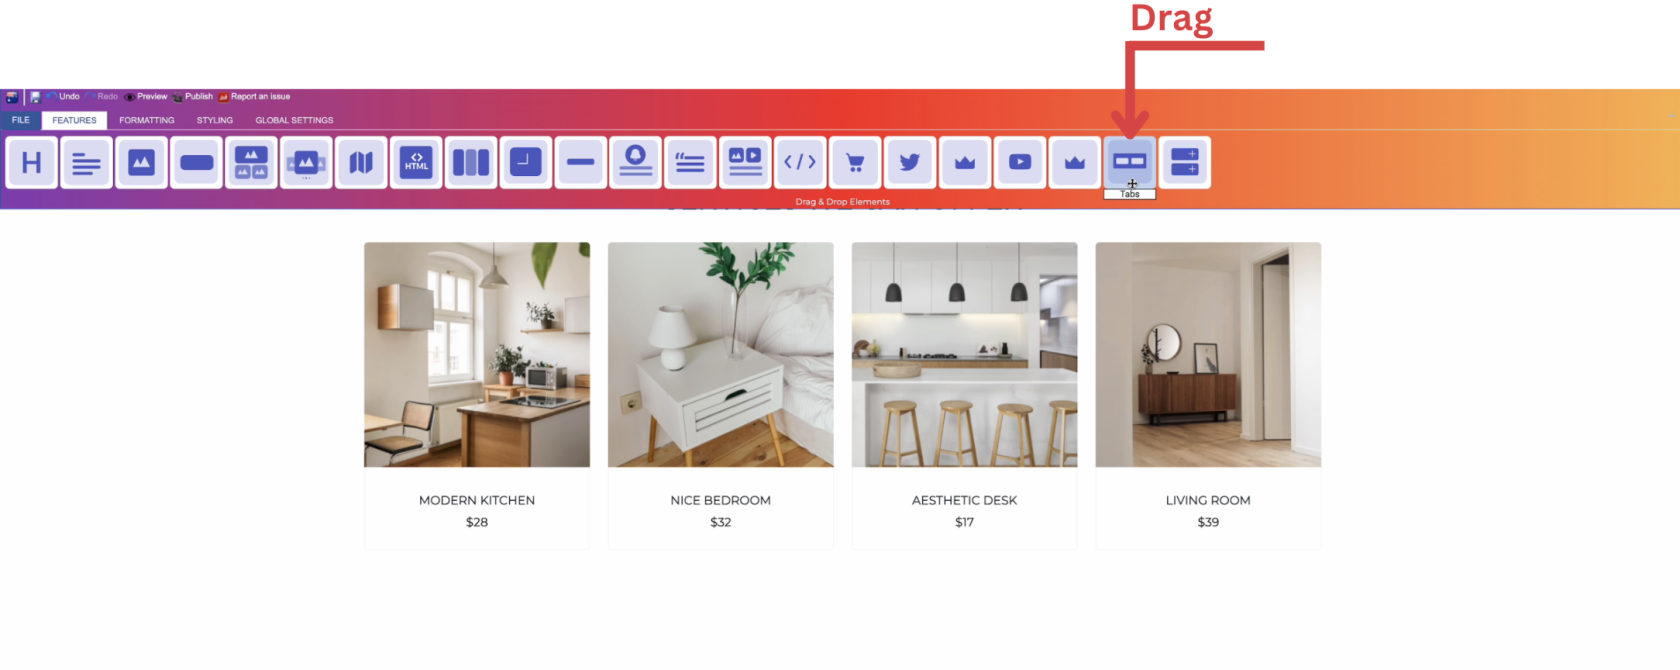](https://kb.salerise.com/uploads/images/gallery/2023-12/image.png)
- Drop the tabs icon into the desired location on your website page
[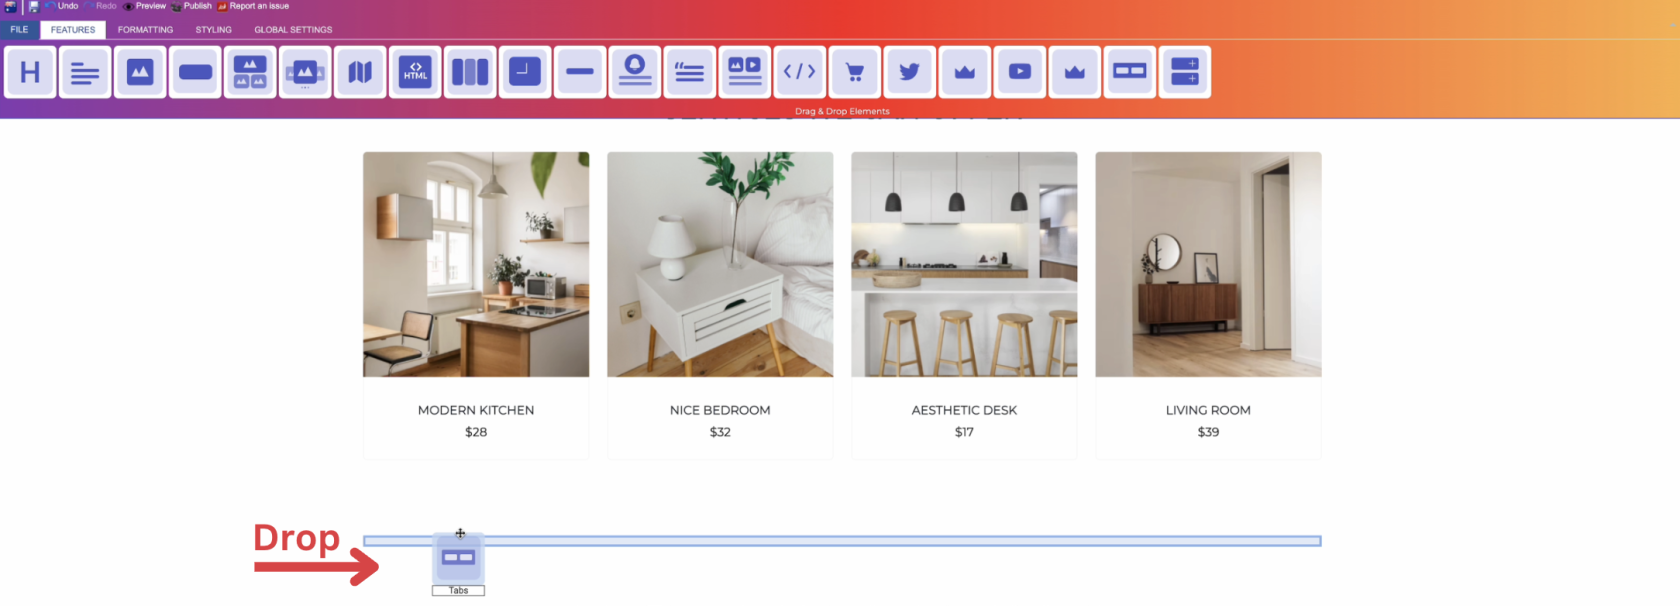](https://kb.salerise.com/uploads/images/gallery/2023-12/PSHimage.png)
### **Feature Settings**Upon dropping the tabs, a settings window will appear, offering three main features:
- **Themes**
- Explore different themes for your tabs to align with your website's aesthetic.
\_\_\_\_\_\_\_\_\_\_\_\_\_\_\_\_\_\_\_\_\_\_\_\_\_\_\_\_\_\_\_\_\_\_\_\_\_\_\_\_\_\_\_\_\_\_\_\_\_\_\_\_\_\_\_\_\_\_\_\_\_\_\_\_\_\_\_\_\_\_\_\_\_\_\_\_
- **Settings**
- Add number of sections as desired and aligned with your website.
- Determine your title text and type (text , icon , or text and icon).
- Add content to your sections (optional).
- Determine how your sections are visible on devices (Mobile , Tablet , Desktop , Large desktop).\_\_\_\_\_\_\_\_\_\_\_\_\_\_\_\_\_\_\_\_\_\_\_\_\_\_\_\_\_\_\_\_\_\_\_\_\_\_\_\_\_\_\_\_\_\_\_\_\_\_\_\_\_\_\_\_\_\_\_\_\_\_\_\_\_\_\_\_\_\_\_\_\_\_\_\_
- **Animations**
- Add animation to your tabs from a long list of animation options.
- Enhance your animated tabs by incorporating timing in seconds.
### **Style Settings****Design Features**
- Access the "Design" feature to customize your tabs appearance. Within this feature, you can determine the following properties:
- **Margin**: Set the spacing around your tabs to control its placement on the page.
- **Border**: Define a border for your tabs to add a distinct visual element.
- **Color**: Choose the color that best complements your website's theme or design.
- **Style**: Apply different styles to your tabs, enhancing its visual appeal.
- **Gradient**: Add gradient effects to your tabs for a more dynamic and modern look.**Background Features**
- Navigate to the "Background" feature to enhance the backdrop of your tabs.
- **Upload Images**: Insert images as a background for your tabs, providing visual interest.
- **Sample Images**: Explore pre-loaded image samples for quick and easy background selection.
- **Background Styling**: Customize the tabs background further with options like:- Background Repeat: Control how the background image repeats.- Background Fill: Adjust how the background fills the space around the tabs.- Background Position: Define the positioning of the background image for optimal display.**Style Customization**
- Within the "Style" section, further refine your tabs presentation by adding classes from a dropdown list with a plethora of options.
- Determine how your tabs are visible on devices (Mobile , Tablet , Desktop , Large desktop.
# How to Add Accordions to Your Page ?
**Through this document , you will uncover the 'Accordions' feature properties in site editor page through these key elements:
[1. Adding Accordions](https://kb.salerise.com/link/43#bkmrk-adding-a-slideshow)[2. Feature Settings Window](https://kb.salerise.com/link/43#bkmrk-feature-settings)[3. Style Settings Window](https://kb.salerise.com/link/43#bkmrk-style-settings)**
### **Adding Accordions**
- Drag the accordions icon from the available features
[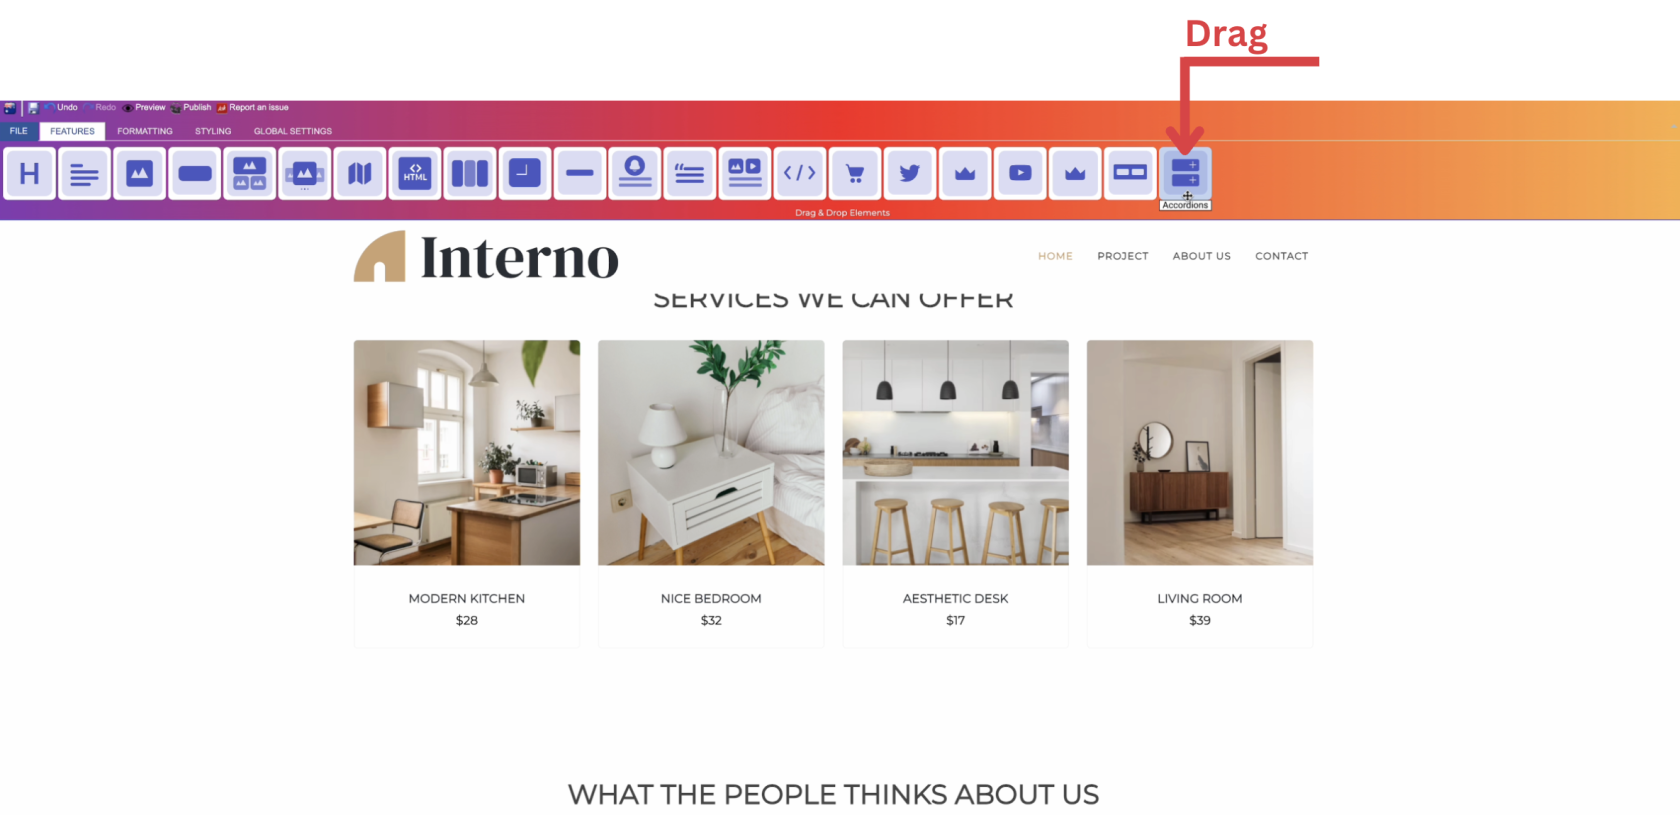](https://kb.salerise.com/uploads/images/gallery/2023-12/NuHimage.png)
- Drop the accordions icon into the desired location on your website page
[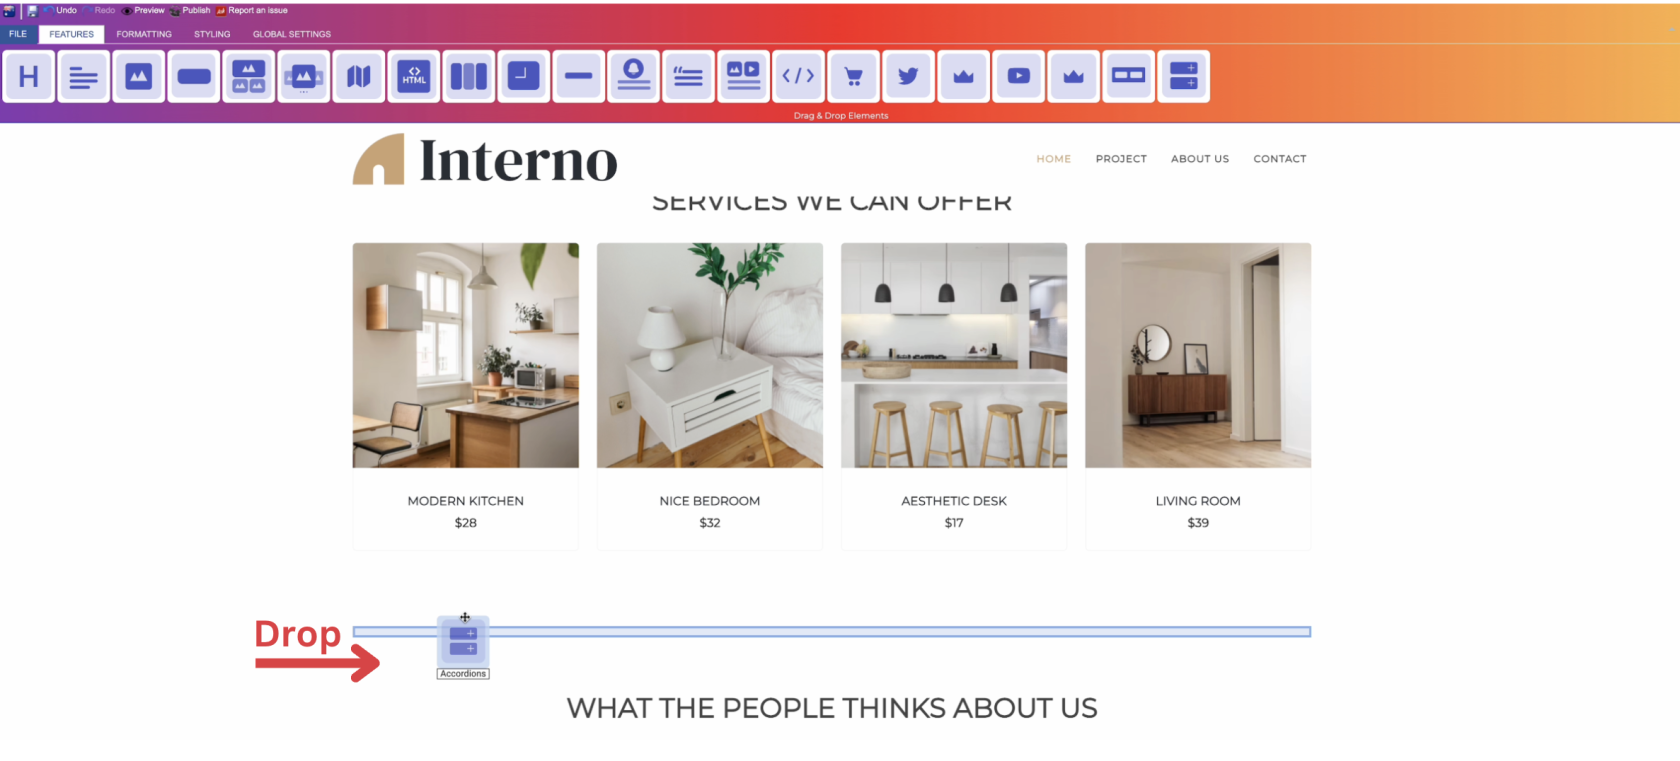](https://kb.salerise.com/uploads/images/gallery/2023-12/R4rimage.png)
### **Feature Settings**Upon dropping the accordions, a settings window will appear, offering three main features:
- **Themes**
- Explore different themes for your accordions to align with your website's aesthetic.\_\_\_\_\_\_\_\_\_\_\_\_\_\_\_\_\_\_\_\_\_\_\_\_\_\_\_\_\_\_\_\_\_\_\_\_\_\_\_\_\_\_\_\_\_\_\_\_\_\_\_\_\_\_\_\_\_\_\_\_\_\_\_\_\_\_\_\_\_\_\_\_\_\_\_\_
- **Settings**
- Add number of sections as desired and aligned with your website.
- Determine your title text and type (text , icon , or text and icon).
- Add content to your sections (optional).
- Determine how your sections are visible on devices (Mobile , Tablet , Desktop , Large desktop).\_\_\_\_\_\_\_\_\_\_\_\_\_\_\_\_\_\_\_\_\_\_\_\_\_\_\_\_\_\_\_\_\_\_\_\_\_\_\_\_\_\_\_\_\_\_\_\_\_\_\_\_\_\_\_\_\_\_\_\_\_\_\_\_\_\_\_\_\_\_\_\_\_\_\_\_
- **Animations**
- Add animation to your accordions from a long list of animation options.
- Enhance your animated accordions by incorporating timing in seconds.
### **Style Settings****Design Features**
- Access the "Design" feature to customize your accordions appearance. Within this feature, you can determine the following properties:
- **Margin**: Set the spacing around your accordions to control its placement on the page.
- **Border**: Define a border for your accordions to add a distinct visual element.
- **Color**: Choose the color that best complements your website's theme or design.
- **Style**: Apply different styles to your accordions, enhancing its visual appeal.
- **Gradient**: Add gradient effects to your accordions for a more dynamic and modern look.**Background Features**
- Navigate to the "Background" feature to enhance the backdrop of your accordions.
- **Upload Images**: Insert images as a background for your accordions, providing visual interest.
- **Sample Images**: Explore pre-loaded image samples for quick and easy background selection.
- **Background Styling**: Customize the accordions background further with options like:- Background Repeat: Control how the background image repeats.- Background Fill: Adjust how the background fills the space around the accordions.- Background Position: Define the positioning of the background image for optimal display.**Style Customization**
- Within the "Style" section, further refine your accordions presentation by adding classes from a dropdown list with a plethora of options.
- Determine how your accordions are visible on devices (Mobile , Tablet , Desktop , Large desktop.
# How to Add Subscribe Feature to Your Page?
**Through this document , you will uncover the 'Subscribe' feature properties in site editor page through these key elements:
[1. Adding Subscribe](https://kb.salerise.com/link/57#bkmrk-adding-a-slideshow)[2. Feature Settings Window](https://kb.salerise.com/link/57#bkmrk-feature-settings)[3. Style Settings Window](https://kb.salerise.com/link/57#bkmrk-style-settings)**
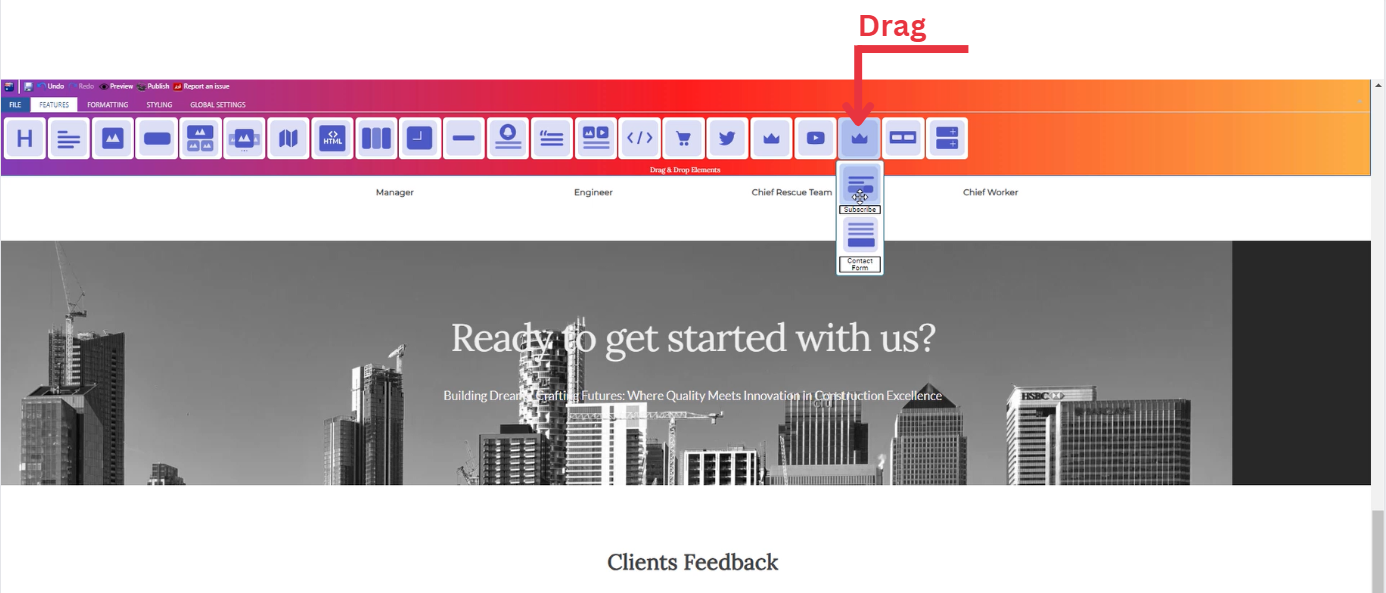
### **Adding Subscribe**
- Drag the subscribe icon from the available features
[](https://kb.salerise.com/uploads/images/gallery/2023-12/h0eimage.png)
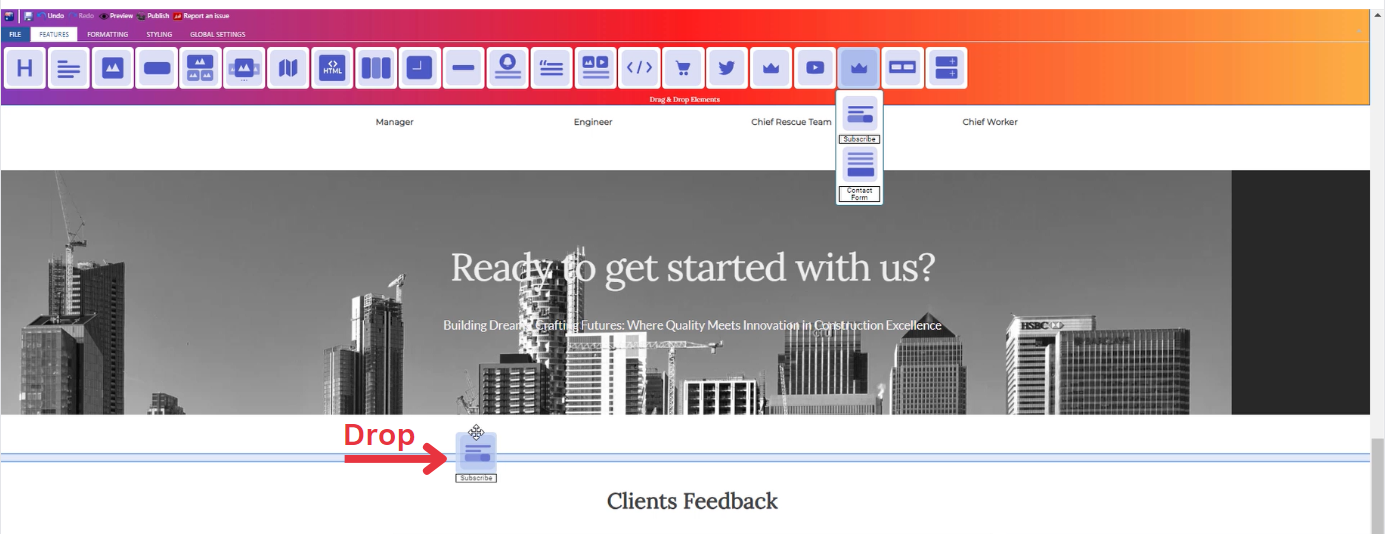
- Drop the subscribe icon into the desired location on your website page
[](https://kb.salerise.com/uploads/images/gallery/2023-12/GH3image.png)
### **Feature Settings**Upon dropping the subscribe icon, a settings window will appear, offering three main features:
- **Records**
- You will be able to see entries from dashboard which allows you to manage user subscriptions conveniently.
- **Settings**
- Determine how your subscription box is visible on devices (Mobile , Tablet , Desktop , Large desktop).
- **Animations**
- - - Add animation to your subscription box from a long list of animation options.
- Enhance your animated subscription box by incorporating timing in seconds.
### **Style Settings****Design Features**
- Access the "Design" feature to customize your subscription box appearance. Within this feature, you can determine the following properties:
- **Margin**: Set the spacing around your subscription box to control its placement on the page.
- **Border**: Define a border for your subscription box to add a distinct visual element.
- **Color**: Choose the color that best complements your website's theme or design.
- **Style**: Apply different styles to your subscription box, enhancing its visual appeal.
- **Gradient**: Add gradient effects to your subscription box for a more dynamic and modern look.**Background Features**
- Navigate to the "Background" feature to enhance the backdrop of your subscription box.
- **Upload Images**: Insert images as a background for your subscription box, providing visual interest.
- **Sample Images**: Explore pre-loaded image samples for quick and easy background selection.
- **Background Styling**: Customize the subscription box background further with options like:- Background Repeat: Control how the background image repeats.- Background Fill: Adjust how the background fills the space around the subscription box.- Background Position: Define the positioning of the background image for optimal display.**Style Customization**
- Within the "Style" section, further refine your subscription box presentation by adding classes from a dropdown list with a plethora of options.
- Determine how your subscription box are visible on devices (Mobile , Tablet , Desktop , Large desktop).
# How to Add Contact Form to Your Page ?
**Through this document , you will uncover the 'Contact Form' feature properties in site editor page through these key elements:
[1. Adding a Contact Form](https://kb.salerise.com/link/60#bkmrk-adding-a-slideshow)[2. Feature Settings Window](https://kb.salerise.com/link/60#bkmrk-feature-settings)[3. Style Settings Window](https://kb.salerise.com/link/60#bkmrk-style-settings)**
### **Adding a Contact Form**
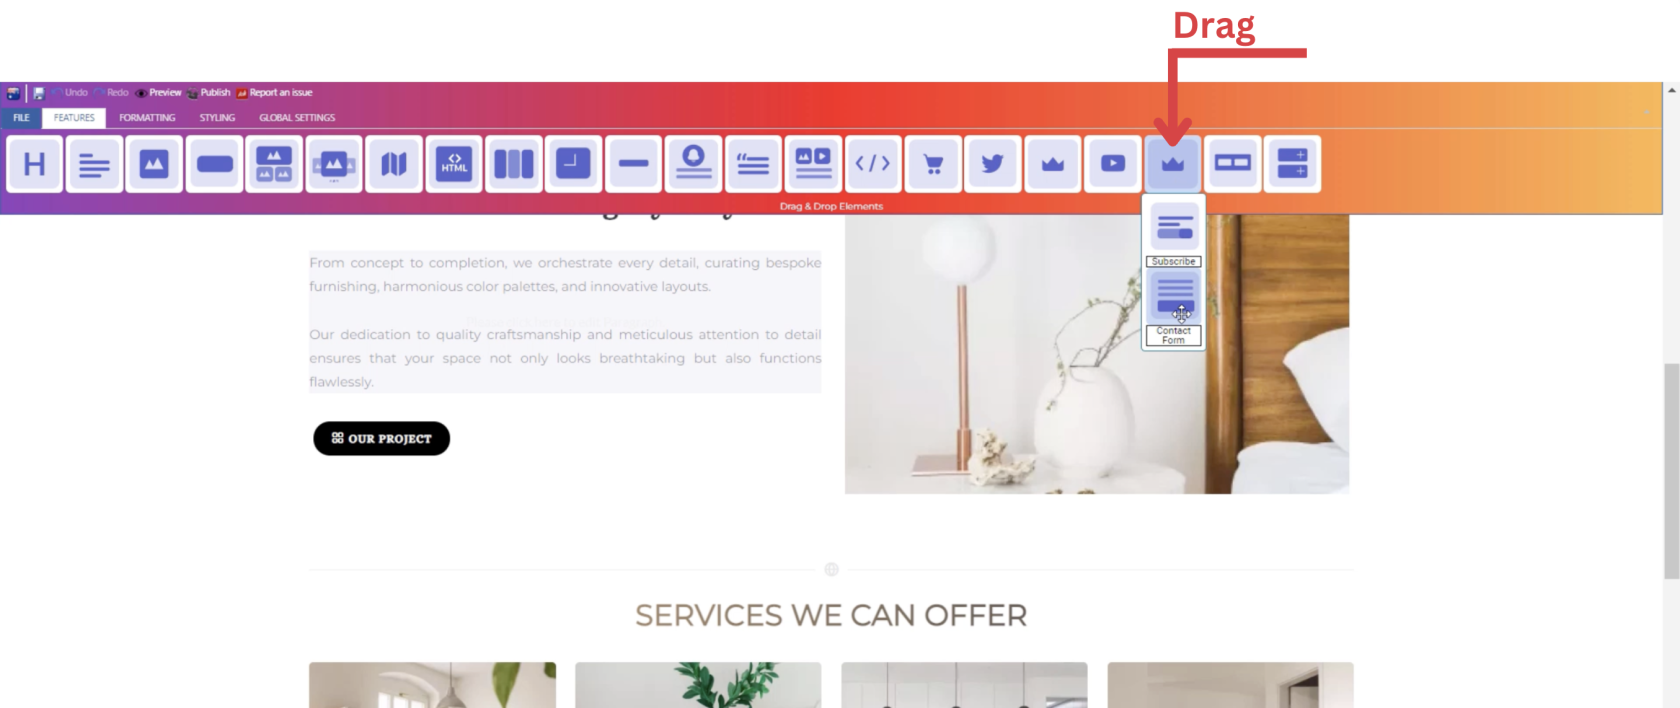
- Drag the contact form icon from the available features
[](https://kb.salerise.com/uploads/images/gallery/2023-12/HEcimage.png)
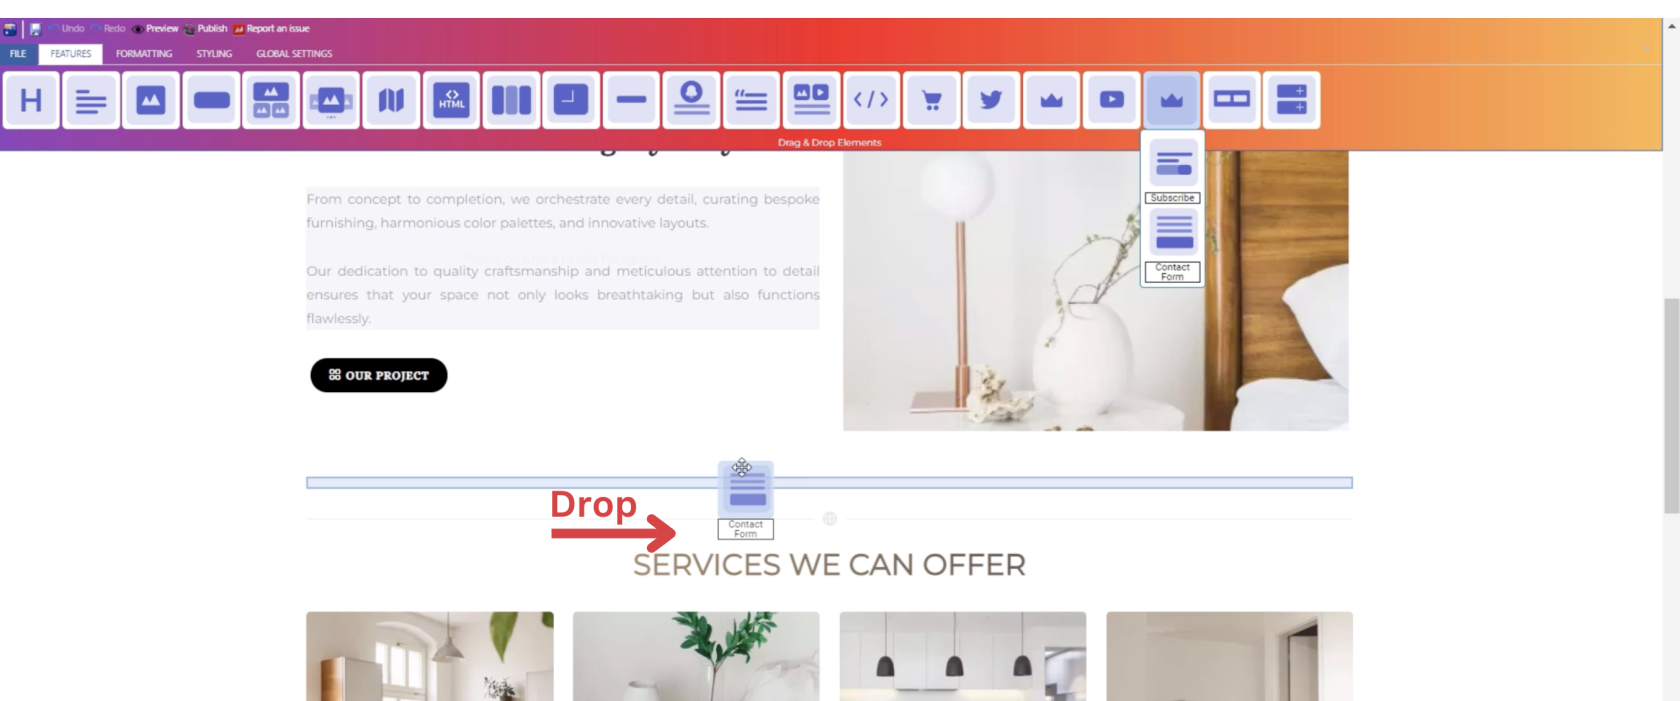
- Drop the contact form icon into the desired location on your website page
[](https://kb.salerise.com/uploads/images/gallery/2023-12/9XJimage.png)
### **Feature Settings**Upon dropping the subscribe icon, a settings window will appear, offering three main features:
- **Records**
- You will be able to see entries from dashboard which allows you to manage contact form conveniently.
- **Settings**
- Determine how your contact form is visible on devices (Mobile , Tablet , Desktop , Large desktop).
- **Animations**
- Add animation to your contact form from a long list of animation options.
- Enhance your animated contact form by incorporating timing in seconds.
### **Style Settings****Design Features**
- Access the "Design" feature to customize your contact form appearance. Within this feature, you can determine the following properties:
- **Margin**: Set the spacing around your contact form to control its placement on the page.
- **Border**: Define a border for your contact form to add a distinct visual element.
- **Color**: Choose the color that best complements your website's theme or design.
- **Style**: Apply different styles to your contact form, enhancing its visual appeal.
- **Gradient**: Add gradient effects to your contact form for a more dynamic and modern look.**Background Features**
- Navigate to the "Background" feature to enhance the backdrop of your contact form.
- **Upload Images**: Insert images as a background for your contact form, providing visual interest.
- **Sample Images**: Explore pre-loaded image samples for quick and easy background selection.
- **Background Styling**: Customize the contact form background further with options like:- Background Repeat: Control how the background image repeats.- Background Fill: Adjust how the background fills the space around the contact form.- Background Position: Define the positioning of the background image for optimal display.**Style Customization**
- Within the "Style" section, further refine your contact form presentation by adding classes from a dropdown list with a plethora of options.
- Determine how your contact form are visible on devices (Mobile , Tablet , Desktop , Large desktop).