Restaurant Ordering
- Restaurent Info Settings
- Location Setup.
- Menu Items
- Taxes
- Payment Method
- Active Orders Management
- Manage Orders
Restaurent Info Settings
The "Restaurant Information" section encompasses the essential elements of your establishment's digital identity. In "General," set the tone with details like the restaurant name, cuisine type, and a captivating description. Transition to "Services" to tailor the ordering experience with options for takeout, delivery, and dine-in, along with additional settings like currency and delivery fees. The "Service Hours" section allows precise definition of operating hours, accommodating multiple time slots per day. Together, these components establish a comprehensive foundation, ensuring your online presence accurately mirrors your restaurant's unique character while providing a seamless ordering experience.
General Info
1.1 General Overview
In the "General" section, define your restaurant's identity with essential details like the name, cuisine type, and a brief description. Share an admin email for communication, setting the stage for an accurate and engaging online presence.
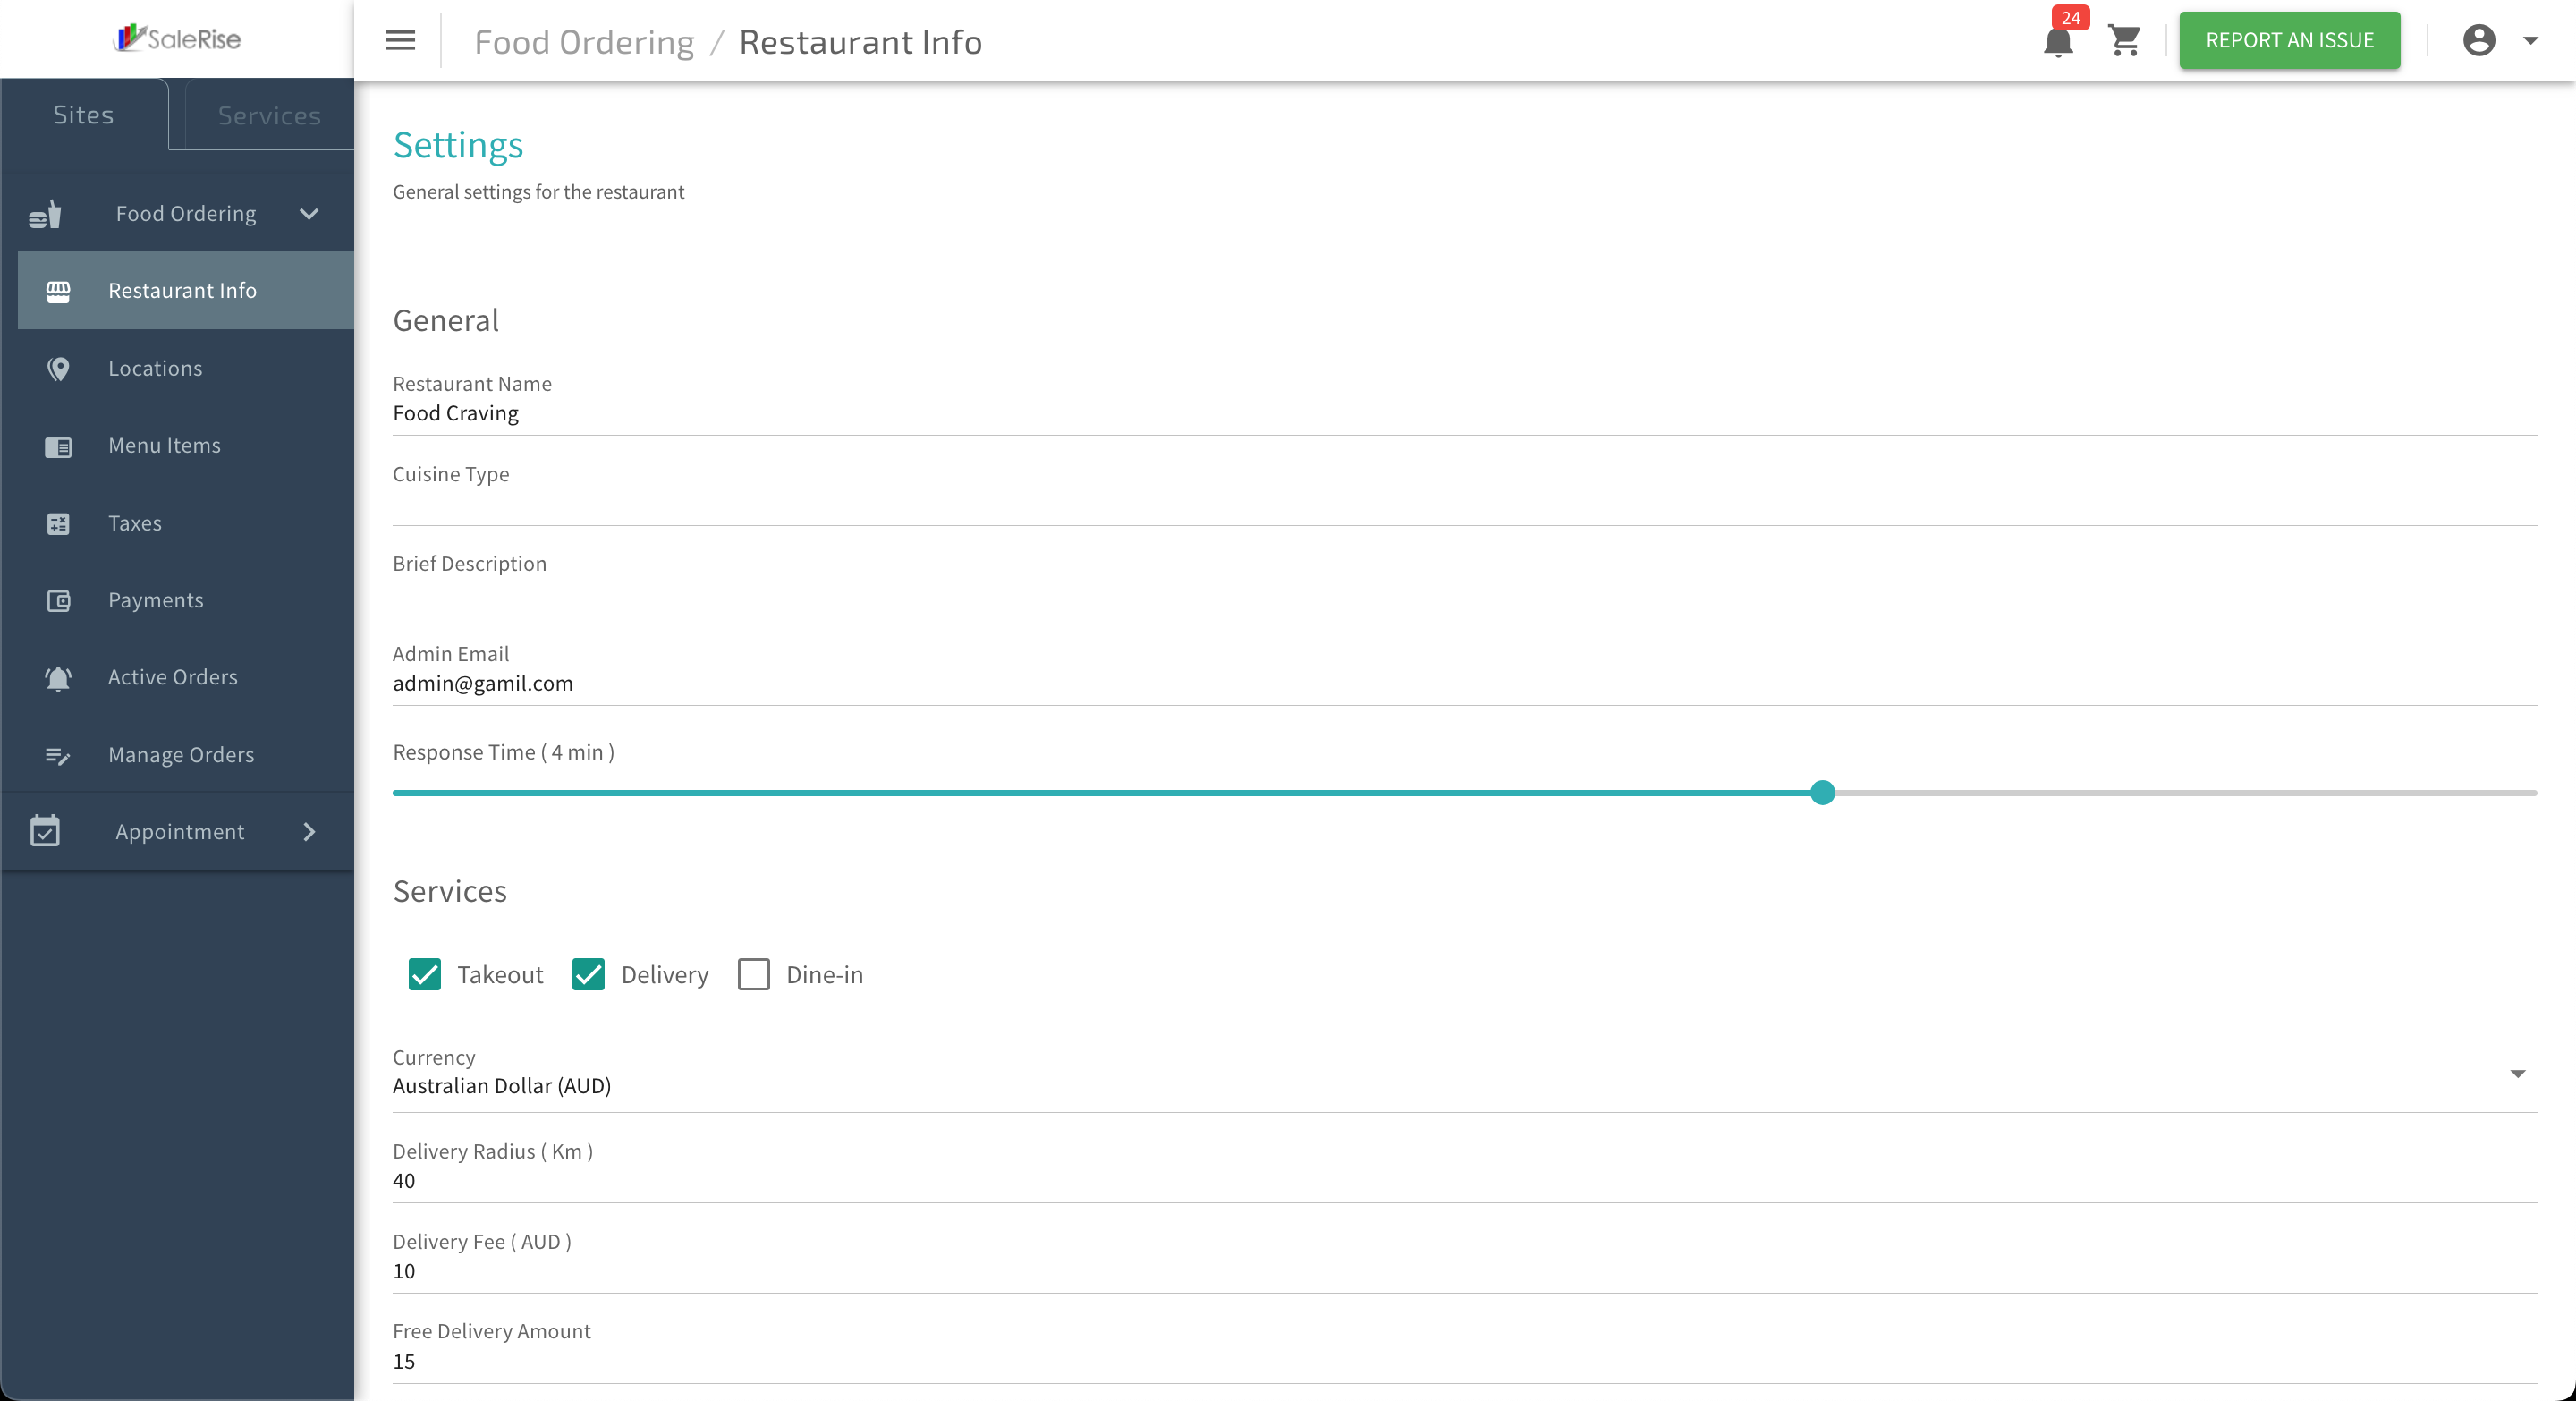
Restaurant Name:
Specify the official name of your restaurant. This is the primary identifier for your establishment.
Cuisine Type:
Indicate the type of cuisine your restaurant specializes in. Whether it's Italian, Mexican, or a fusion of flavors, this helps set expectations for your customers.
Description:
Provide a brief but compelling description of your restaurant. Highlight key features, specialties, or the ambiance to give customers a glimpse of what to expect.
Admin Email:
Enter the email address that will serve as the primary contact for administrative purposes. This email will receive notifications, updates, and inquiries related to the ordering system.
Response Time:
Set the expected response time for customer inquiries. This helps manage customer expectations regarding when they can anticipate a reply from your restaurant.
Services
1.2 Services Overview
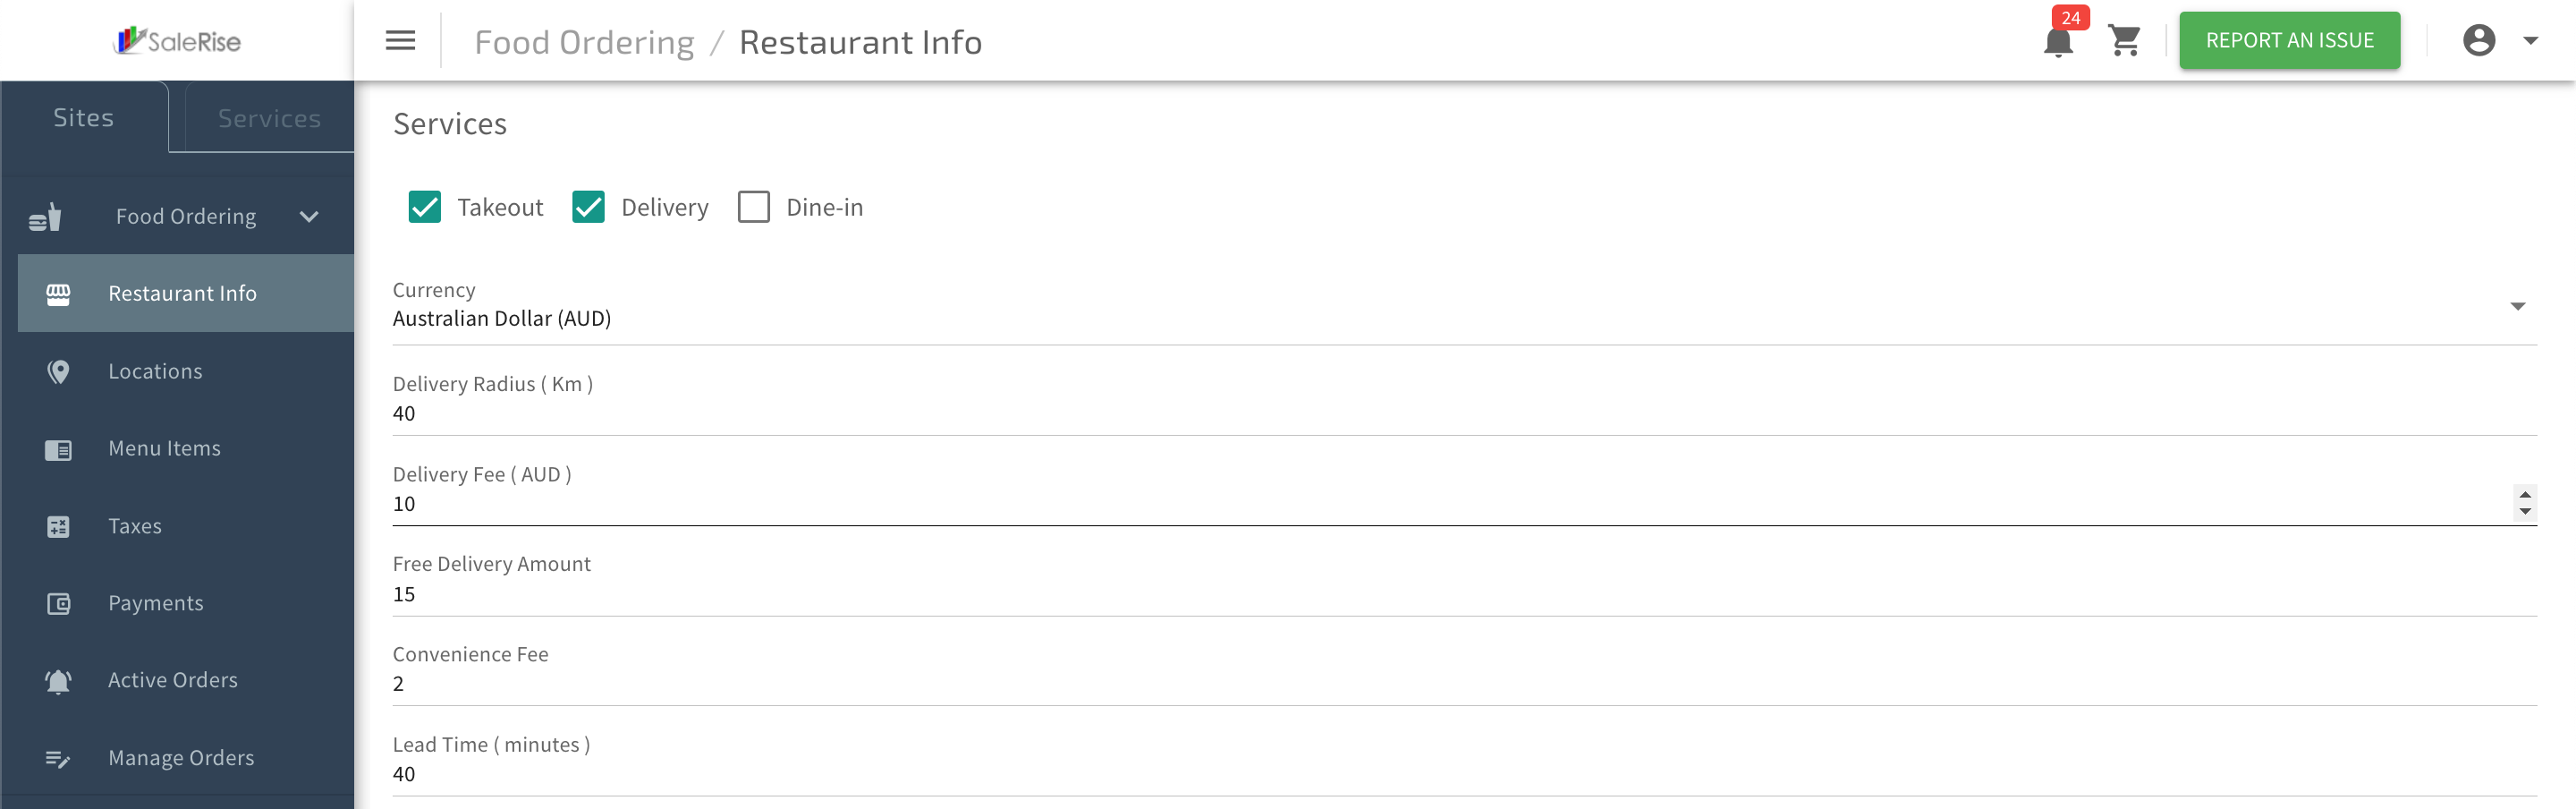
In the "Services" section, tailor the ordering experience to your restaurant's unique offerings. Define takeout, delivery, and dine-in options, each with its own set of customizable features. Specify the currency, delivery radius, fees, and lead time to streamline the ordering process. These settings empower you to create a personalized and efficient service that aligns seamlessly with your restaurant's operations.
Takeout:
Specify whether your restaurant offers takeout services. If applicable, set any associated fees or policies.
Delivery:
Indicate if your restaurant provides delivery services. Define the delivery radius, associated fees, and any conditions for free delivery.
Dine-in:
Specify if your restaurant has a dine-in option. If applicable, outline any reservation policies or other relevant details.
Currency:
Define the currency used for transactions within the ordering system.
Delivery Radius:
Set the maximum distance for delivery services to ensure accurate order fulfillment.
Delivery Fee:
Specify the delivery charge for orders within the defined delivery radius.
Free Delivery Amount:
If applicable, set a minimum order amount for customers to qualify for free delivery.
Convenience Fee:
Specify any additional convenience fees associated with the ordering process.
Lead Time:
Set the lead time for order preparation and delivery, ensuring timely service.
Service Hours
1.3 Service Hours Overview
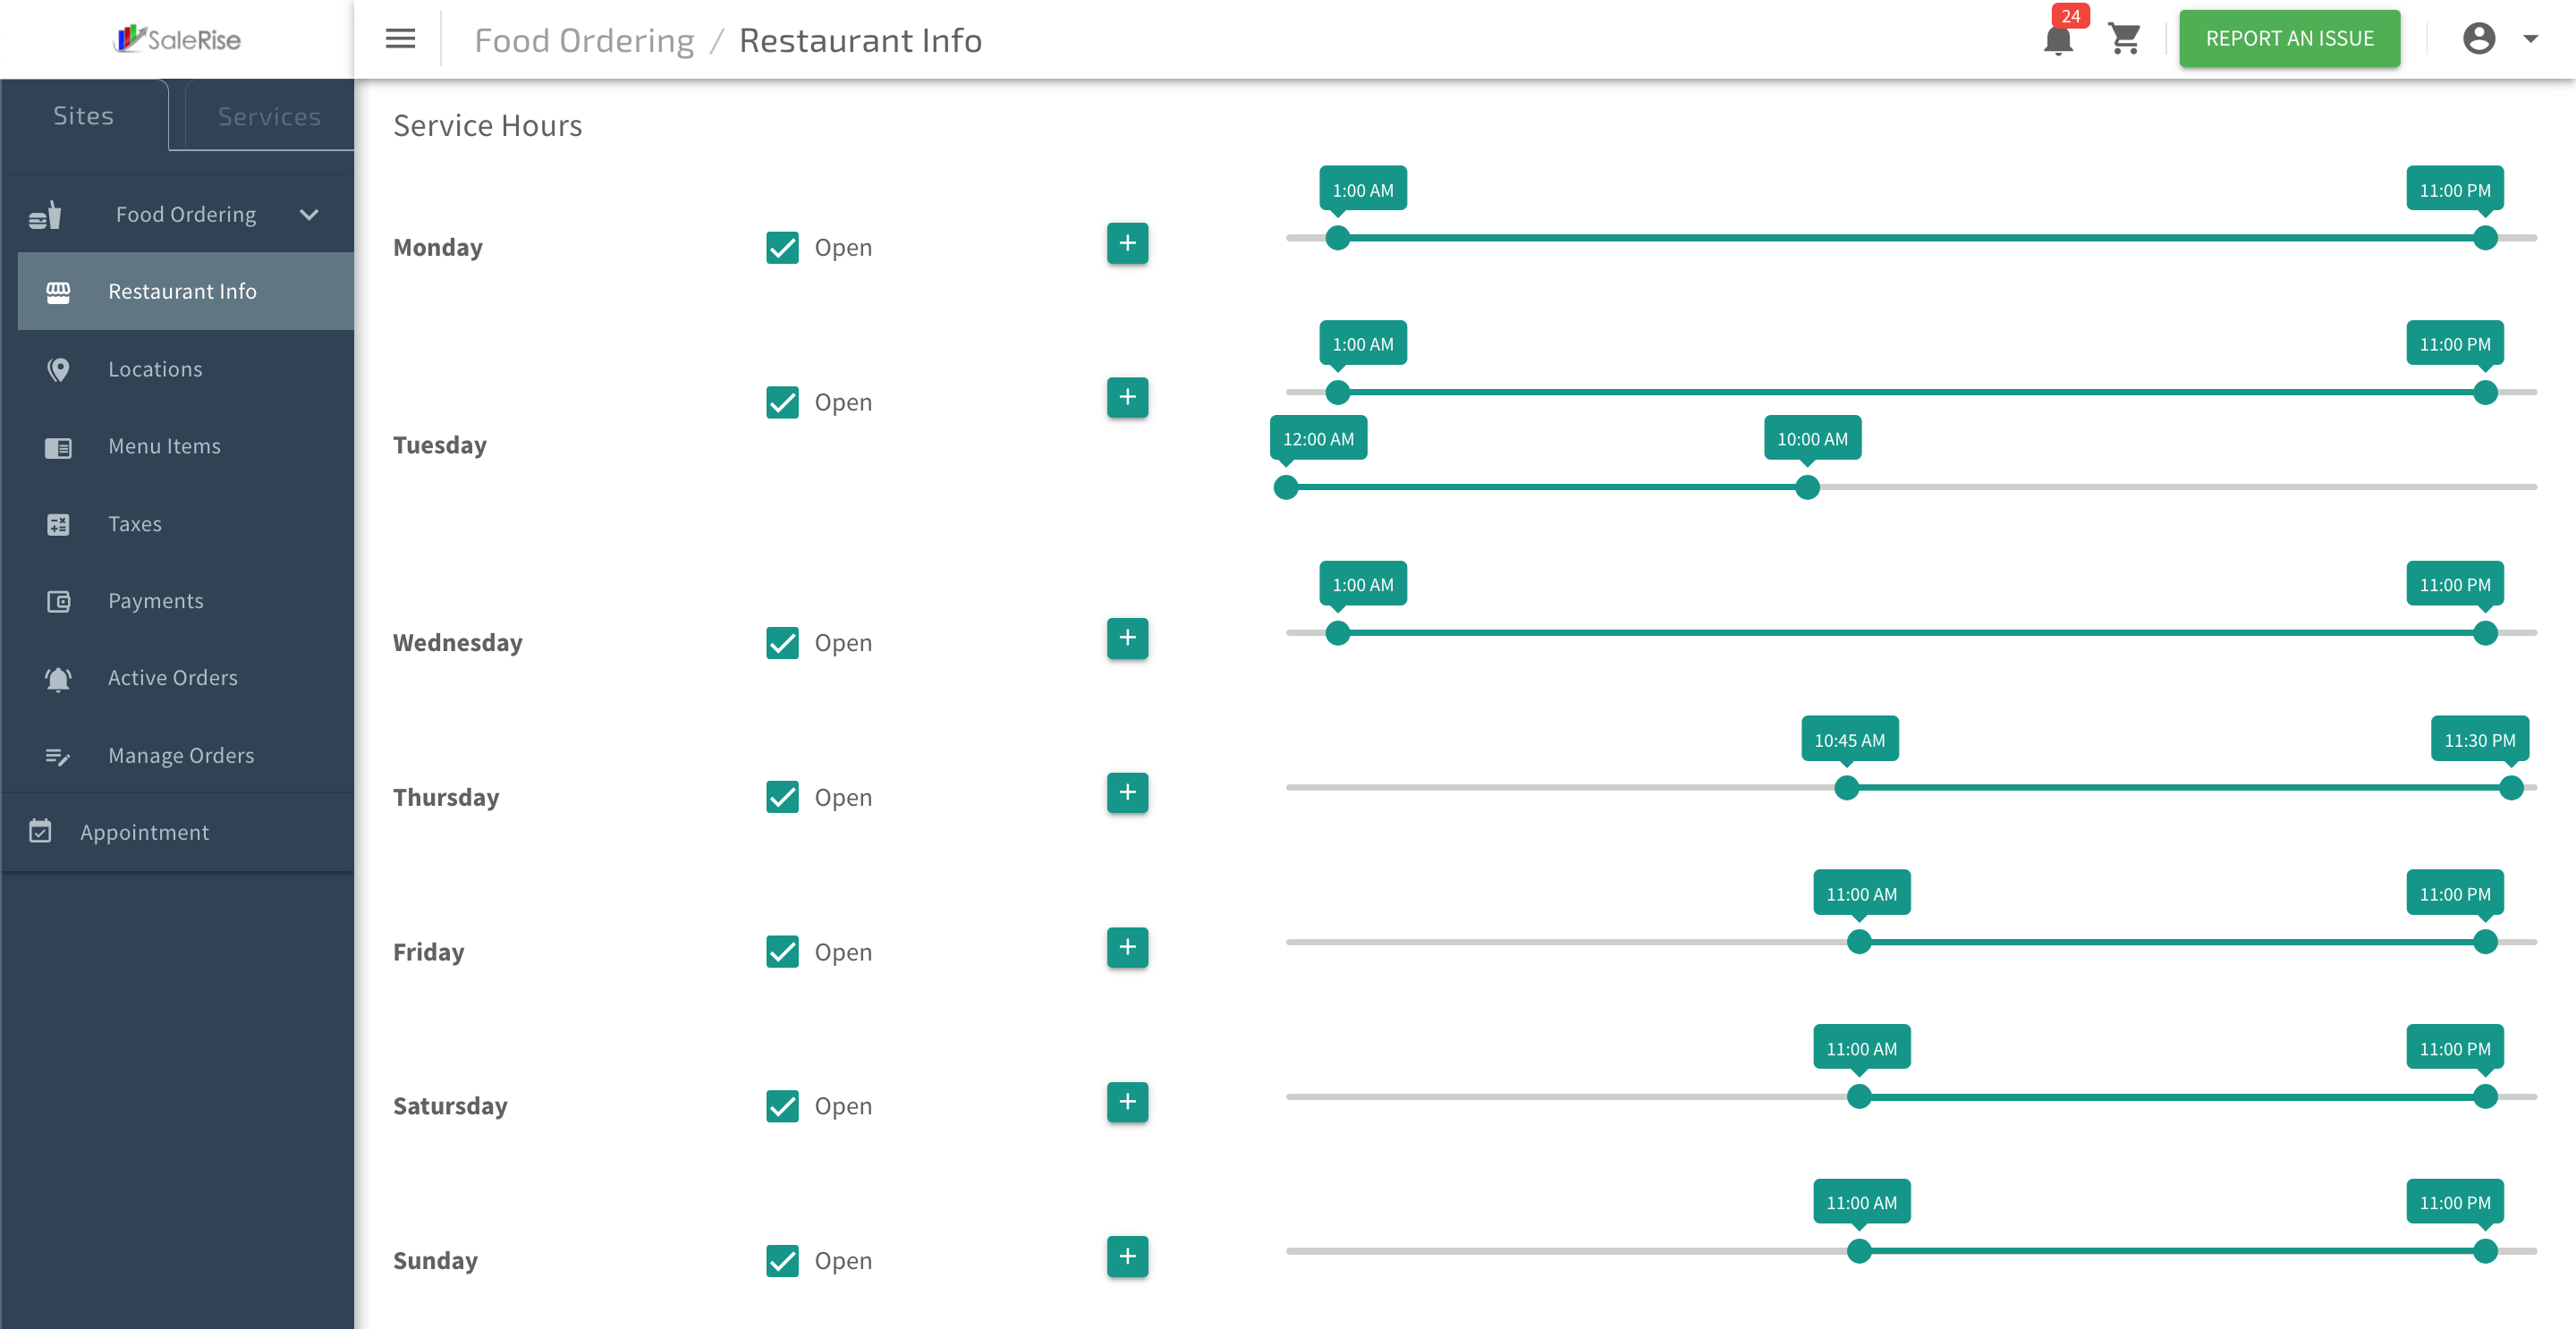
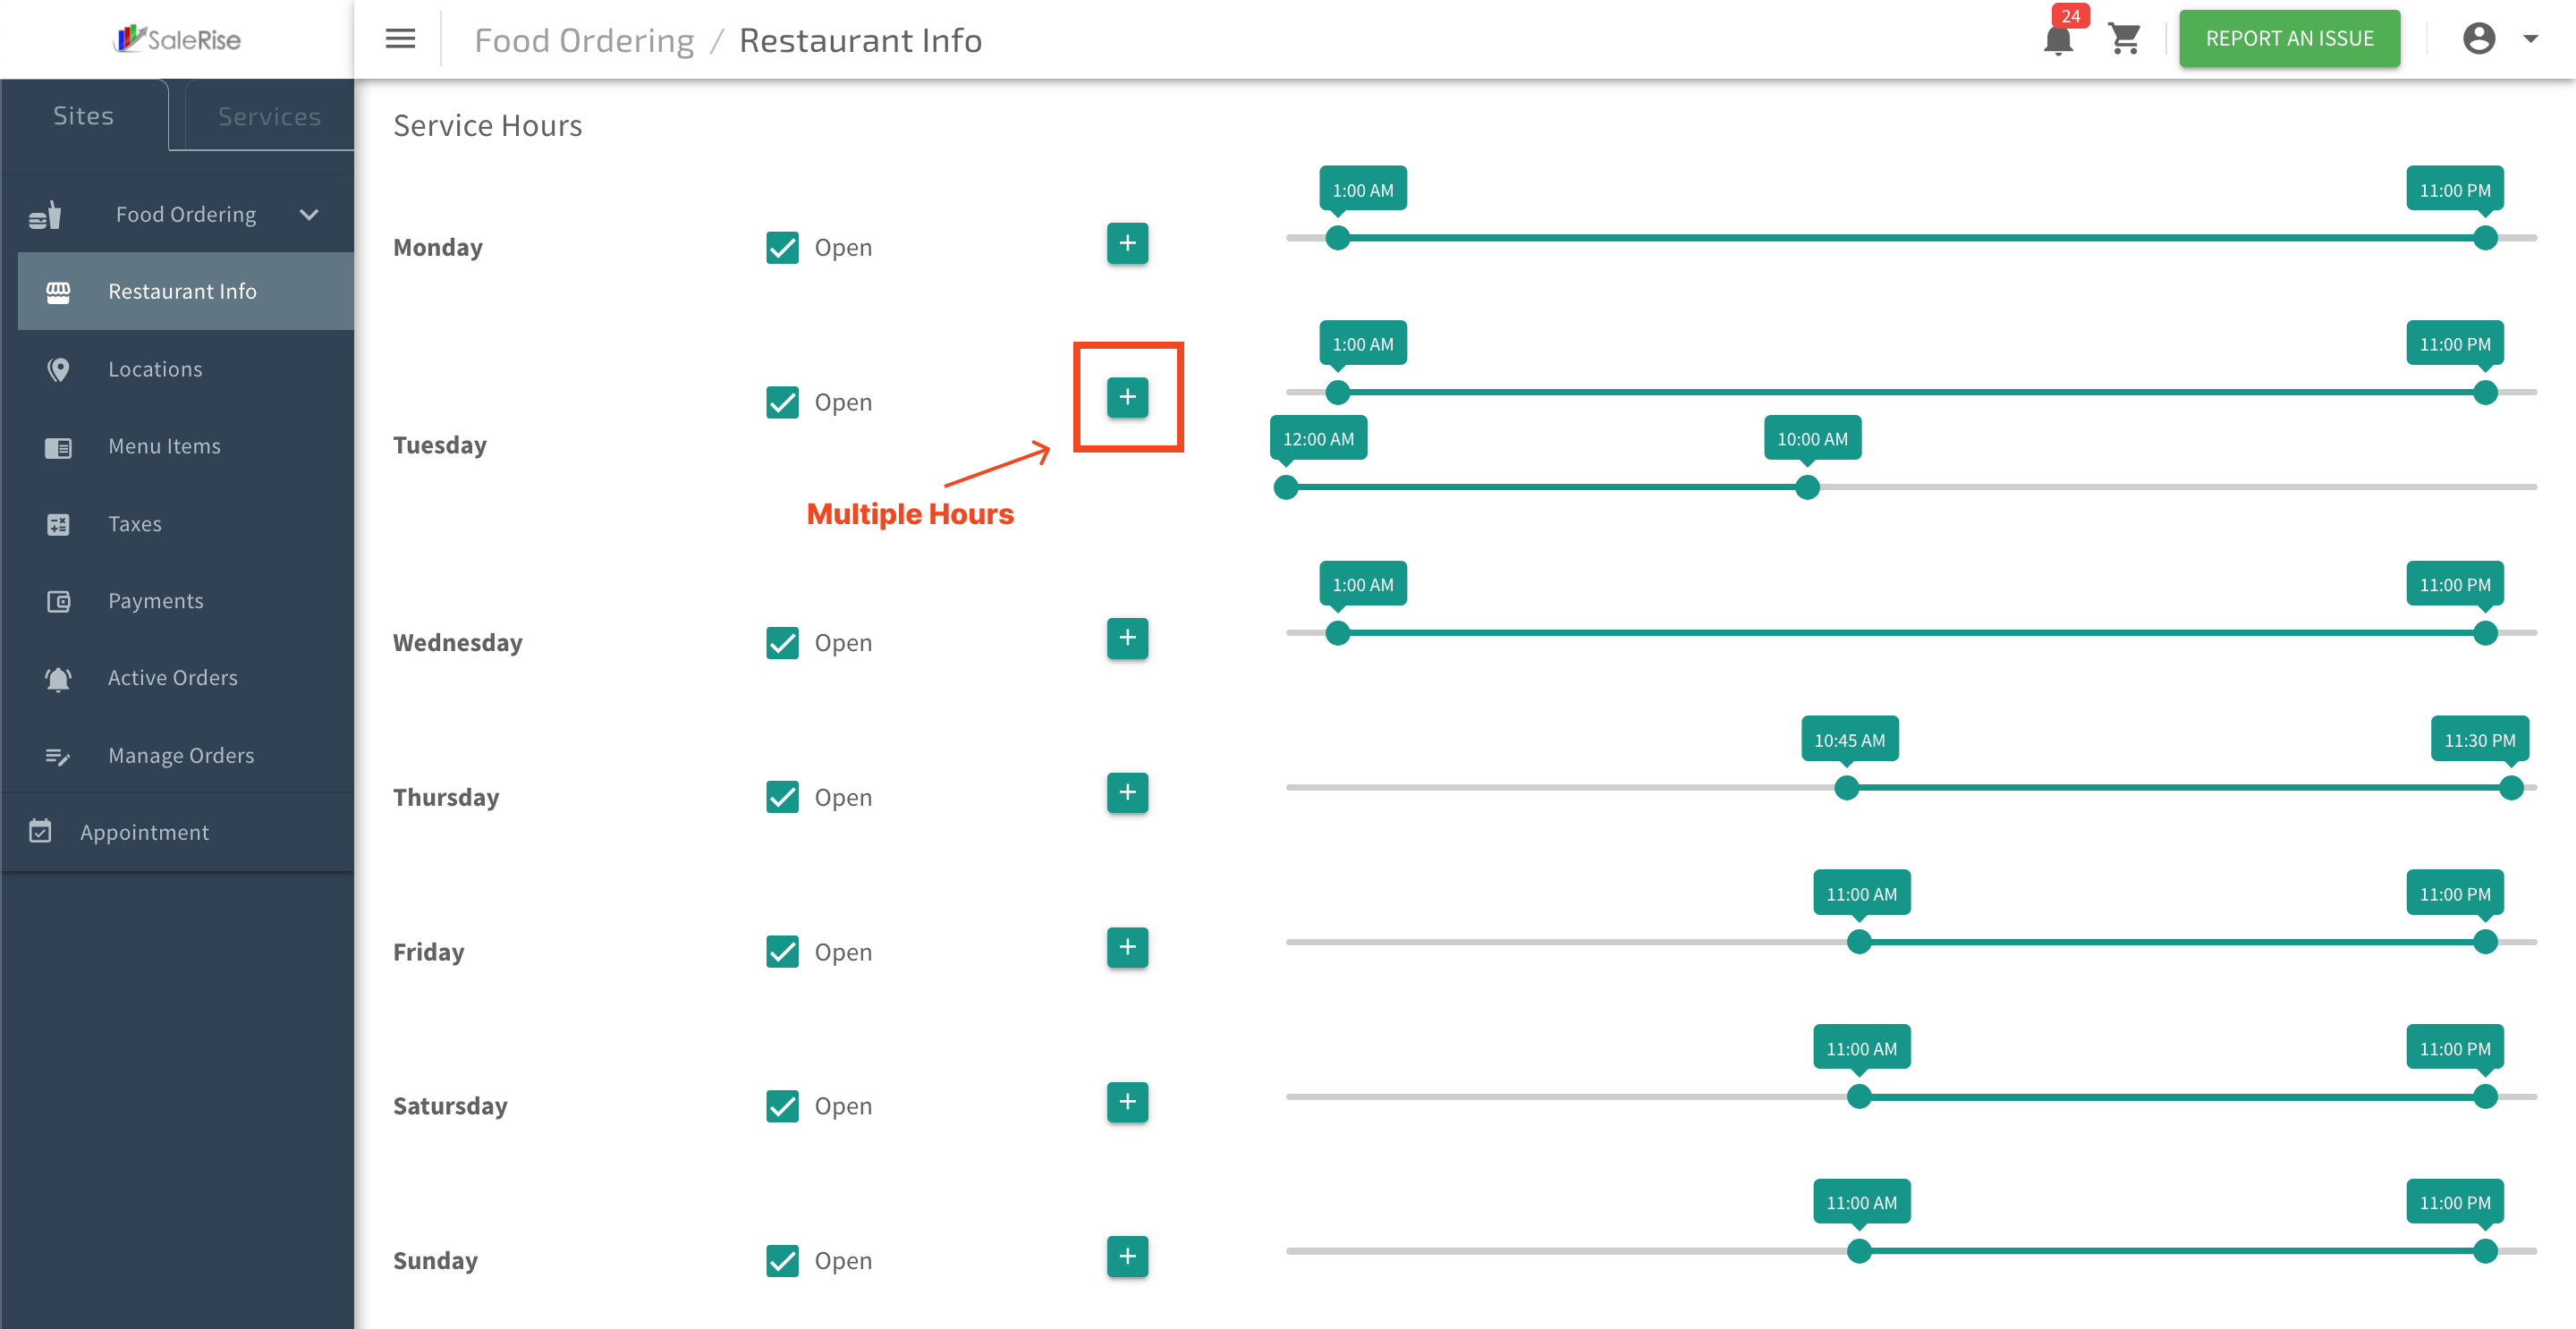
In the "Service Hours" section, you can precisely define your restaurant's operating hours. Tailor the schedule for each day and add multiple time slots, ensuring an accurate representation of your service availability. This customizable feature allows you to create a dynamic timetable for takeout, delivery, and dine-in services, providing customers with real-time information on when your restaurant is open.
-
Define Operating Hours:
- Set the general opening and closing times for each day of the week.
-
Add Multiple Time Slots:
- Accommodate variations by adding multiple time slots for a single day, reflecting different service periods.
-
Special Hours:
- Specify any exceptional operating hours, such as holidays or special events.
Location Setup.
In the "Location Setup" page, take command of your restaurant's geographical footprint. Effortlessly manage and add multiple locations, ensuring a precise and unified representation of your brand. This functionality is particularly crucial for businesses with multiple branches or those aiming to broaden their reach.
Location Management
2.1 Location Setup Overview
In the "Location Setup" page, you gain control over your restaurant's geographical presence. Manage and add multiple locations effortlessly, ensuring an accurate representation of your brand across various areas. This feature is instrumental for establishments with multiple branches or those looking to expand their reach.
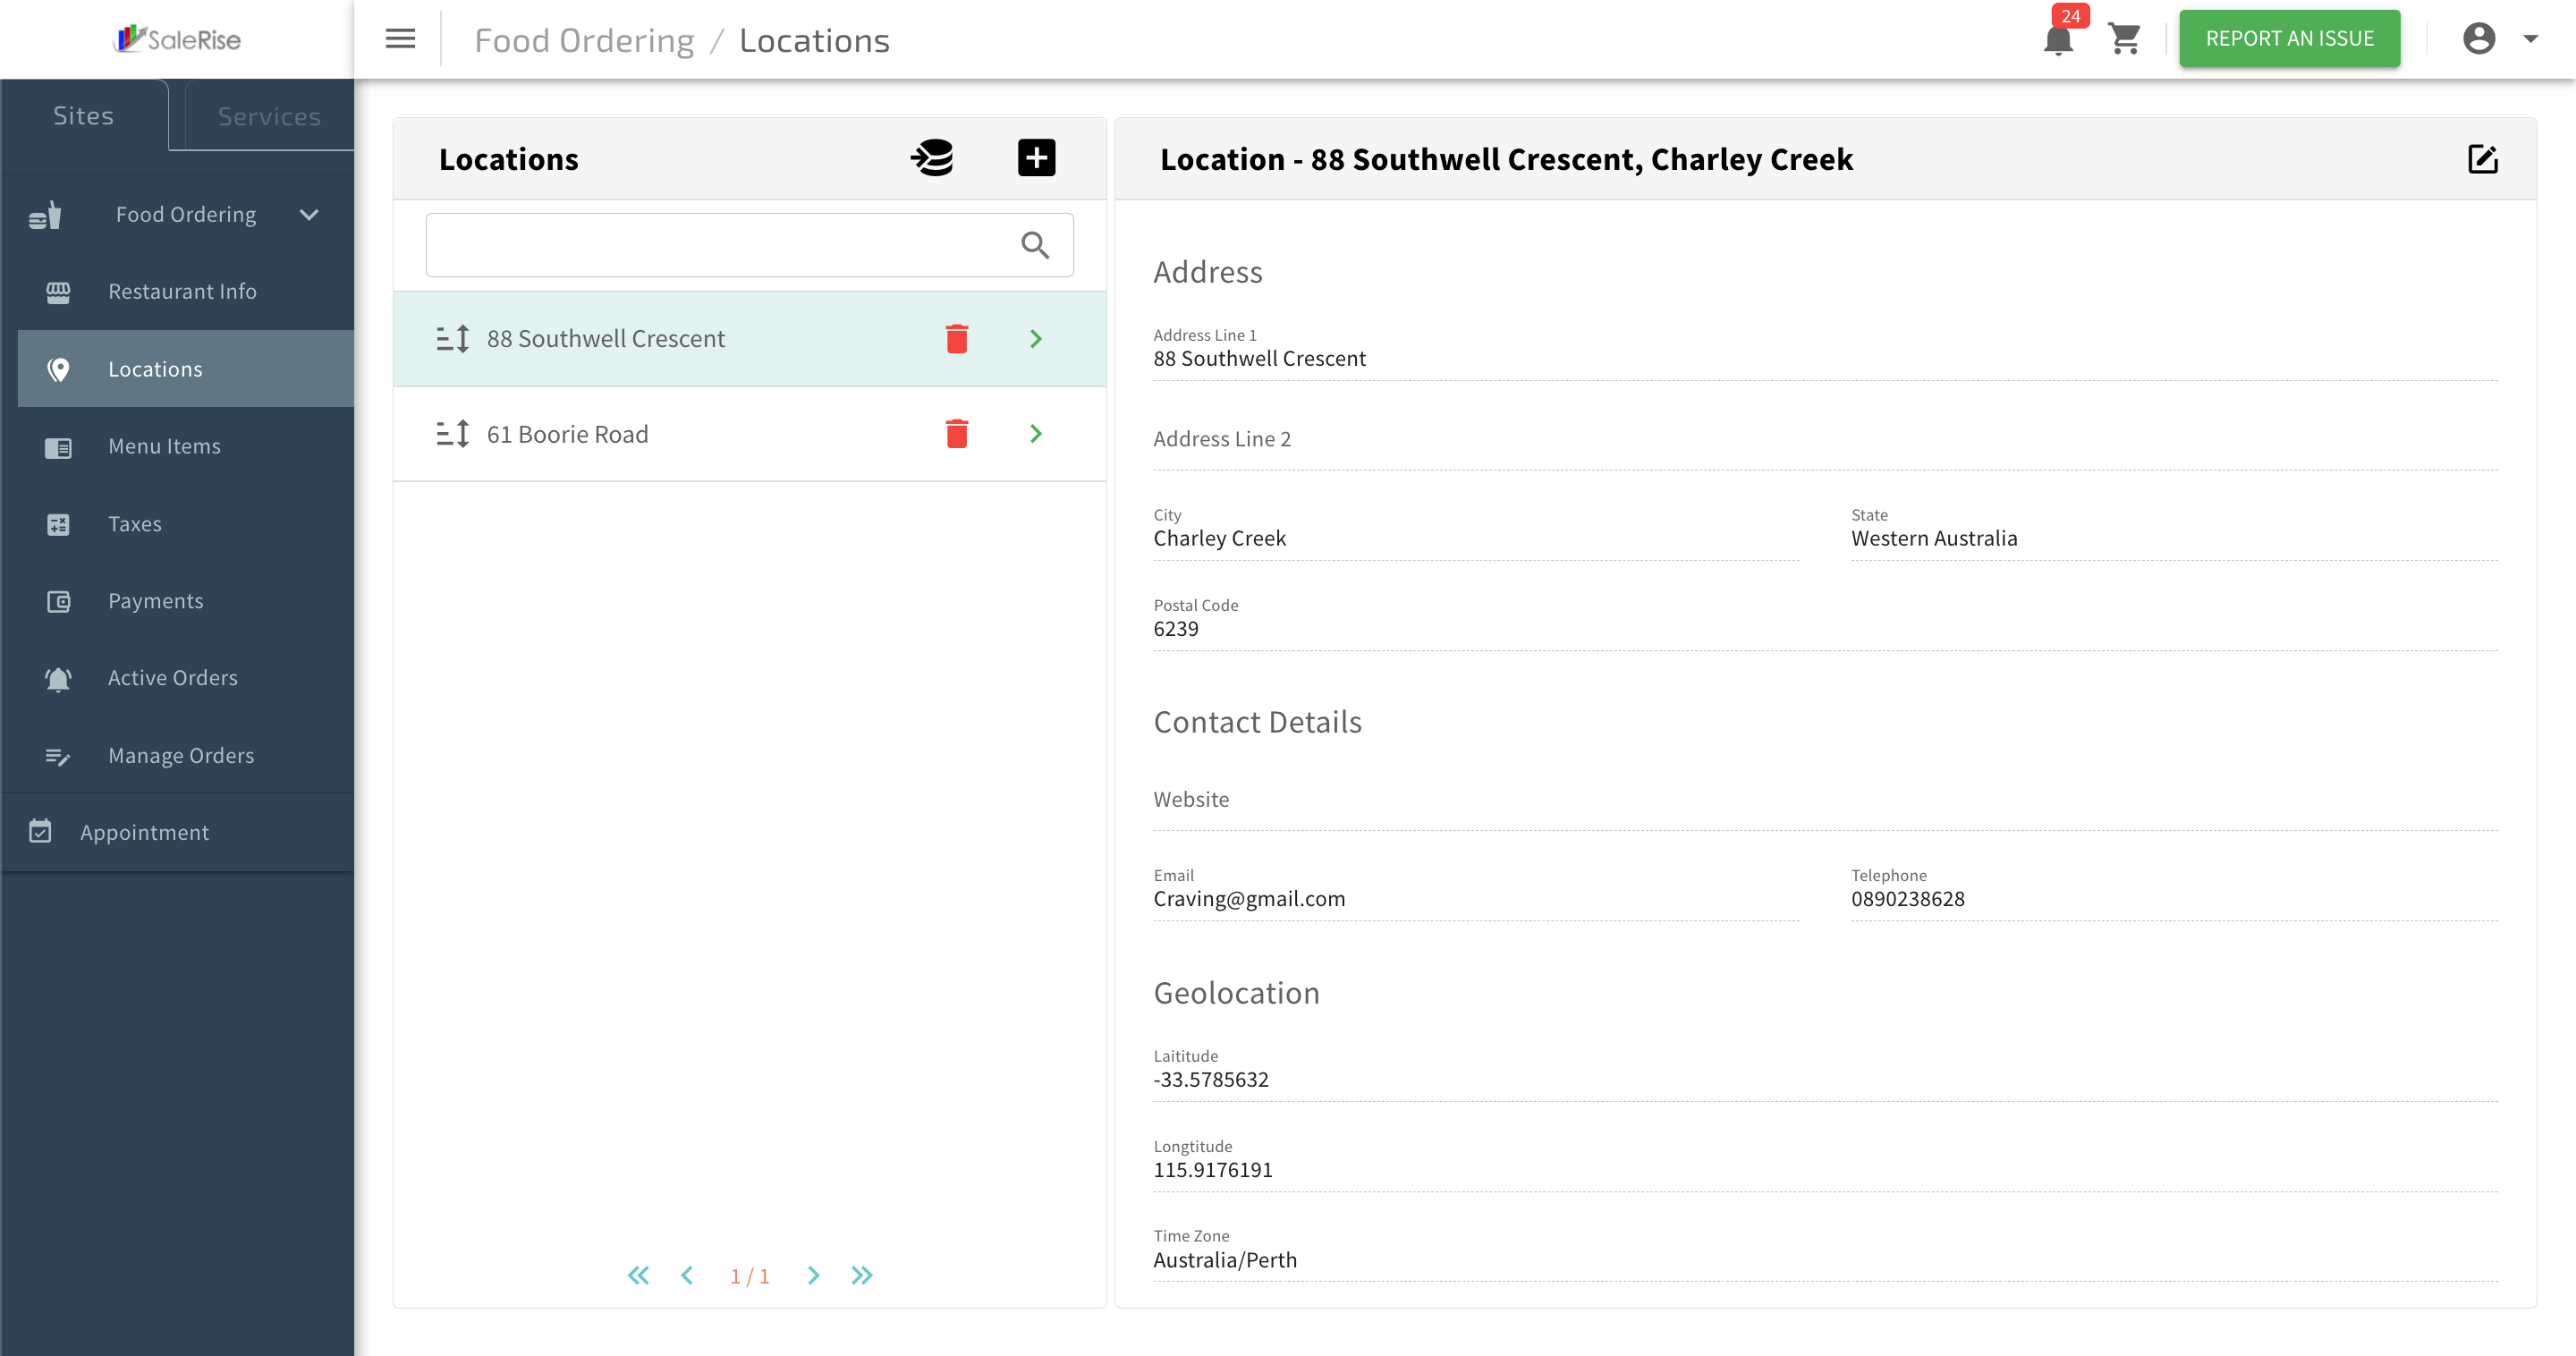
Manage Existing Locations:
- View and modify details of current restaurant locations.
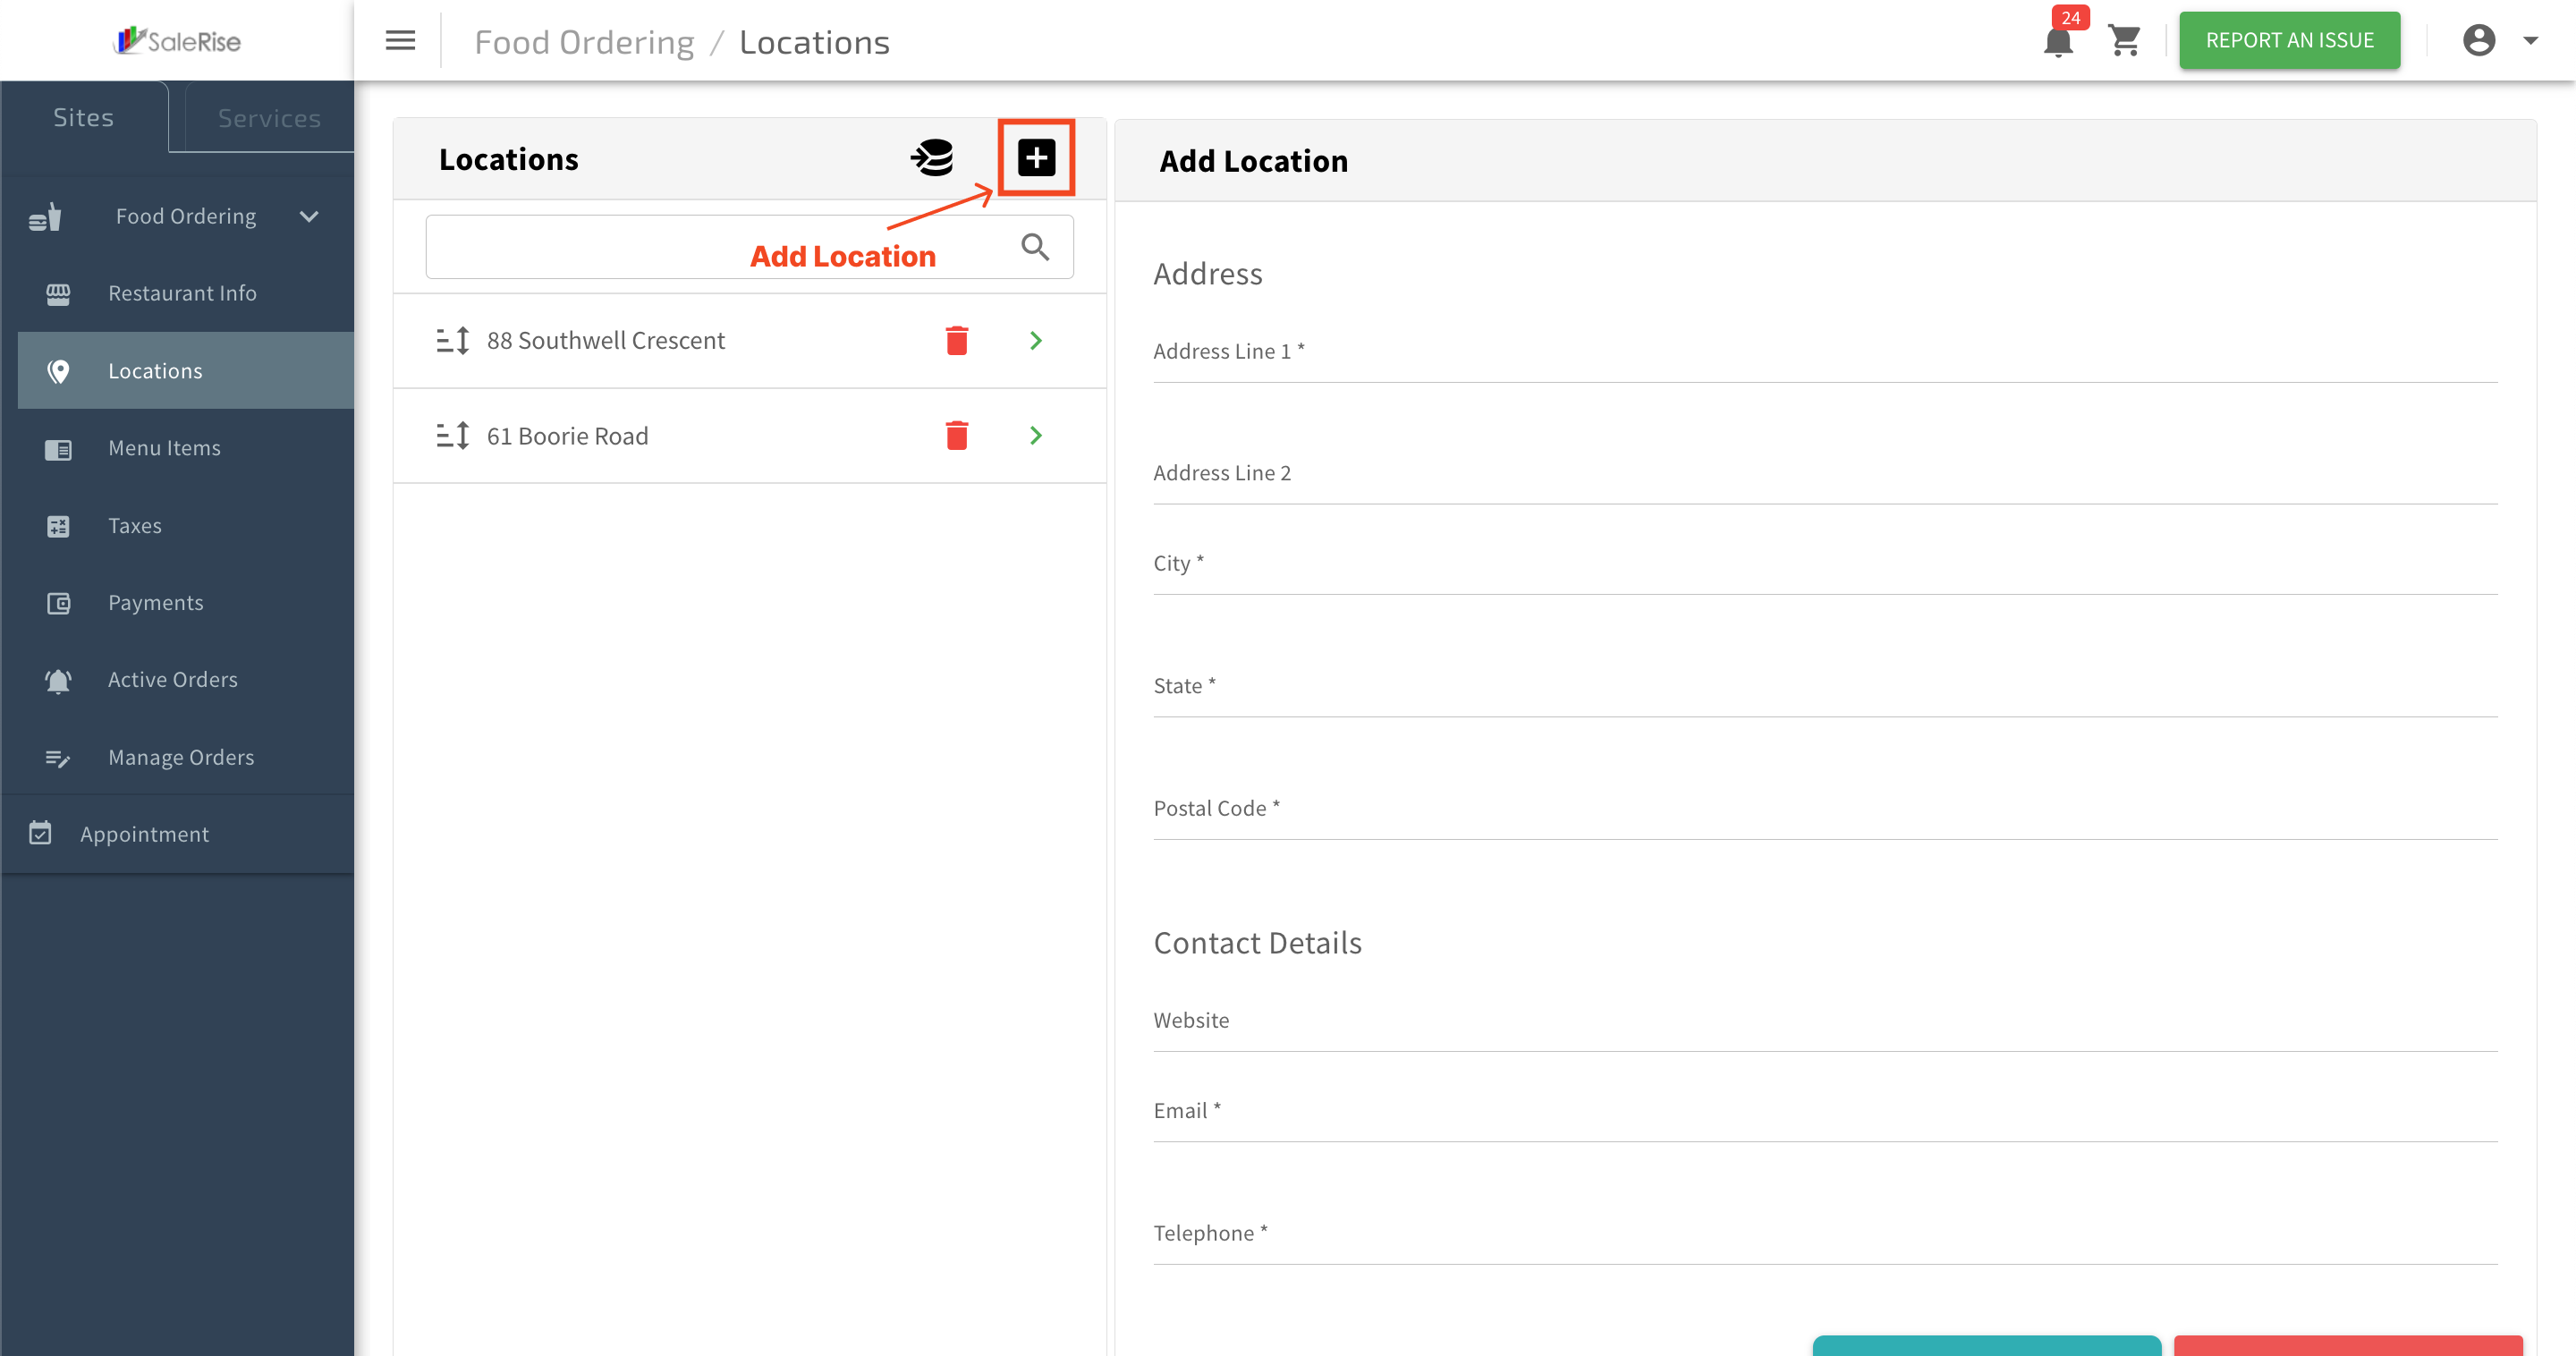
Add New Locations:
- Seamlessly incorporate additional branches or locations as your business expands.
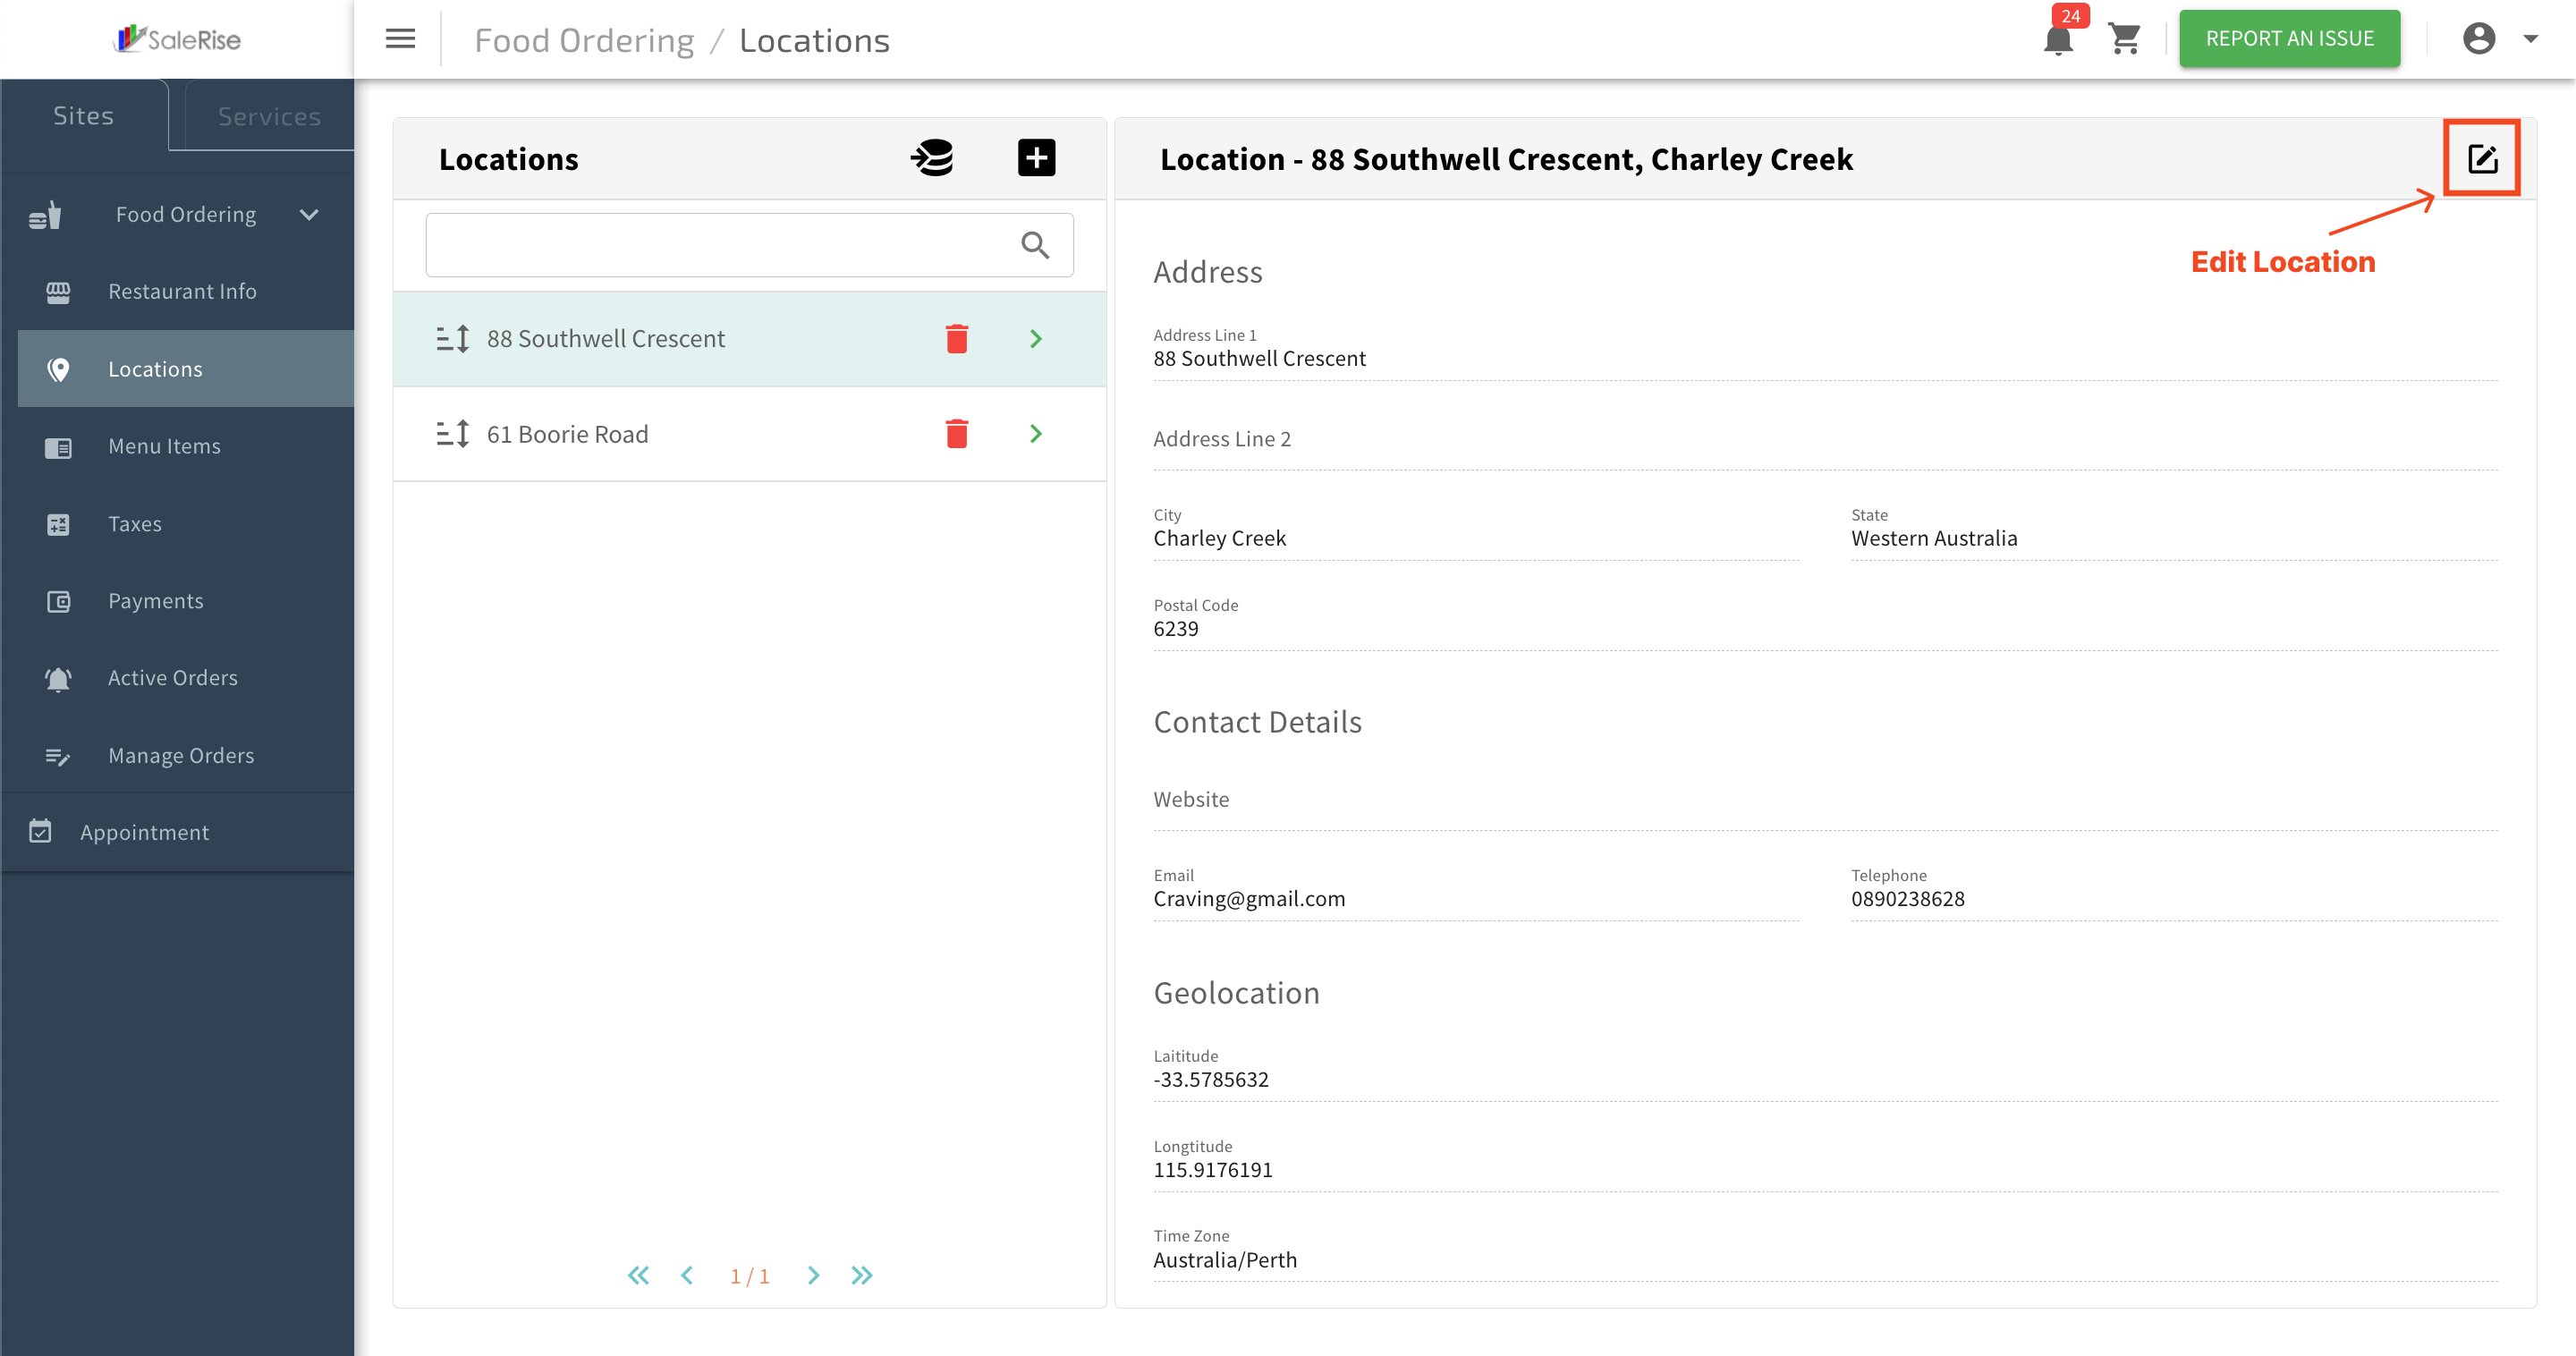
Edit Location:
- Easily edit existing ones to adapt to changes in your business landscape.
- Ensure that all information, including geographical details and services, is up-to-date for each location.
Menu Items
In the "Menu Items" section, take full control of your restaurant's offerings. Users can add, organize, and edit categories, populate them with diverse items, and introduce multiple variations to cater to varied preferences. This dynamic feature empowers you to craft a comprehensive and customizable menu that reflects the uniqueness of your culinary offerings.
Add Categories
3.1 Add Categories Overview
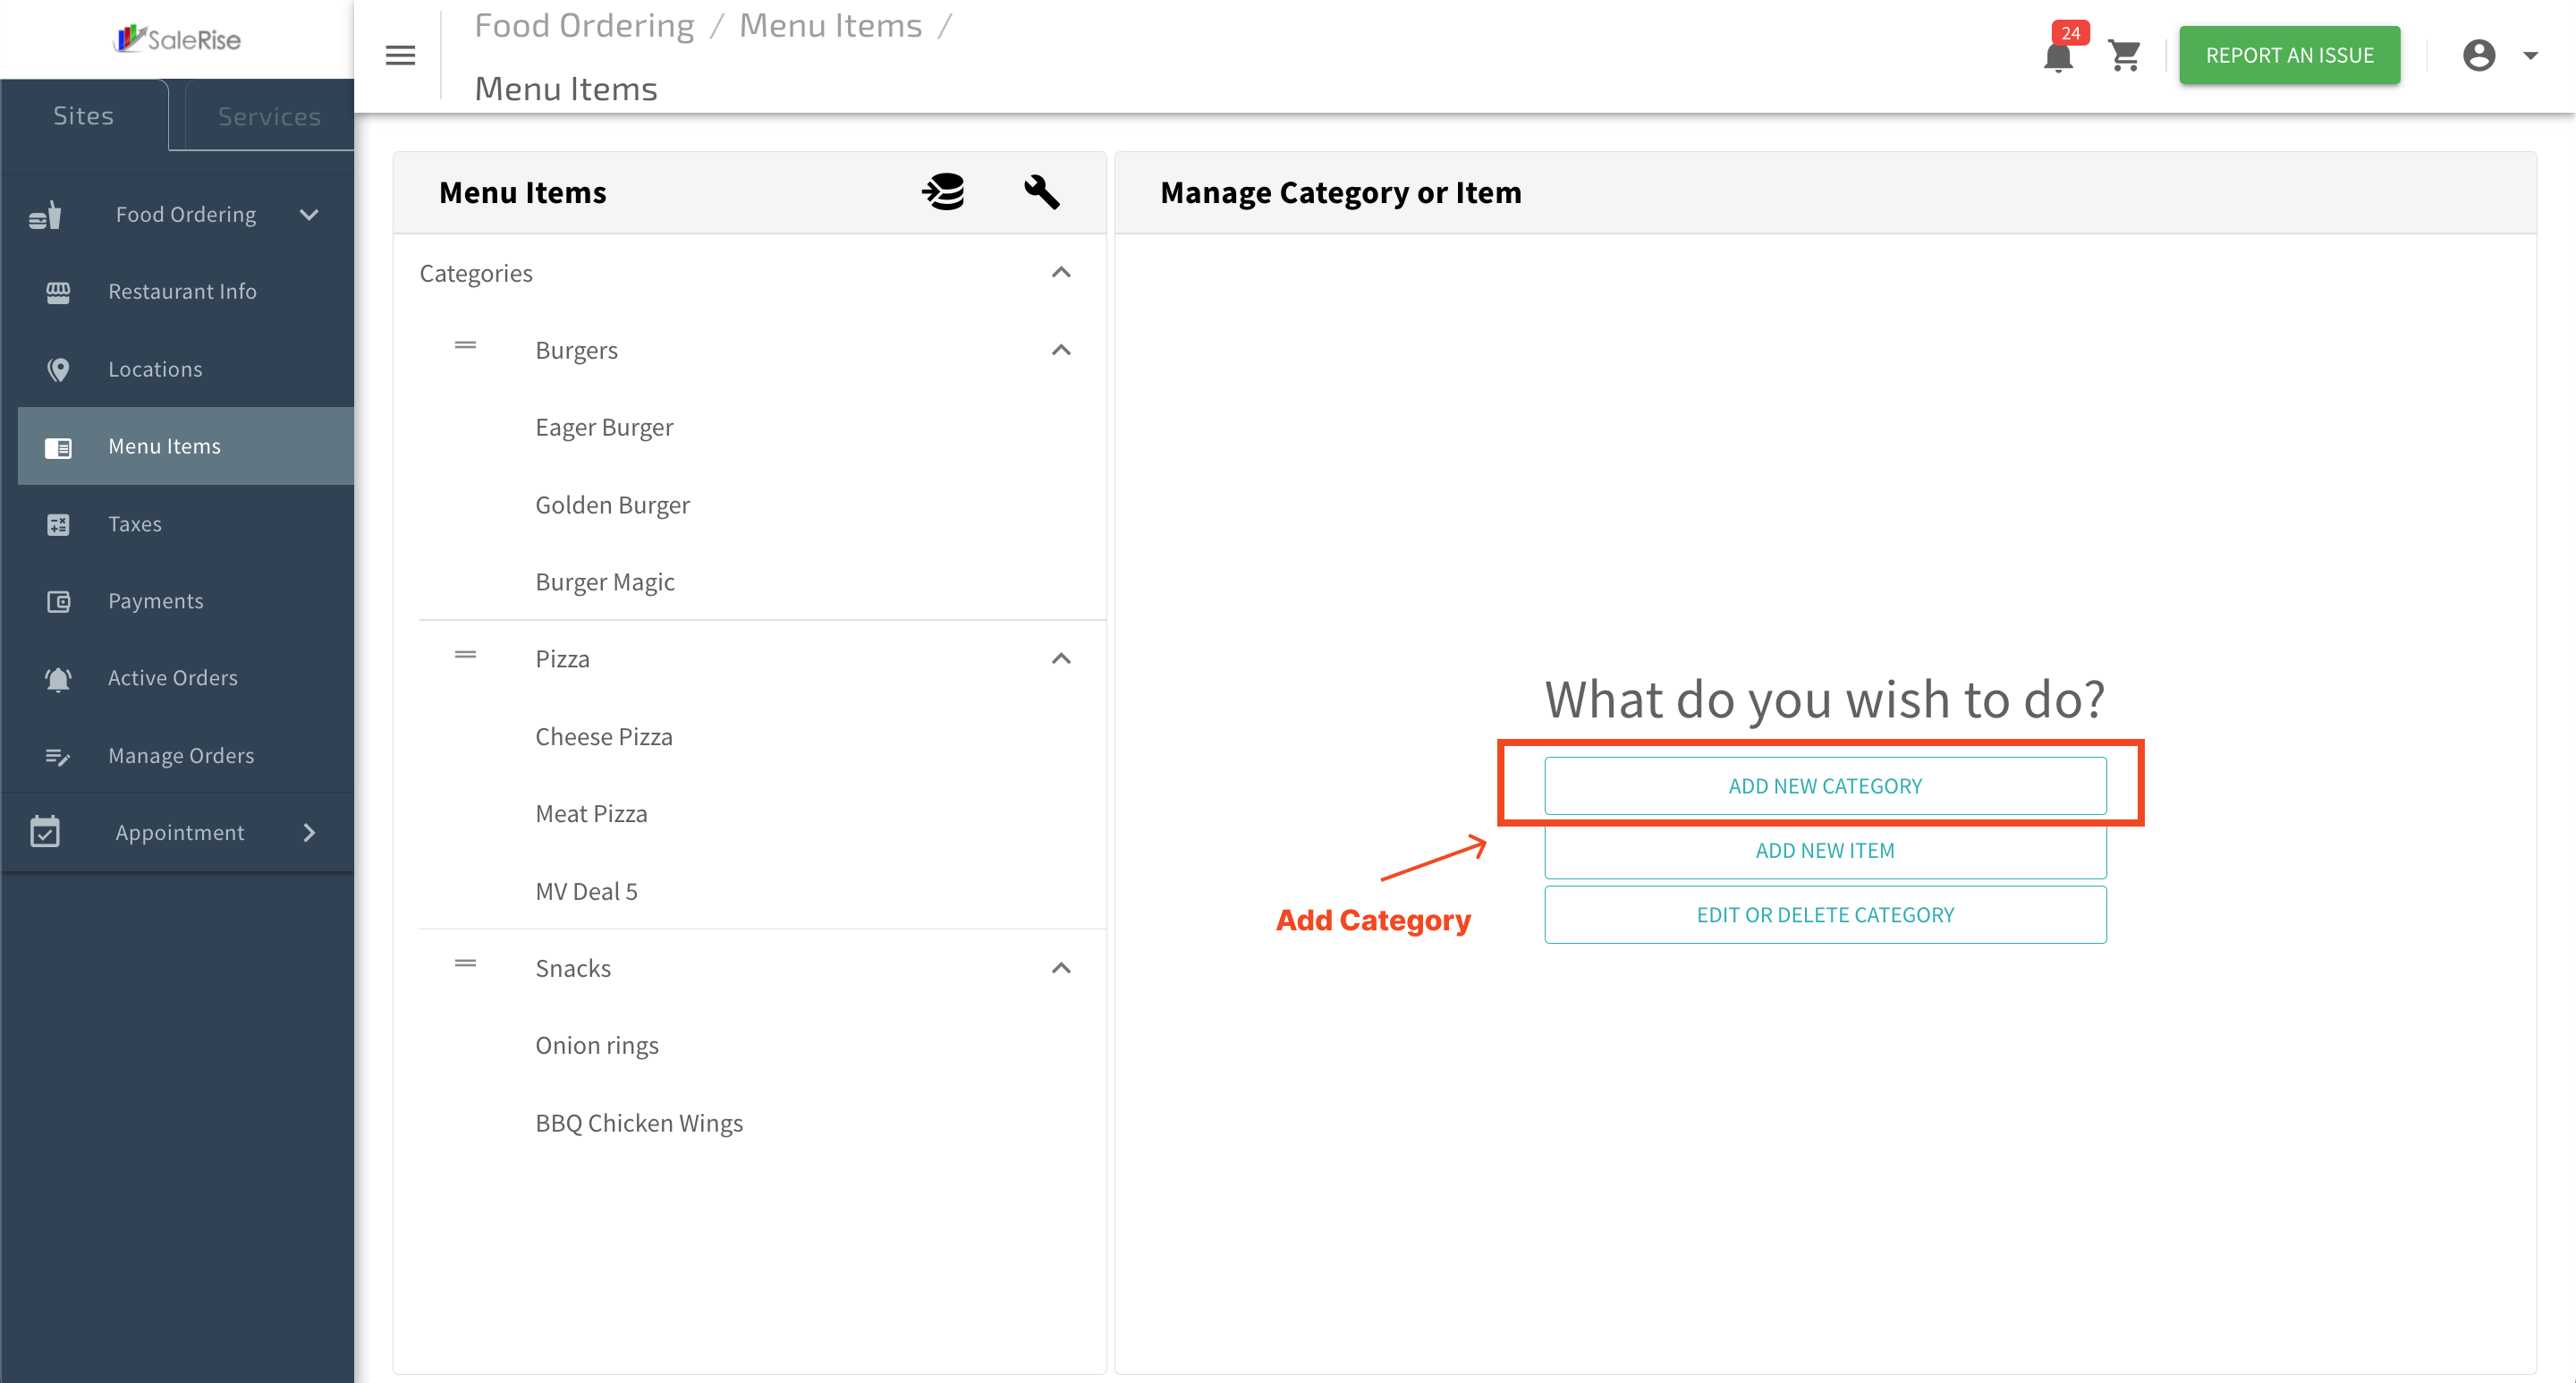
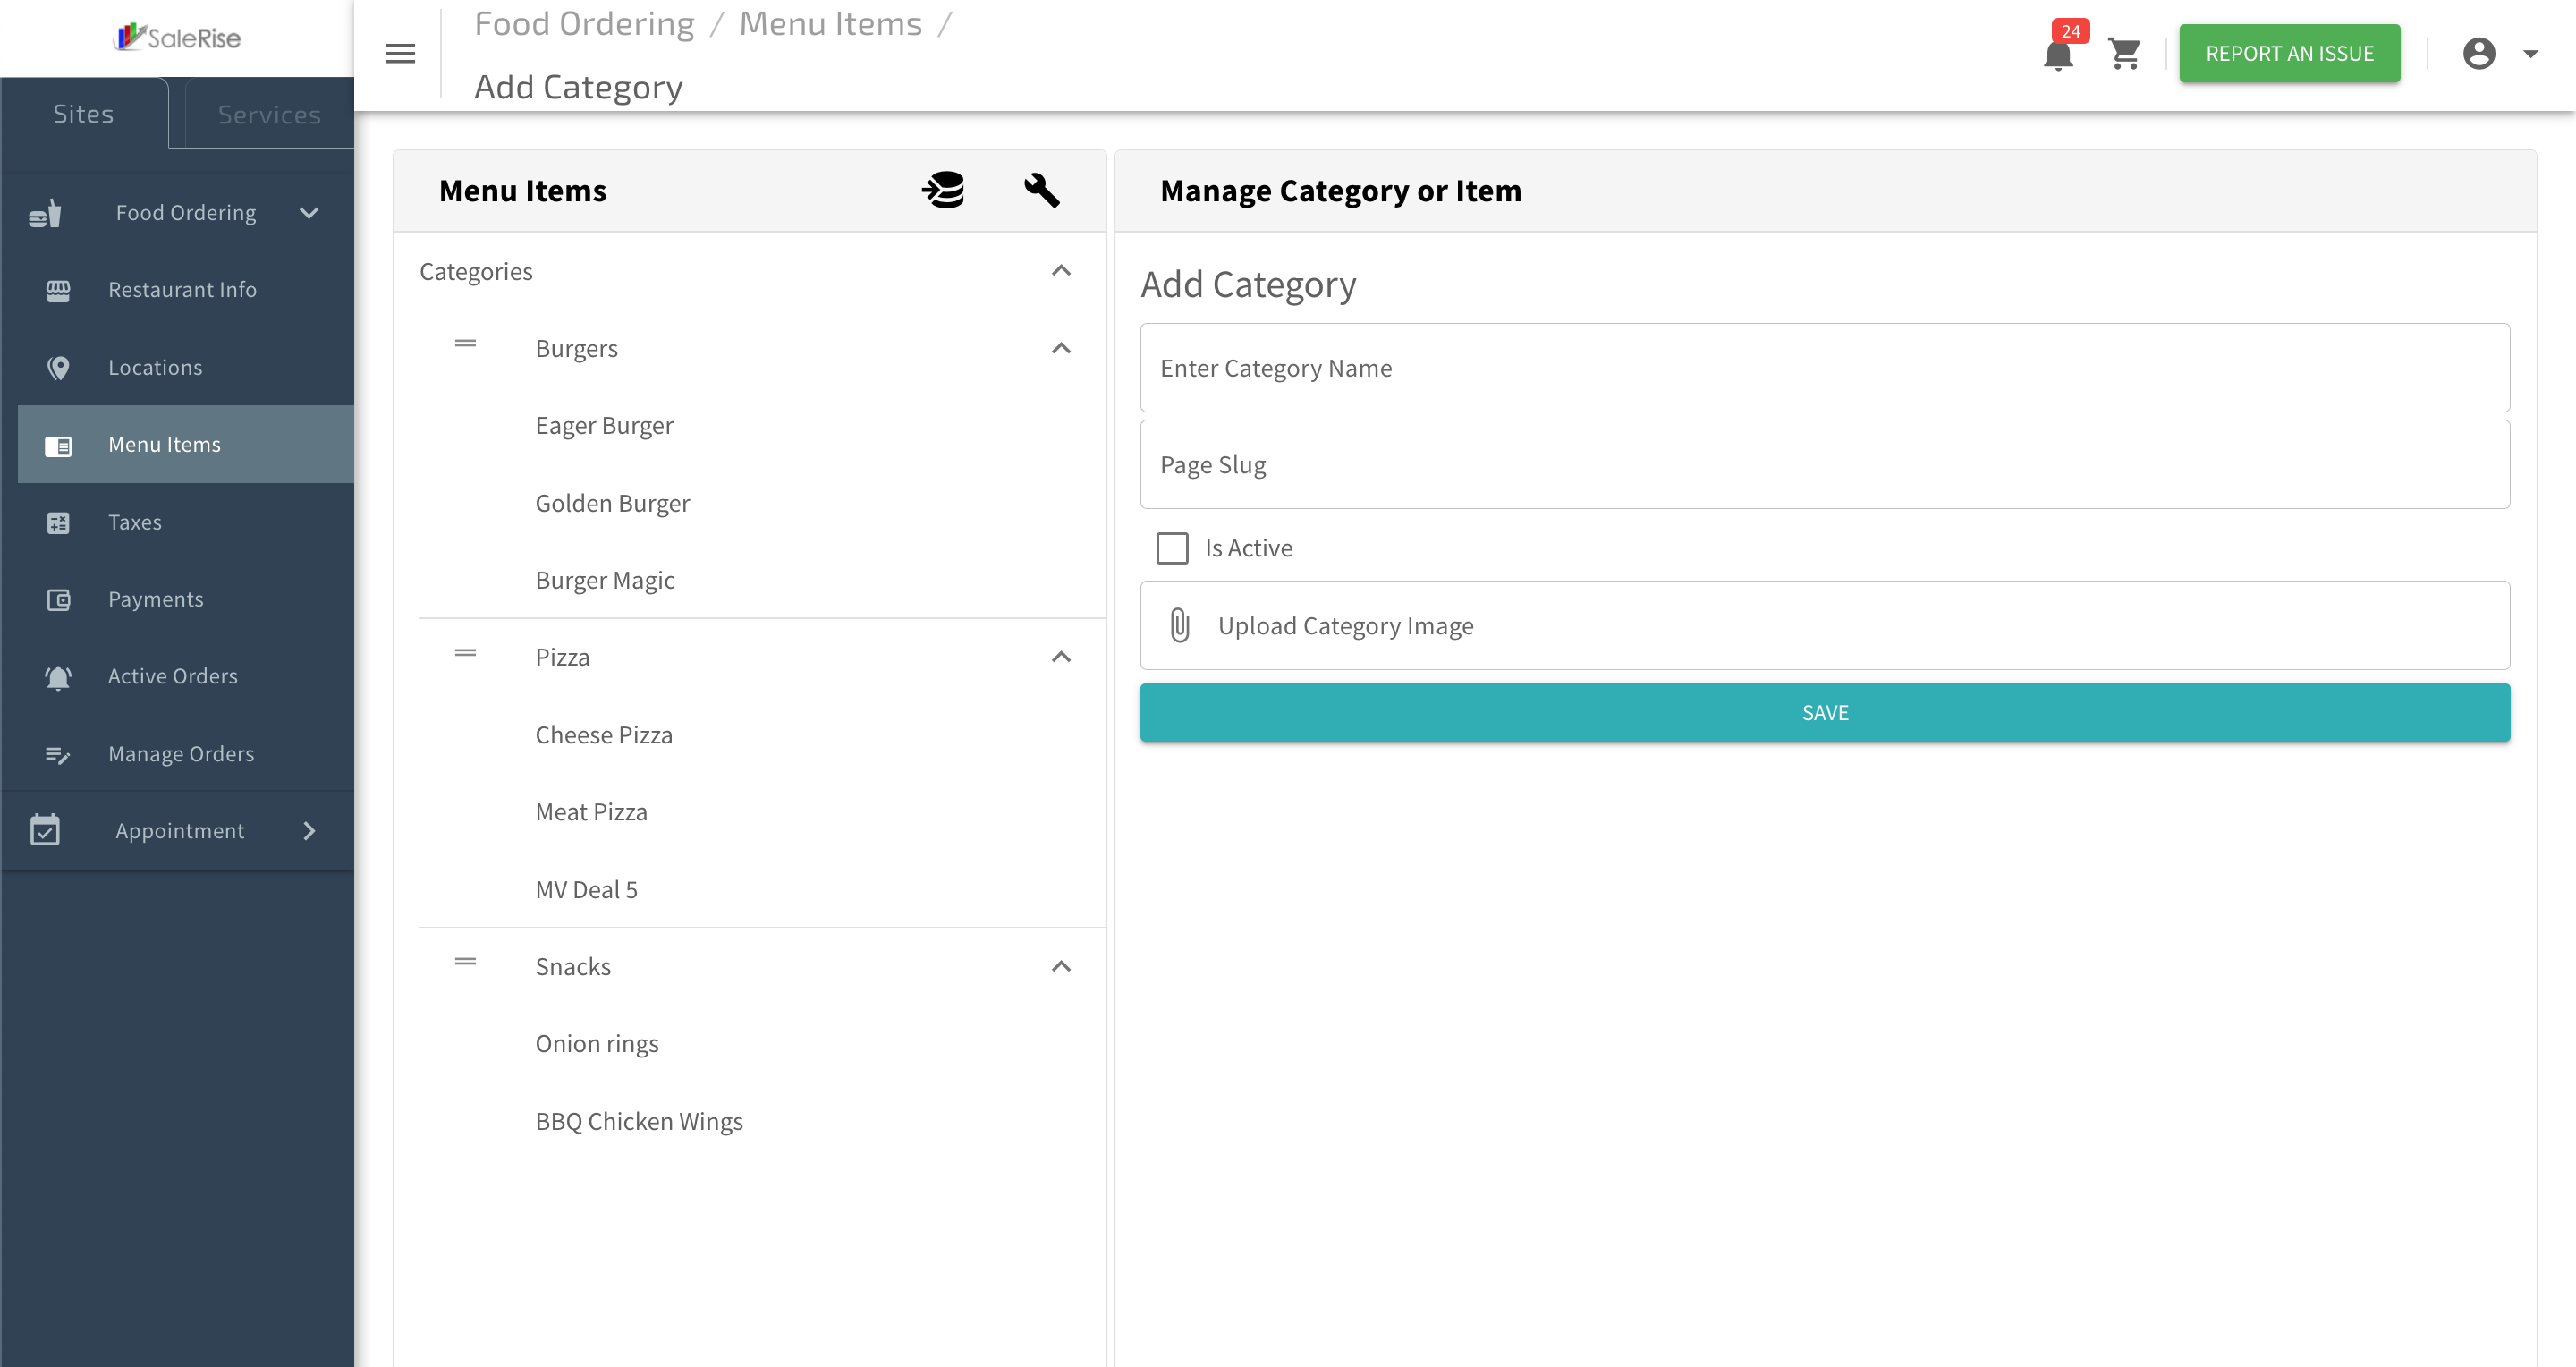
On the "Manage Category" page, efficiently organize your restaurant's menu by creating and modifying categories. Users can easily add a new category, set a page slug, upload a category image, and toggle between active and deactivated states.
1. Create New Category:
- Click on the "Create" button to add a new category.
2. Category Details:
-
- Enter the following information:
- Category Name: Provide a descriptive name for the category.
- Page Slug: Set a user-friendly URL slug for the category page.
- Image for Category: Upload a visually appealing image representing the category.
- Enter the following information:
3. Activation Status:
- Toggle between "Active" and "Deactivated" to control the visibility of the category.
4. Save Changes:
- Click "Save" to confirm and create the new category.
Edit Categories
3.2 Edit Categories Overview
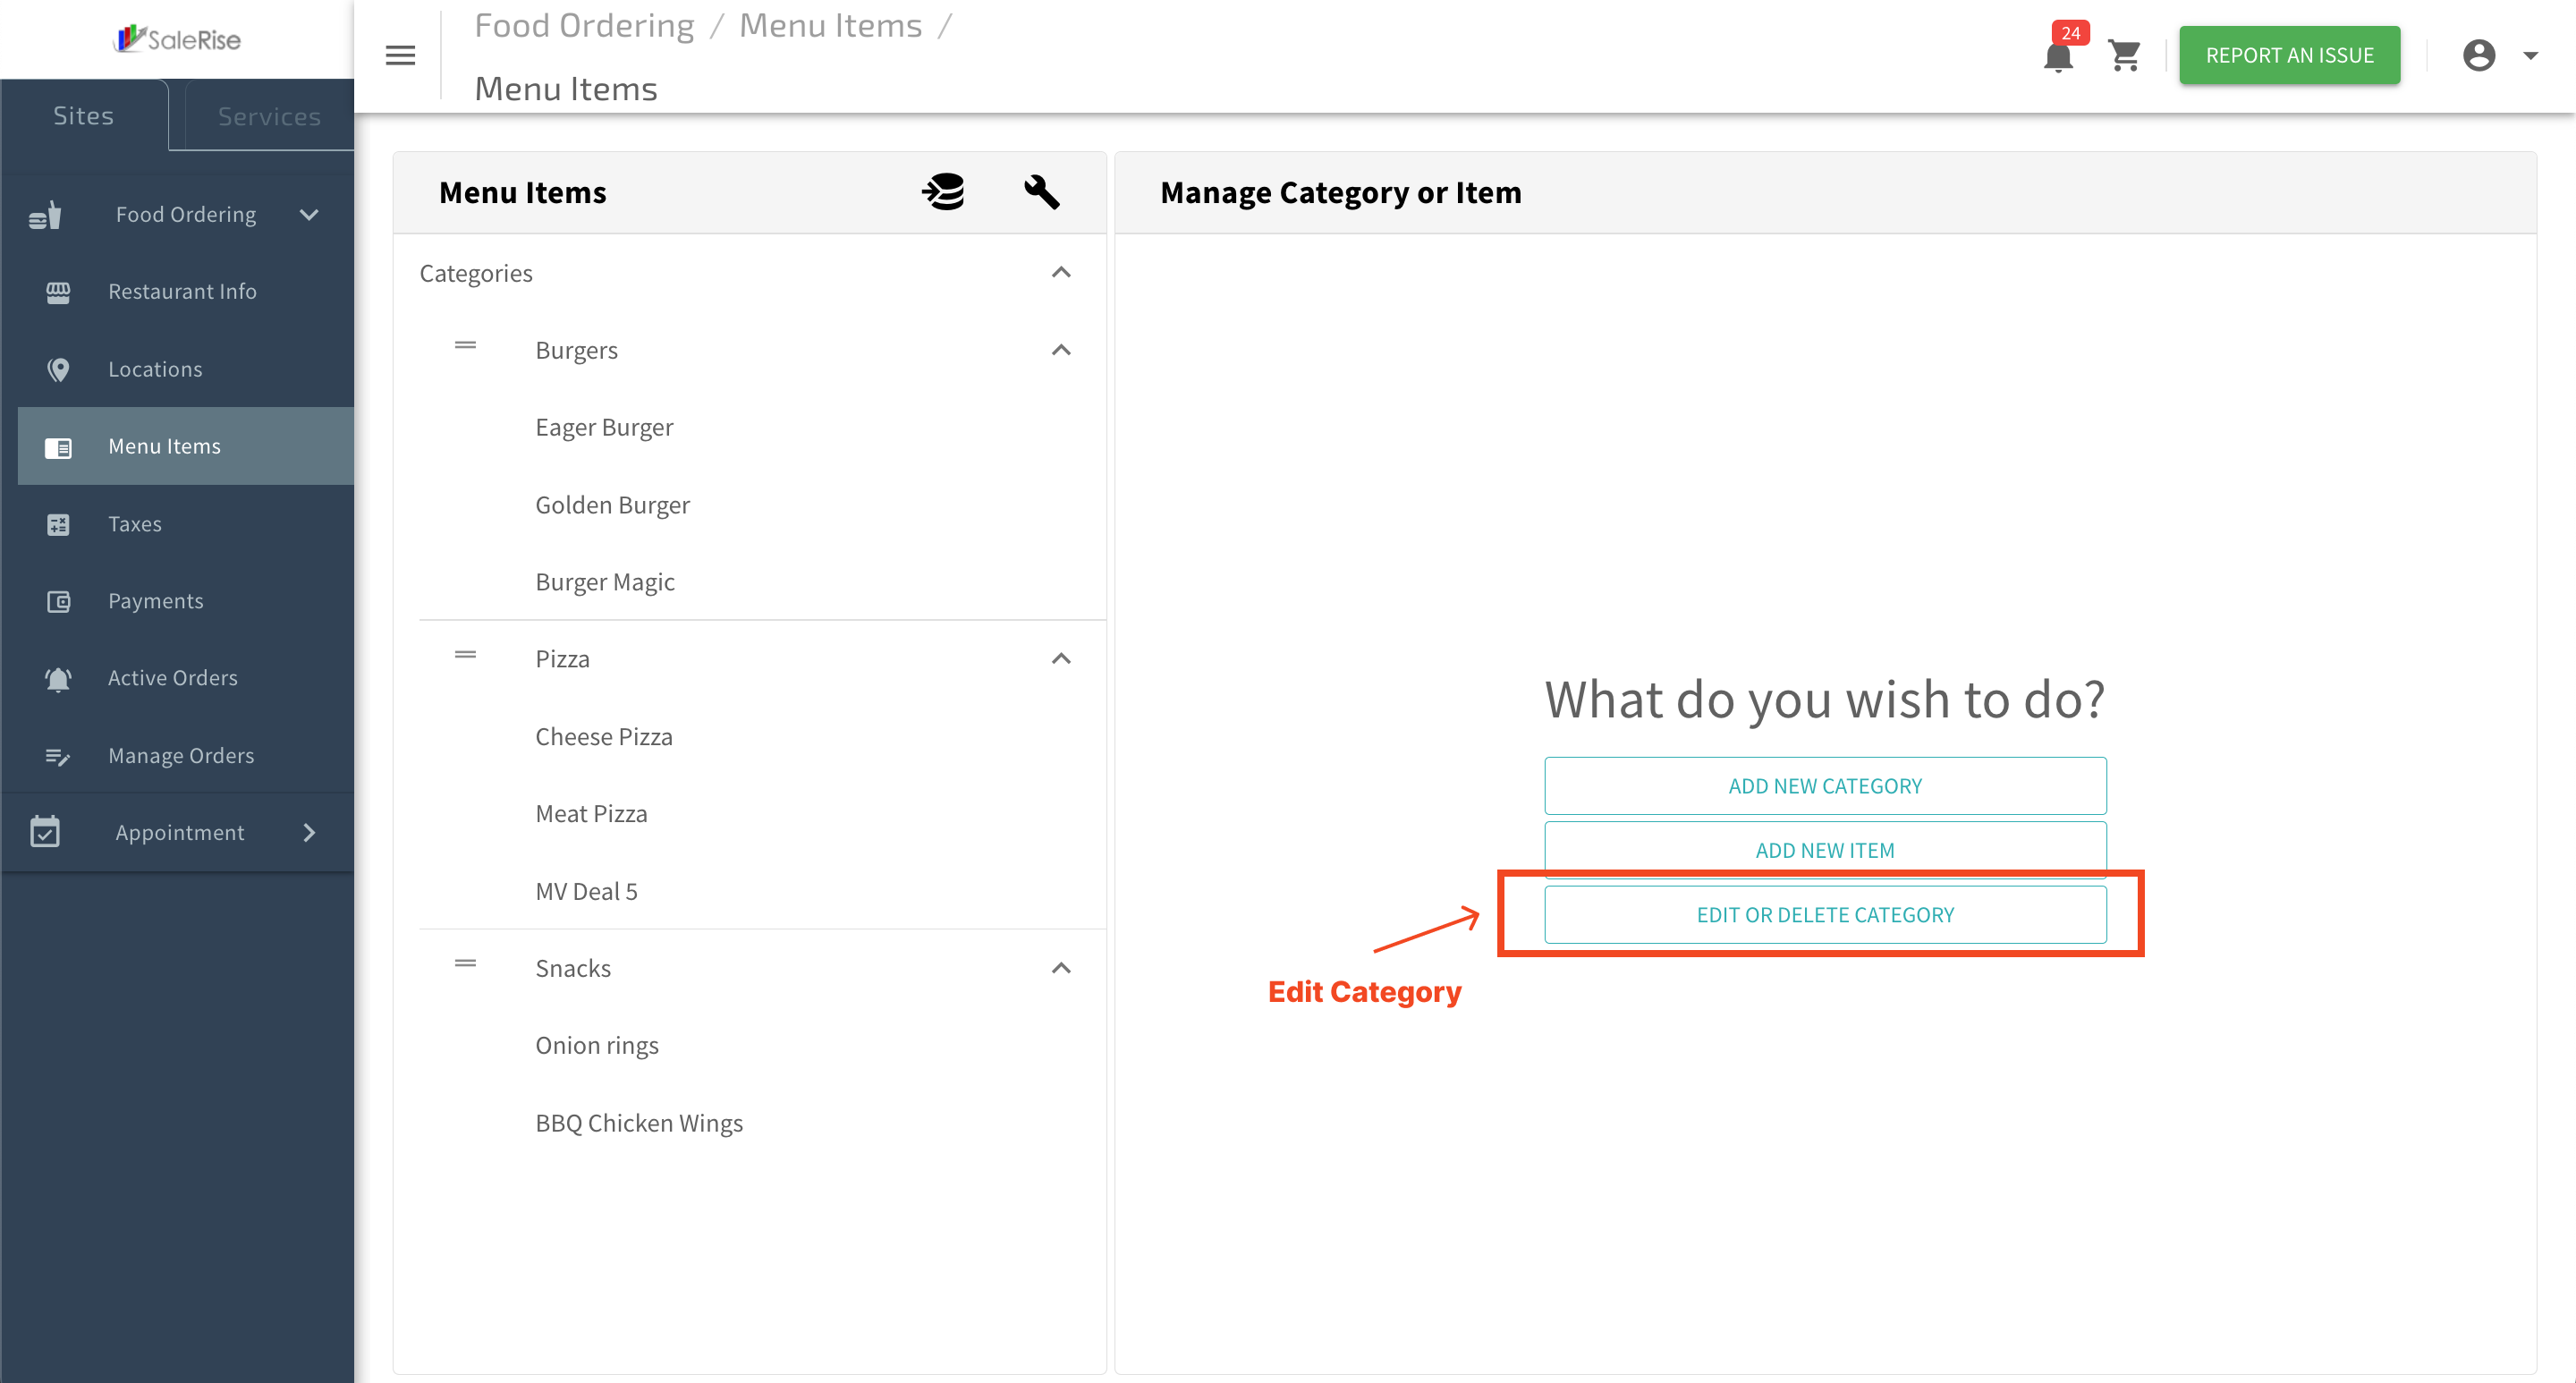
In the "Edit Categories" section, seamlessly refine and organize your restaurant's menu by editing or deleting existing categories. This feature provides users with the flexibility to adapt to changing menu structures and maintain an up-to-date and well-curated selection.
View Existing Categories:
- Access the "Categories Management" page to see a comprehensive list of all existing categories.
- Click on the edit button next to a category to modify its details.
Edit Categories:
- Category Name: Update the category name for clarity.
- Page Slug: Adjust the URL slug for improved user experience.
- Image for Category: Replace or update the category image.
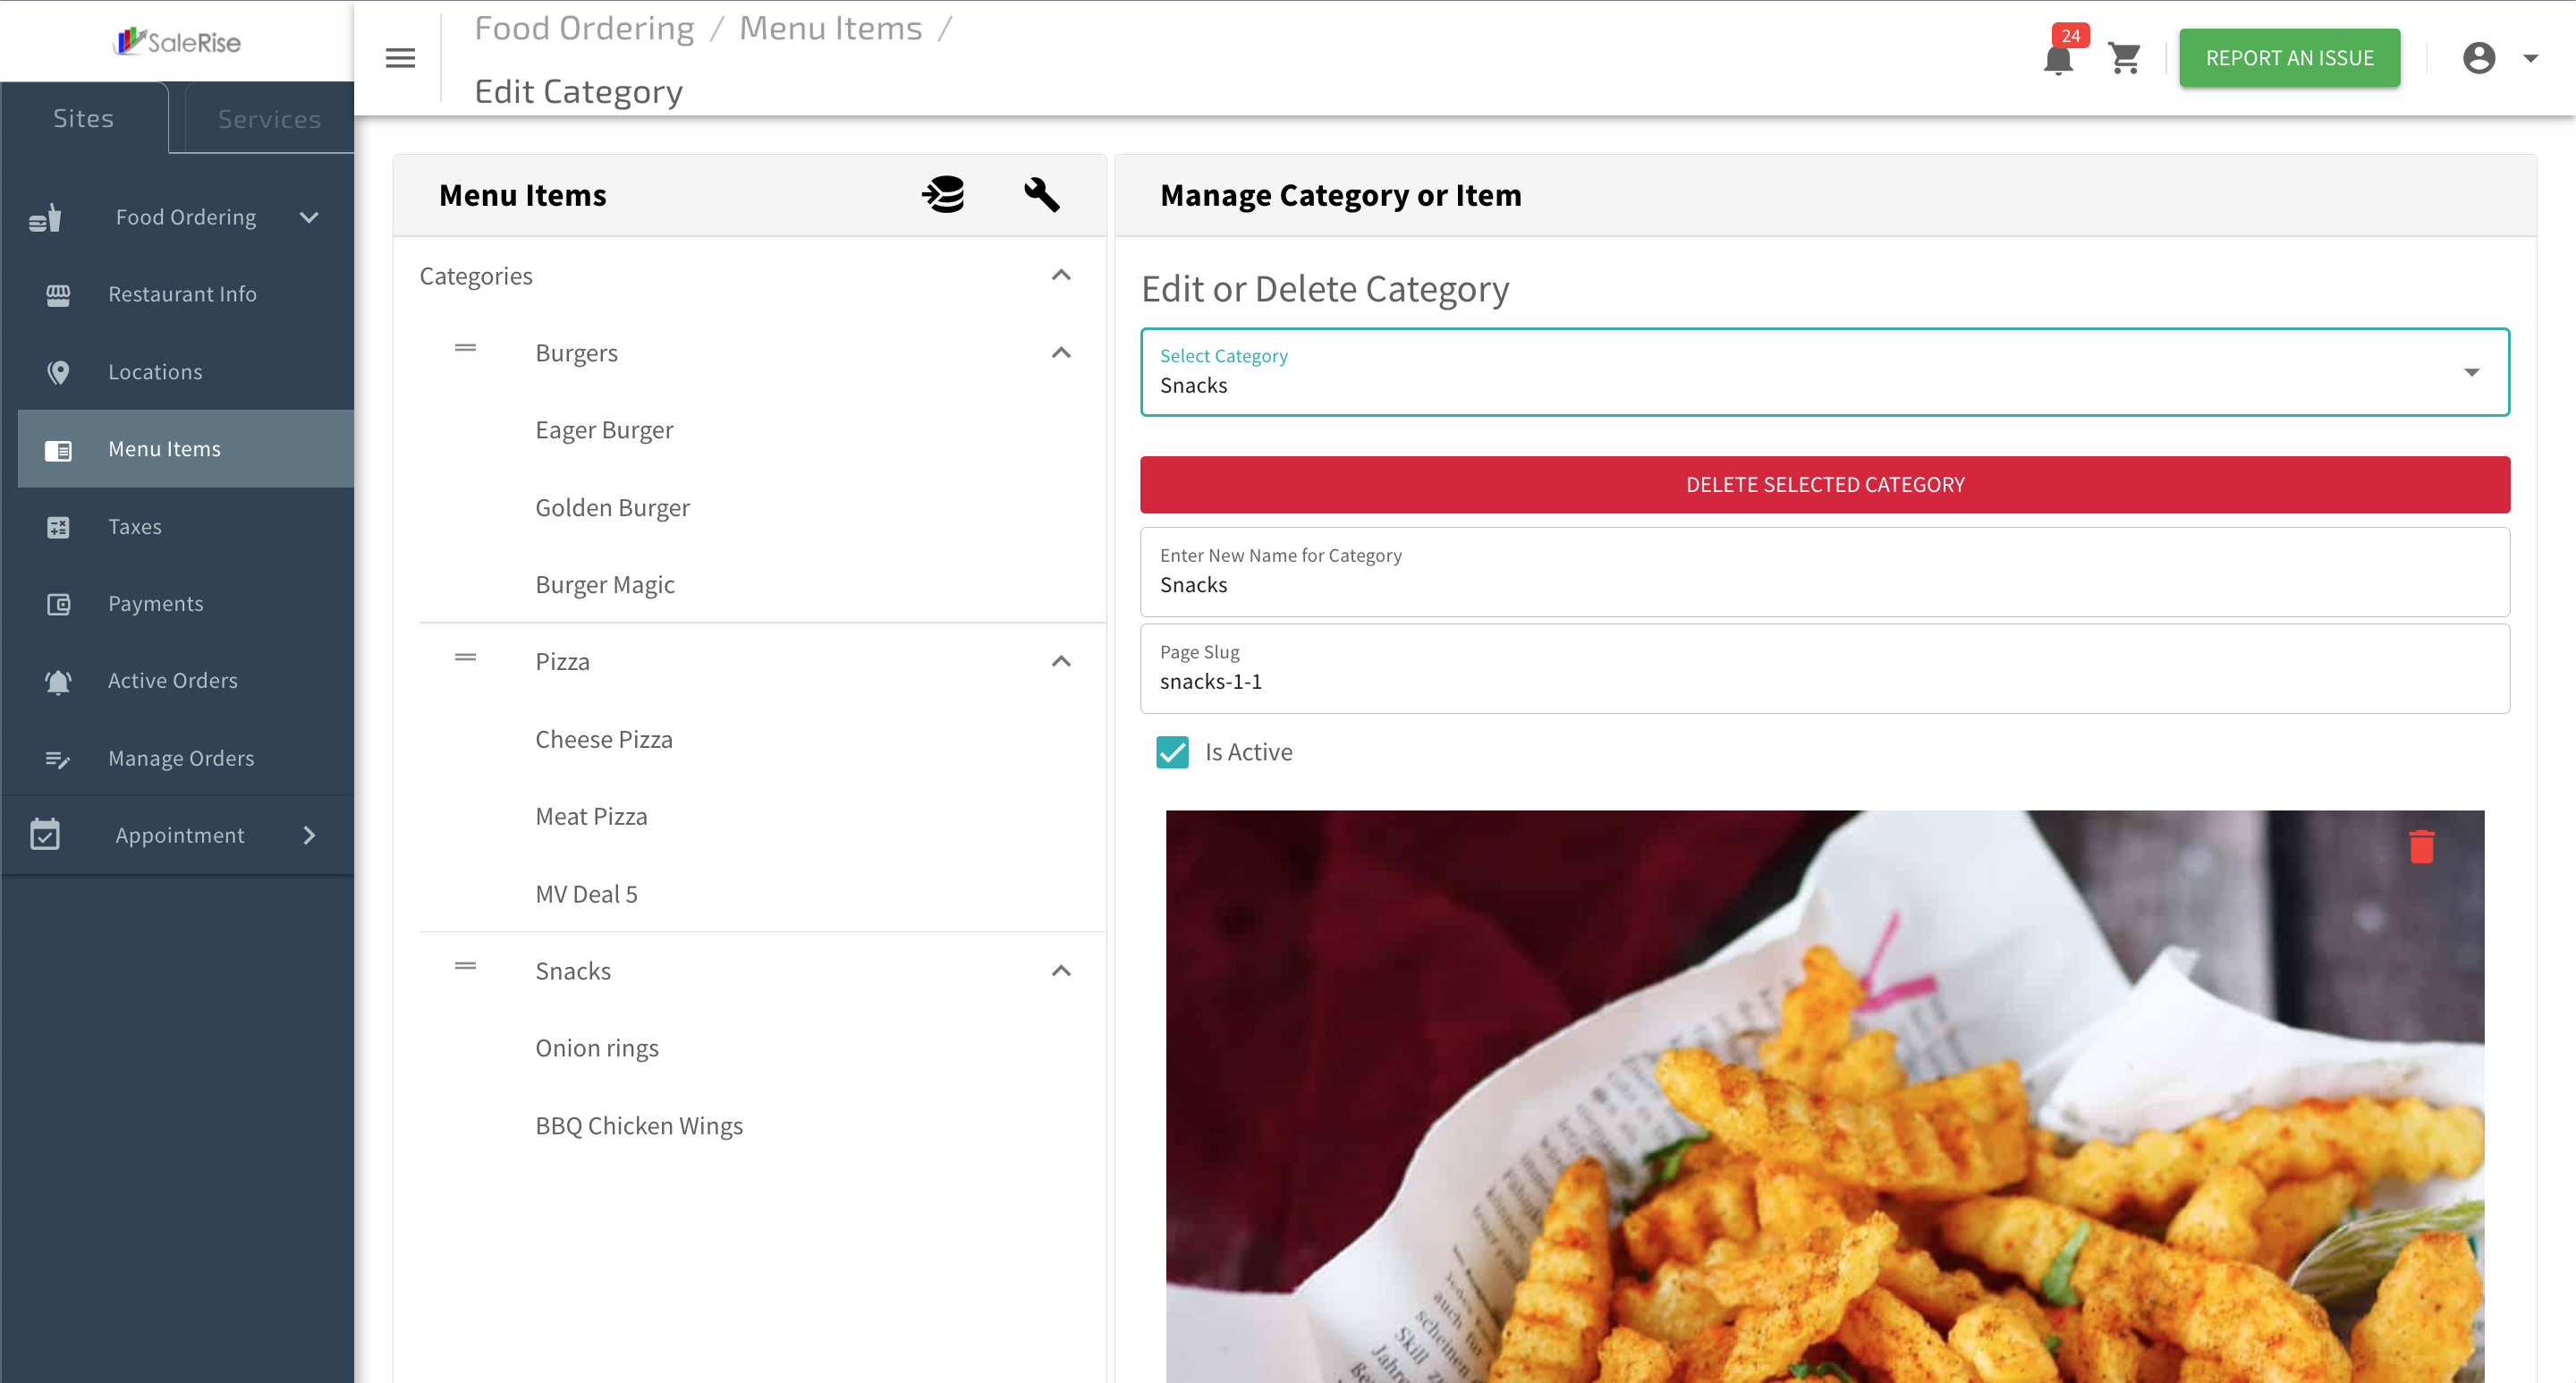
Delete Categories:
- Safely remove categories that are no longer relevant or needed.
Confirmation Prompt:
- Receive a confirmation prompt before finalizing the deletion of a category.
Save Changes:
- Click "Save" to confirm edits and updates to the category details.
Add Items
3.3 Add Item Overview
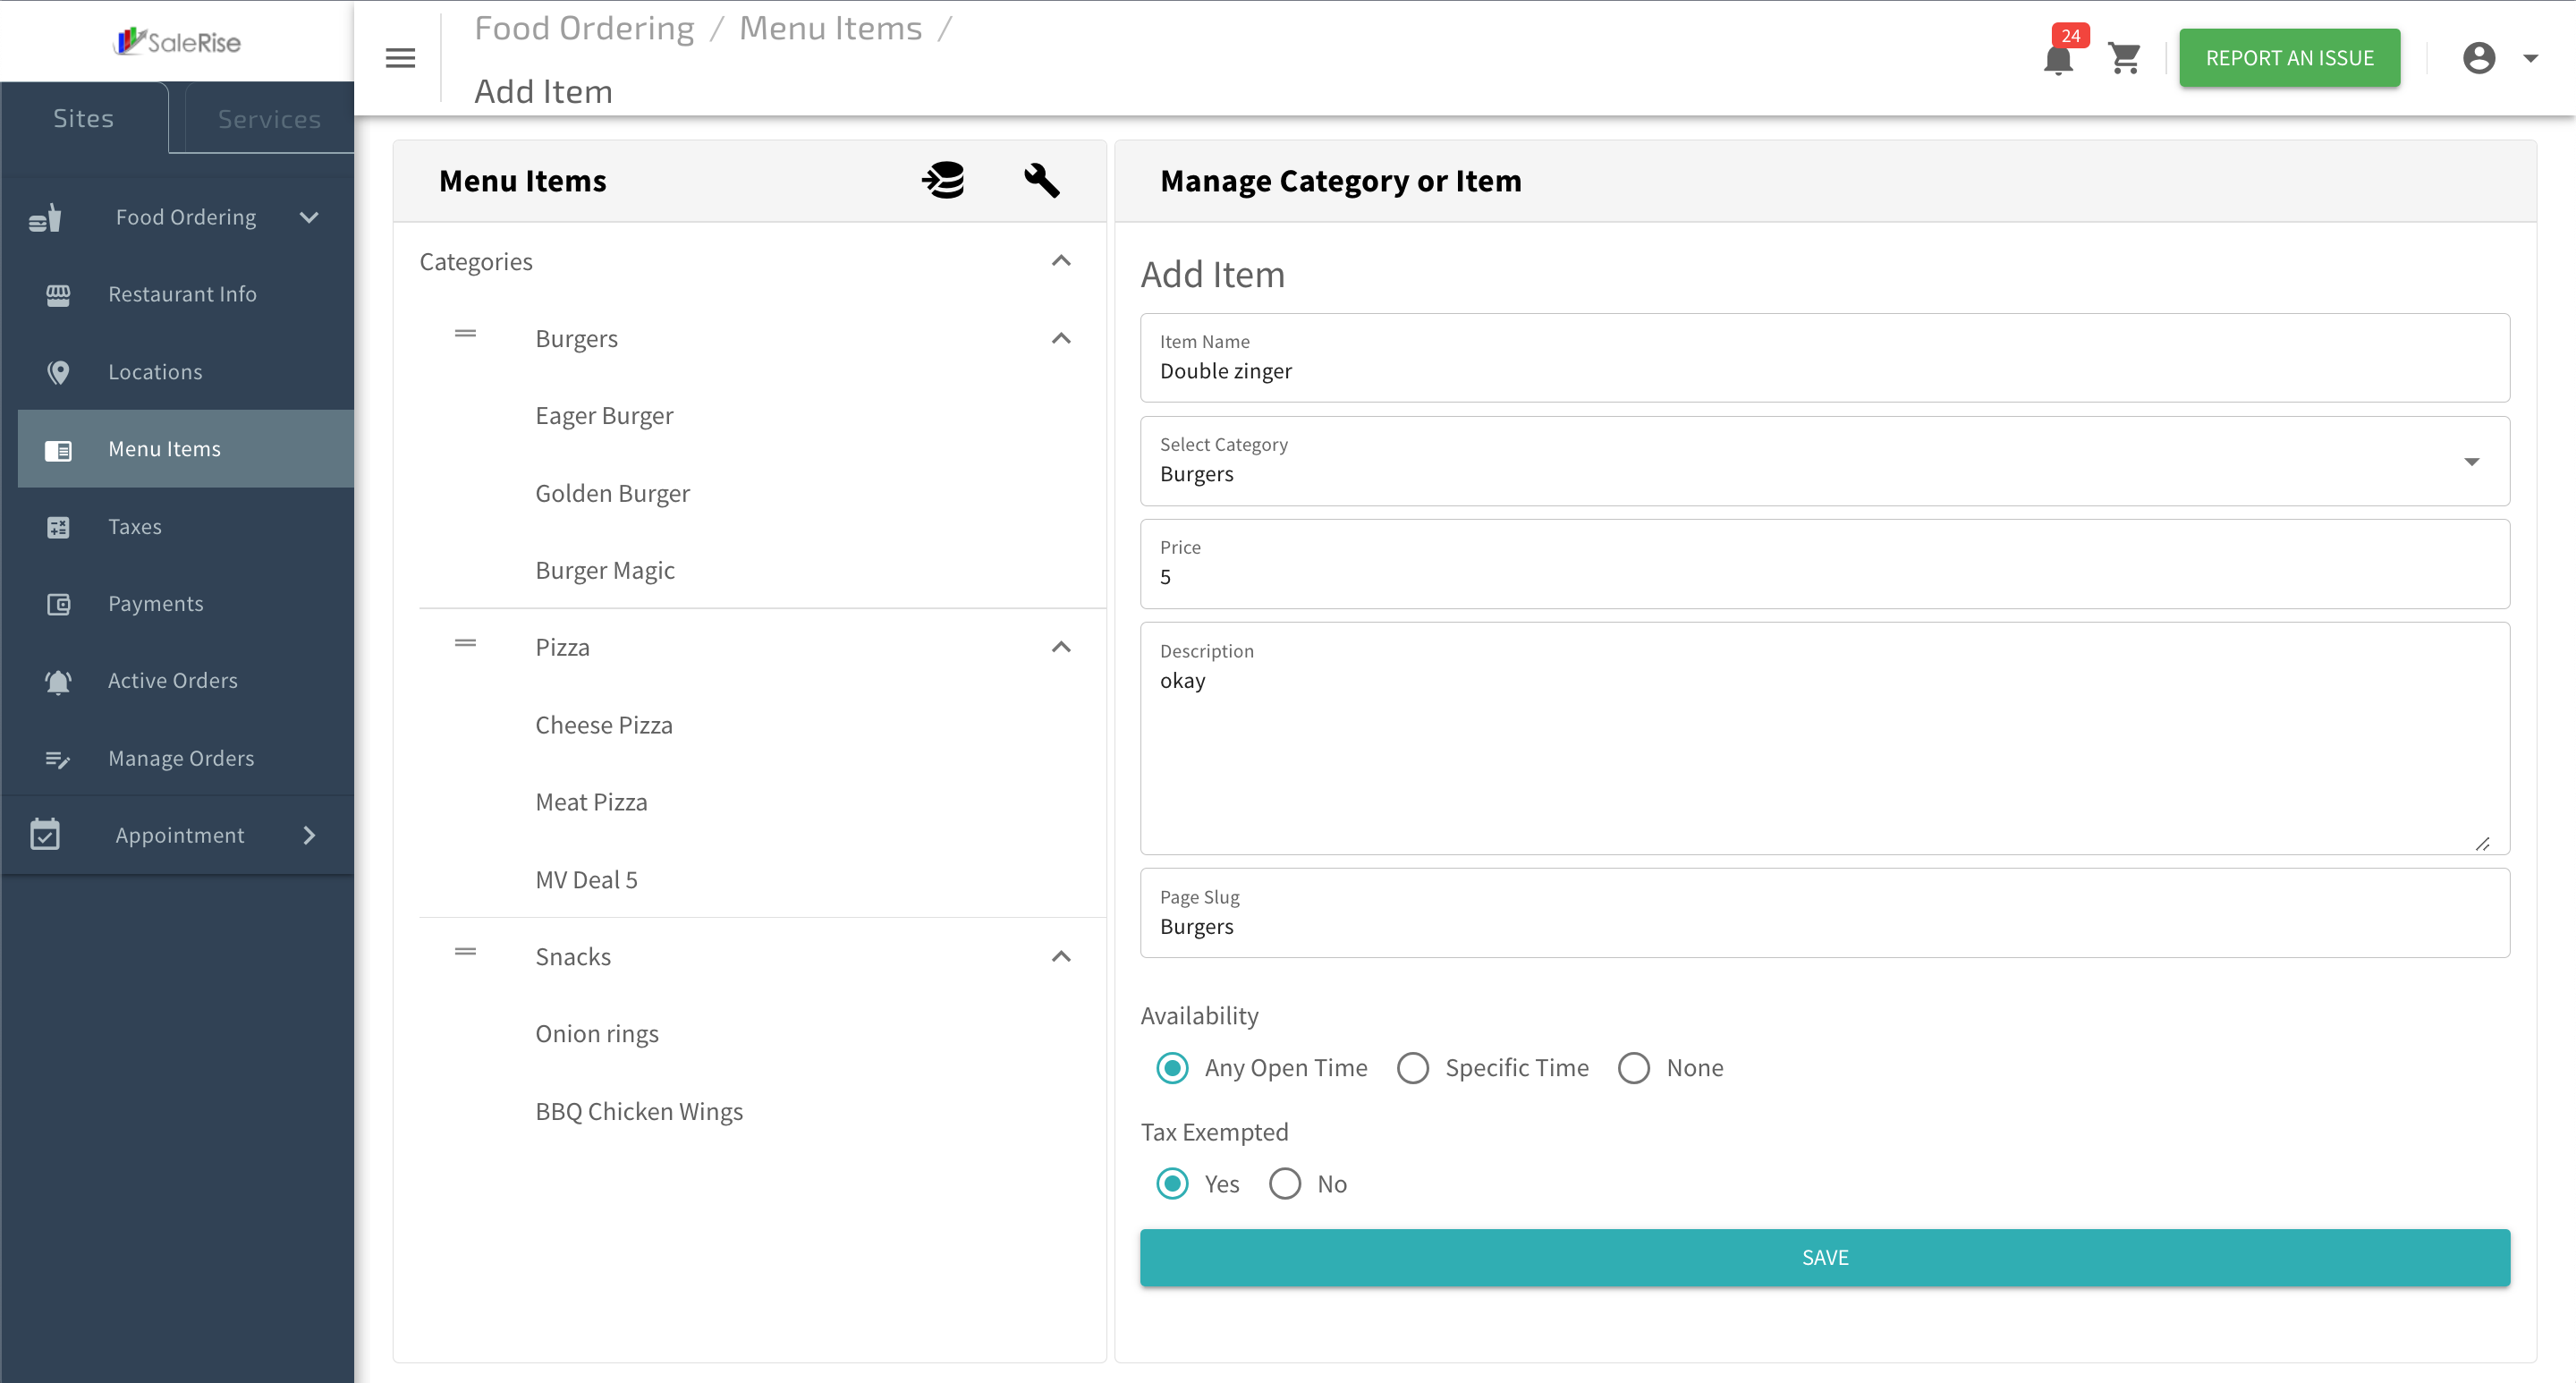
In the "Add Item" section, users can effortlessly expand their restaurant's menu. This process includes providing essential details such as item name, category selection, pricing, description, page slug, availability settings, and tax exemption preferences.
1. Add Item:
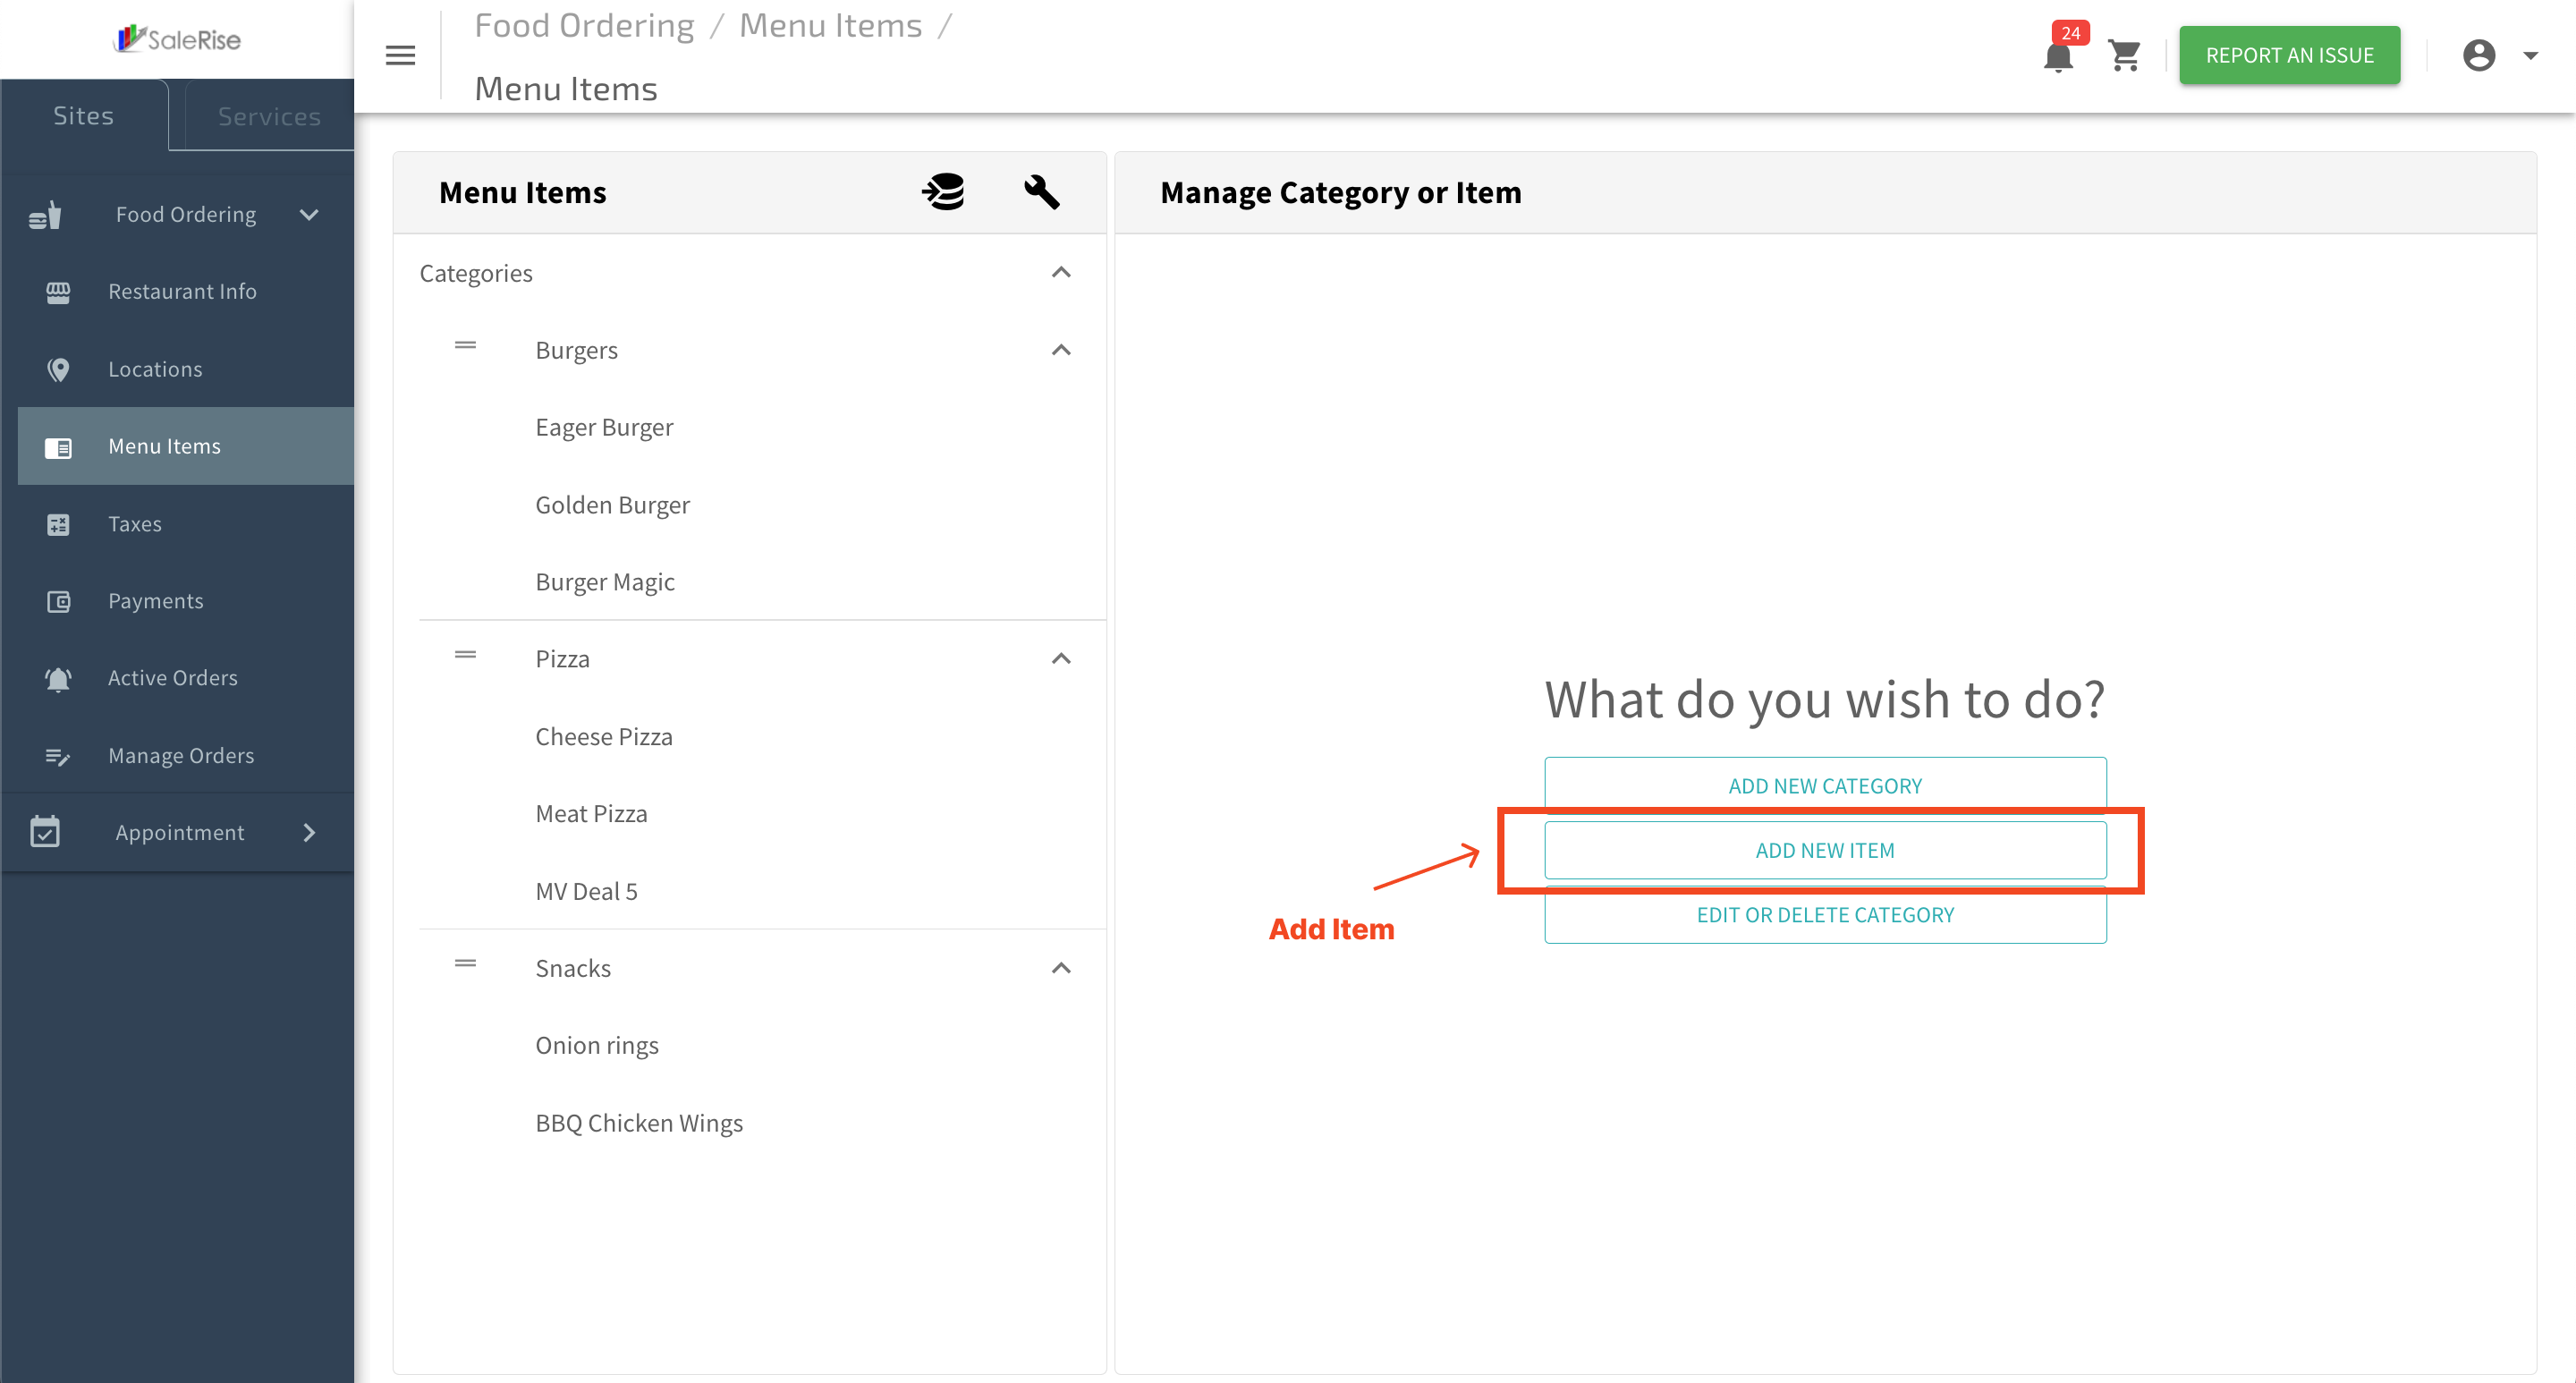
2. Basic Information:
- Enter the fundamental details for the new item.
- Item Name: Provide a descriptive name for the item.
- Select Category: Choose the appropriate category from the available options.
3. Pricing and Description:
- Set the pricing and provide a detailed description of the item.
- Price: Specify the cost of the item.
- Description: Offer an engaging description to entice customers.
4. SEO-Friendly Details:
- Enhance online visibility with SEO-friendly details.
- Page Slug: Set a user-friendly URL slug for the item.
5. Availability Settings:
- Choose the availability settings for the item.
- Availability Options: Select from "Any Open Time," "Special Time," or "None."
6. Tax Exemption:
- Indicate whether the item is tax-exempt.
- Tax Exempted: Choose between "Yes" or "No" for tax exemption.
7. Save and Confirm:
- Click "Save" to confirm the addition of the new item.
-----------------------------------------------------------------------------------------------------------------------------
3.3.1 Items - Enhance Details
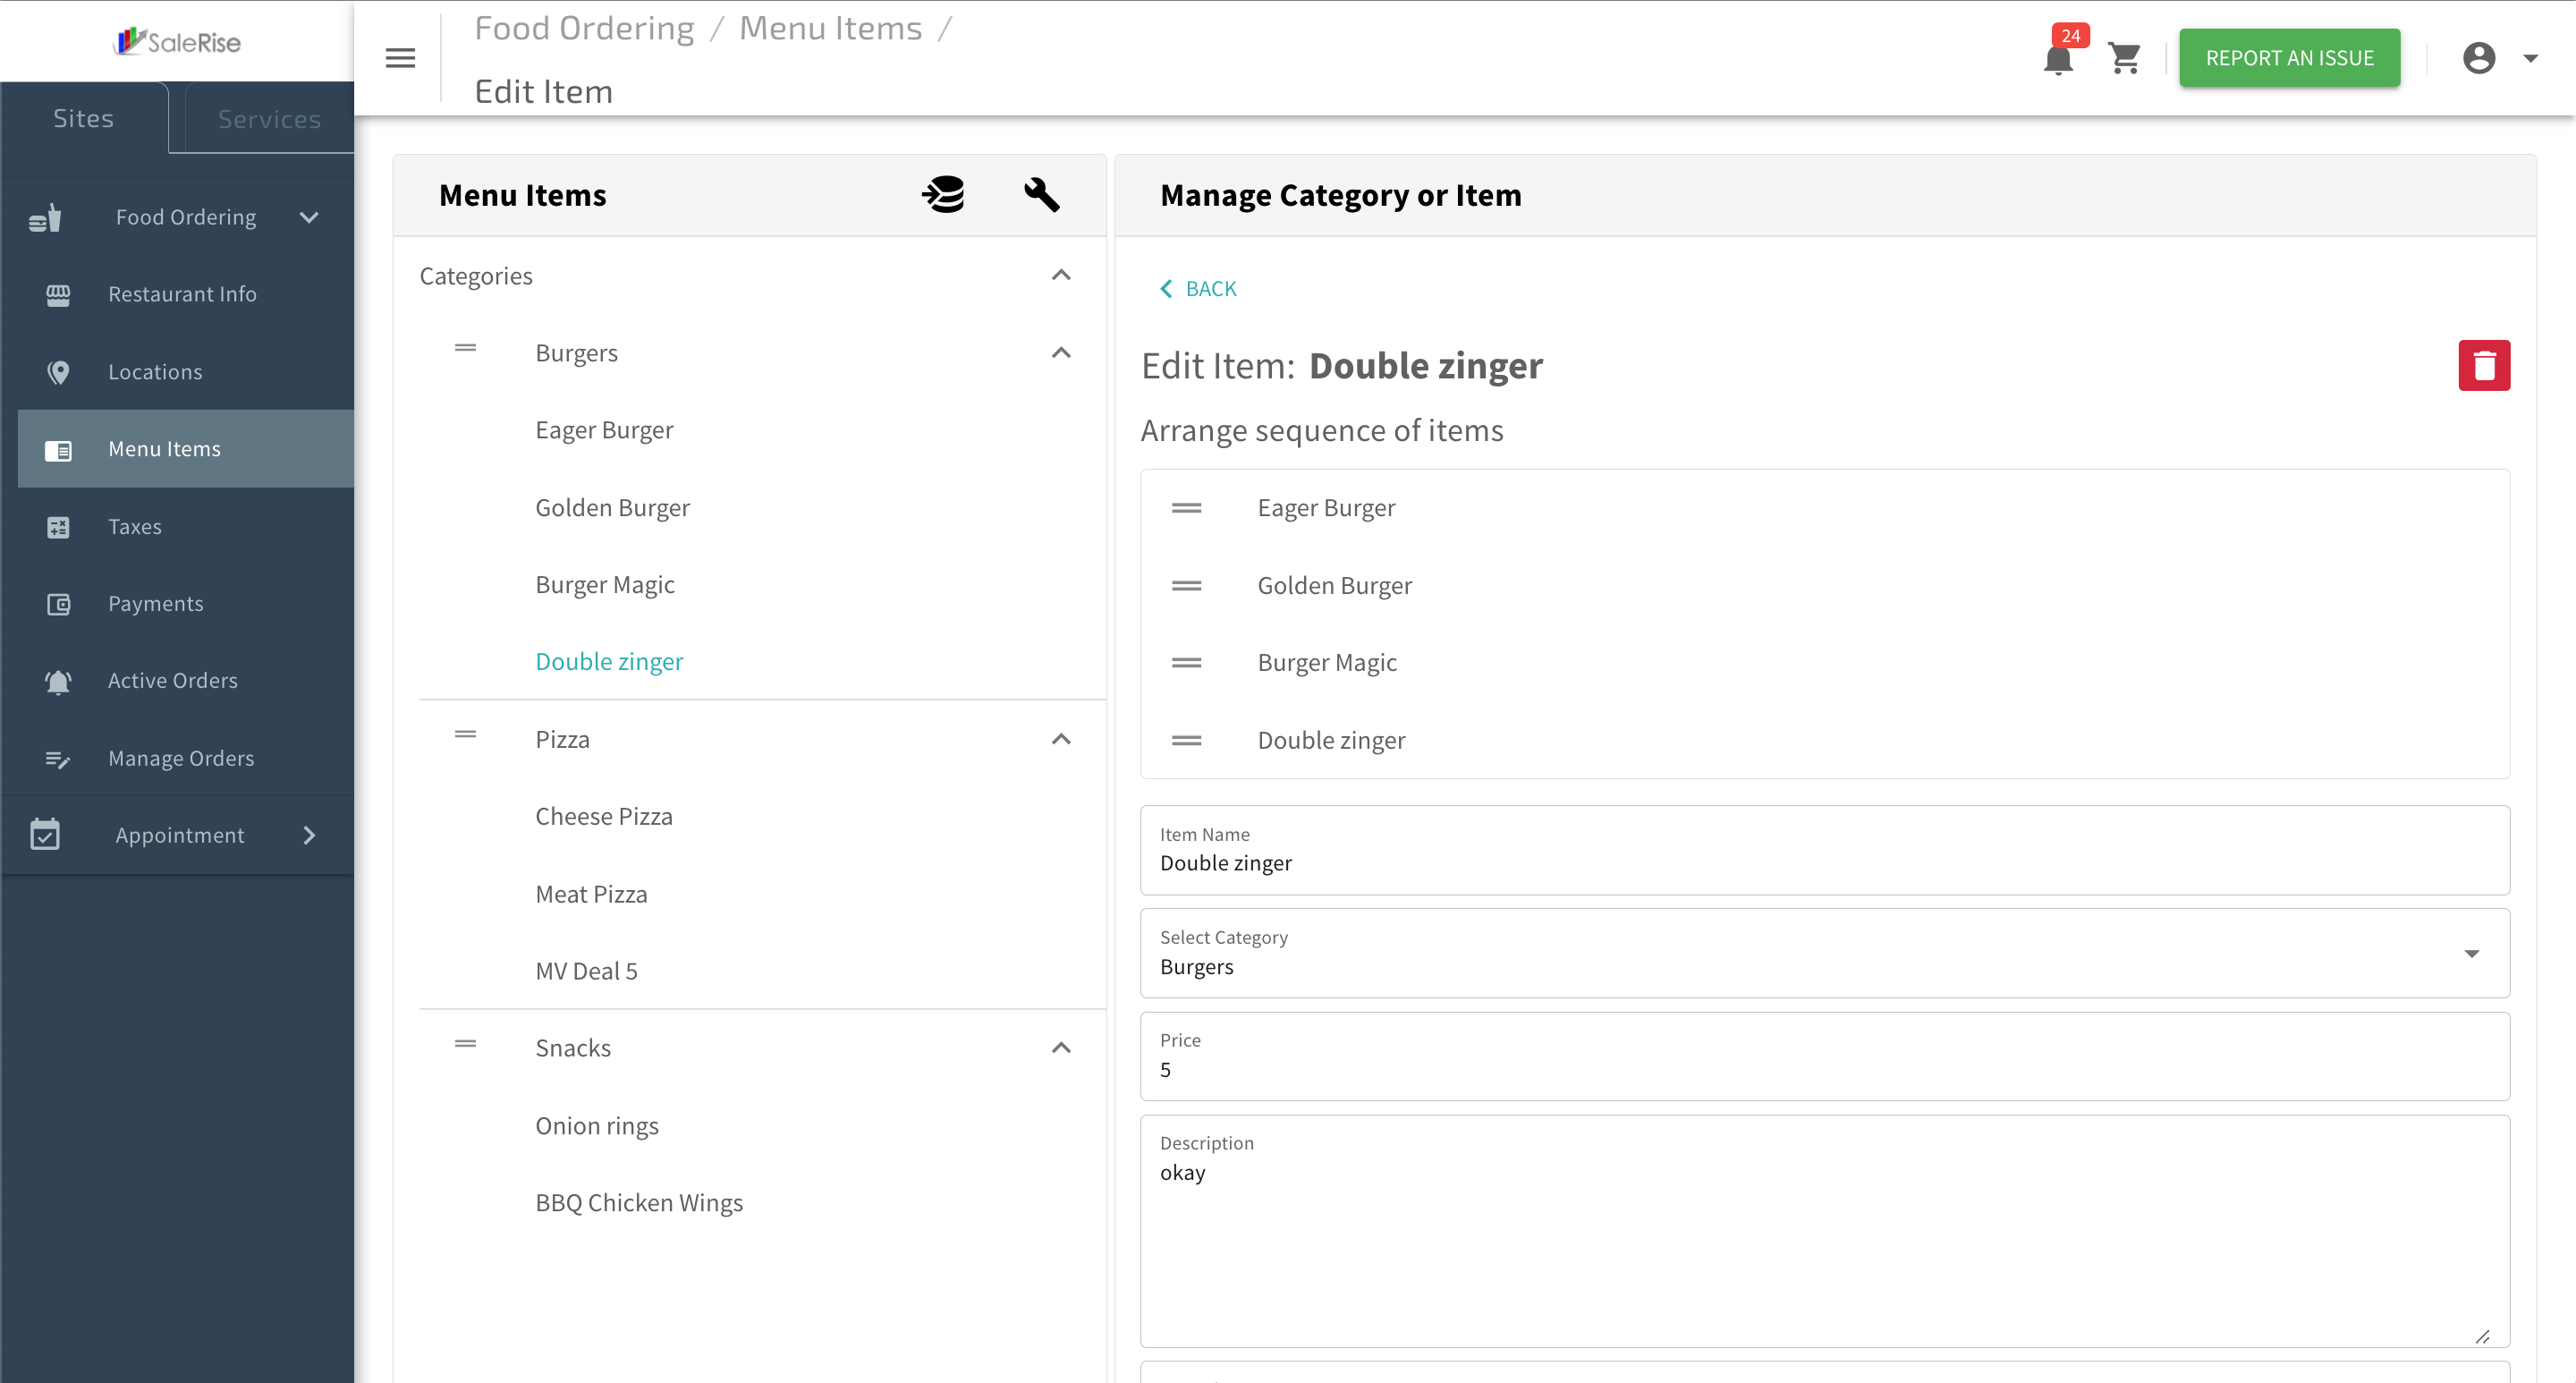
After successfully adding the basic details of a new item, users can now enhance their menu item by including an image, creating option groups, adding individual options, and specifying sizes.
1. View Added Item:
- After saving the basic details, the user can view the added item in the menu.
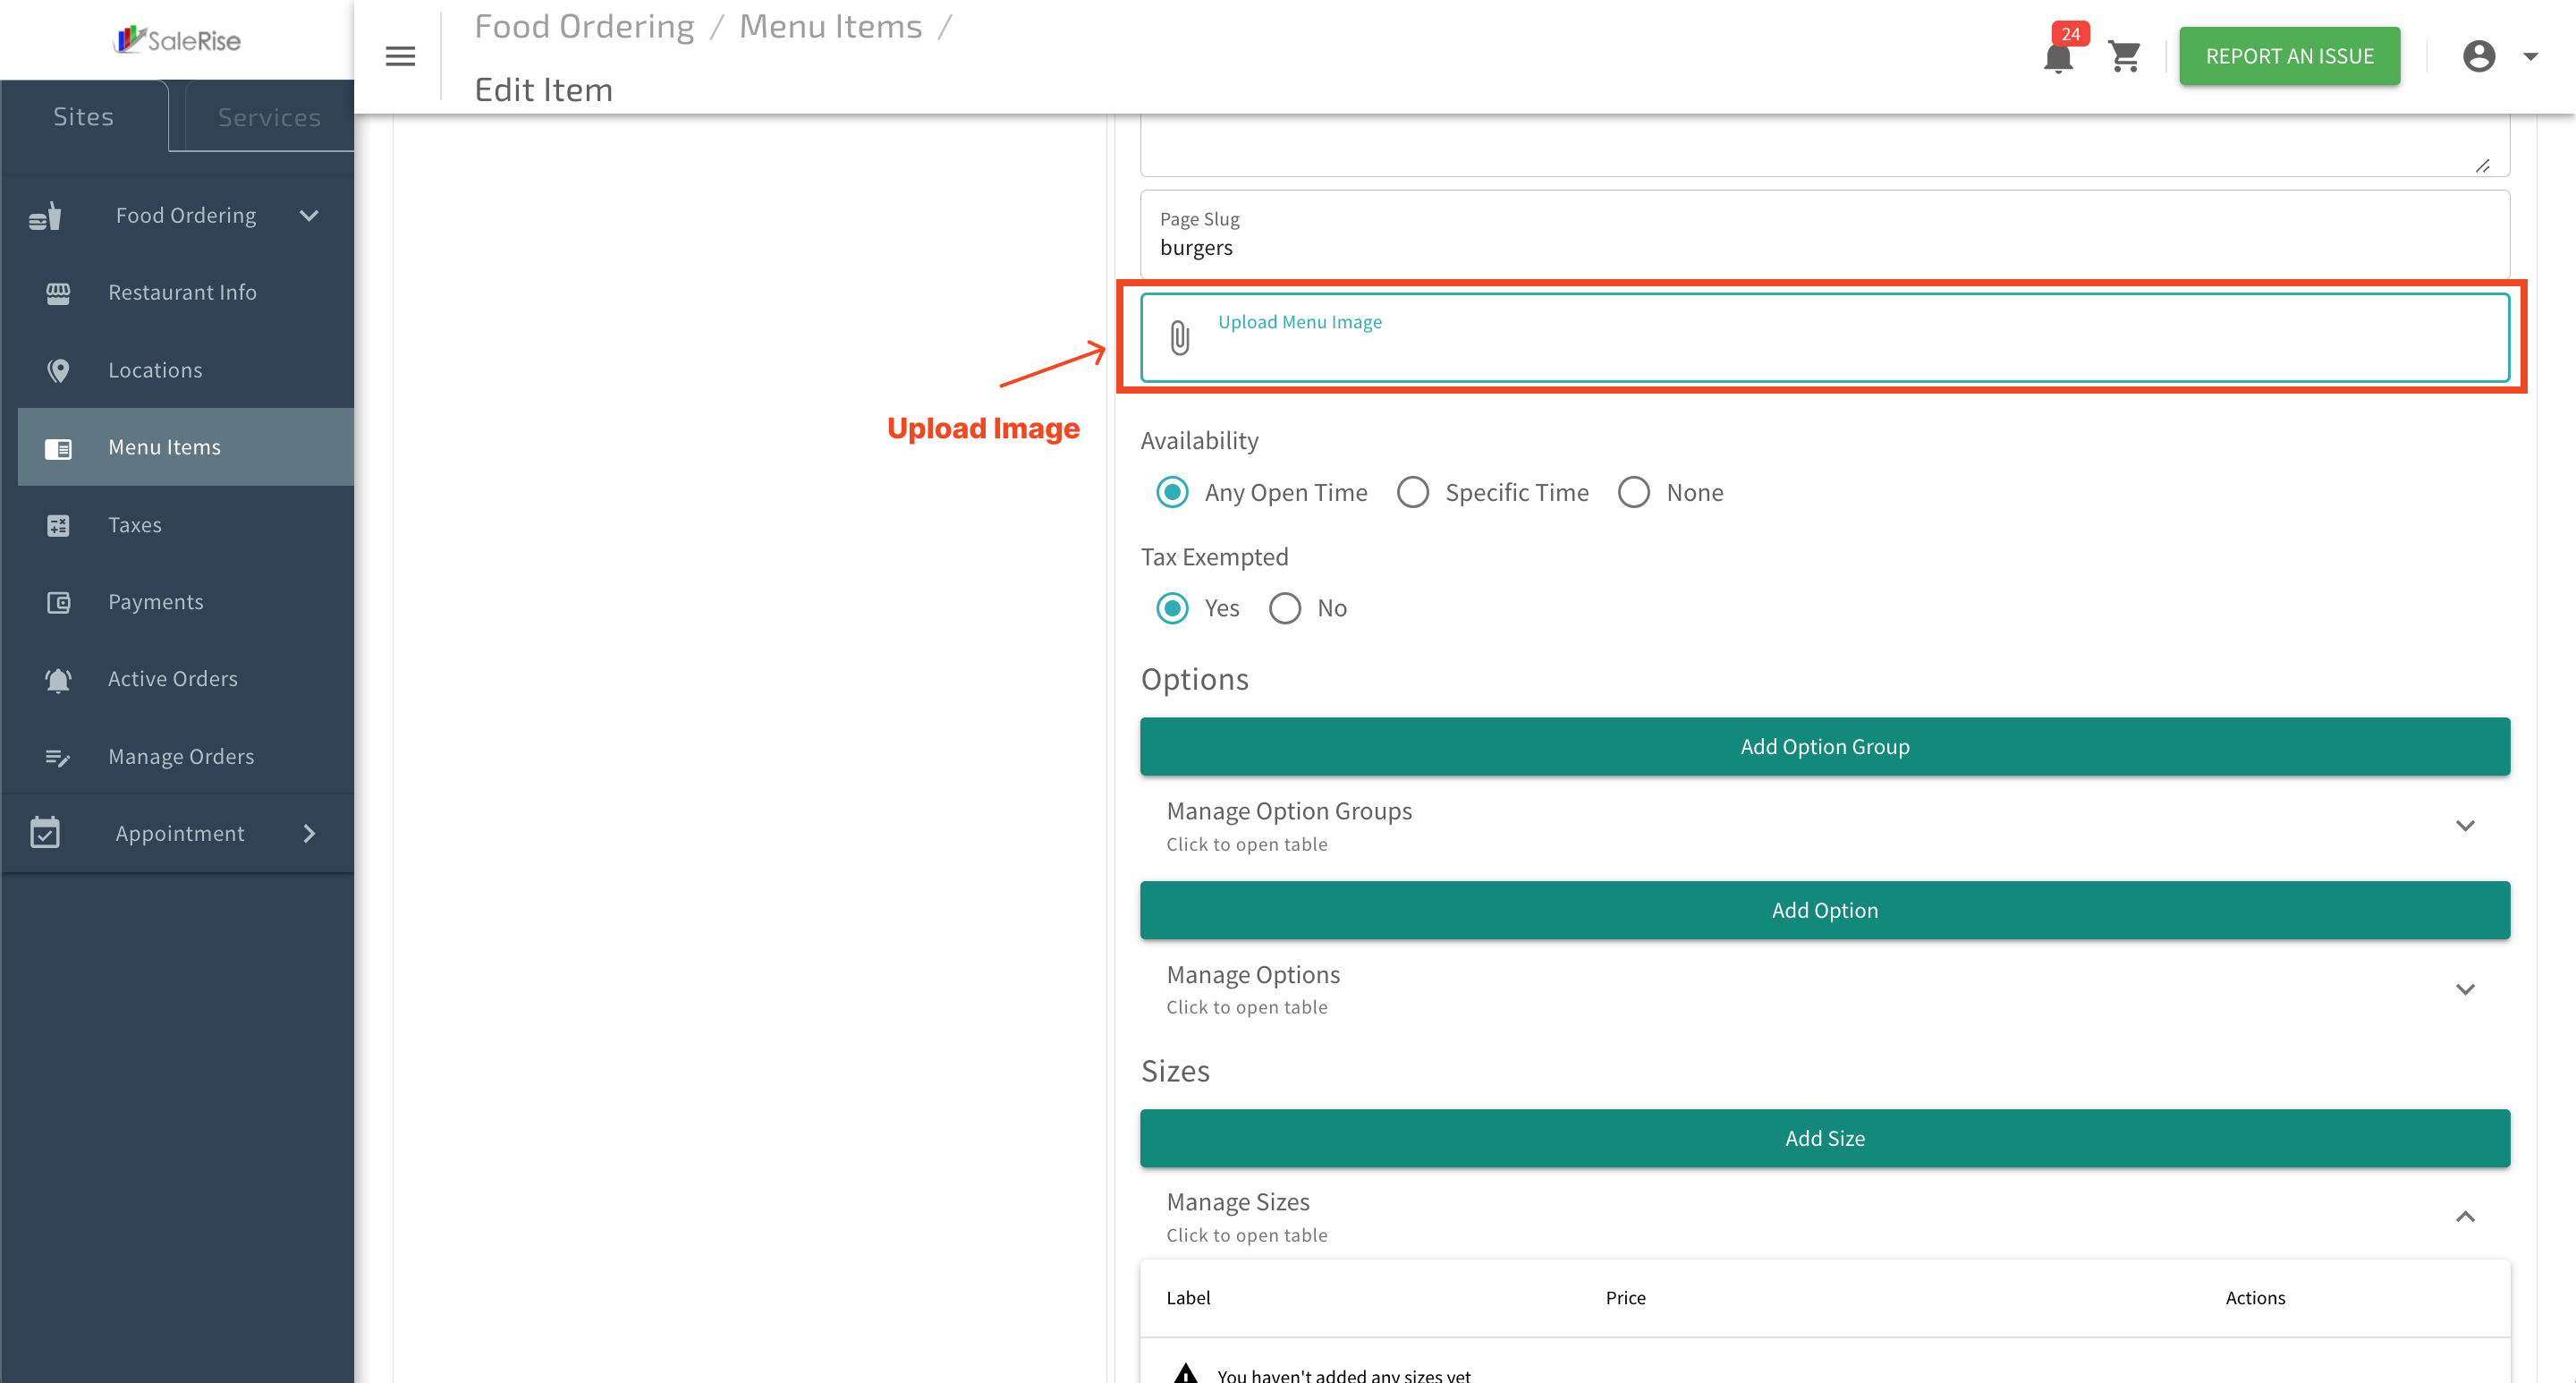
2. Add Image:
- Upload a visually appealing image to showcase the item.
- Click on "Add Image" and choose the image file.
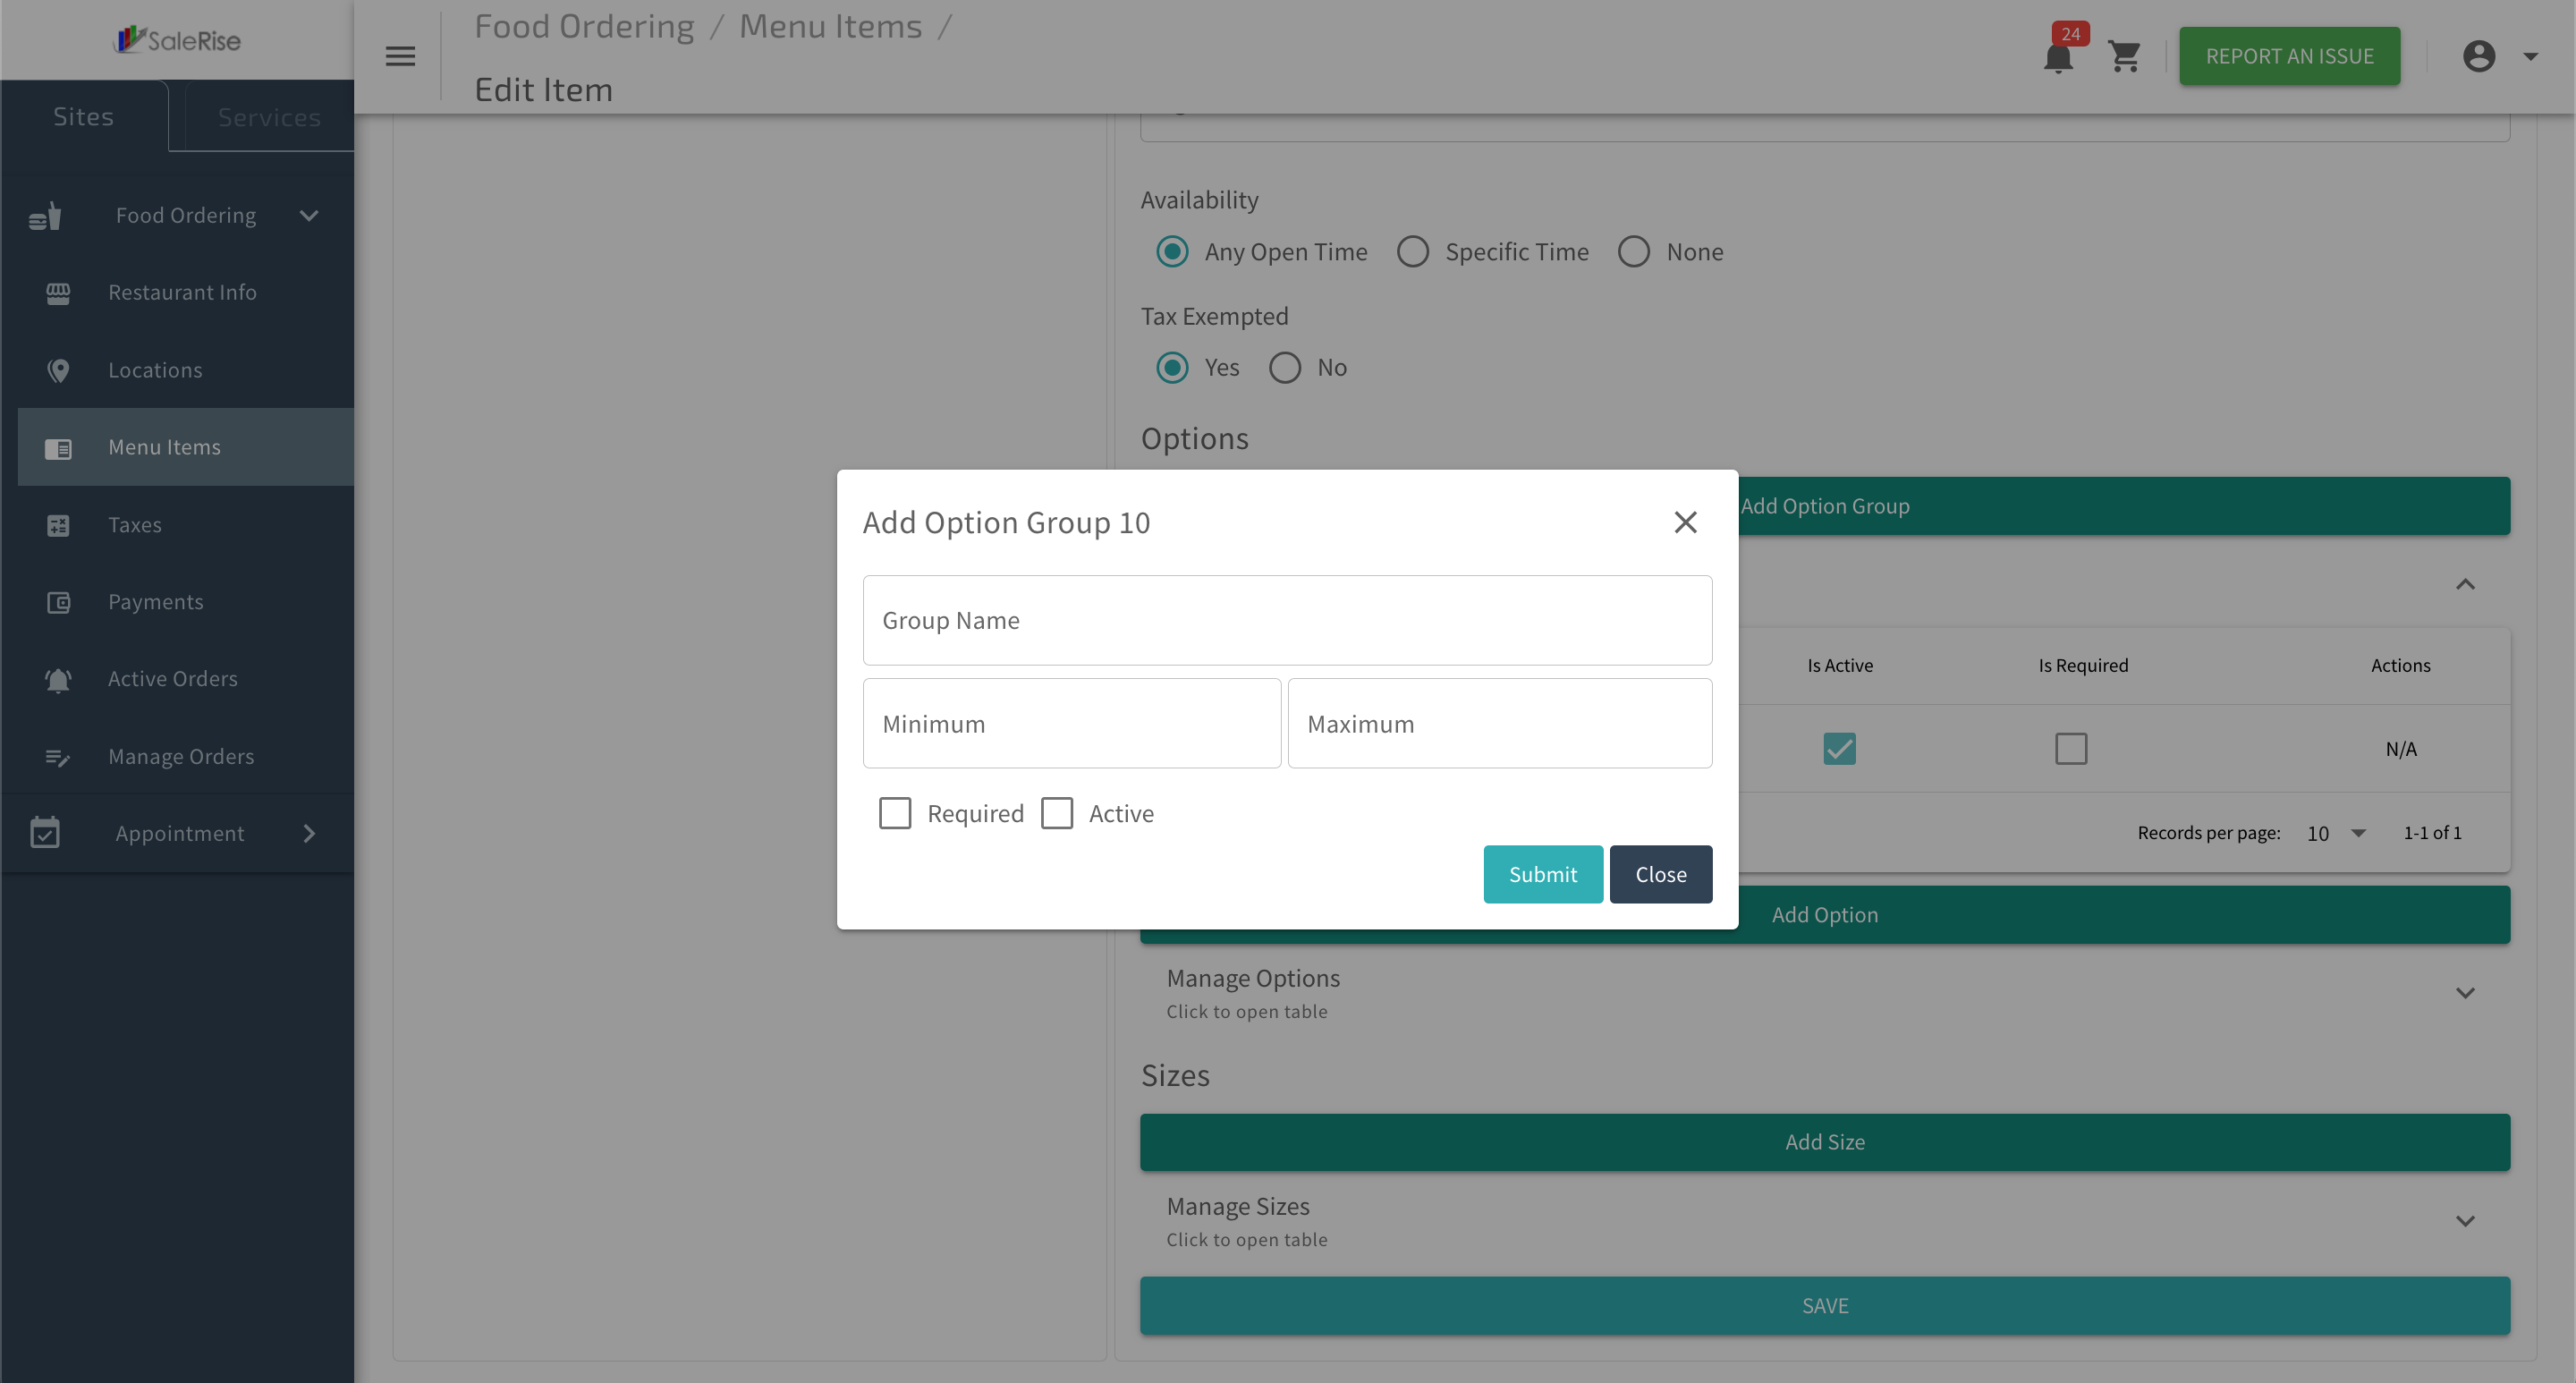
3. Option Groups:
Enhance customization by creating option groups.
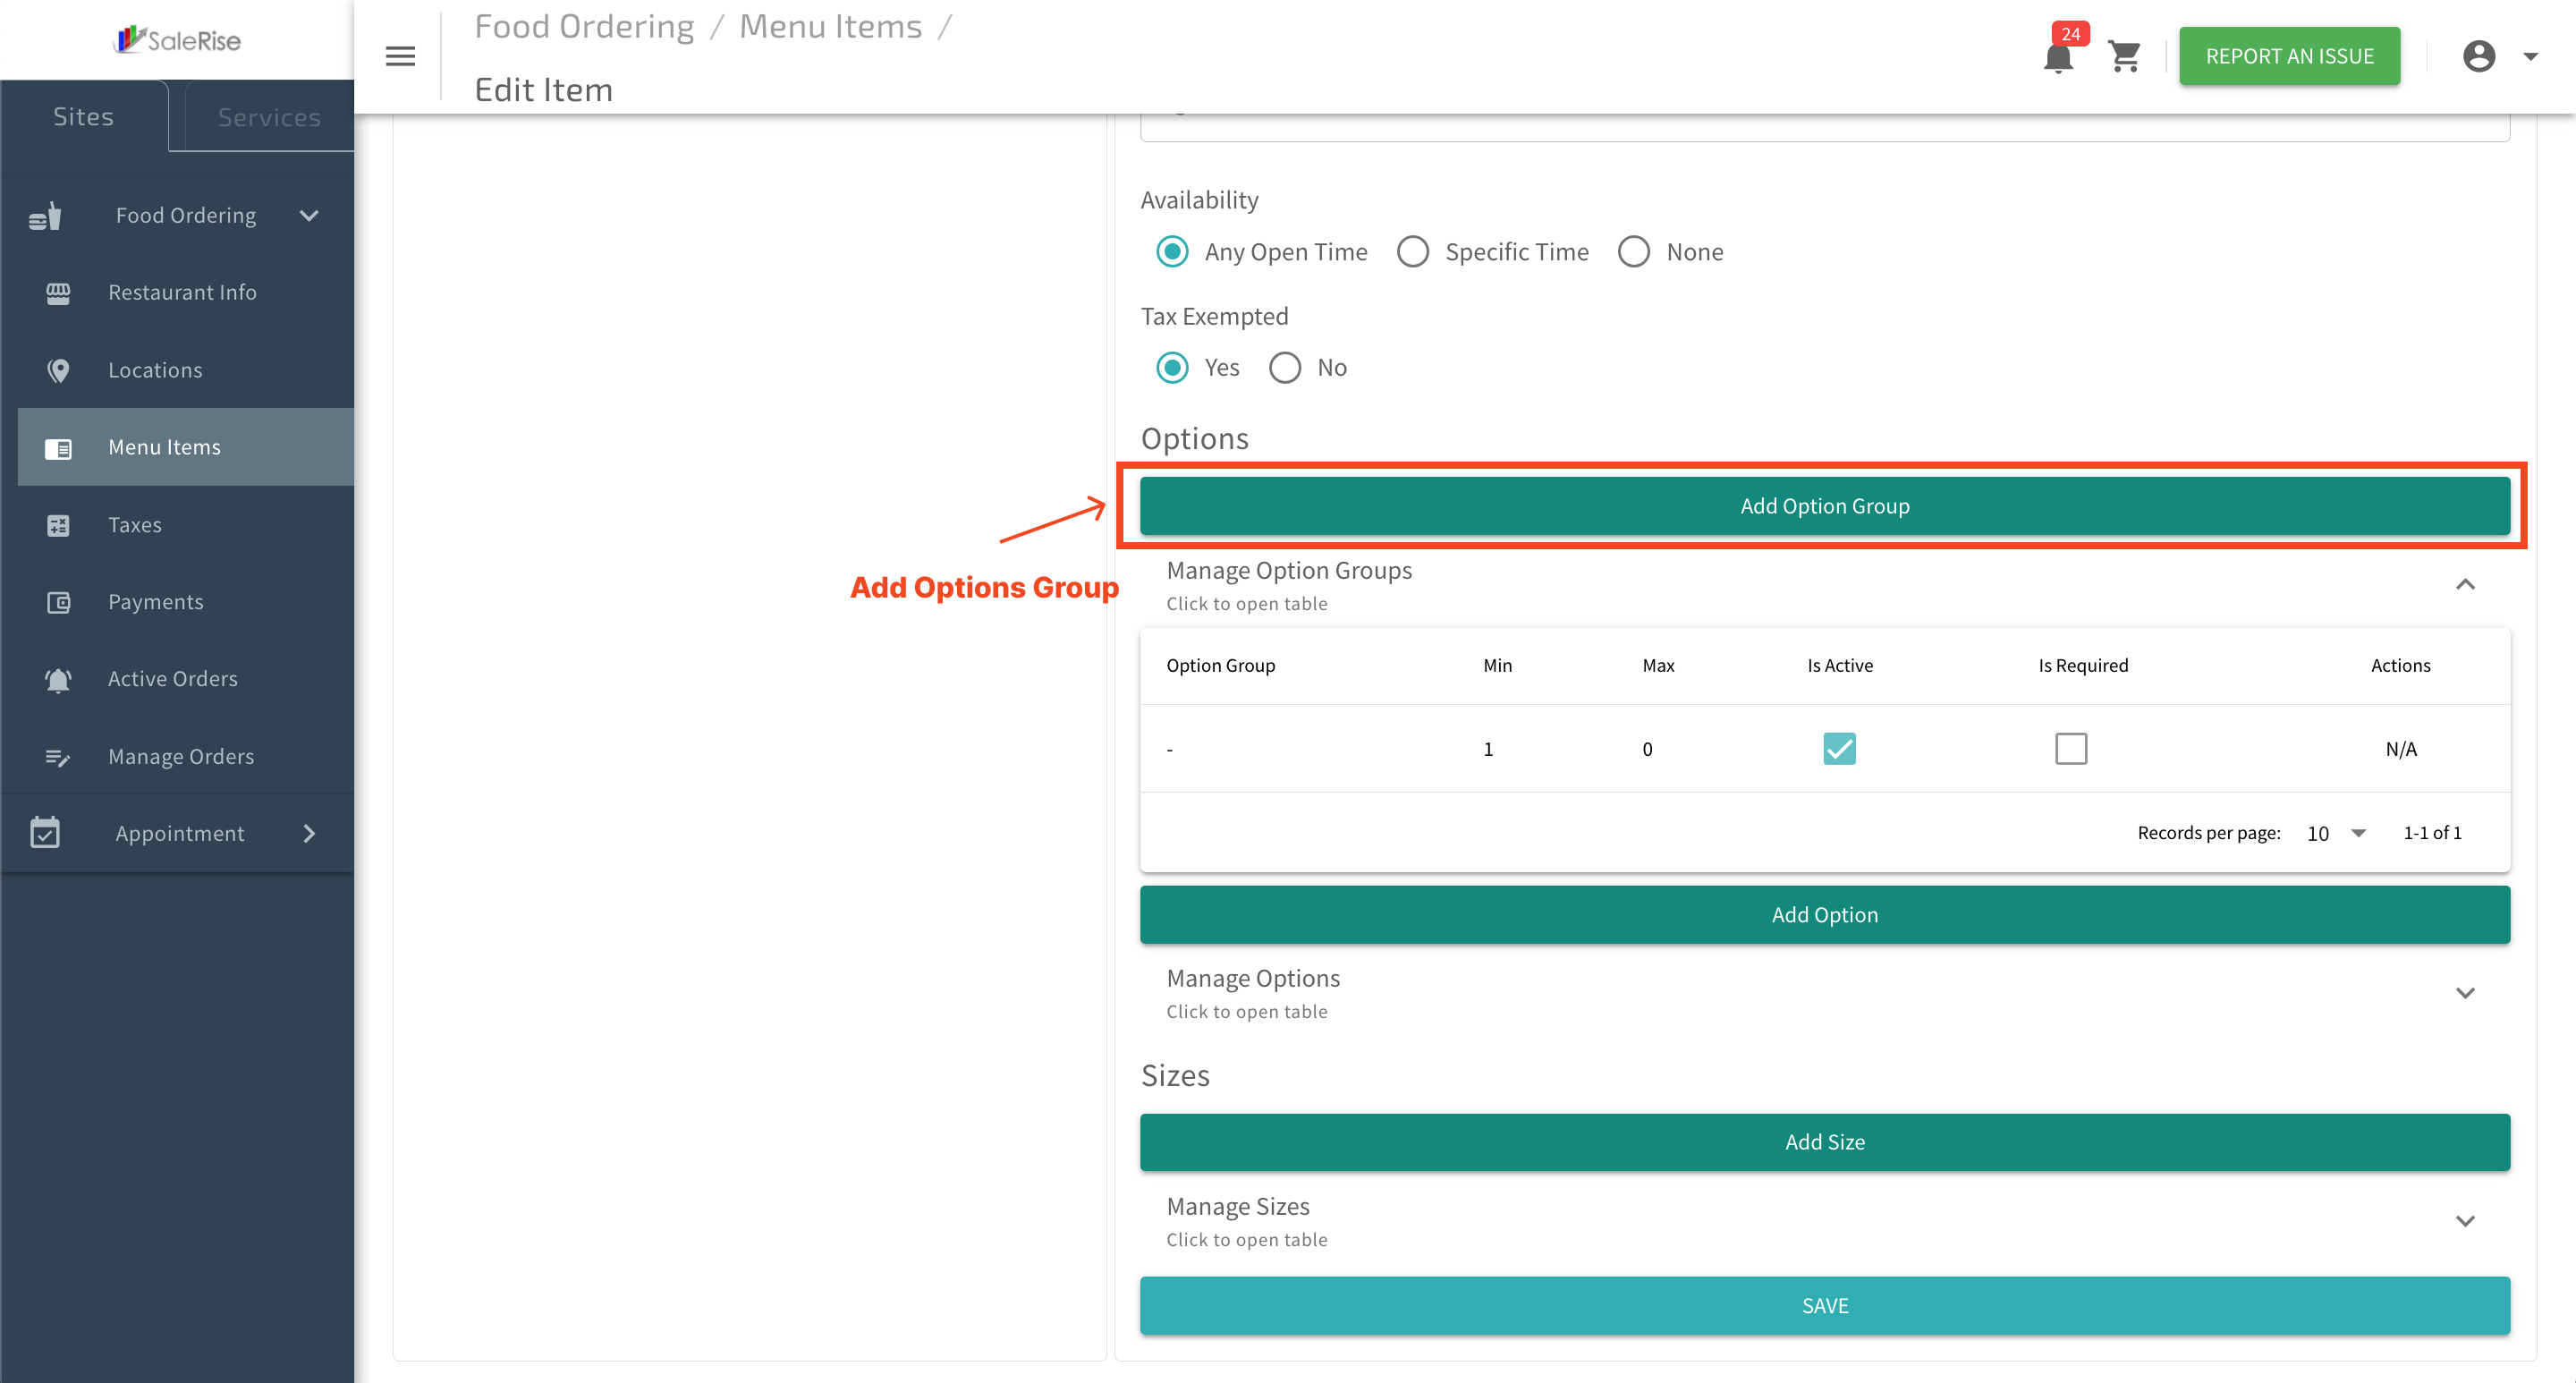
- Option Group Name: Provide a descriptive name for the group.
- Minimum and Maximum Input Fields: Specify the range of input fields allowed.
- Required Checkbox: Indicate if the option is required.
- Active Checkbox: Activate or deactivate the option group.
4. Add Options:
Associate options with the created option group.
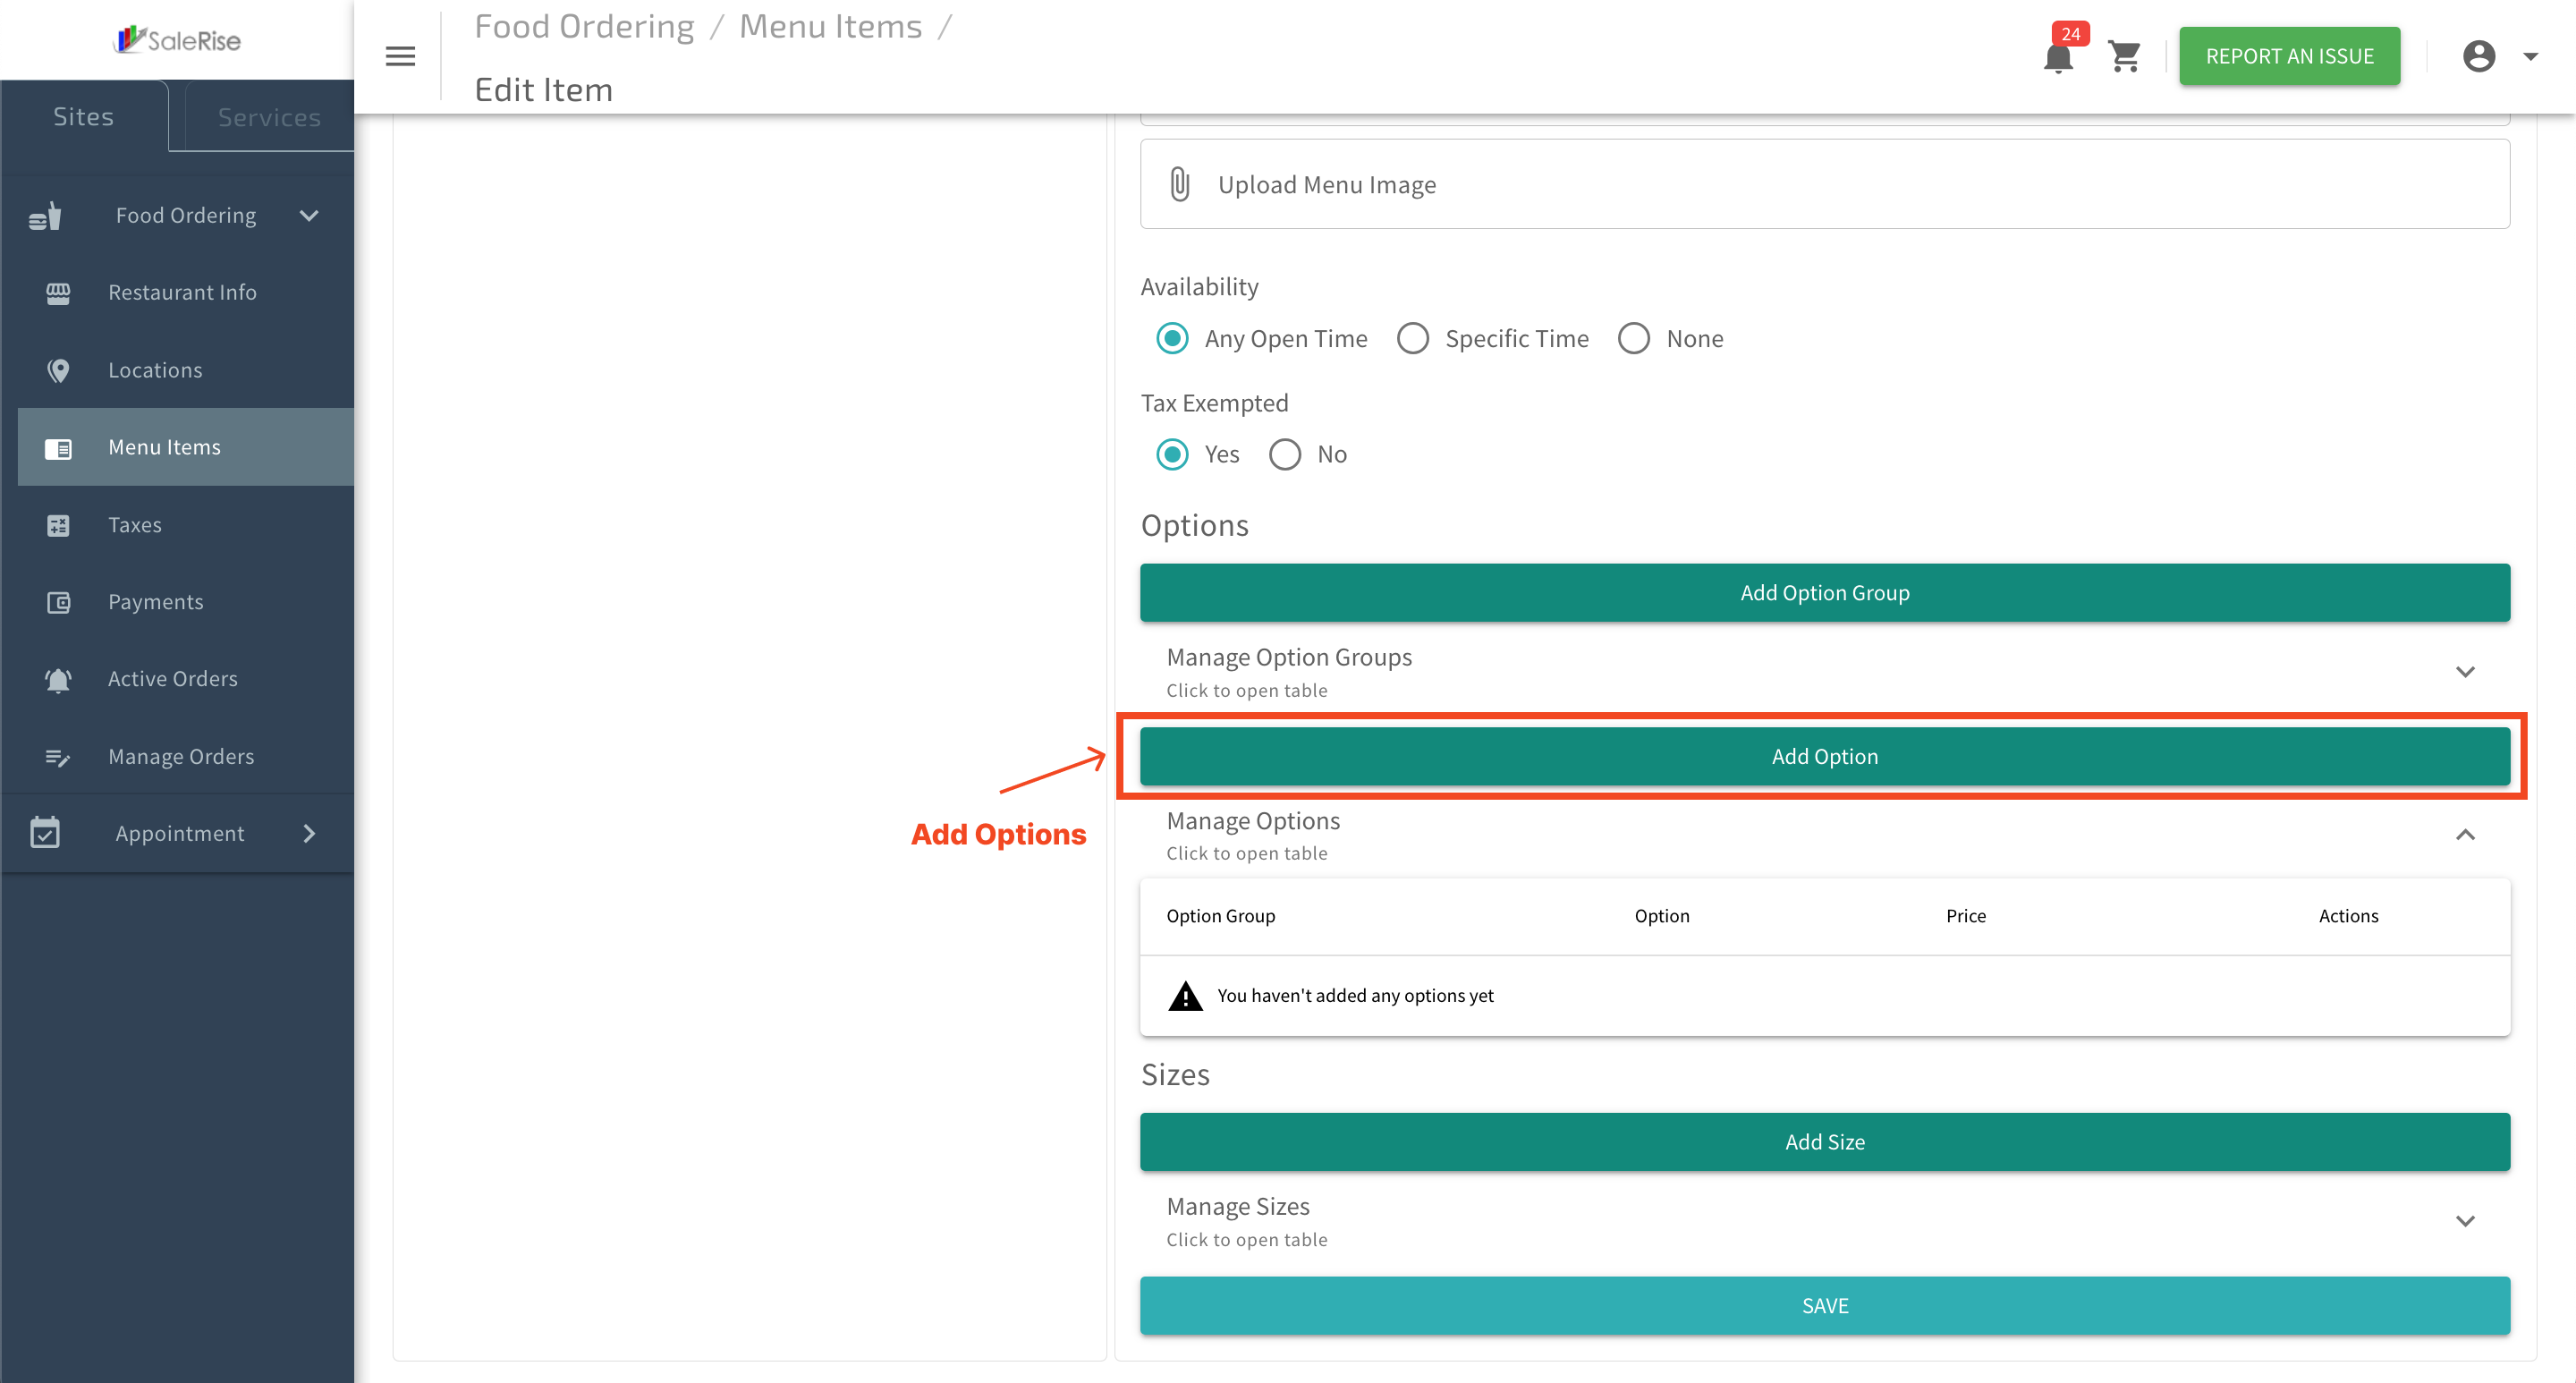
- Select Option Group: Choose the relevant group from the created option groups.
- Label: Provide a label for the option.
- Add Price: Specify an additional price if applicable.
- Active Checkbox: Activate or deactivate the option.

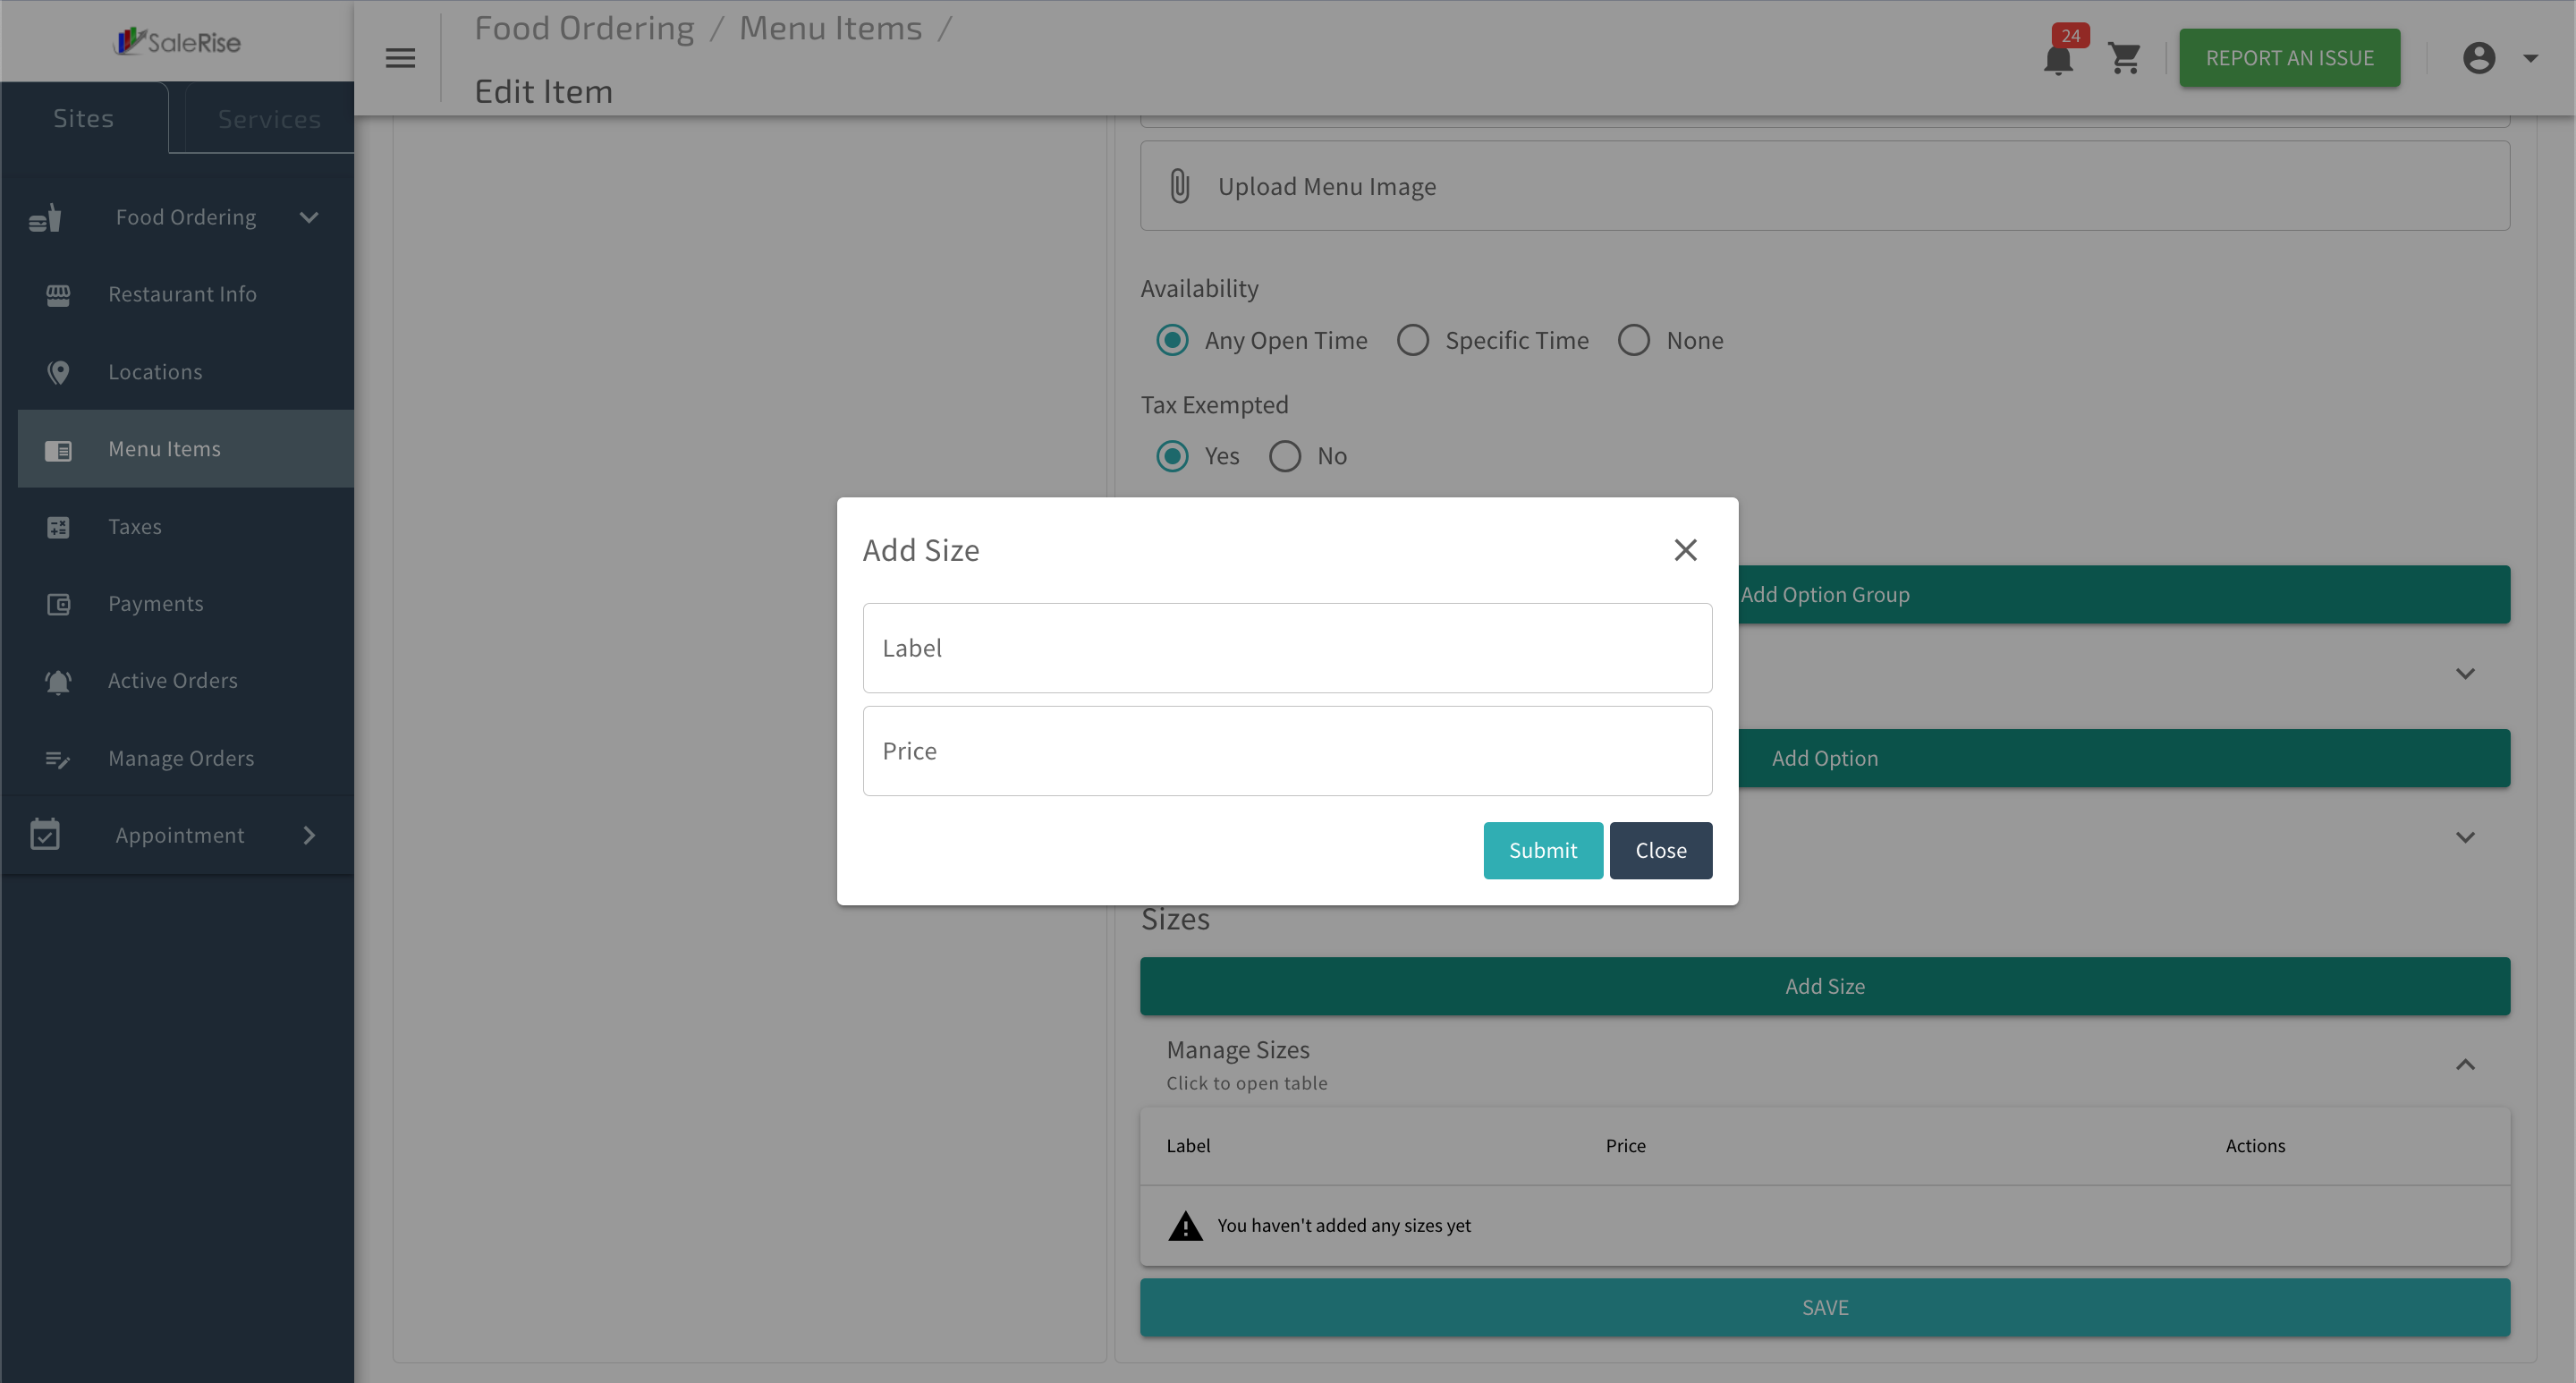
5. Sizes:
Offer size variations for the item.
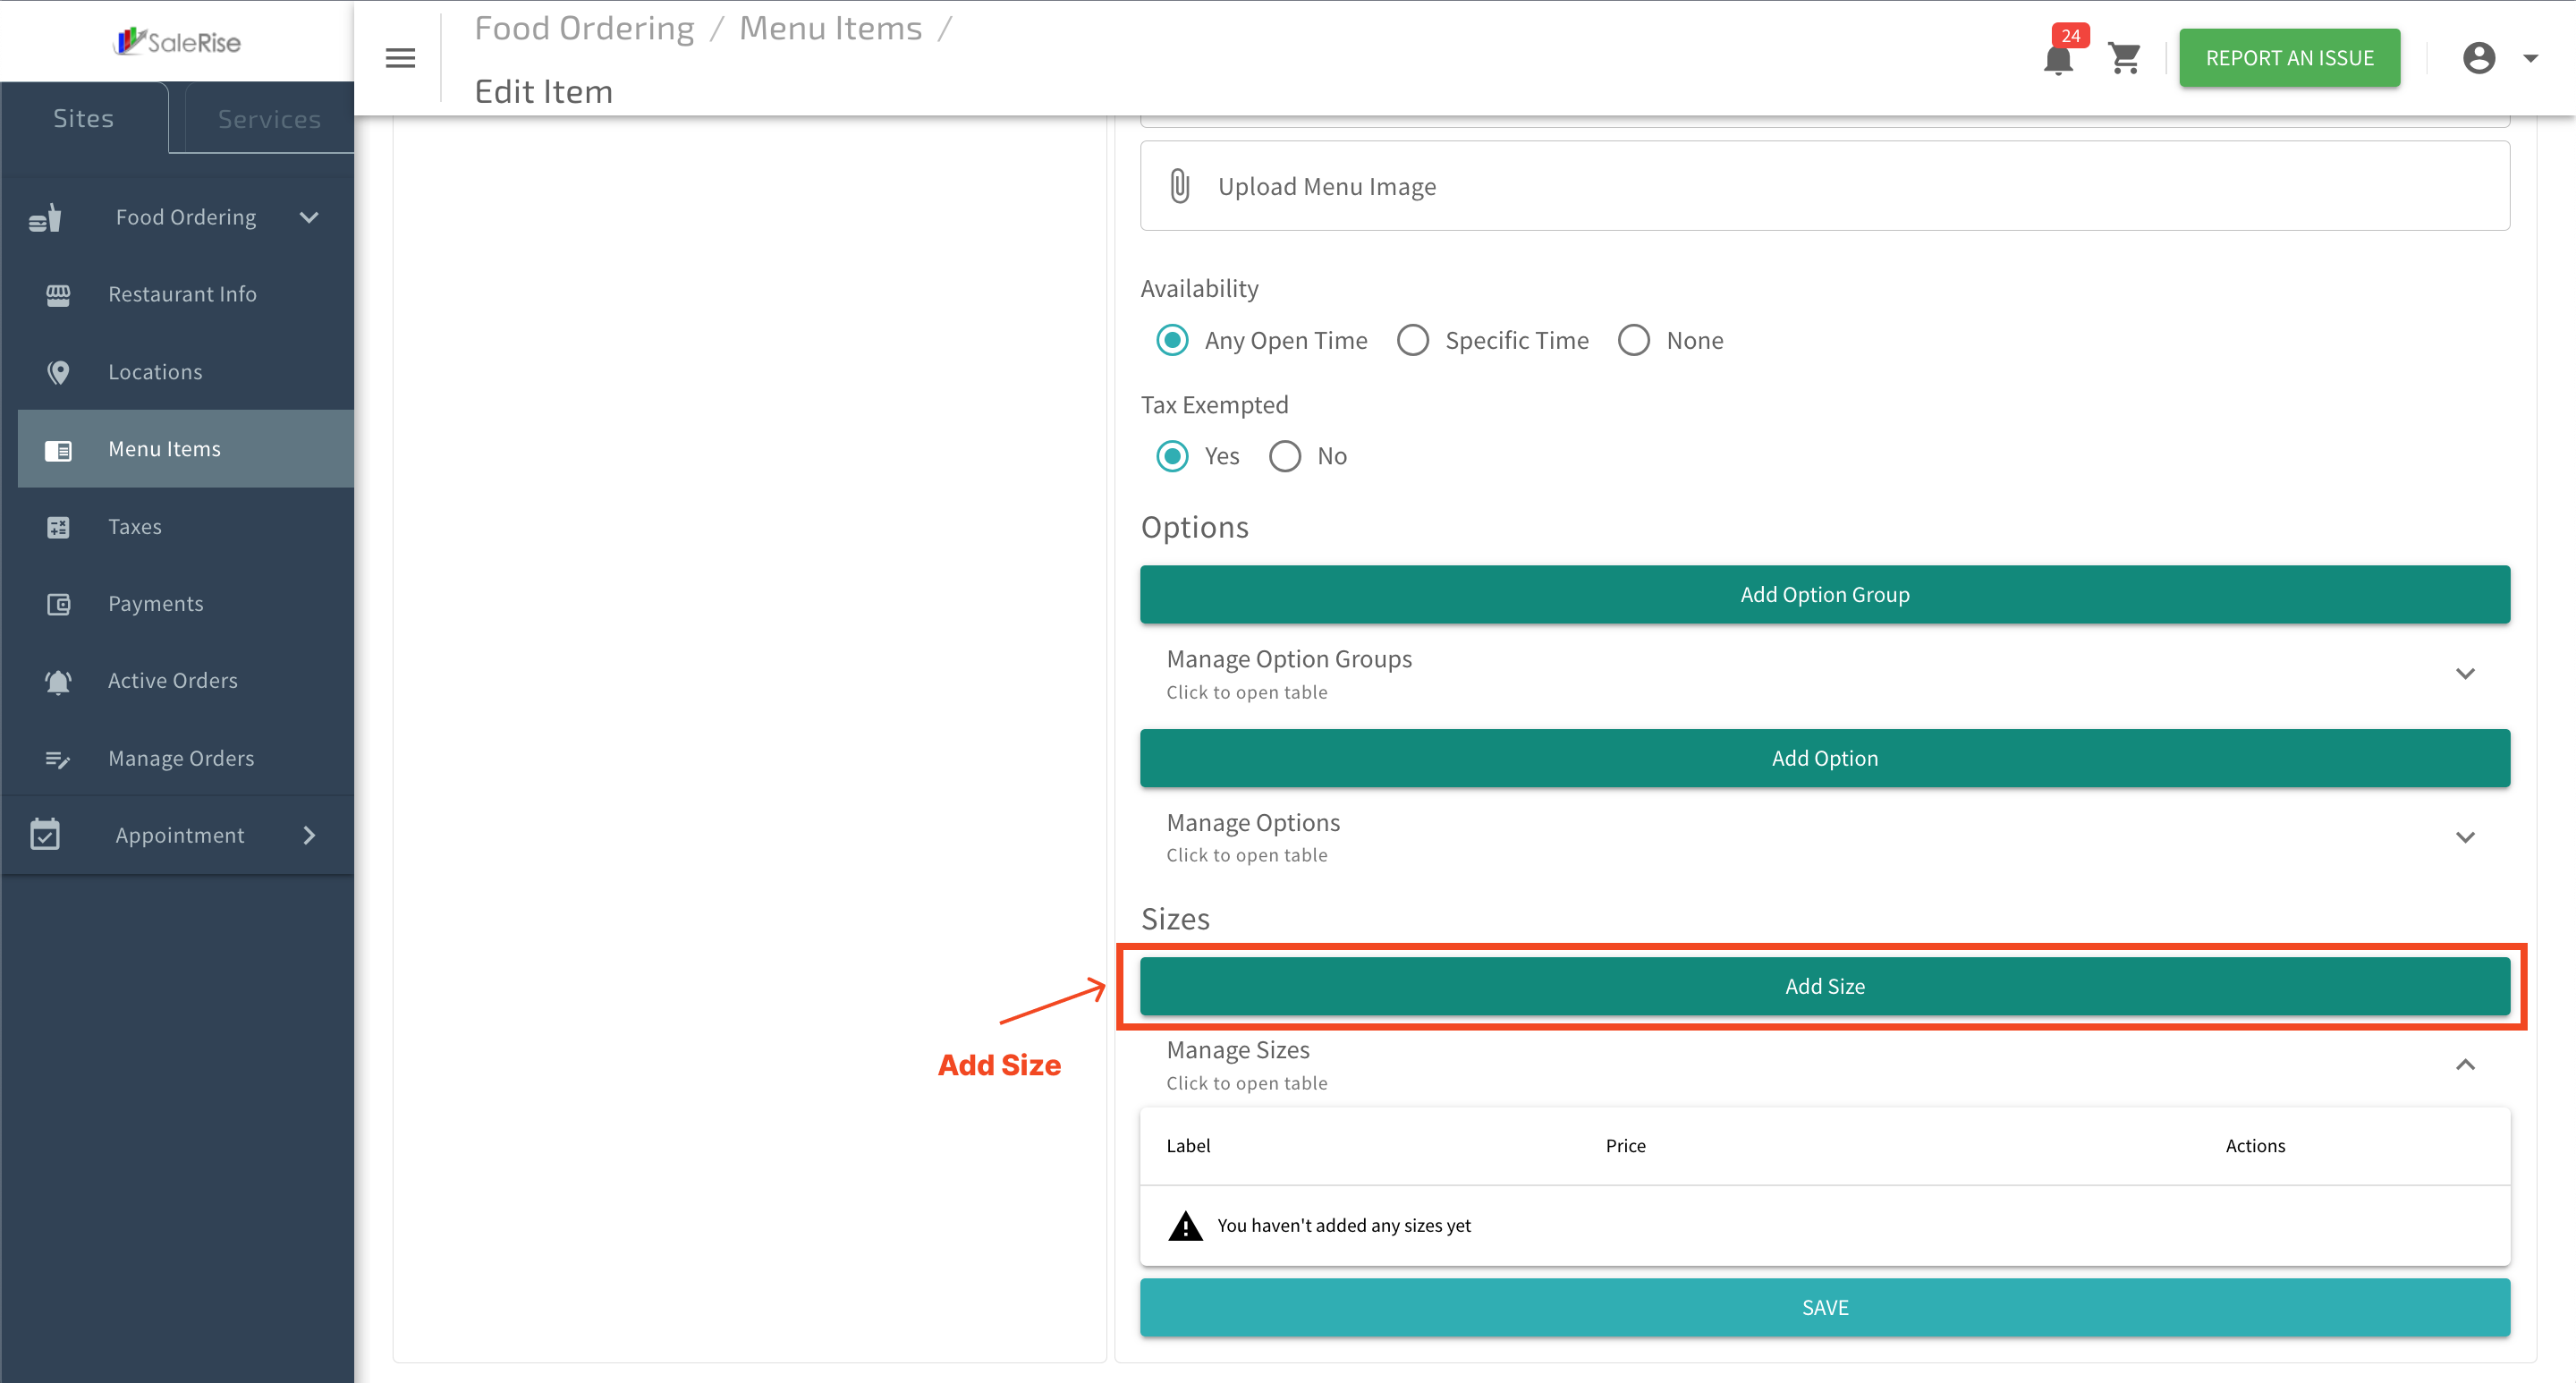
- Label: Name the size (e.g., Small, Medium, Large).
- Add Price: Specify the price difference for each size.
6. Save Changes:
- Click "Save" to confirm the additional details.
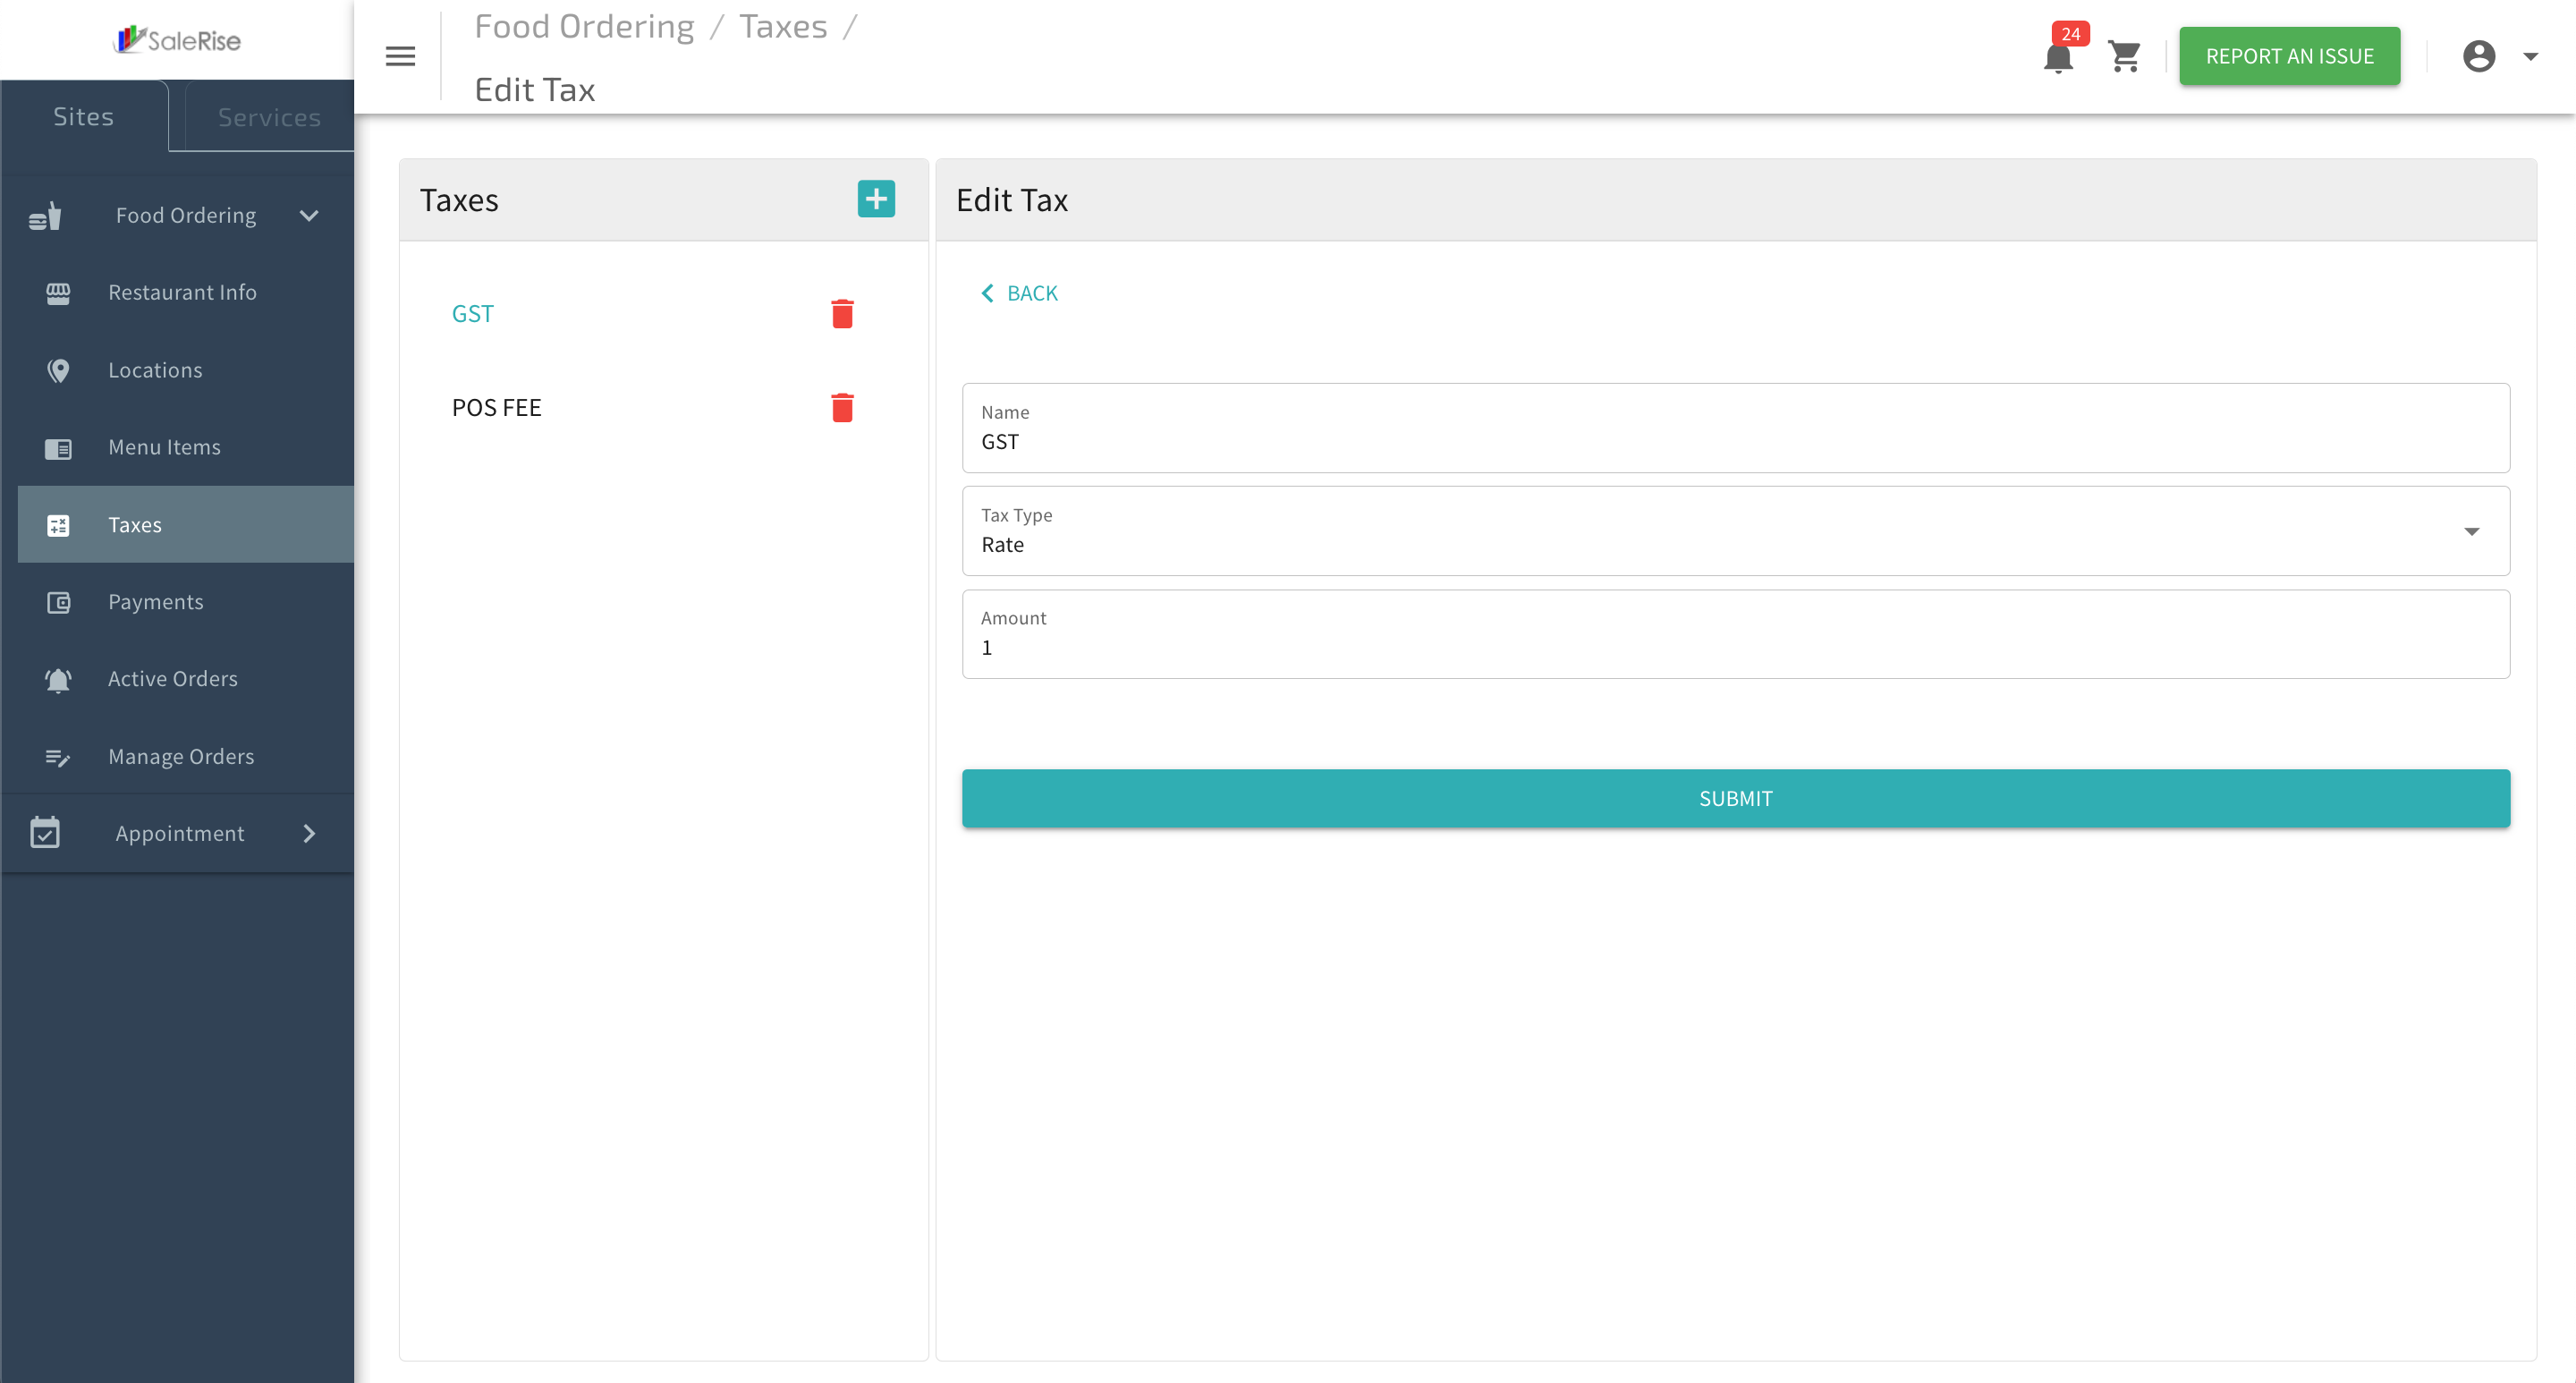
Taxes
In the "Taxes" section, users can efficiently manage tax settings for their restaurants. Adding new taxes involves specifying the tax name, choosing the tax type (rate or flat amount), and entering the applicable amount.
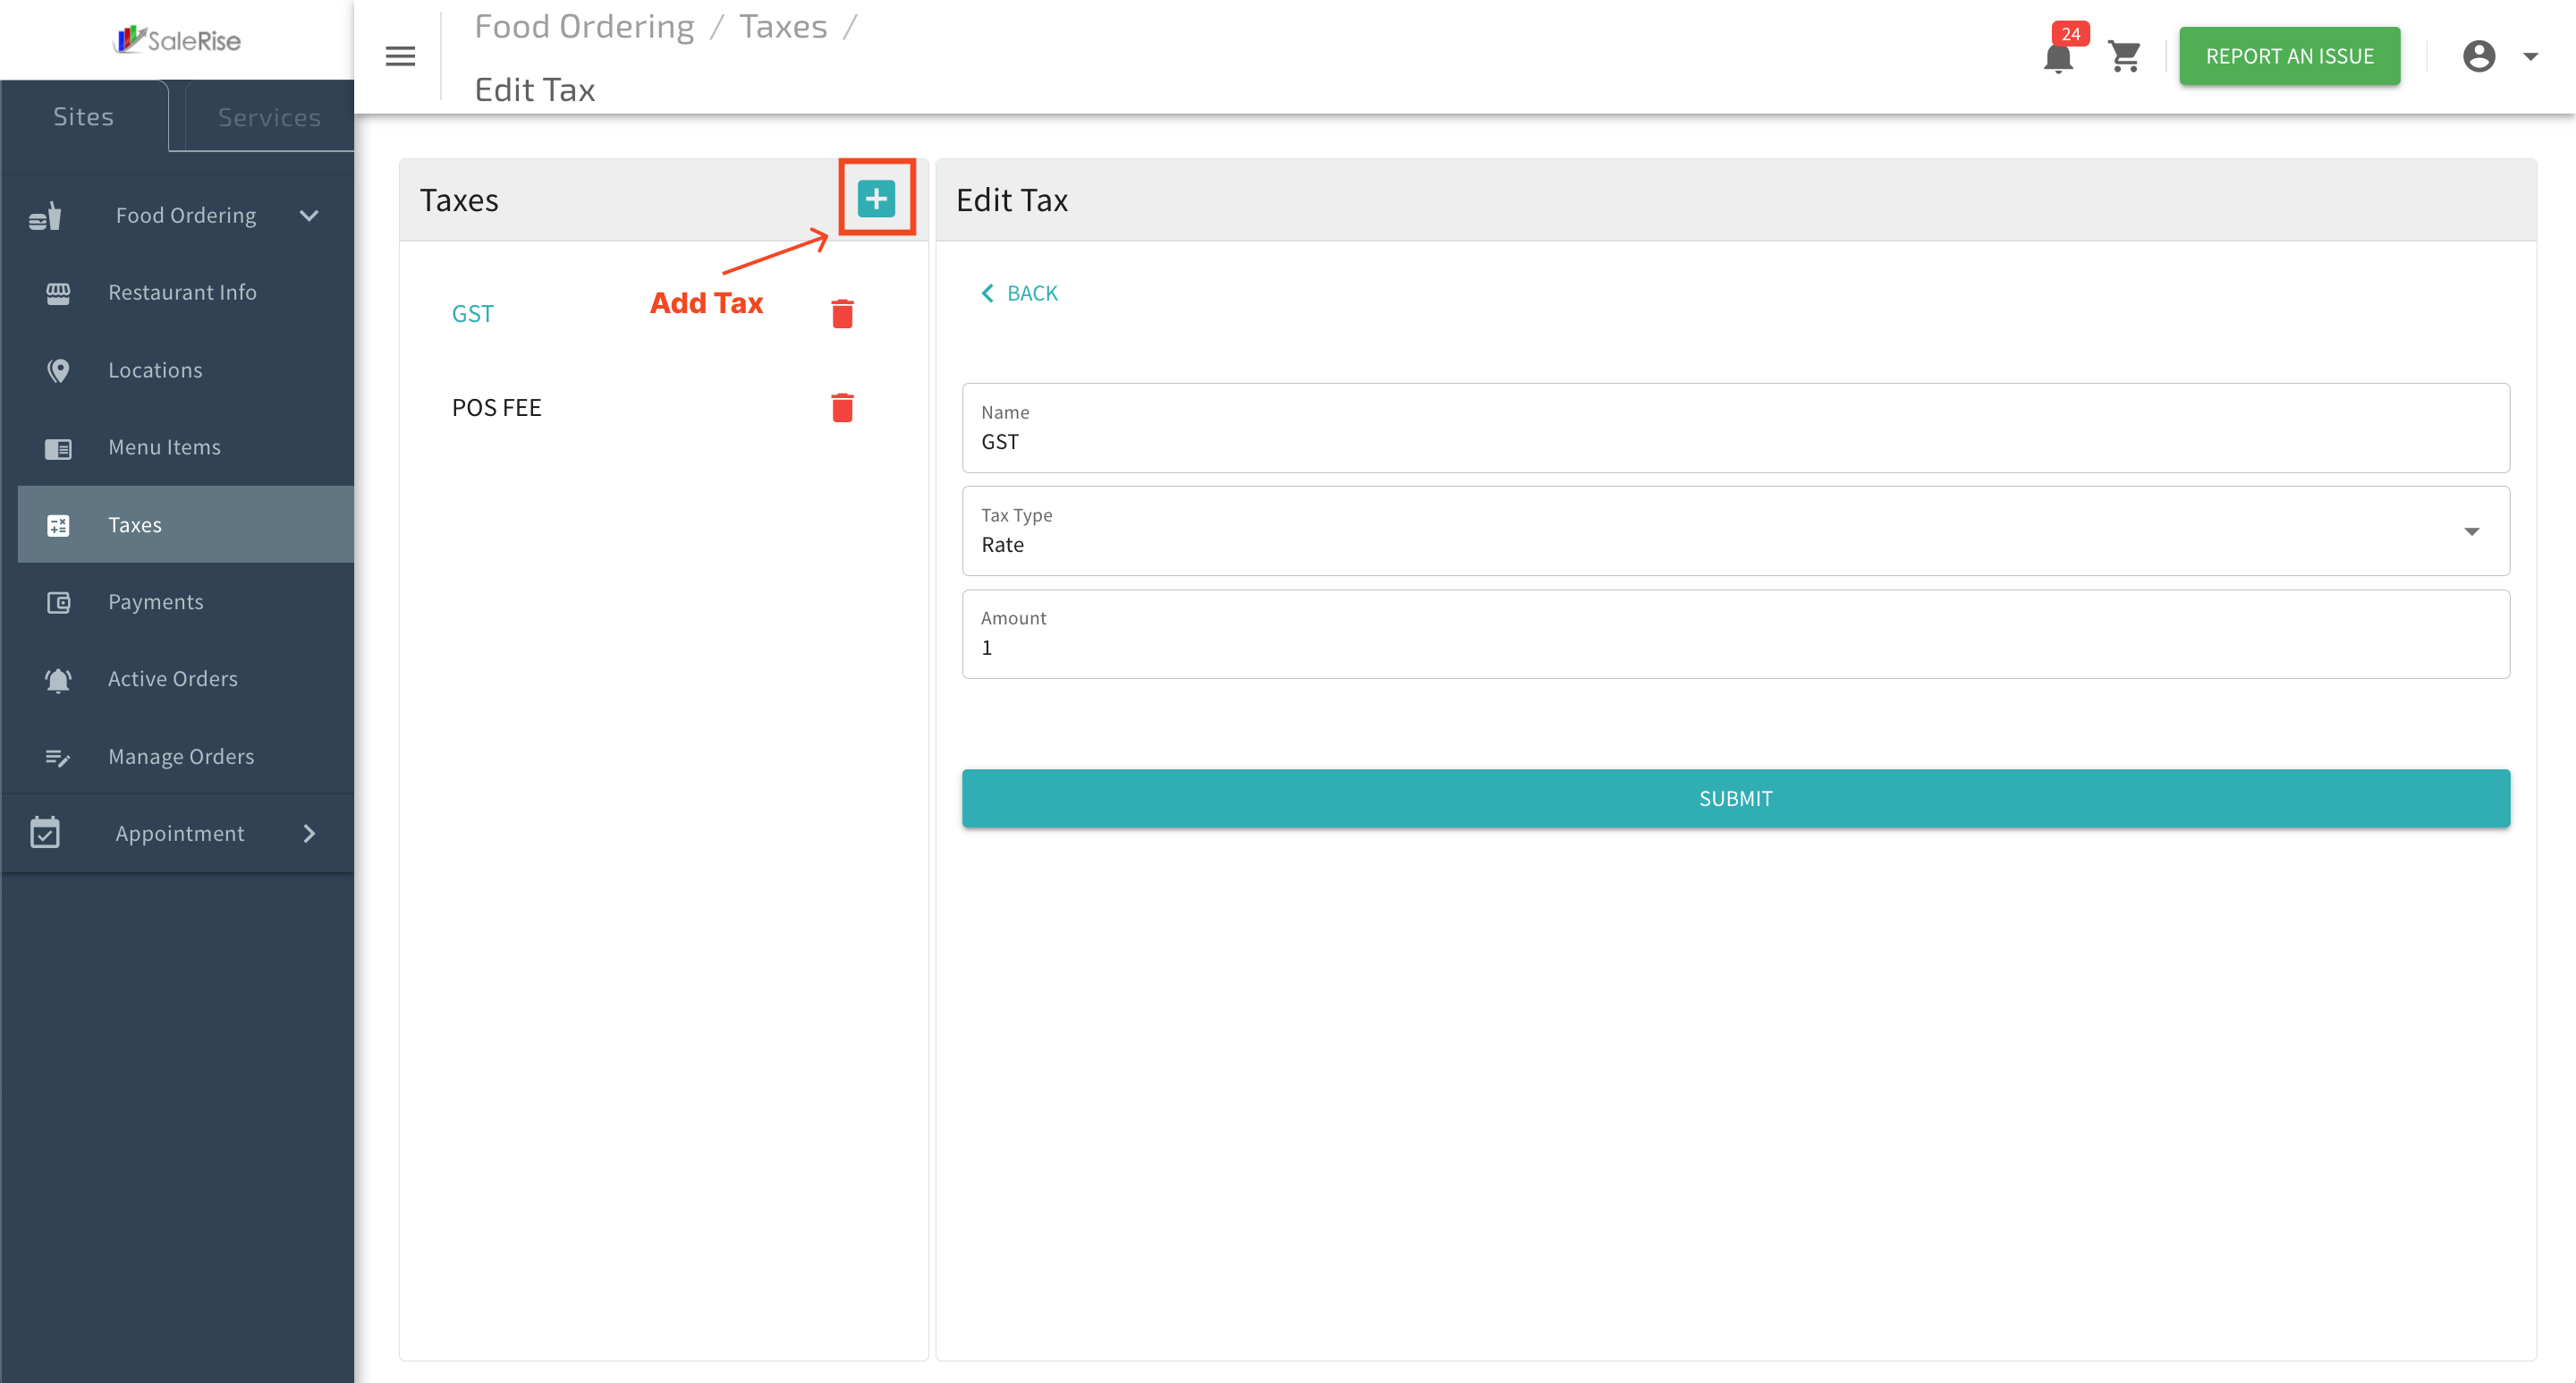
Add Taxes
4.1 Add Taxes Overview
In the "Taxes" section, users can efficiently manage tax settings for their restaurant. Adding new taxes involves specifying the tax name, choosing the tax type (rate or flat amount), and entering the applicable amount.
1. Access "Taxes":
2. Add New Tax:
Click on "Add New Tax" to create a new tax entry.
3. Basic Information:
Enter the fundamental details for the new tax.
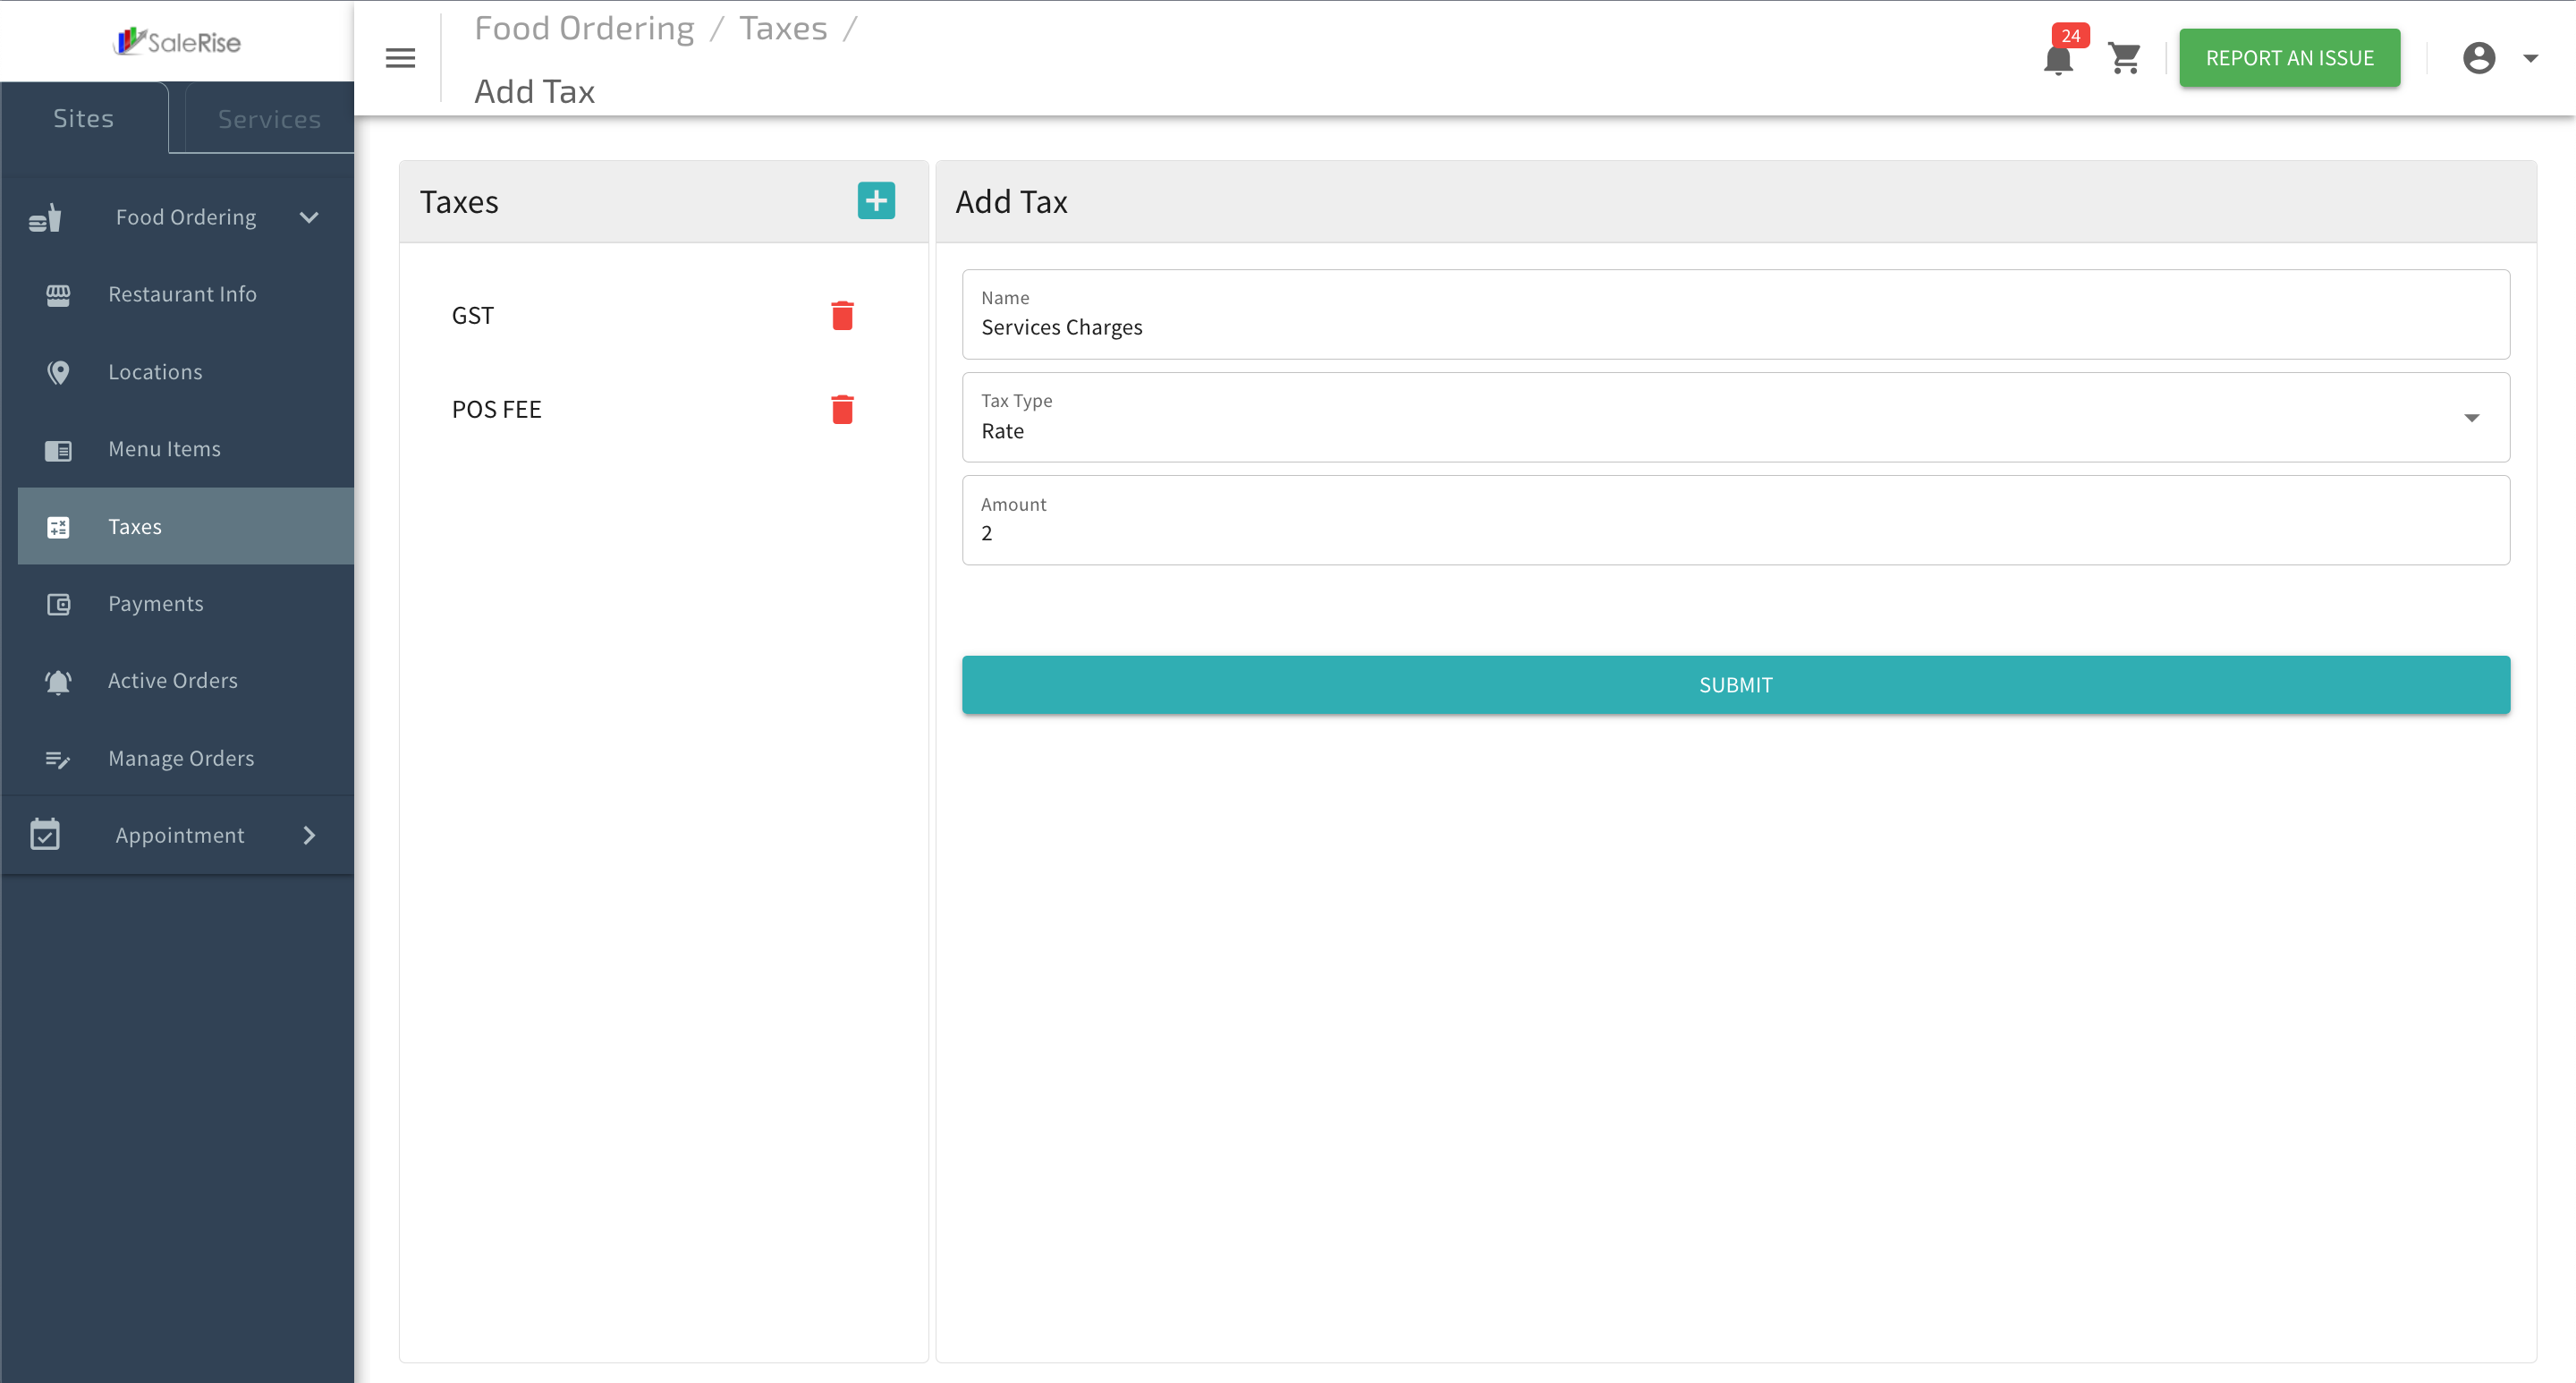
- Tax Name: Provide a descriptive name for the tax.
- Tax Type: Choose between "Rate" or "Flat Amount."
- Amount: Enter the applicable tax amount.
Save Changes:
Click "Save" to confirm the addition of the new tax.
Payment Method
In the "Payment Methods" section, users can configure payment options for their restaurant. Choose from Cash, PayPal, and Stripe, each with specific settings tailored to the selected method.
Payment Methods - Setup
5.1 Payment Methods - Setup Overview
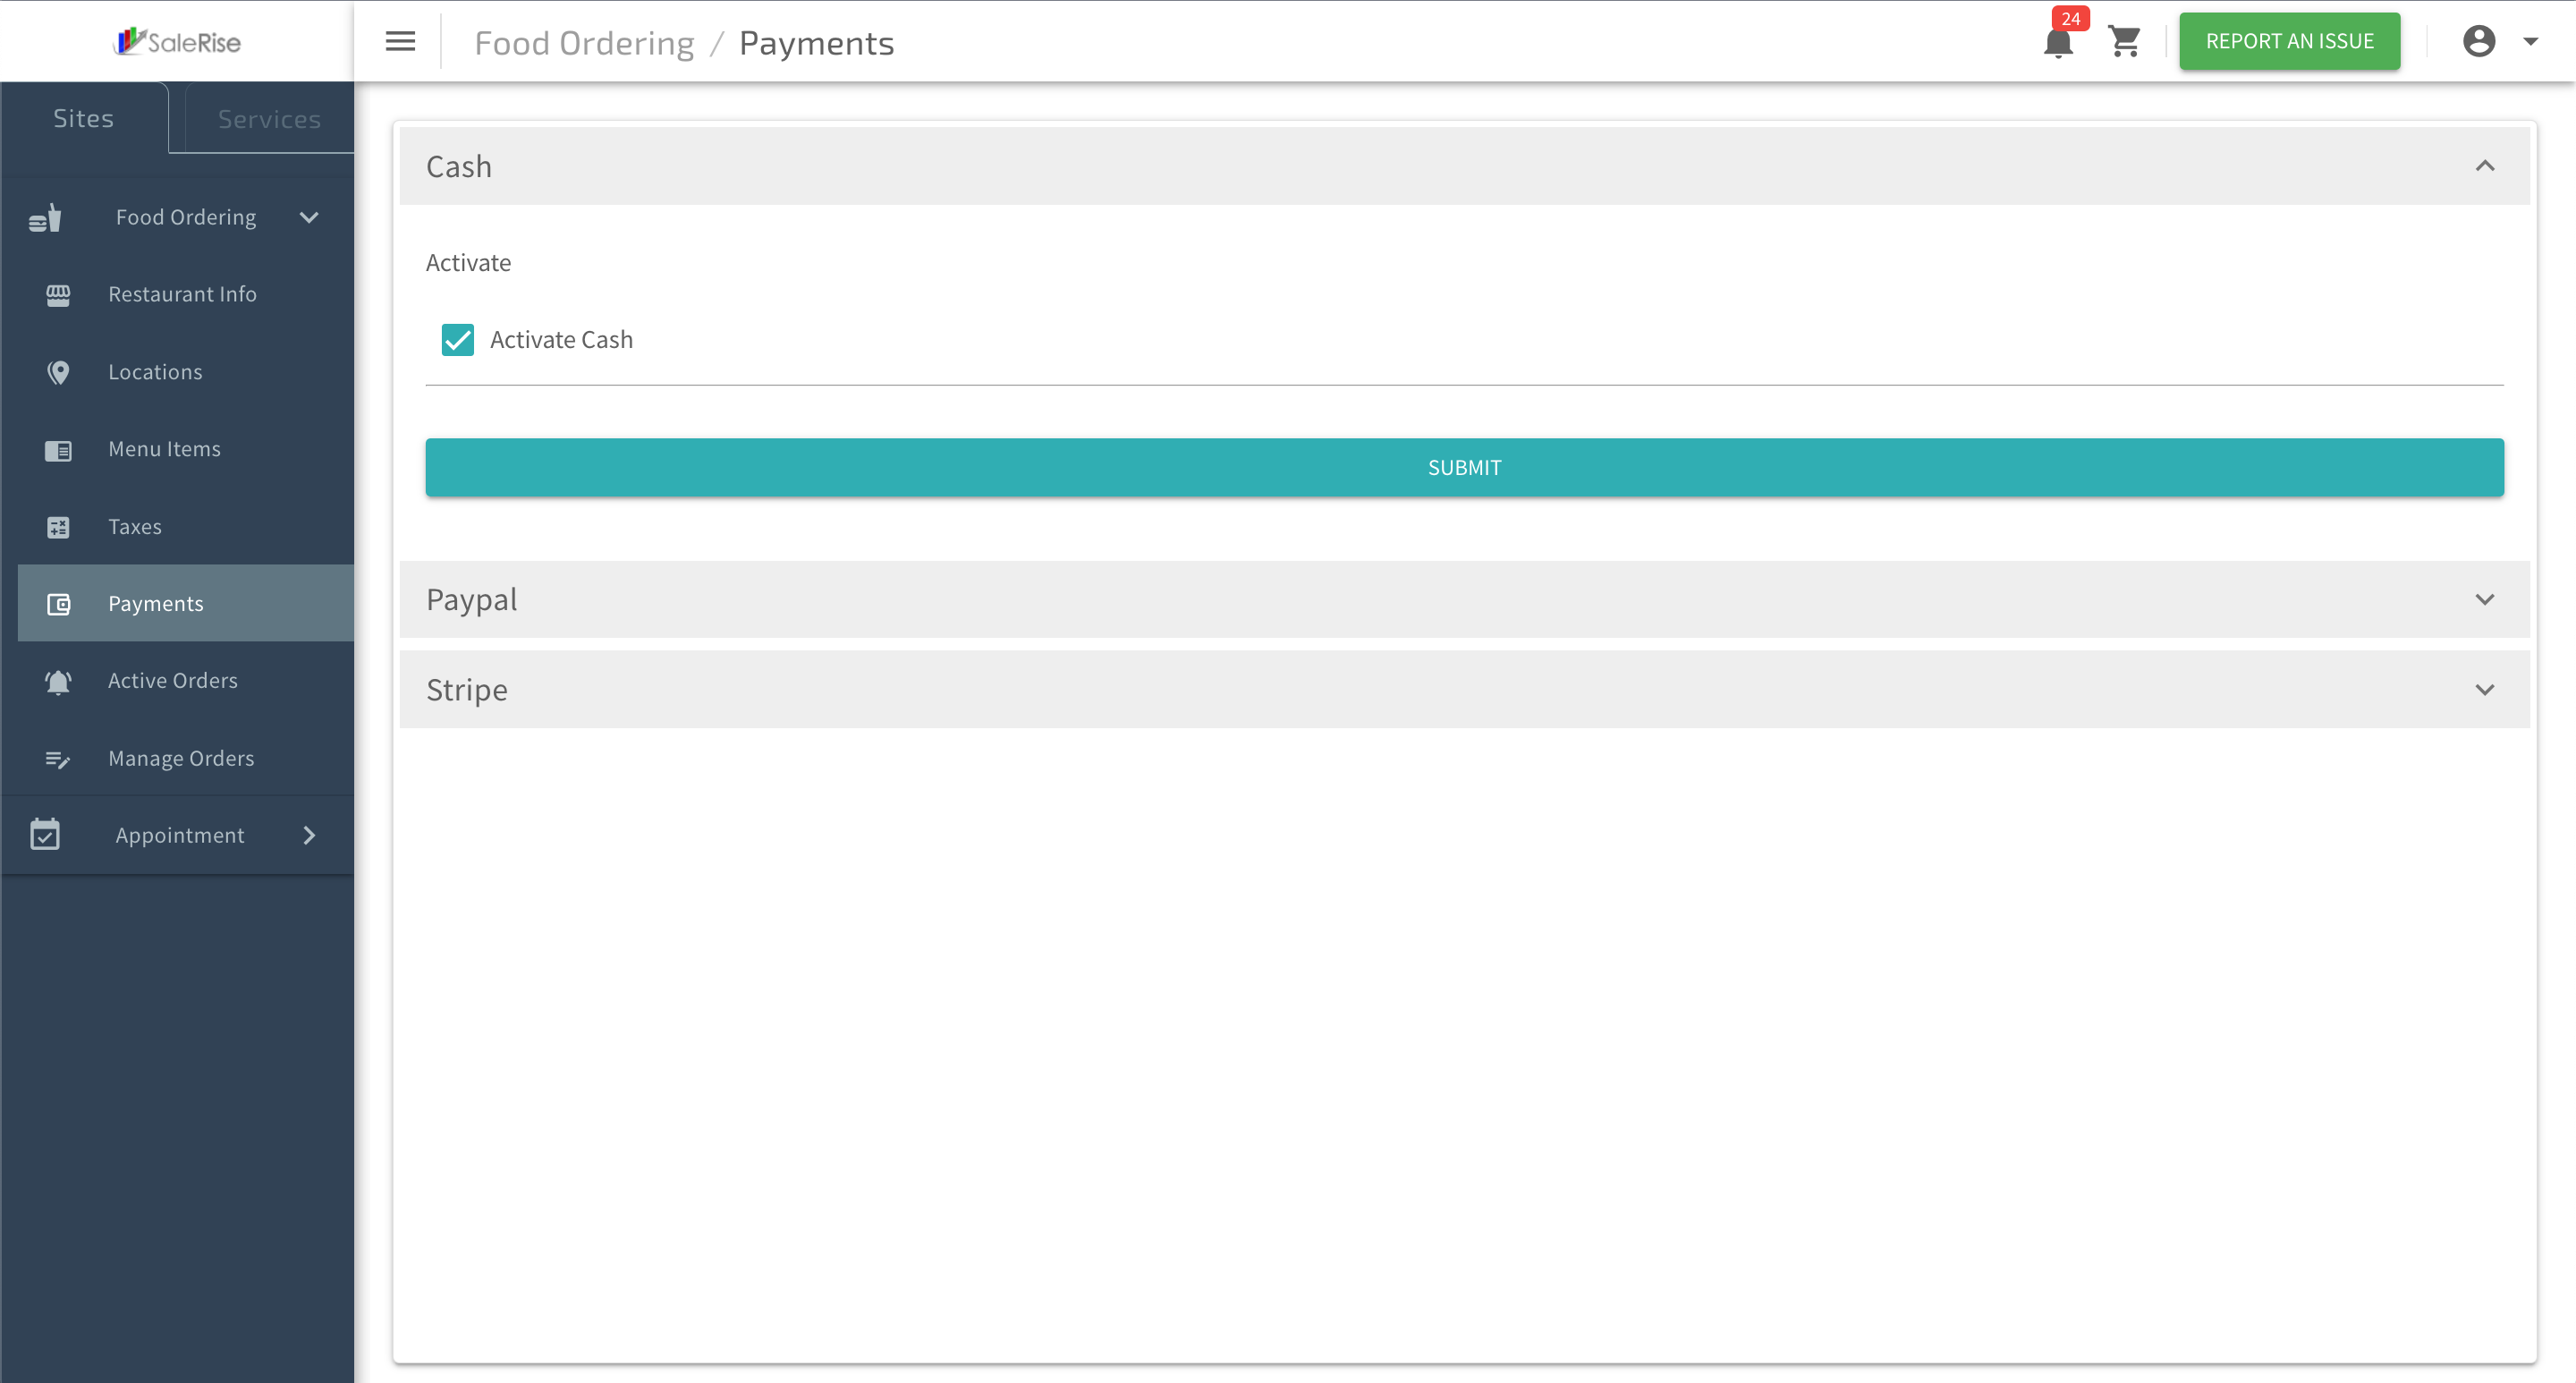
In the "Payment Methods" section, users can configure payment options for their restaurant. Choose from Cash, PayPal, and Stripe, each with specific settings tailored to the selected method.
1. Access "Payment Methods":
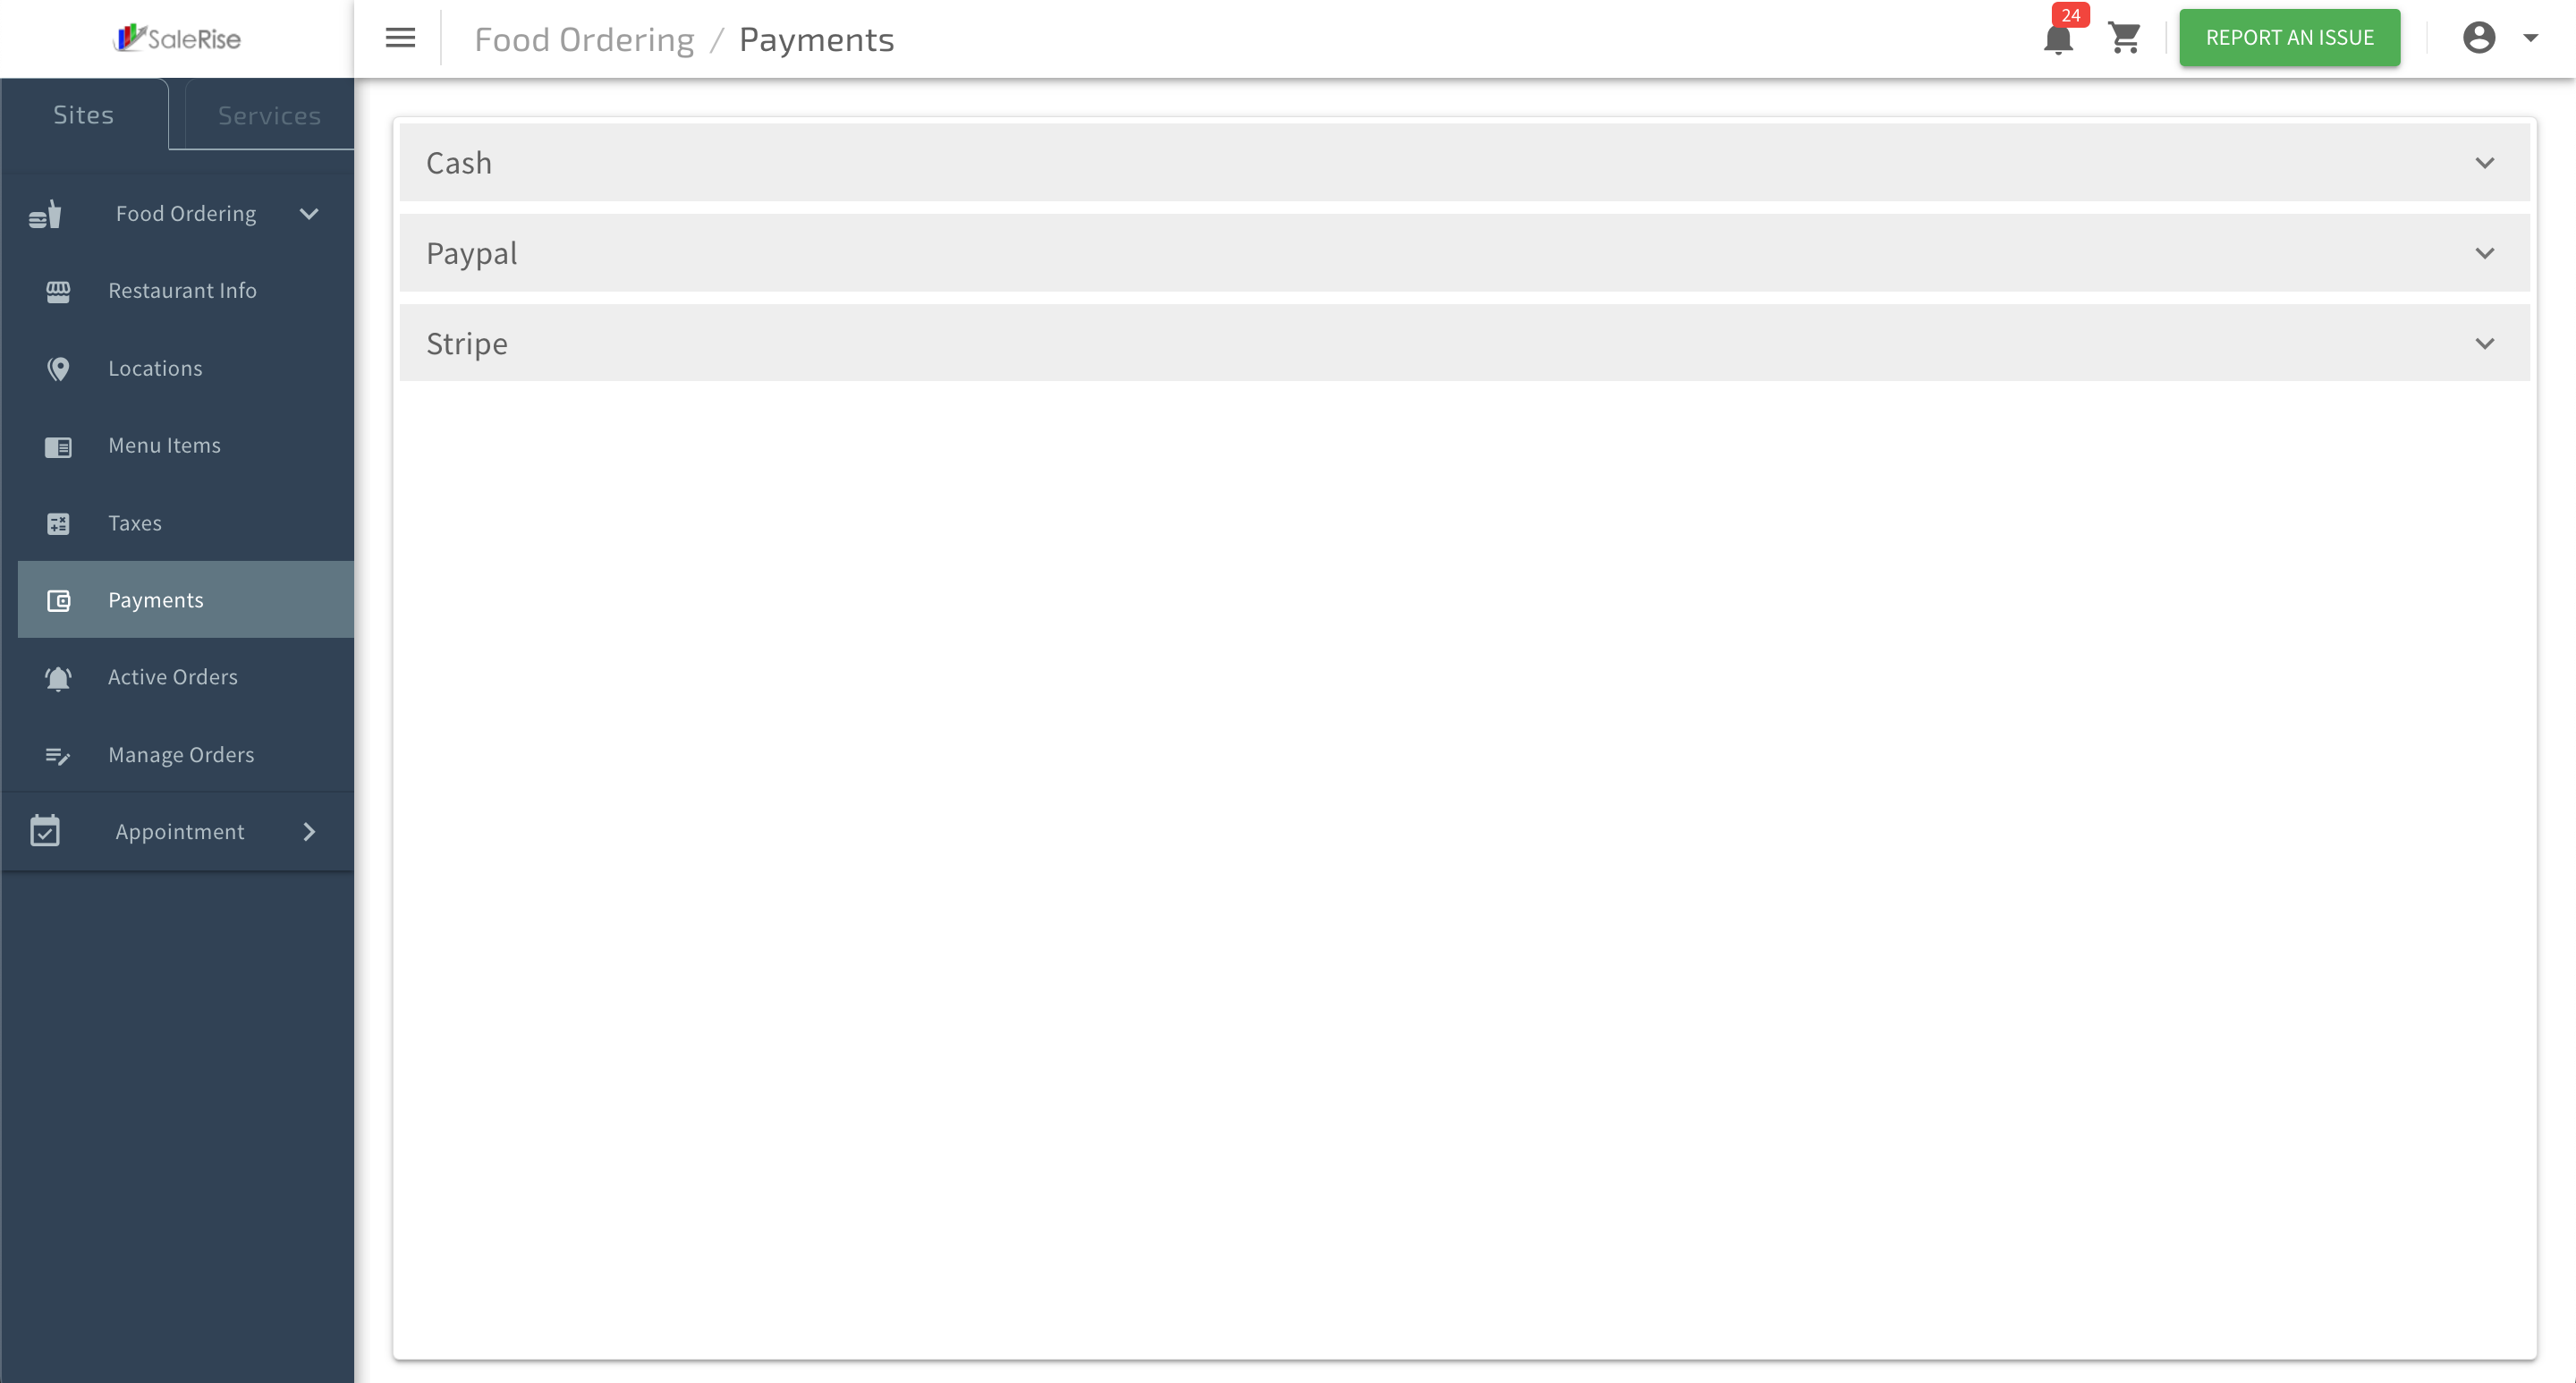
2. Cash:
- Active Checkbox: Activate or deactivate Cash as a payment option.
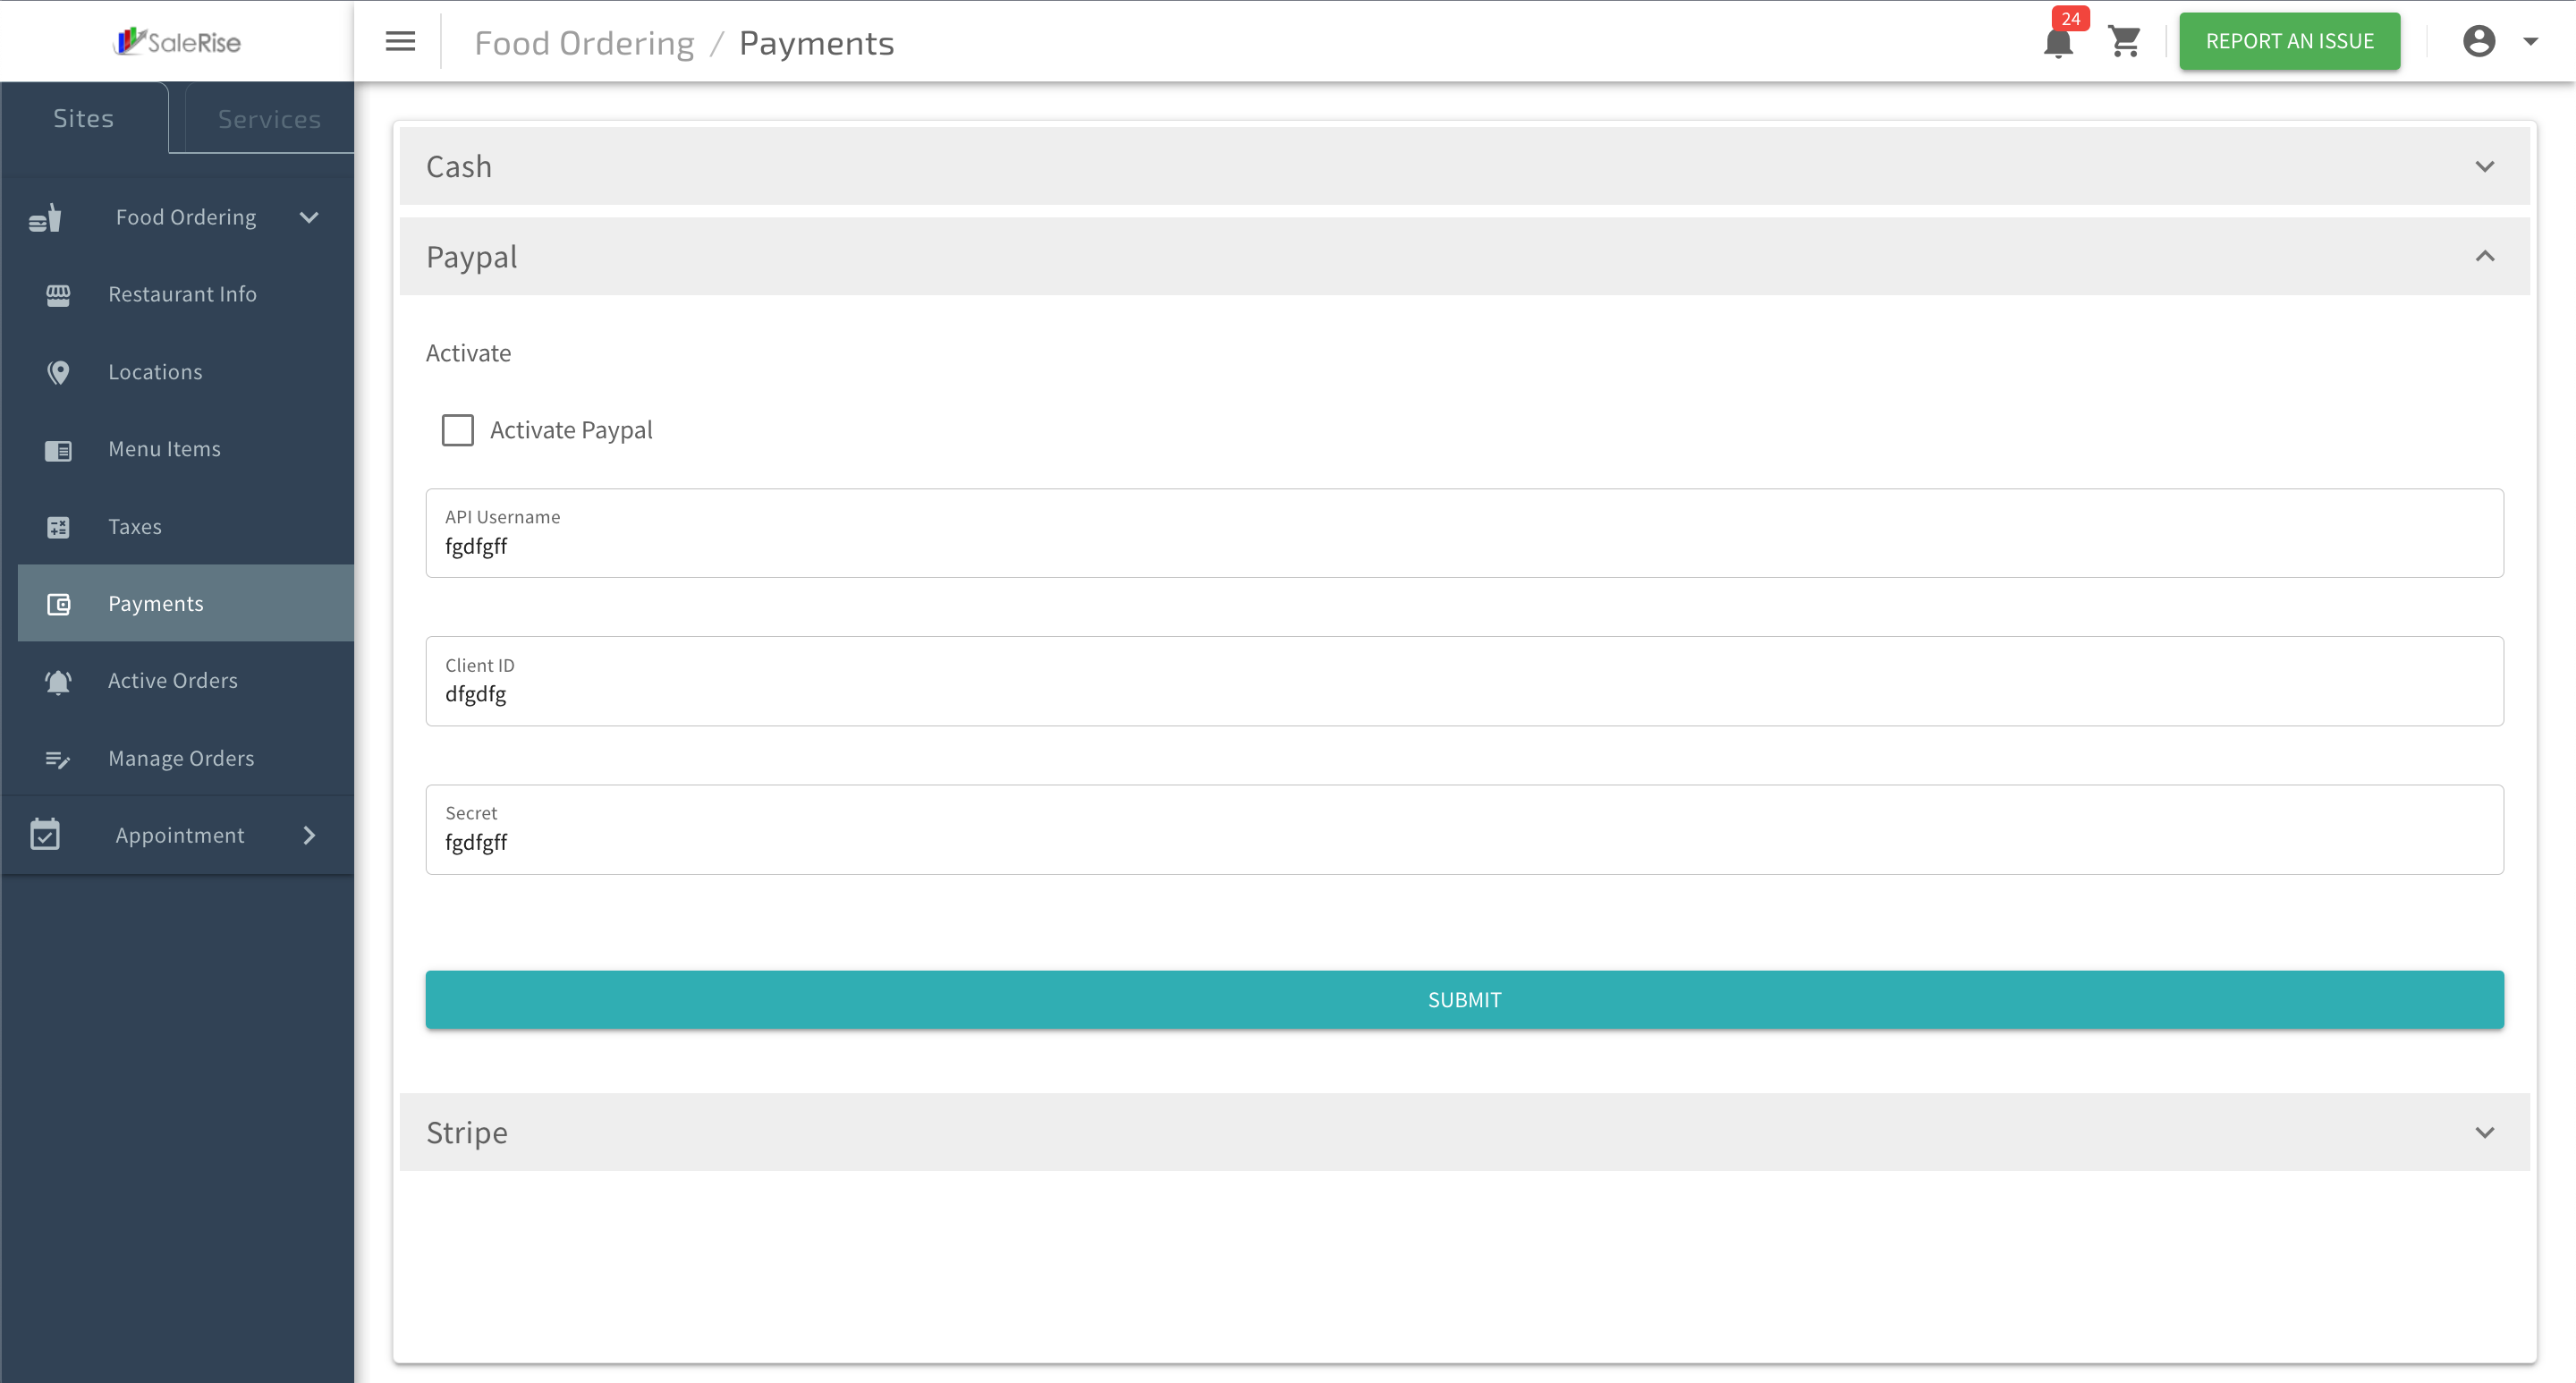
3. PayPal:
- Active Checkbox: Activate or deactivate PayPal as a payment option.
- API User Name: Enter the API user name for PayPal integration.
- Client ID: Provide the PayPal client ID.
- Secret: Enter the secret key for PayPal integration.
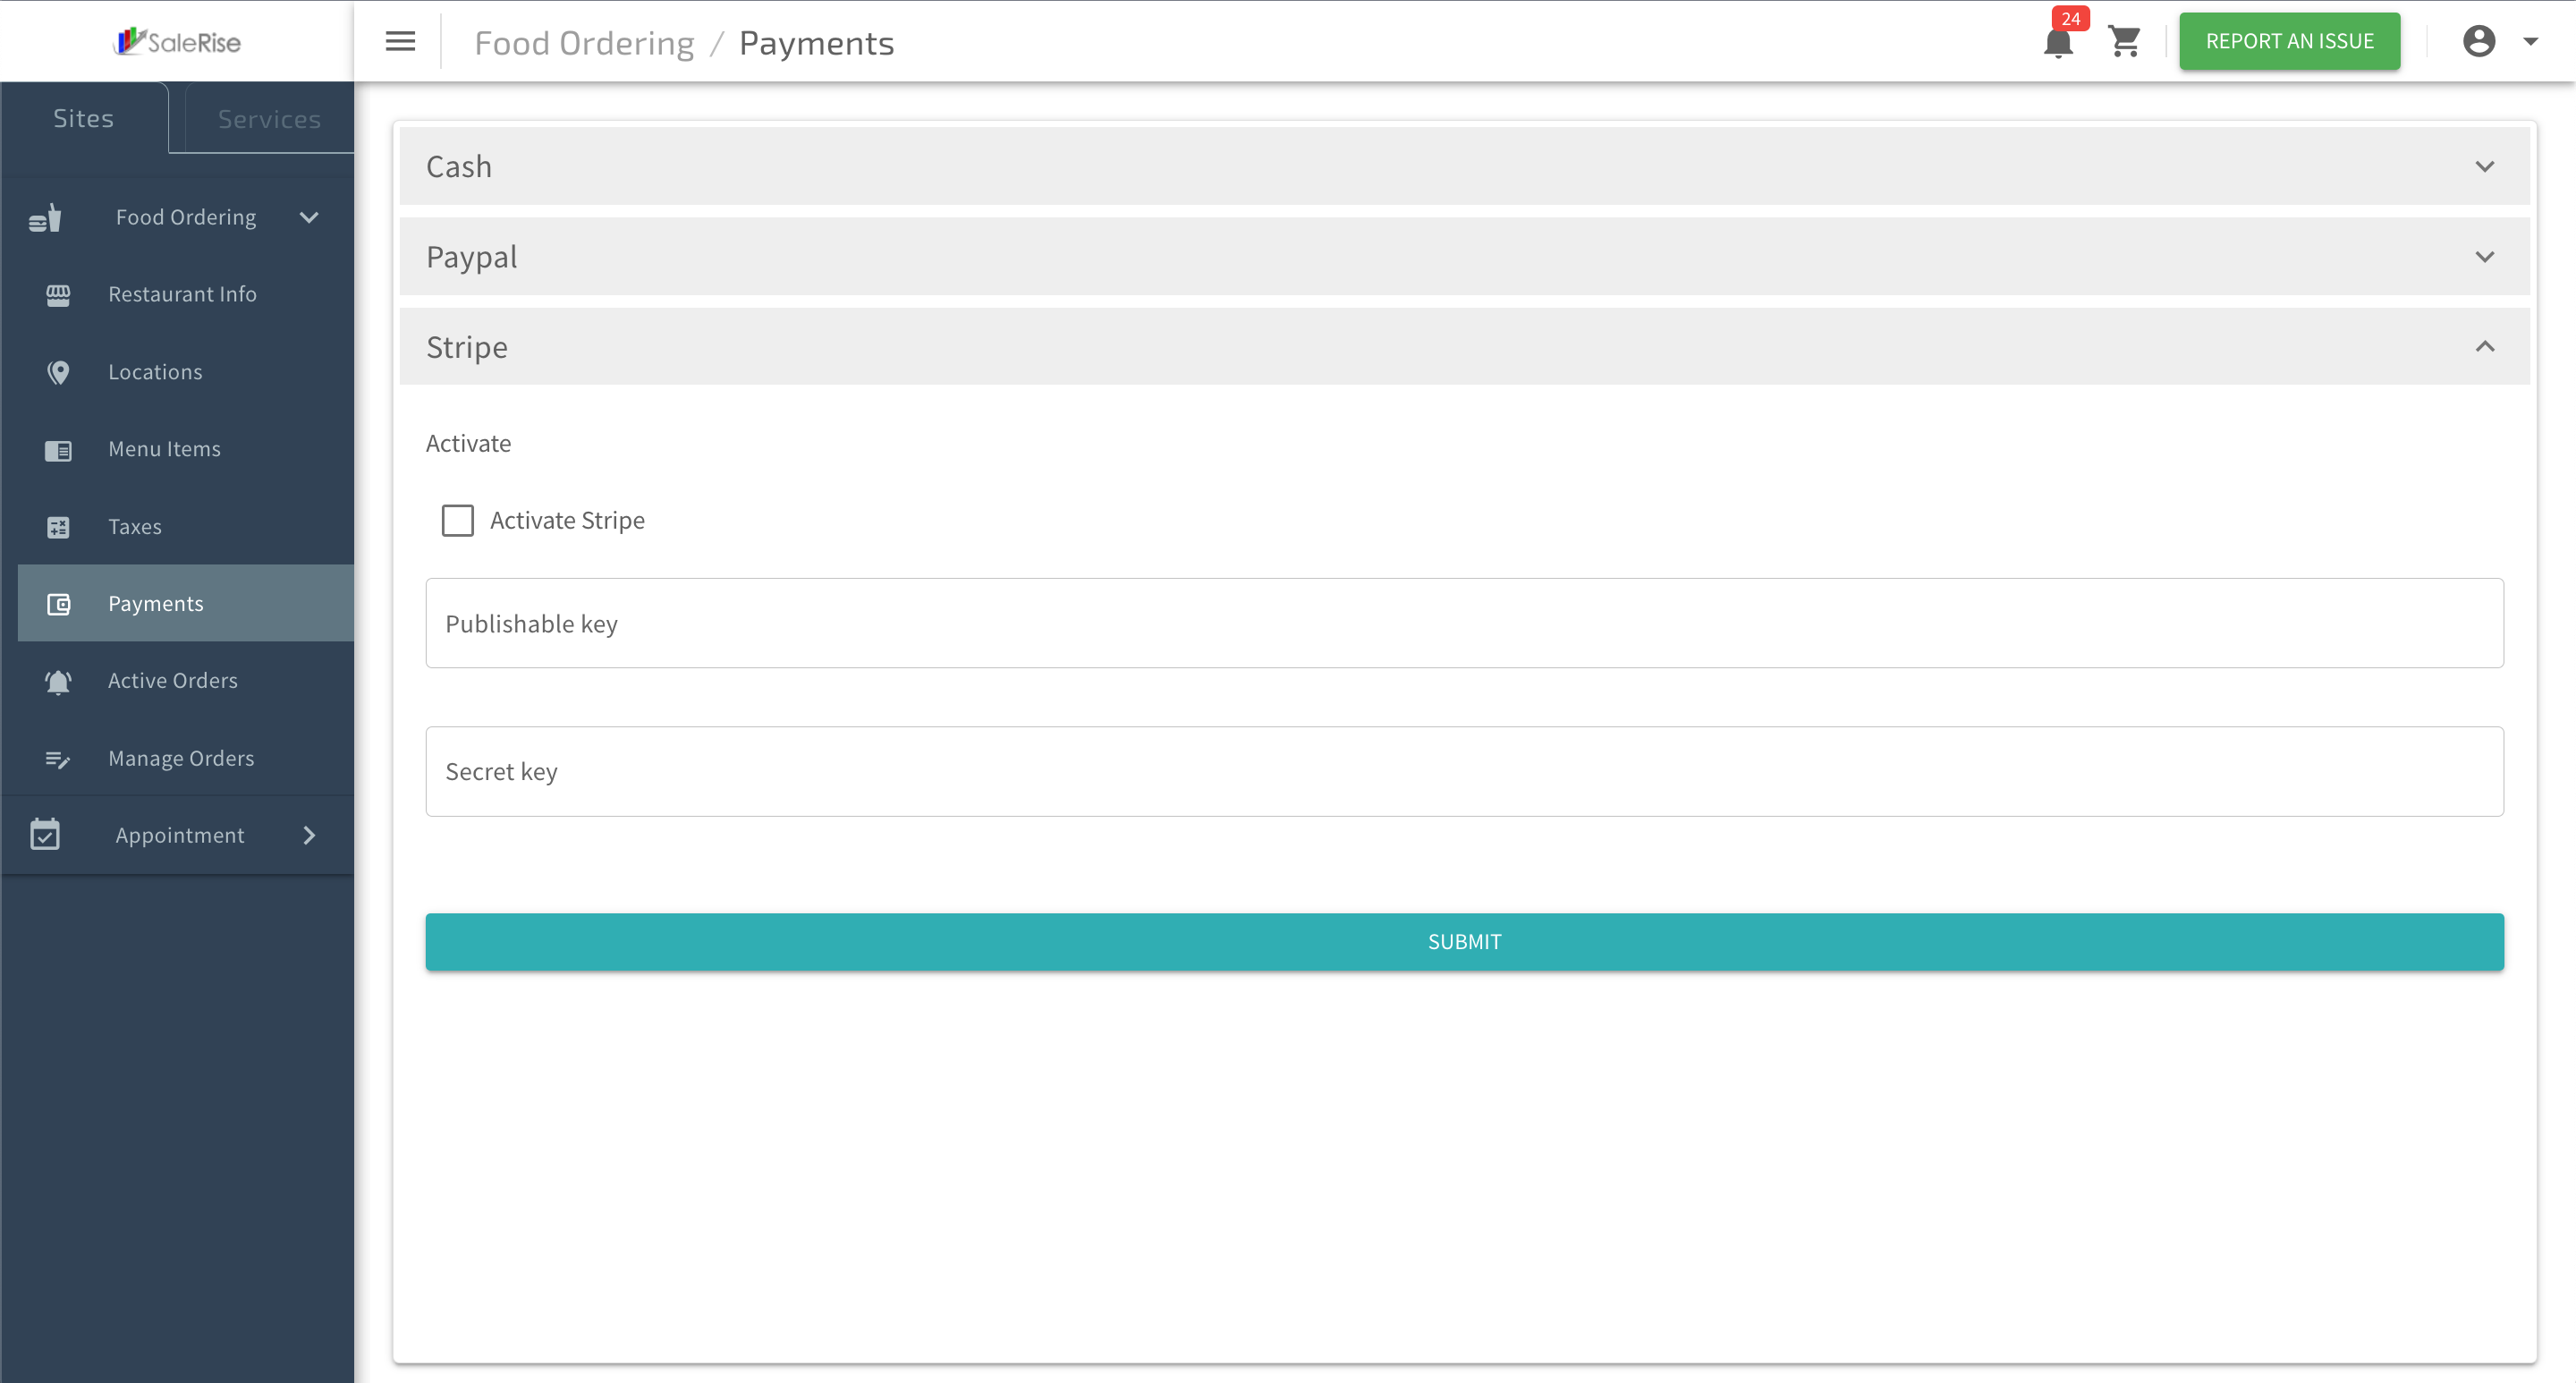
4. Stripe:
- Active Checkbox: Activate or deactivate Stripe as a payment option.
- Publishable Key: Provide the Stripe publishable key.
- Secret Key: Enter the secret key for Stripe integration.
Active Orders Management
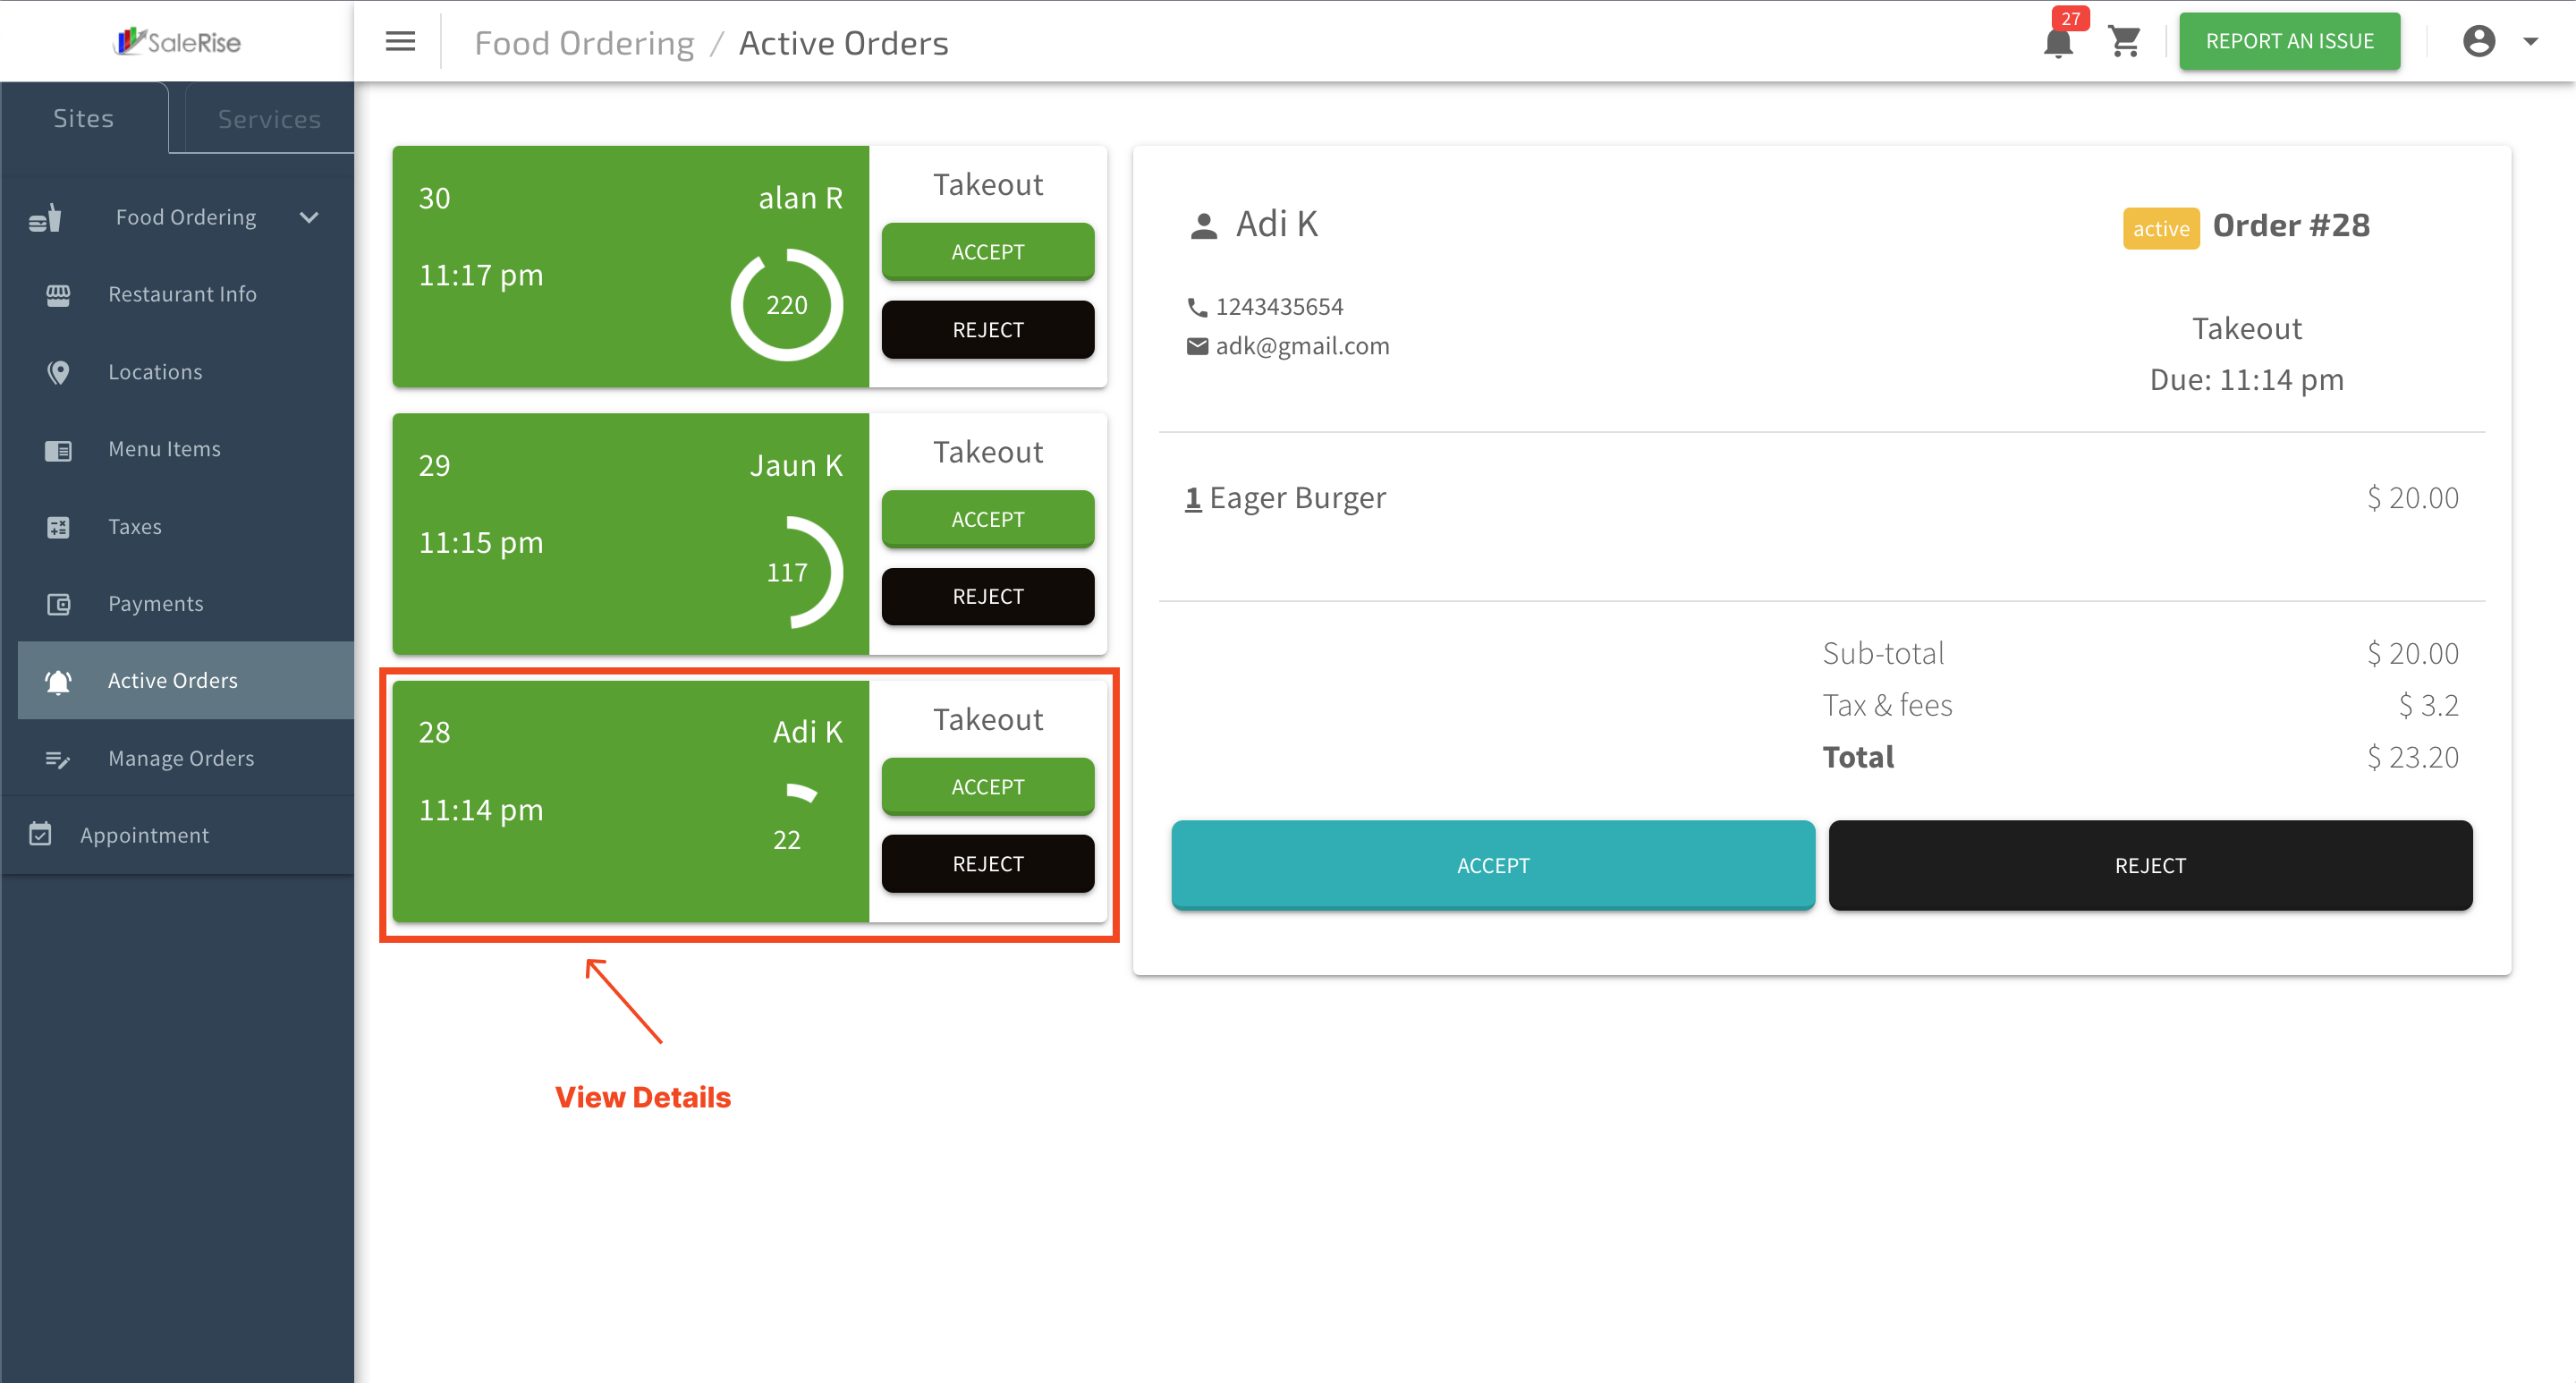
On the "Active Orders" page, users can efficiently manage incoming orders from their website or app. Each order card displays a timer, reflecting the response time set in the restaurant information. Users can accept or reject orders within this time frame, and upon cooking completion, mark the order as "Food Ready" to remove it from the active queue.
Active Orders
Active Orders Overview
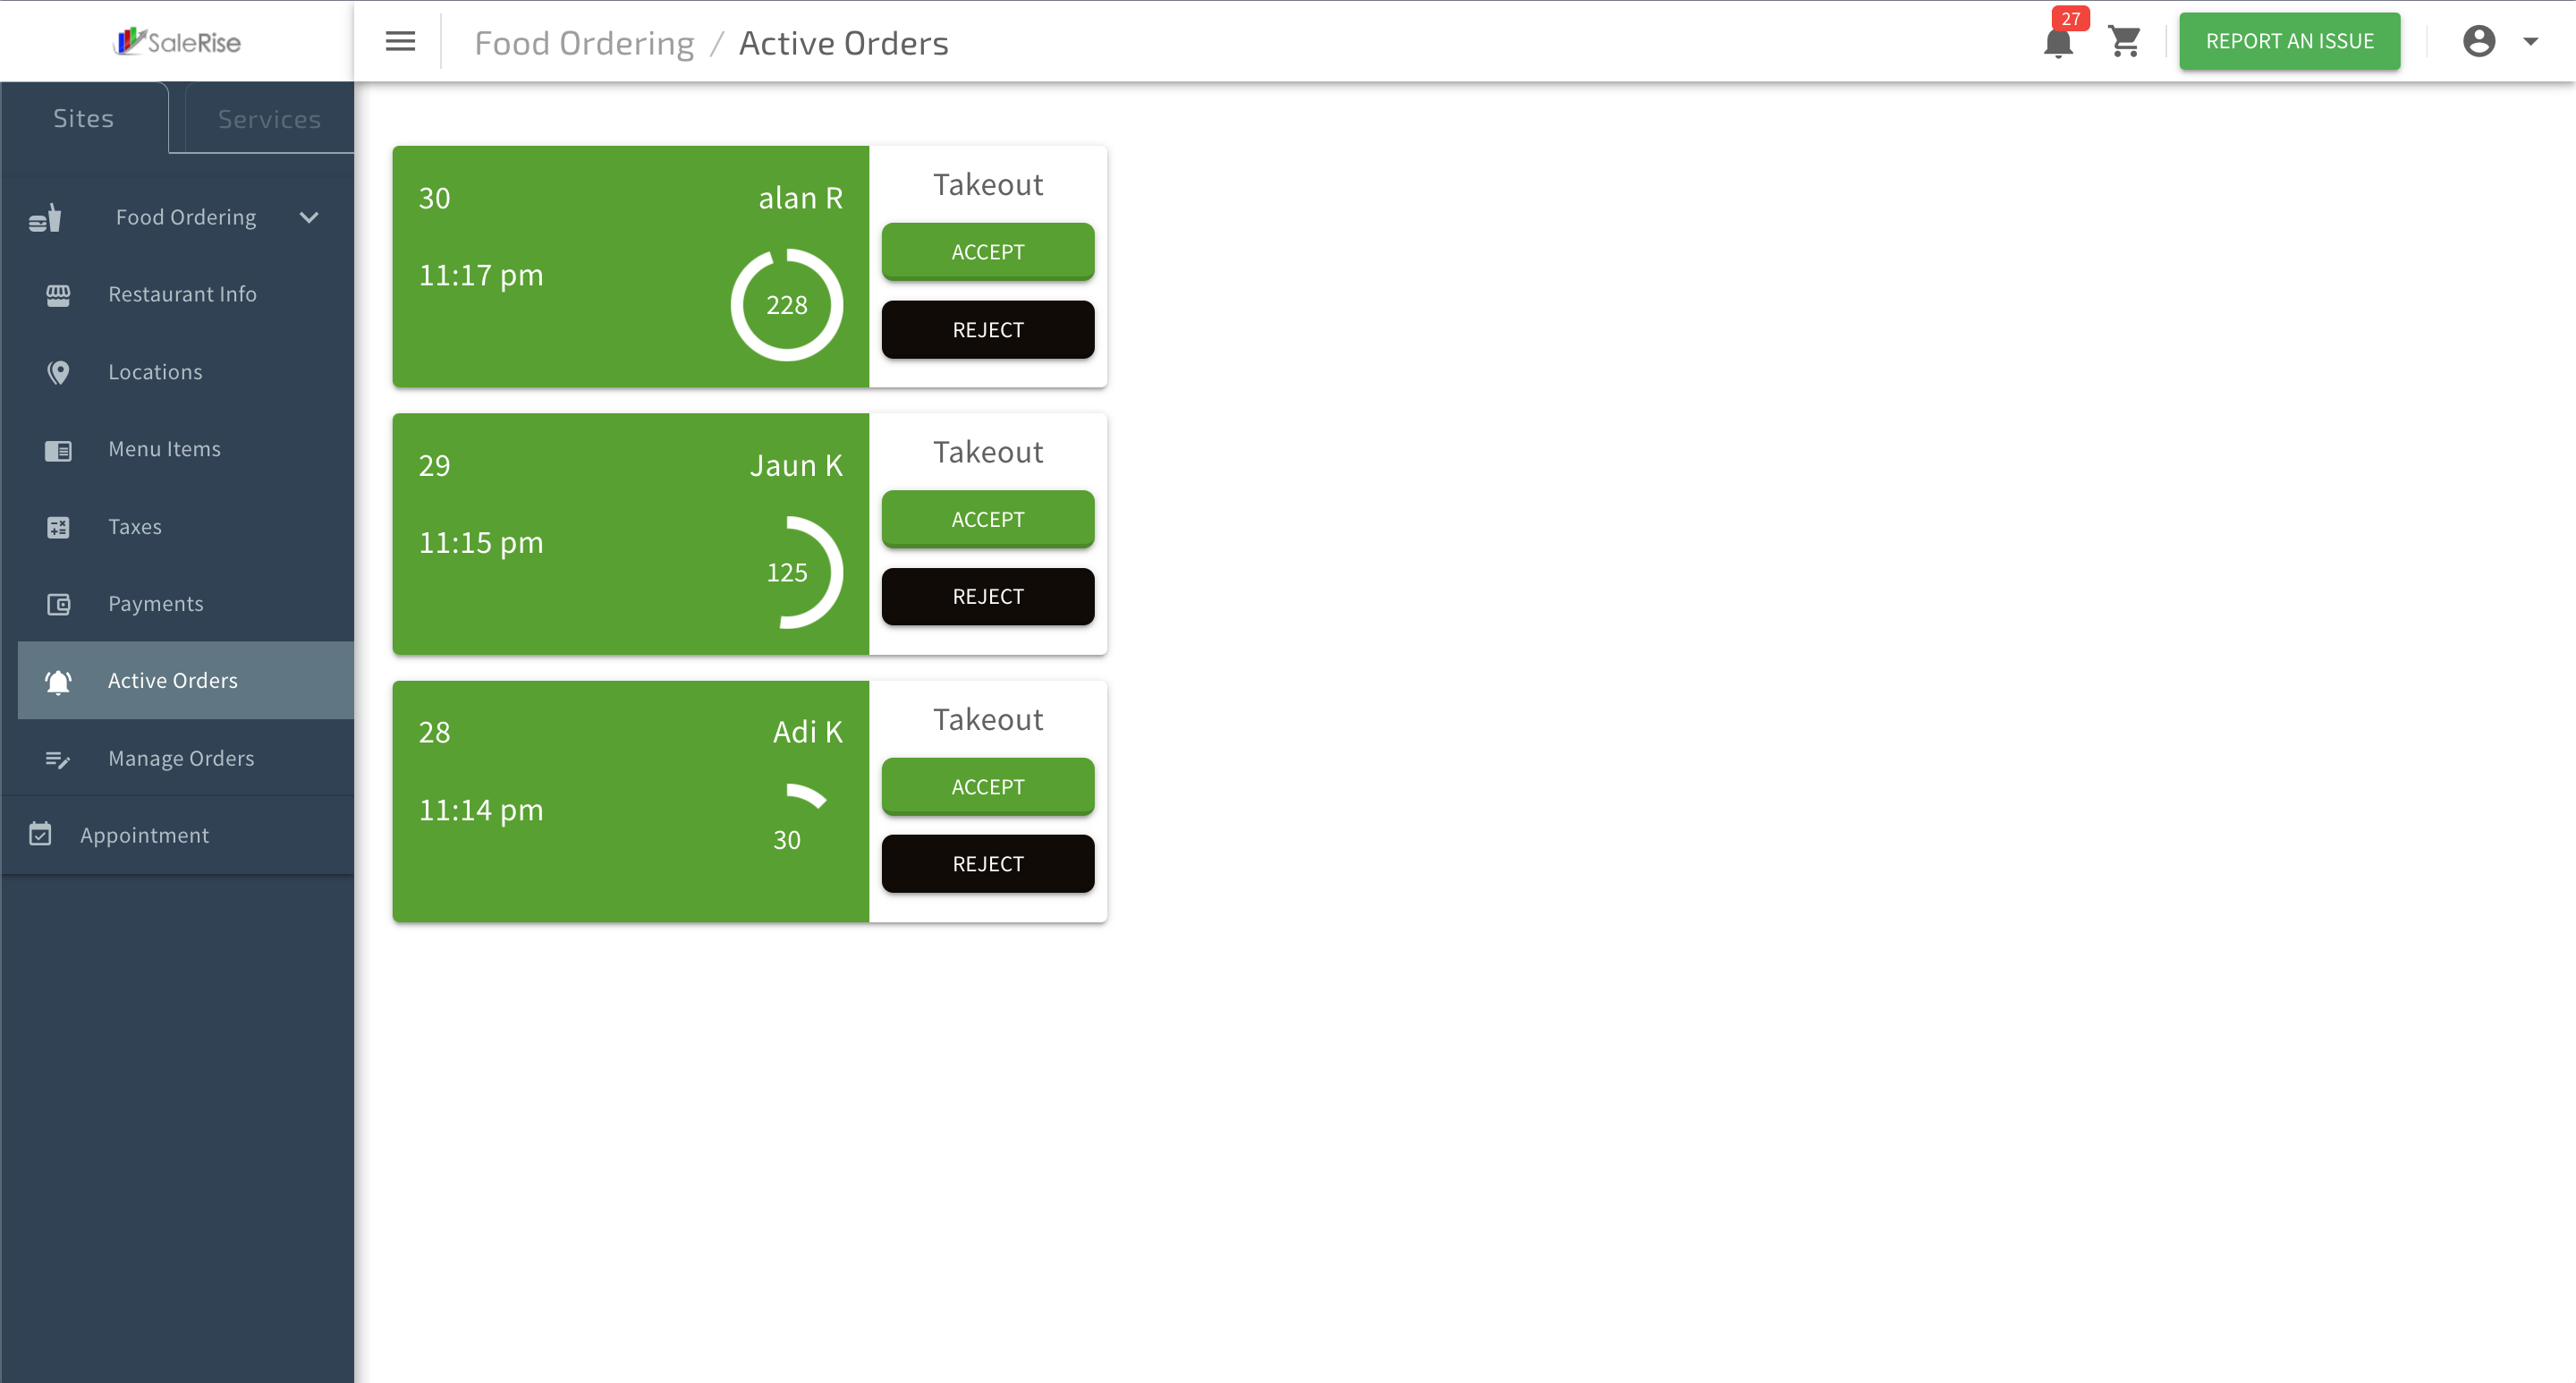
On the "Active Orders" page, users can efficiently manage incoming orders from their website or app. Each order card displays a timer, reflecting the response time set in the restaurant information. Users can accept or reject orders within this time frame, and upon cooking completion, mark the order as "Food Ready" to remove it from the active queue.
1. Access "Active Orders":
2. Order Cards:
Each order is represented by a card displaying essential details.
- Timer: Reflects the response time set in the restaurant information.
- Accept & Reject Buttons: Quickly respond to incoming orders by accepting or rejecting.
3. View Order Details:
- Click on an order card to view detailed information about the order.
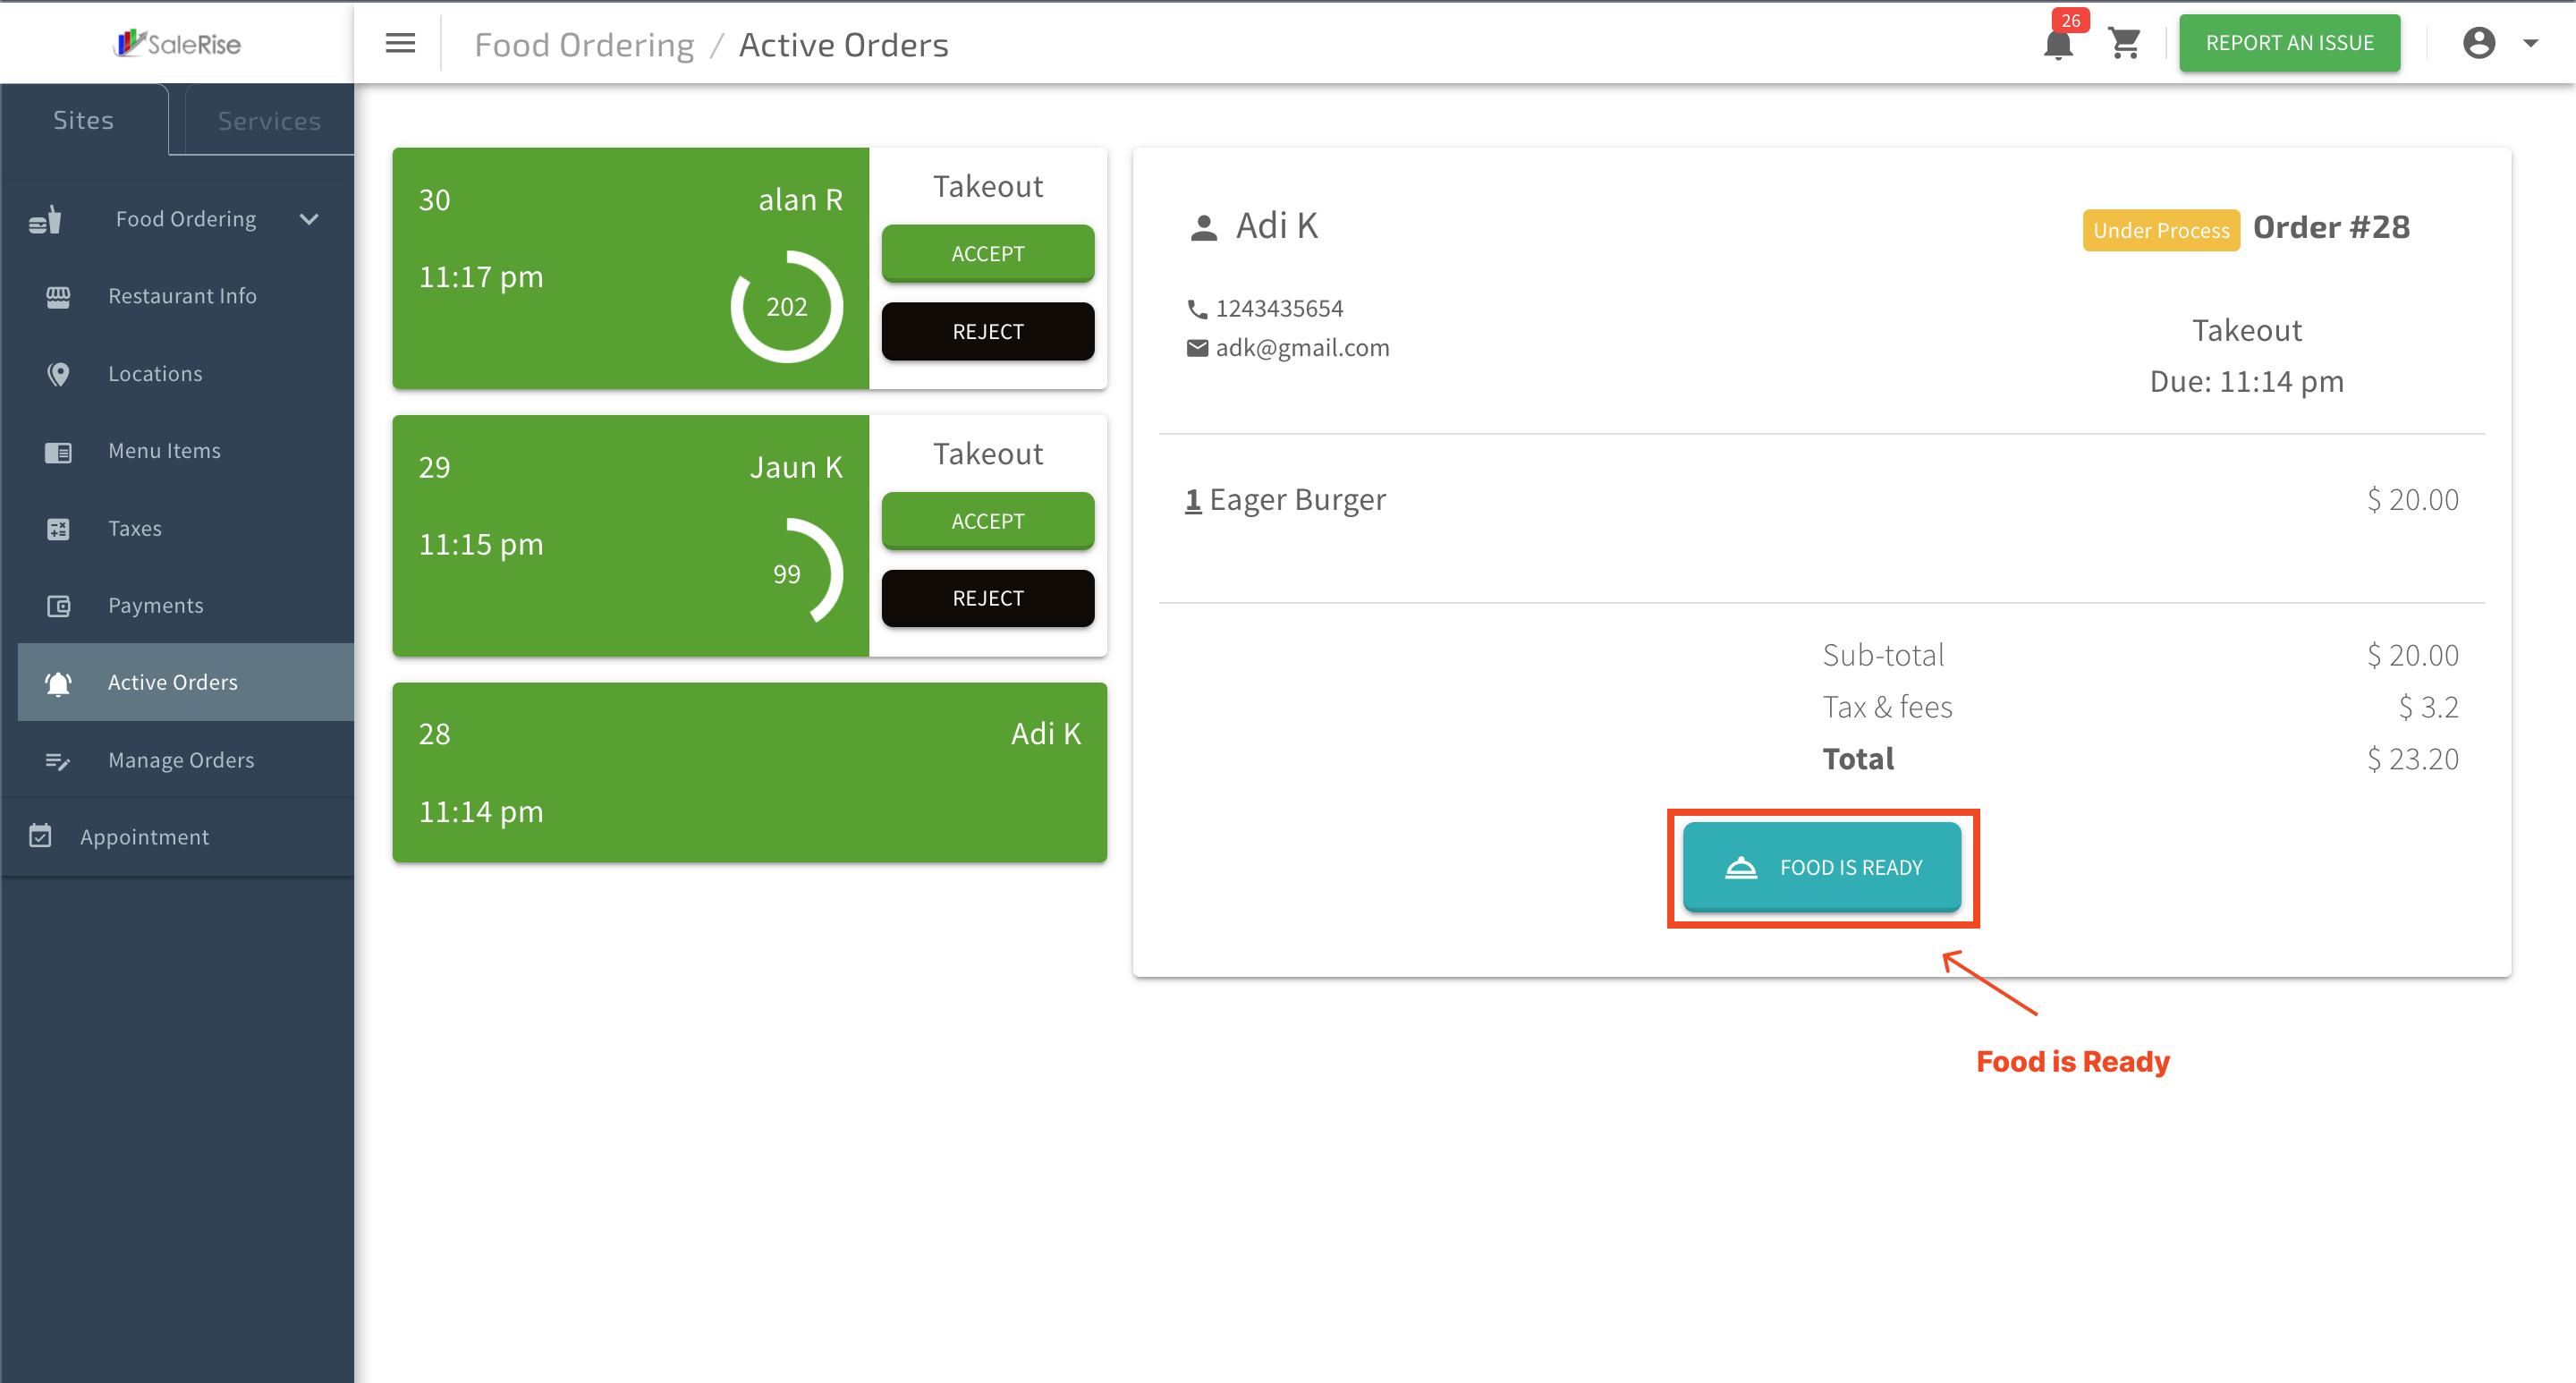
4. Accept Order:
- If ready to proceed, click "Accept" within the specified response time.

5. Reject Order:
- If unable to accept the order, click "Reject" within the response time.

6. Food Ready:
- After cooking, click "Food Ready" to indicate that the order is prepared for pickup or delivery.
- Once marked as "Food Ready," the order disappears from the active order queue.
Manage Orders
On the "Manage Orders" page, users can efficiently organize and review both new and old orders. The page offers filters for easy categorization, and users can view detailed invoices for each order.
Manage Orders view
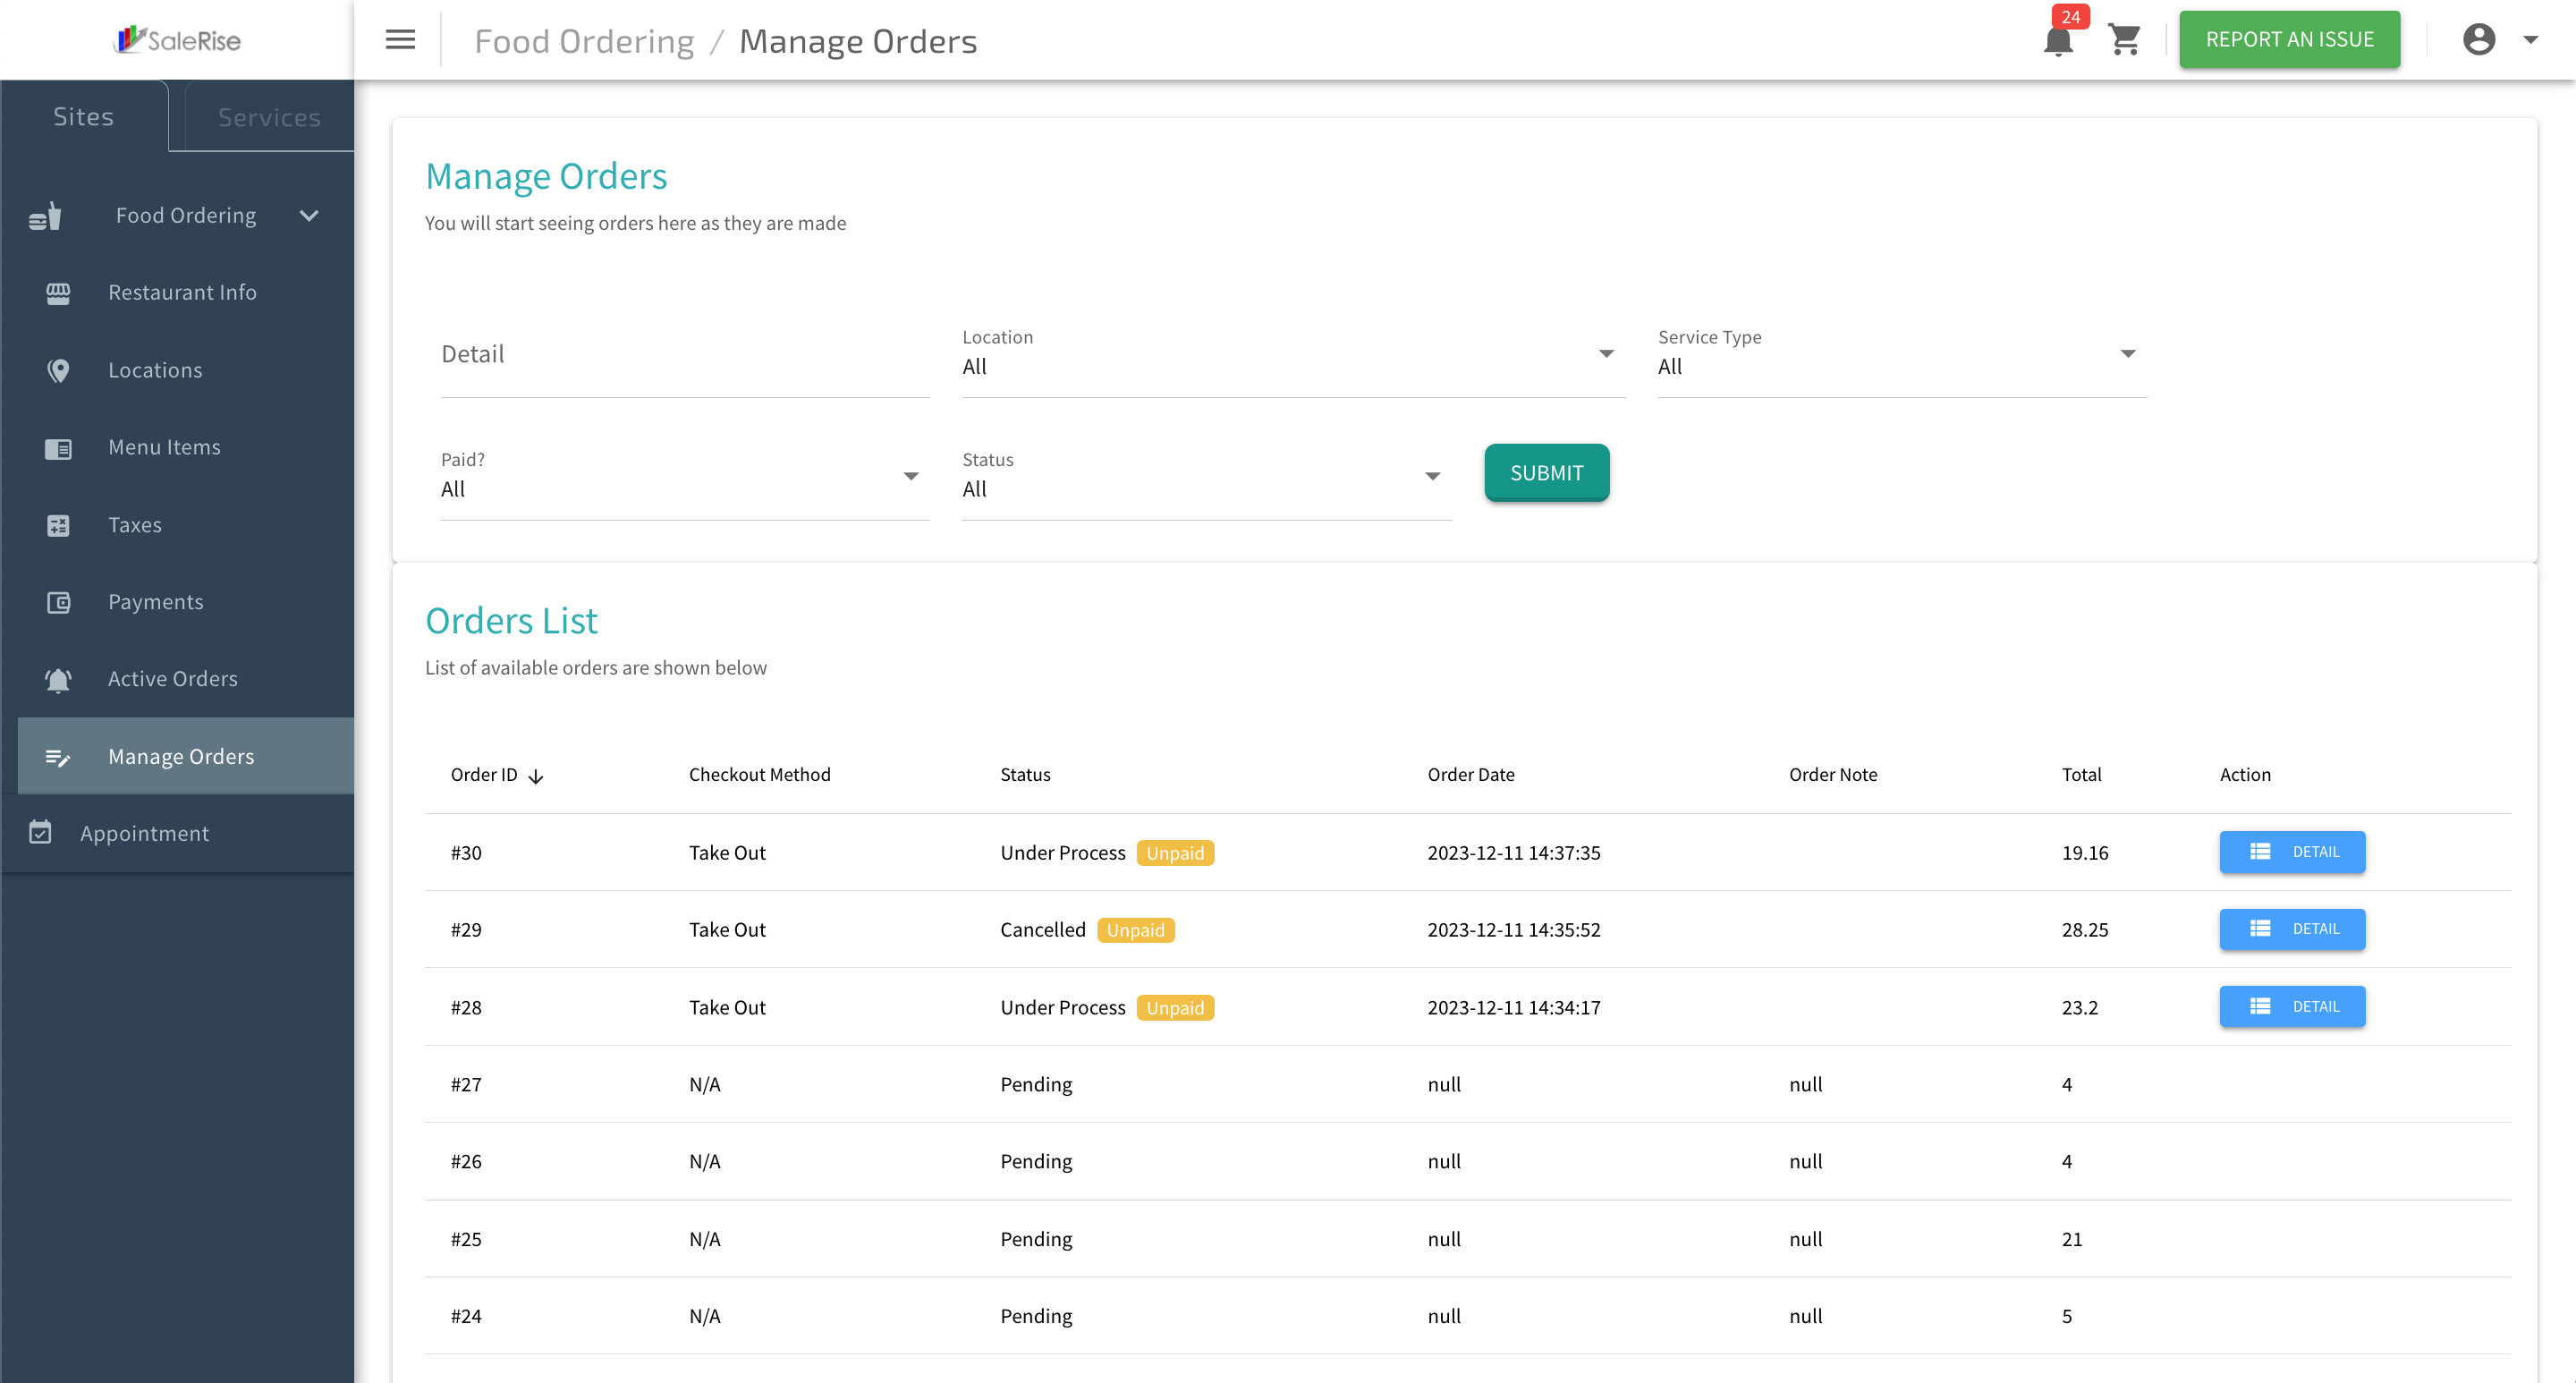
Manage Orders Overview
On the "Manage Orders" page, users can efficiently organize and review both new and old orders. The page offers filters for easy categorization, and users can view detailed invoices for each order.
-
Access "Manage Orders":
- Navigate to the "Manage Orders" page to review and organize orders.
-
Order List:
- The page displays a list of both new and old orders.

- The page displays a list of both new and old orders.
-
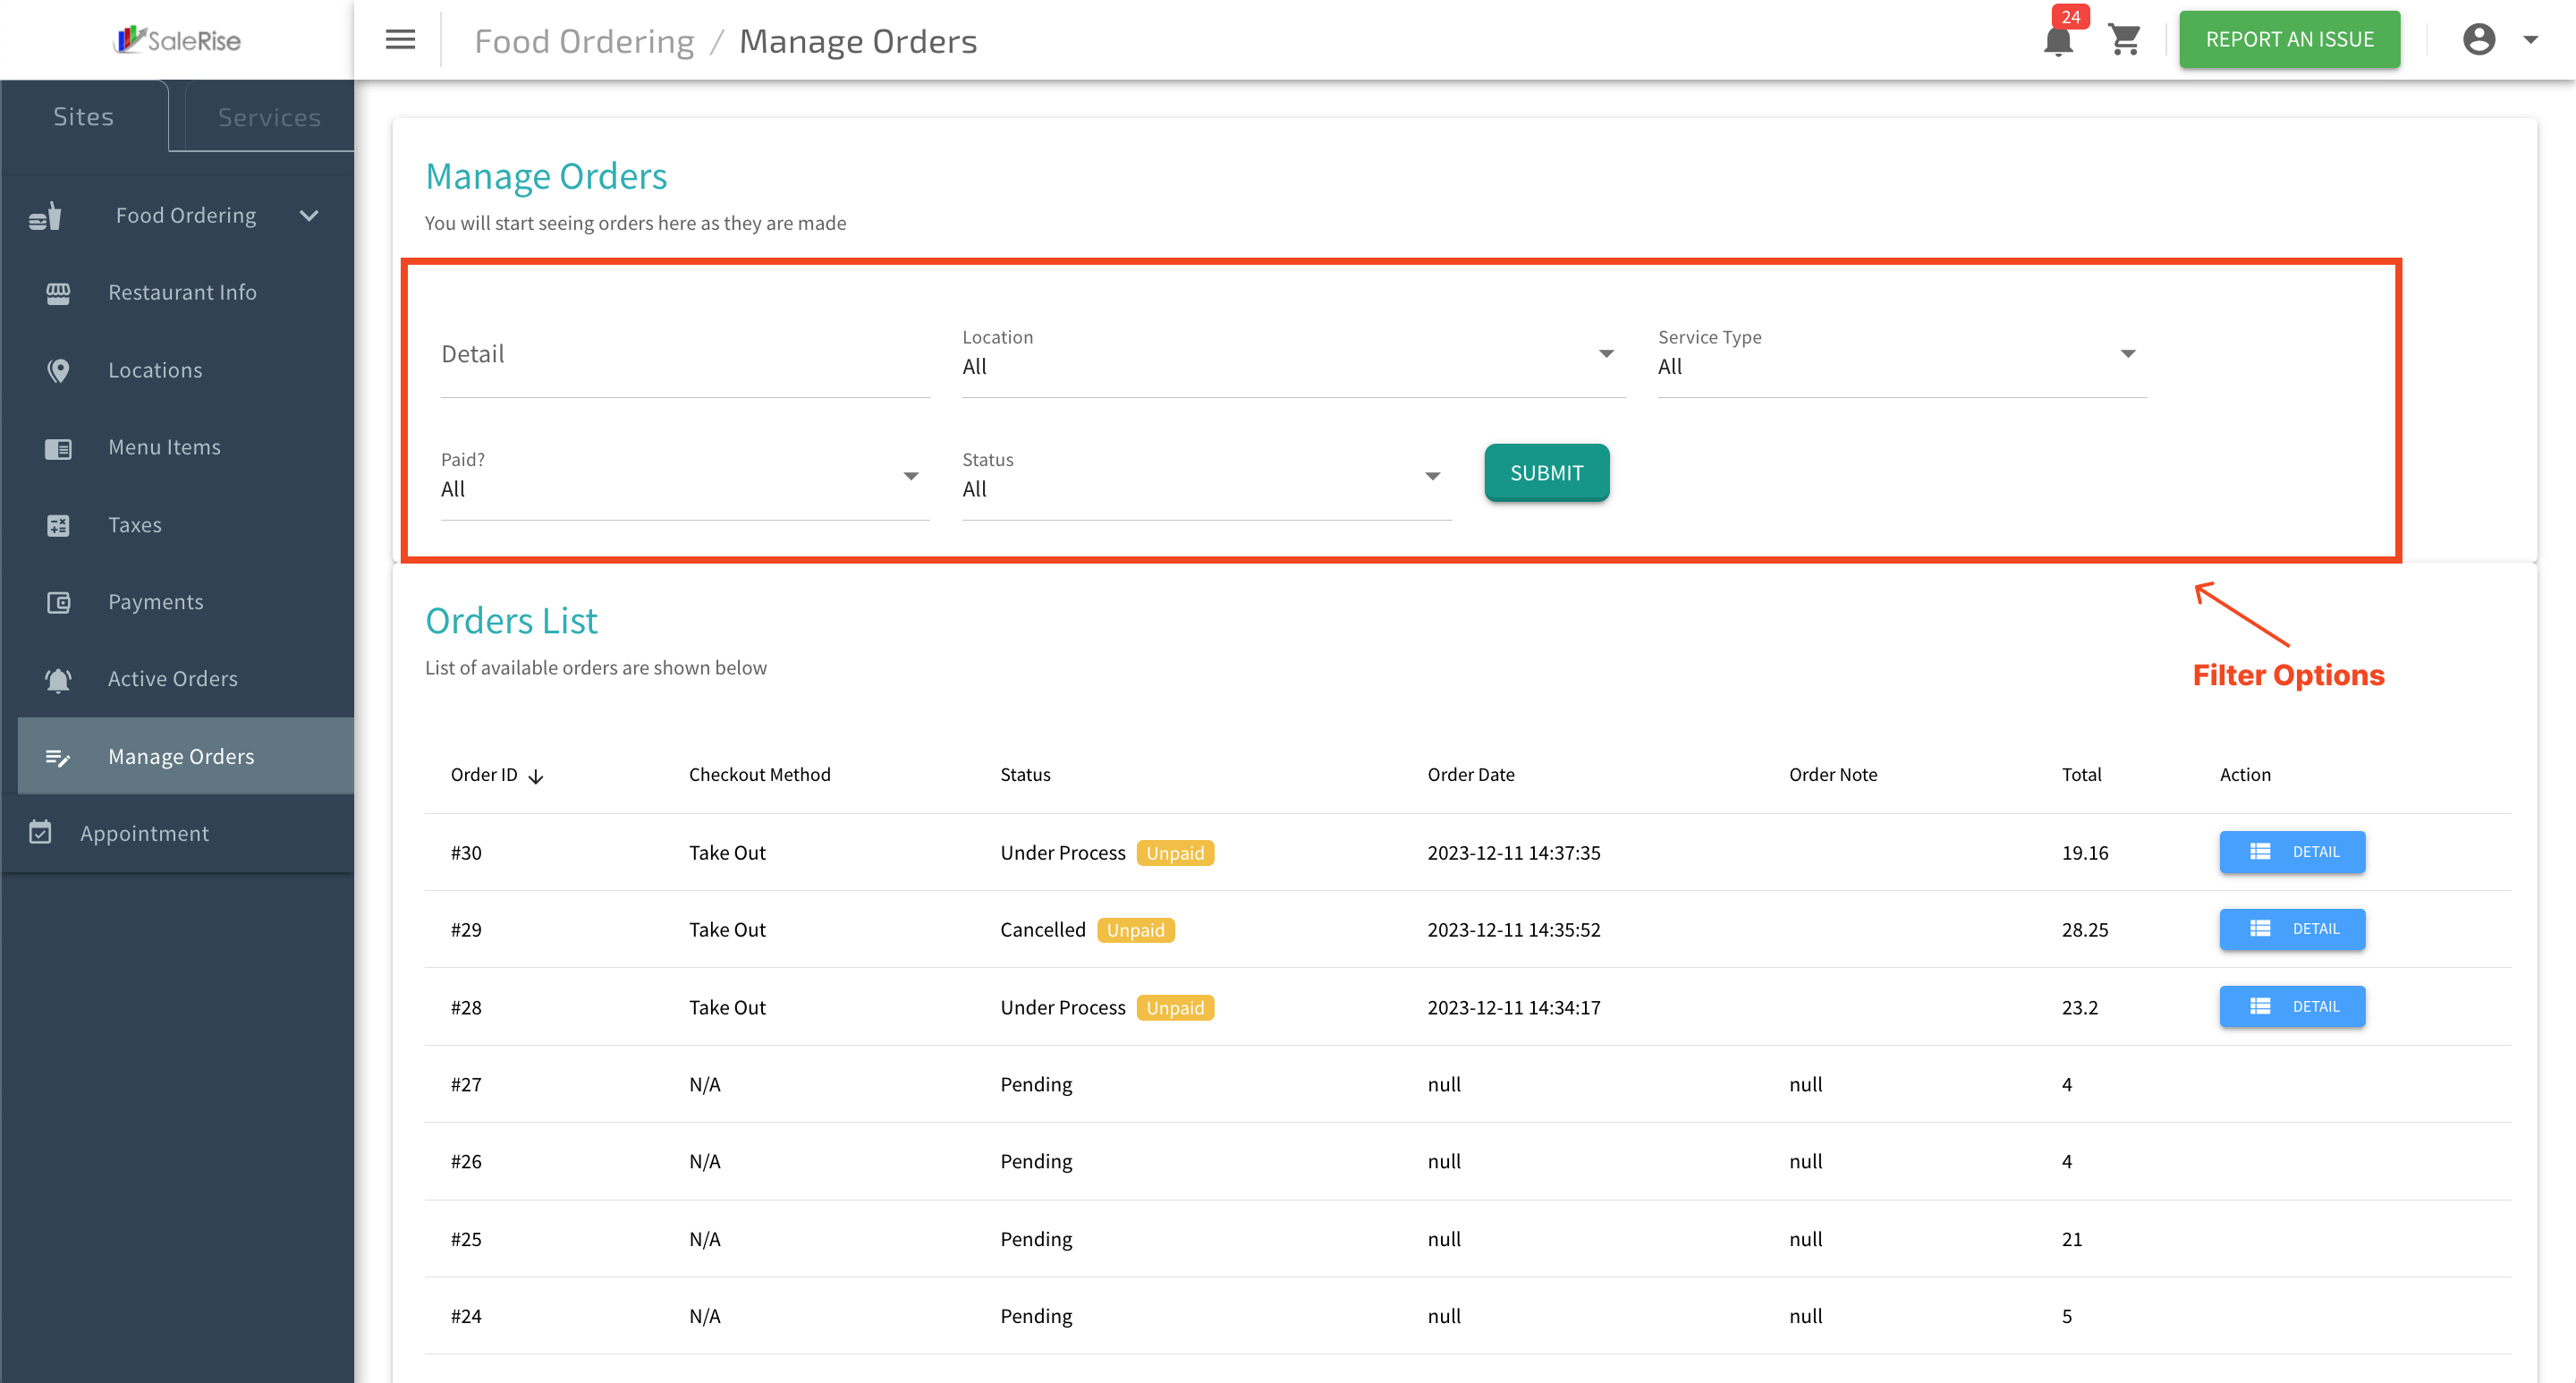
Filter Options:
- Utilize enhanced filters to categorize orders based on specific criteria.
- Location: Filter orders based on the restaurant location.
- Service Type: Categorize orders by takeout, delivery, or dine-in.
- Payment Status: Sort orders by payment status (e.g., paid, pending).
- Order Status: Categorize orders by status (e.g., new, in progress, completed).

- Utilize enhanced filters to categorize orders based on specific criteria.
-
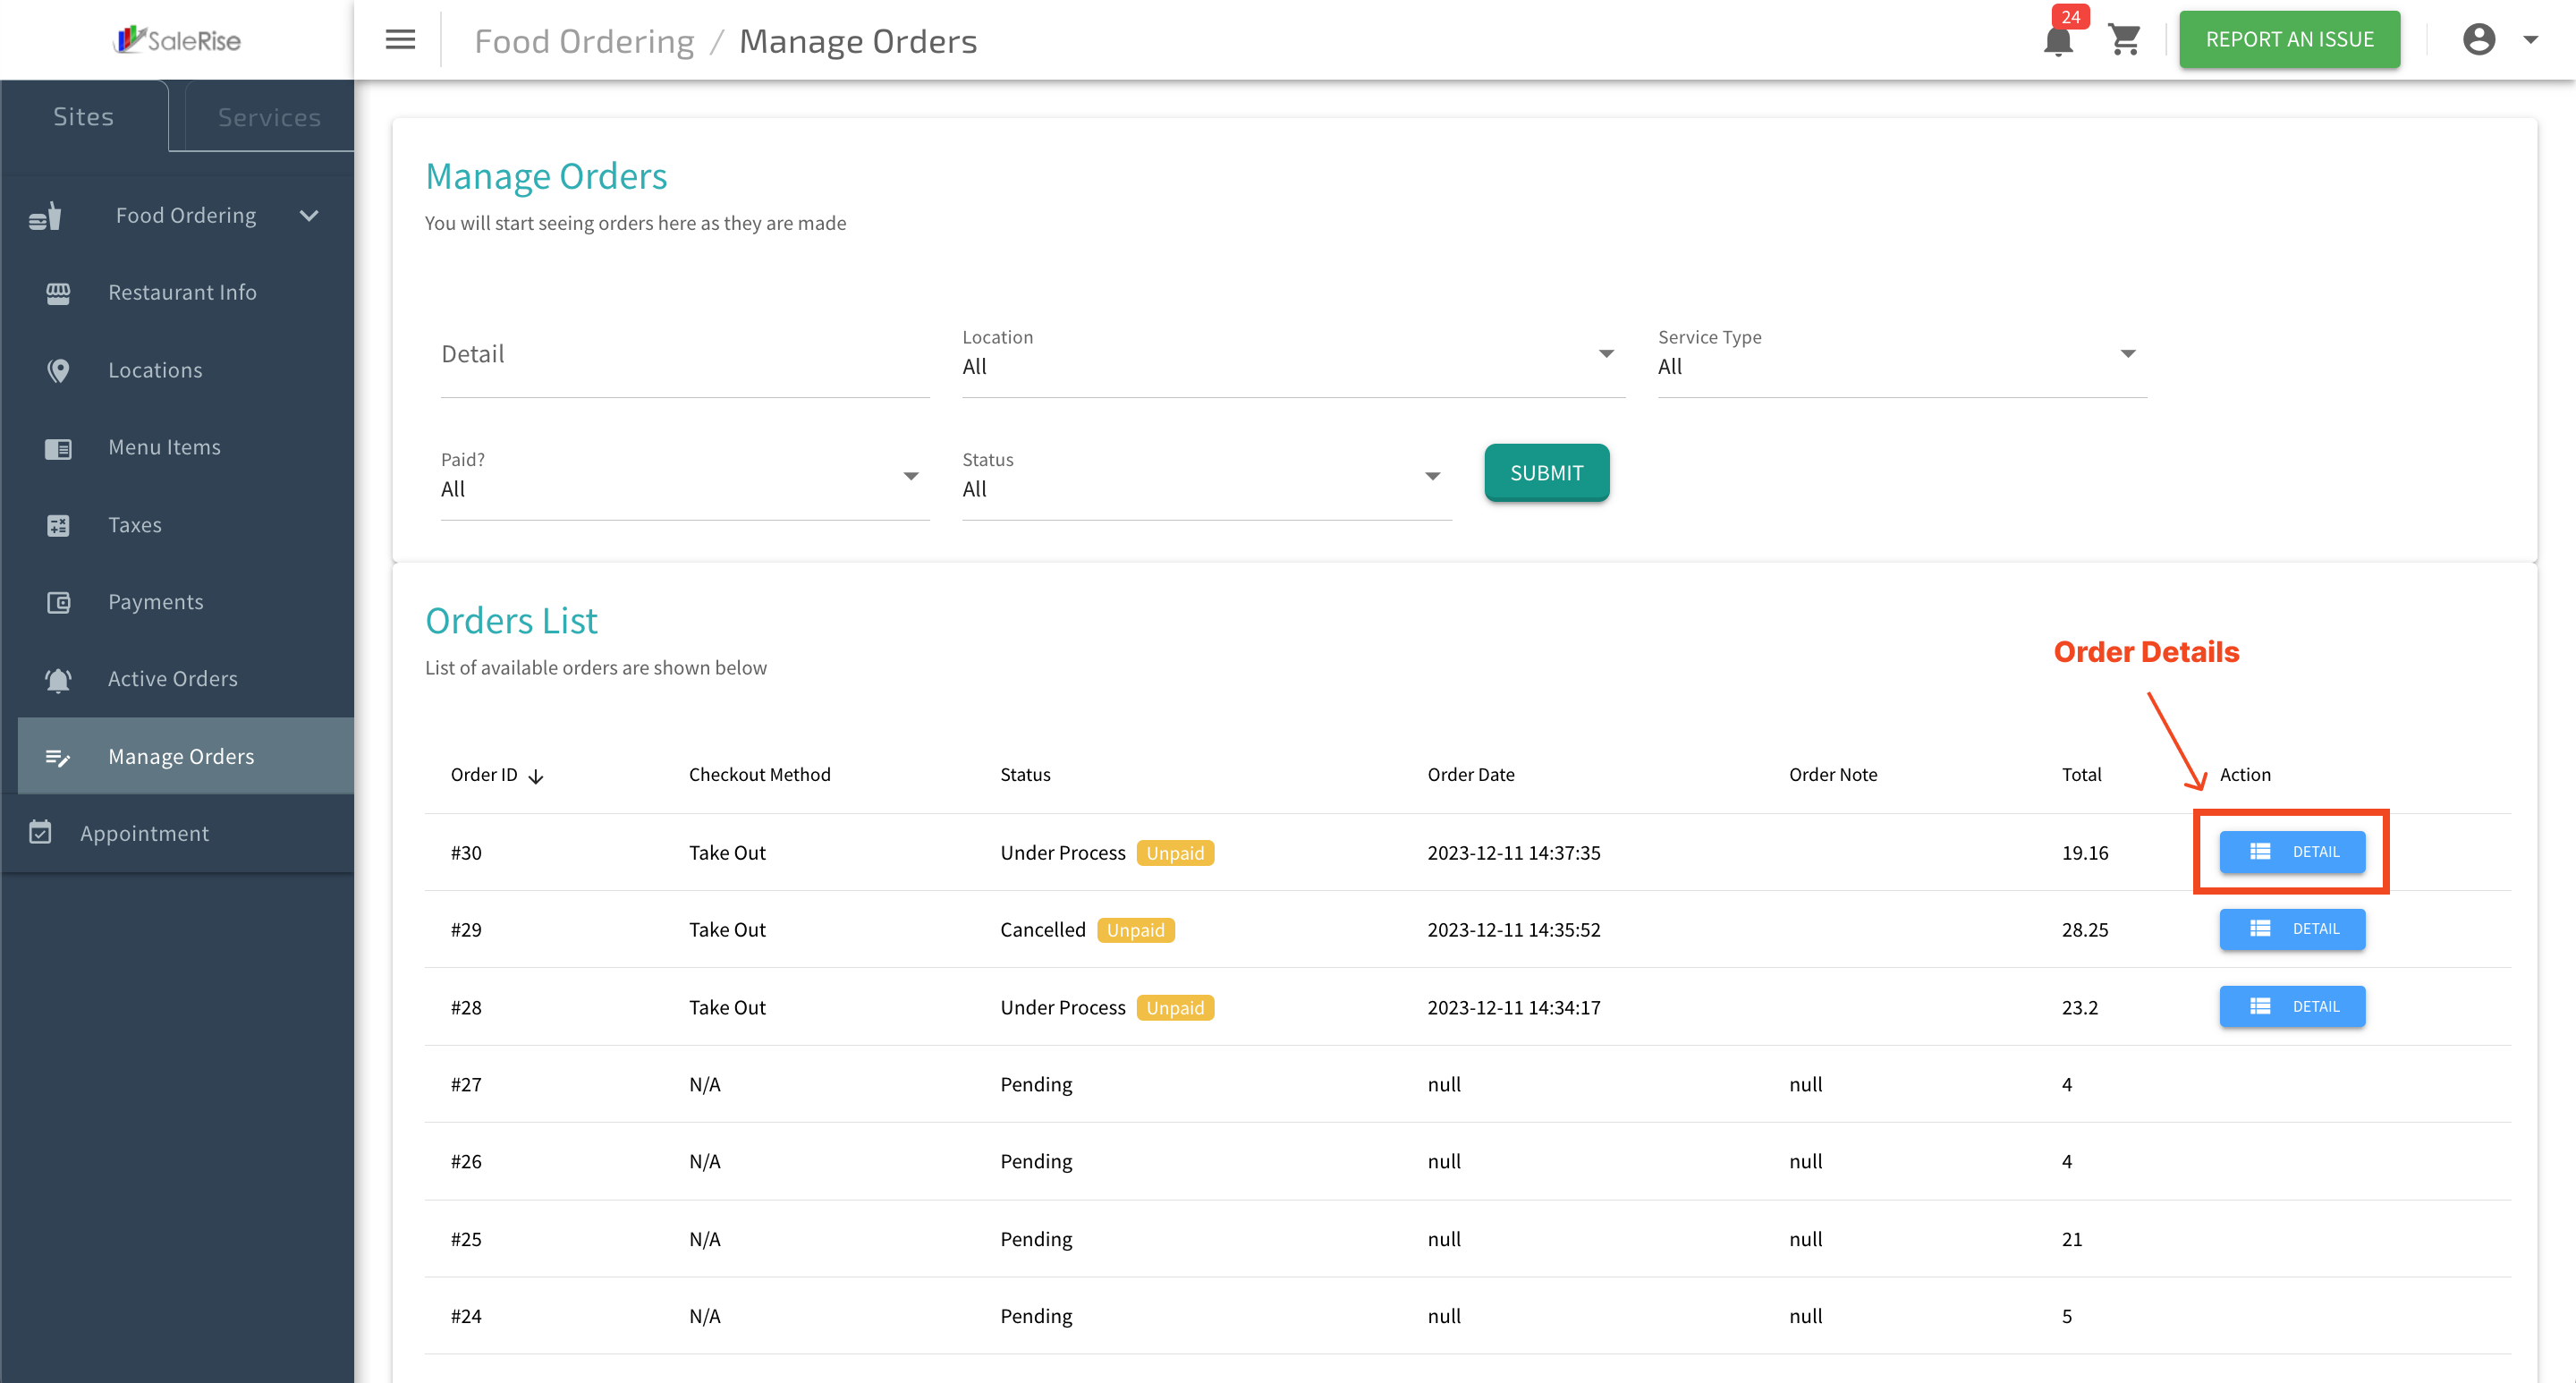
View Details:
- Click on an order to view detailed information and the corresponding invoice.

- Click on an order to view detailed information and the corresponding invoice.
-
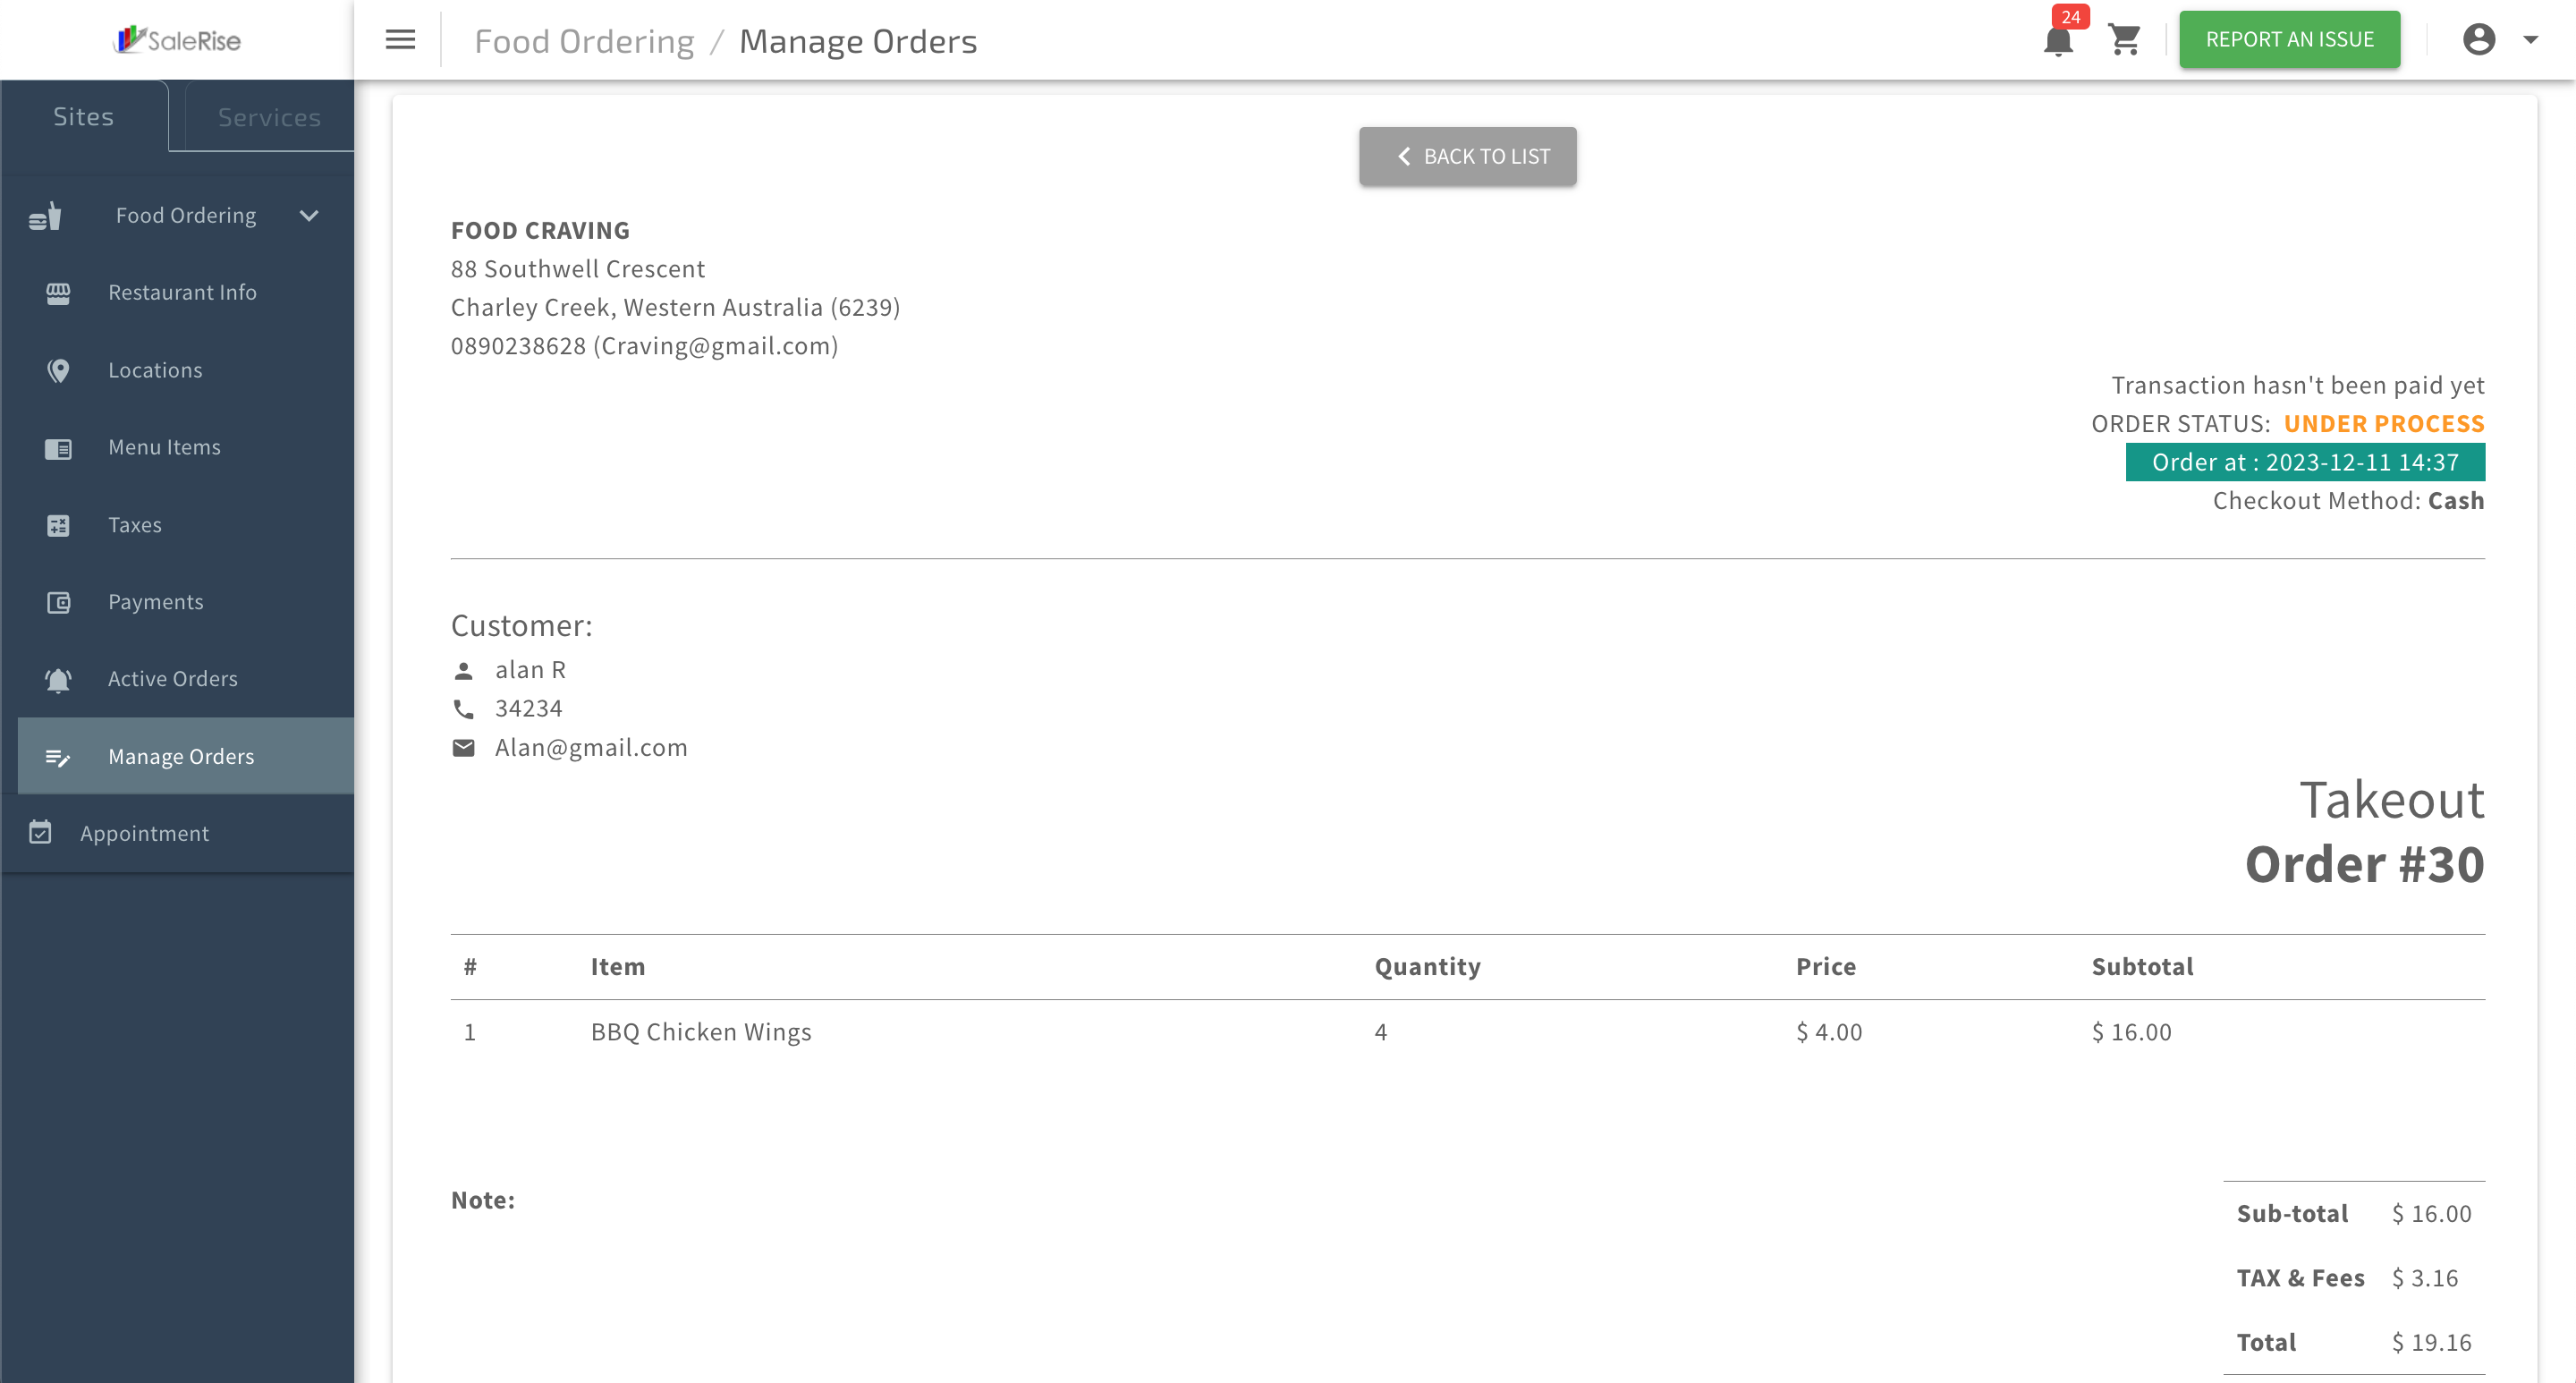
Invoice Details:
- The detailed view includes:
- Customer Details: Name, contact information, and delivery address.
- Order Items: Comprehensive list of items ordered.
- Total Amount: The total cost of the order.

- The detailed view includes: