Dental Module
The Dental Module is a comprehensive solution for efficient dental practice management. It allows users to create and customize clinic profiles with essential details such as address, contact info, and specific appointment slot session times. In the technician setup, dental professionals can be added with their names, images, and customizable availability, including the option to assign specific services, tags, and manage maintenance schedules. The system offers flexibility with customizable time slots, days of operation, and service assignments. A visually intuitive calendar view streamlines appointment and reservation management, providing a user-friendly and feature-rich environment tailored to the unique needs of dental professionals and clinics.
- Clinics Setup
- Doctors Setup
- Services Setup
- Tags Setup
- Extras Setup
- Reservations View
- Calendar View for Reservations
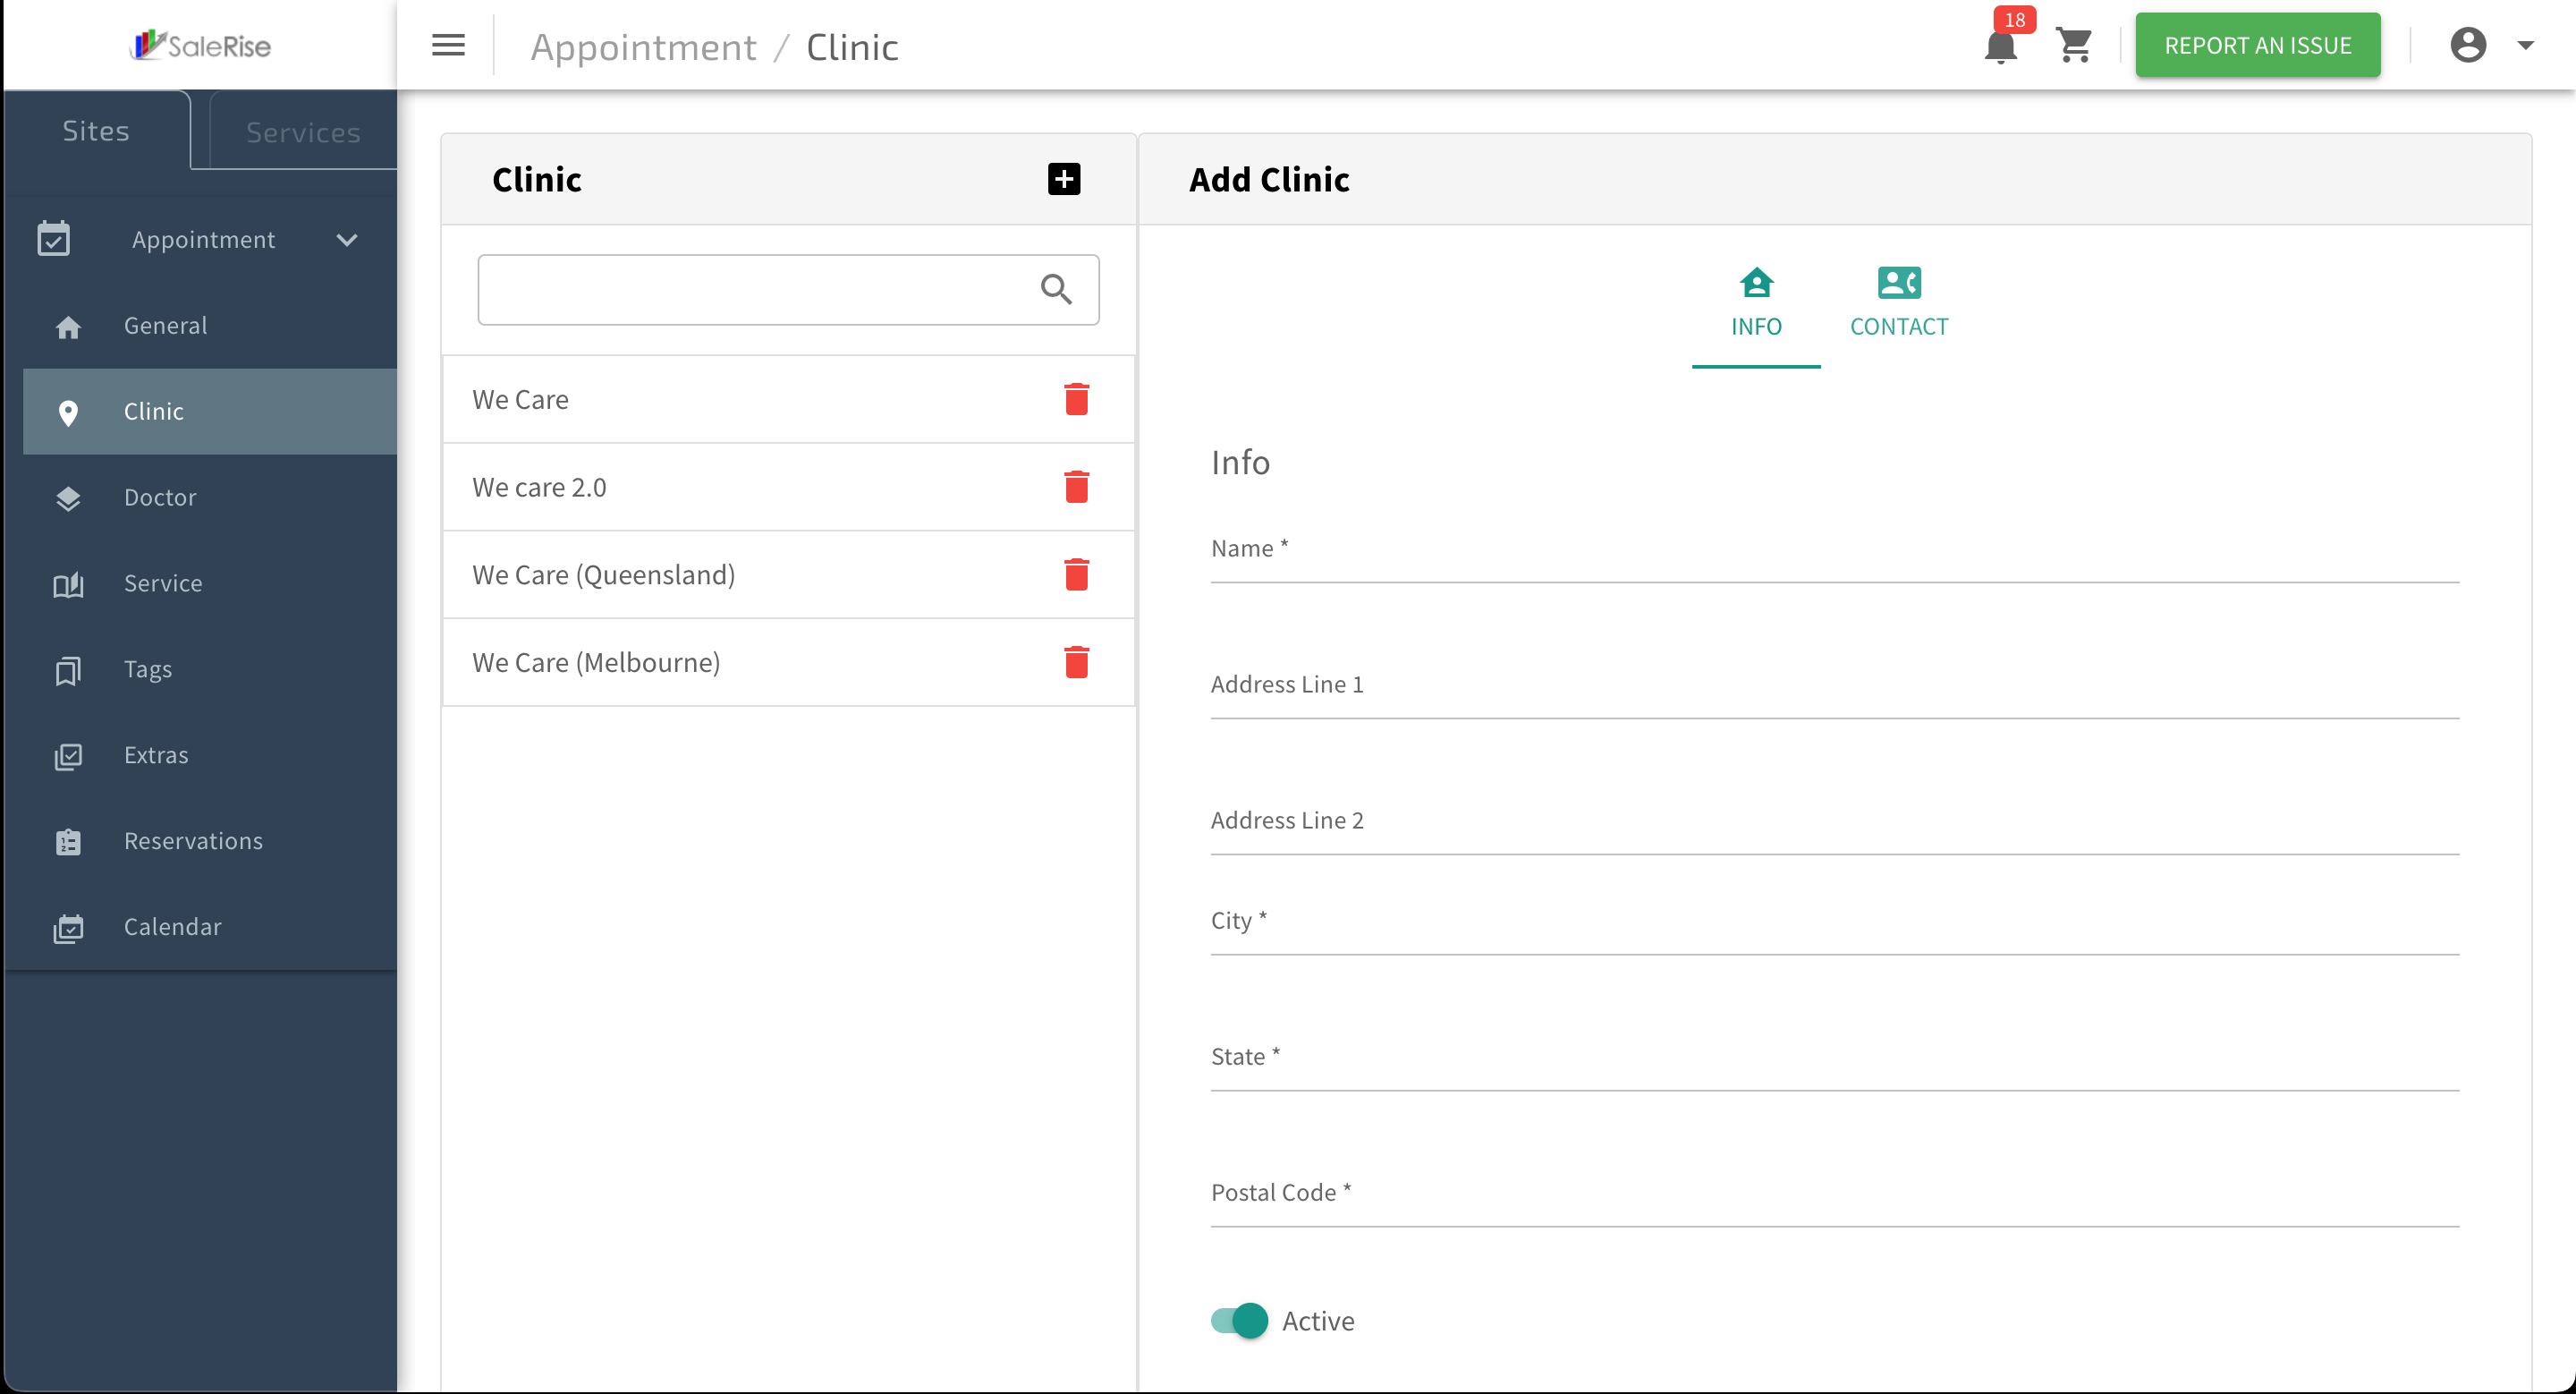
Clinics Setup
In the "Clinics Setup" module, users can effortlessly create and manage clinics by providing essential information such as name, address, city, state, postal code, and contact details. The option to activate or deactivate a clinic ensures flexible management.
Add or Edit Clinics
Overview:
In the "Clinics Setup" module, users can effortlessly create and manage clinics by providing essential information such as name, address, city, state, postal code, and contact details. The option to activate or deactivate a clinic ensures flexible management.
-
Access "Clinics Setup":
- Navigate to the "Clinics Setup" module to create or manage clinics.
-
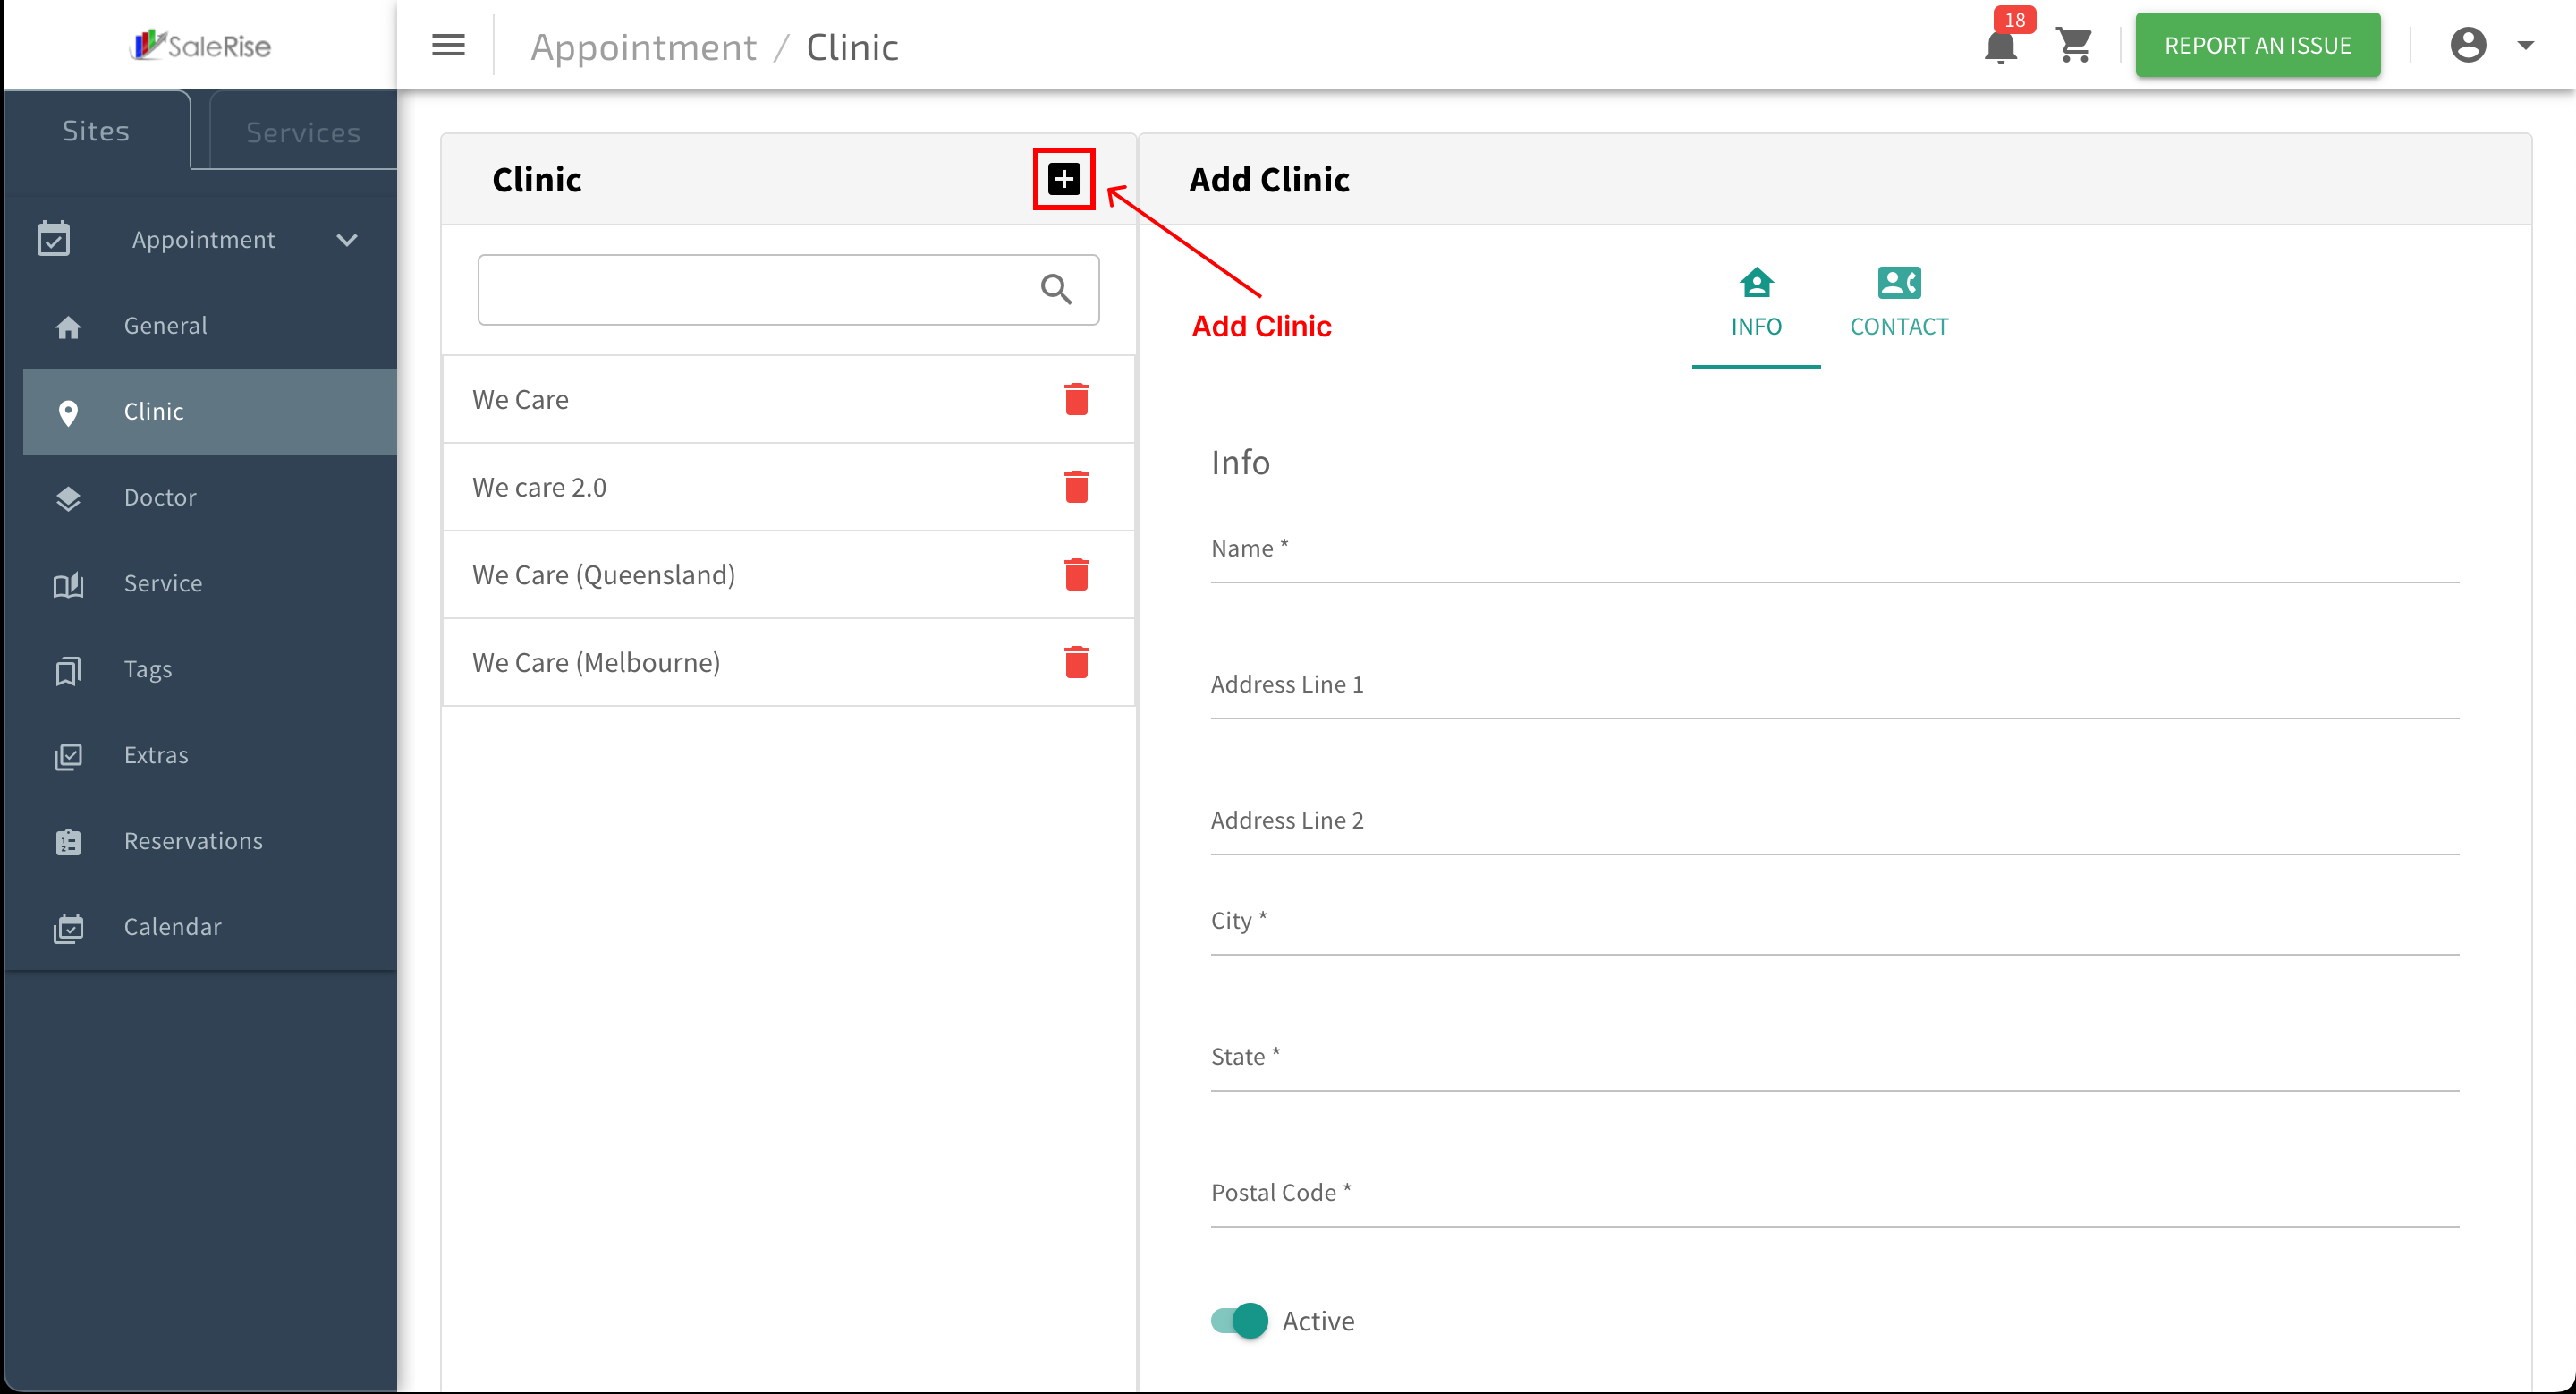
Add New Clinic:
- Click on "Add New Clinic" to initiate the setup process.

- Click on "Add New Clinic" to initiate the setup process.
-
Basic Information:
- Fill in the essential details for the clinic.
- Clinic Name: Provide a unique name for the clinic.
- Address: Enter the physical address of the clinic.
- City, State, Postal Code: Specify the location details.
- Fill in the essential details for the clinic.
-
Activation Options:
- Choose the activation status for the clinic.
- Active: The clinic is currently operational.
- Inactive: Temporarily deactivate the clinic.
- Choose the activation status for the clinic.
-
Save Basic Details:
- Click "Save" to confirm the basic information set up.
-
Add Contact Information:
- Navigate to the "Contact Information" section to provide additional details.
- Email: Enter the clinic's contact email.
- Phone: Provide a contact phone number.
- Navigate to the "Contact Information" section to provide additional details.
-
Save Contact Details:
- Click "Save" to confirm the contact information setup.
-
View and Manage Clinics:
- Access the list of clinics with options to edit or deactivate.
-
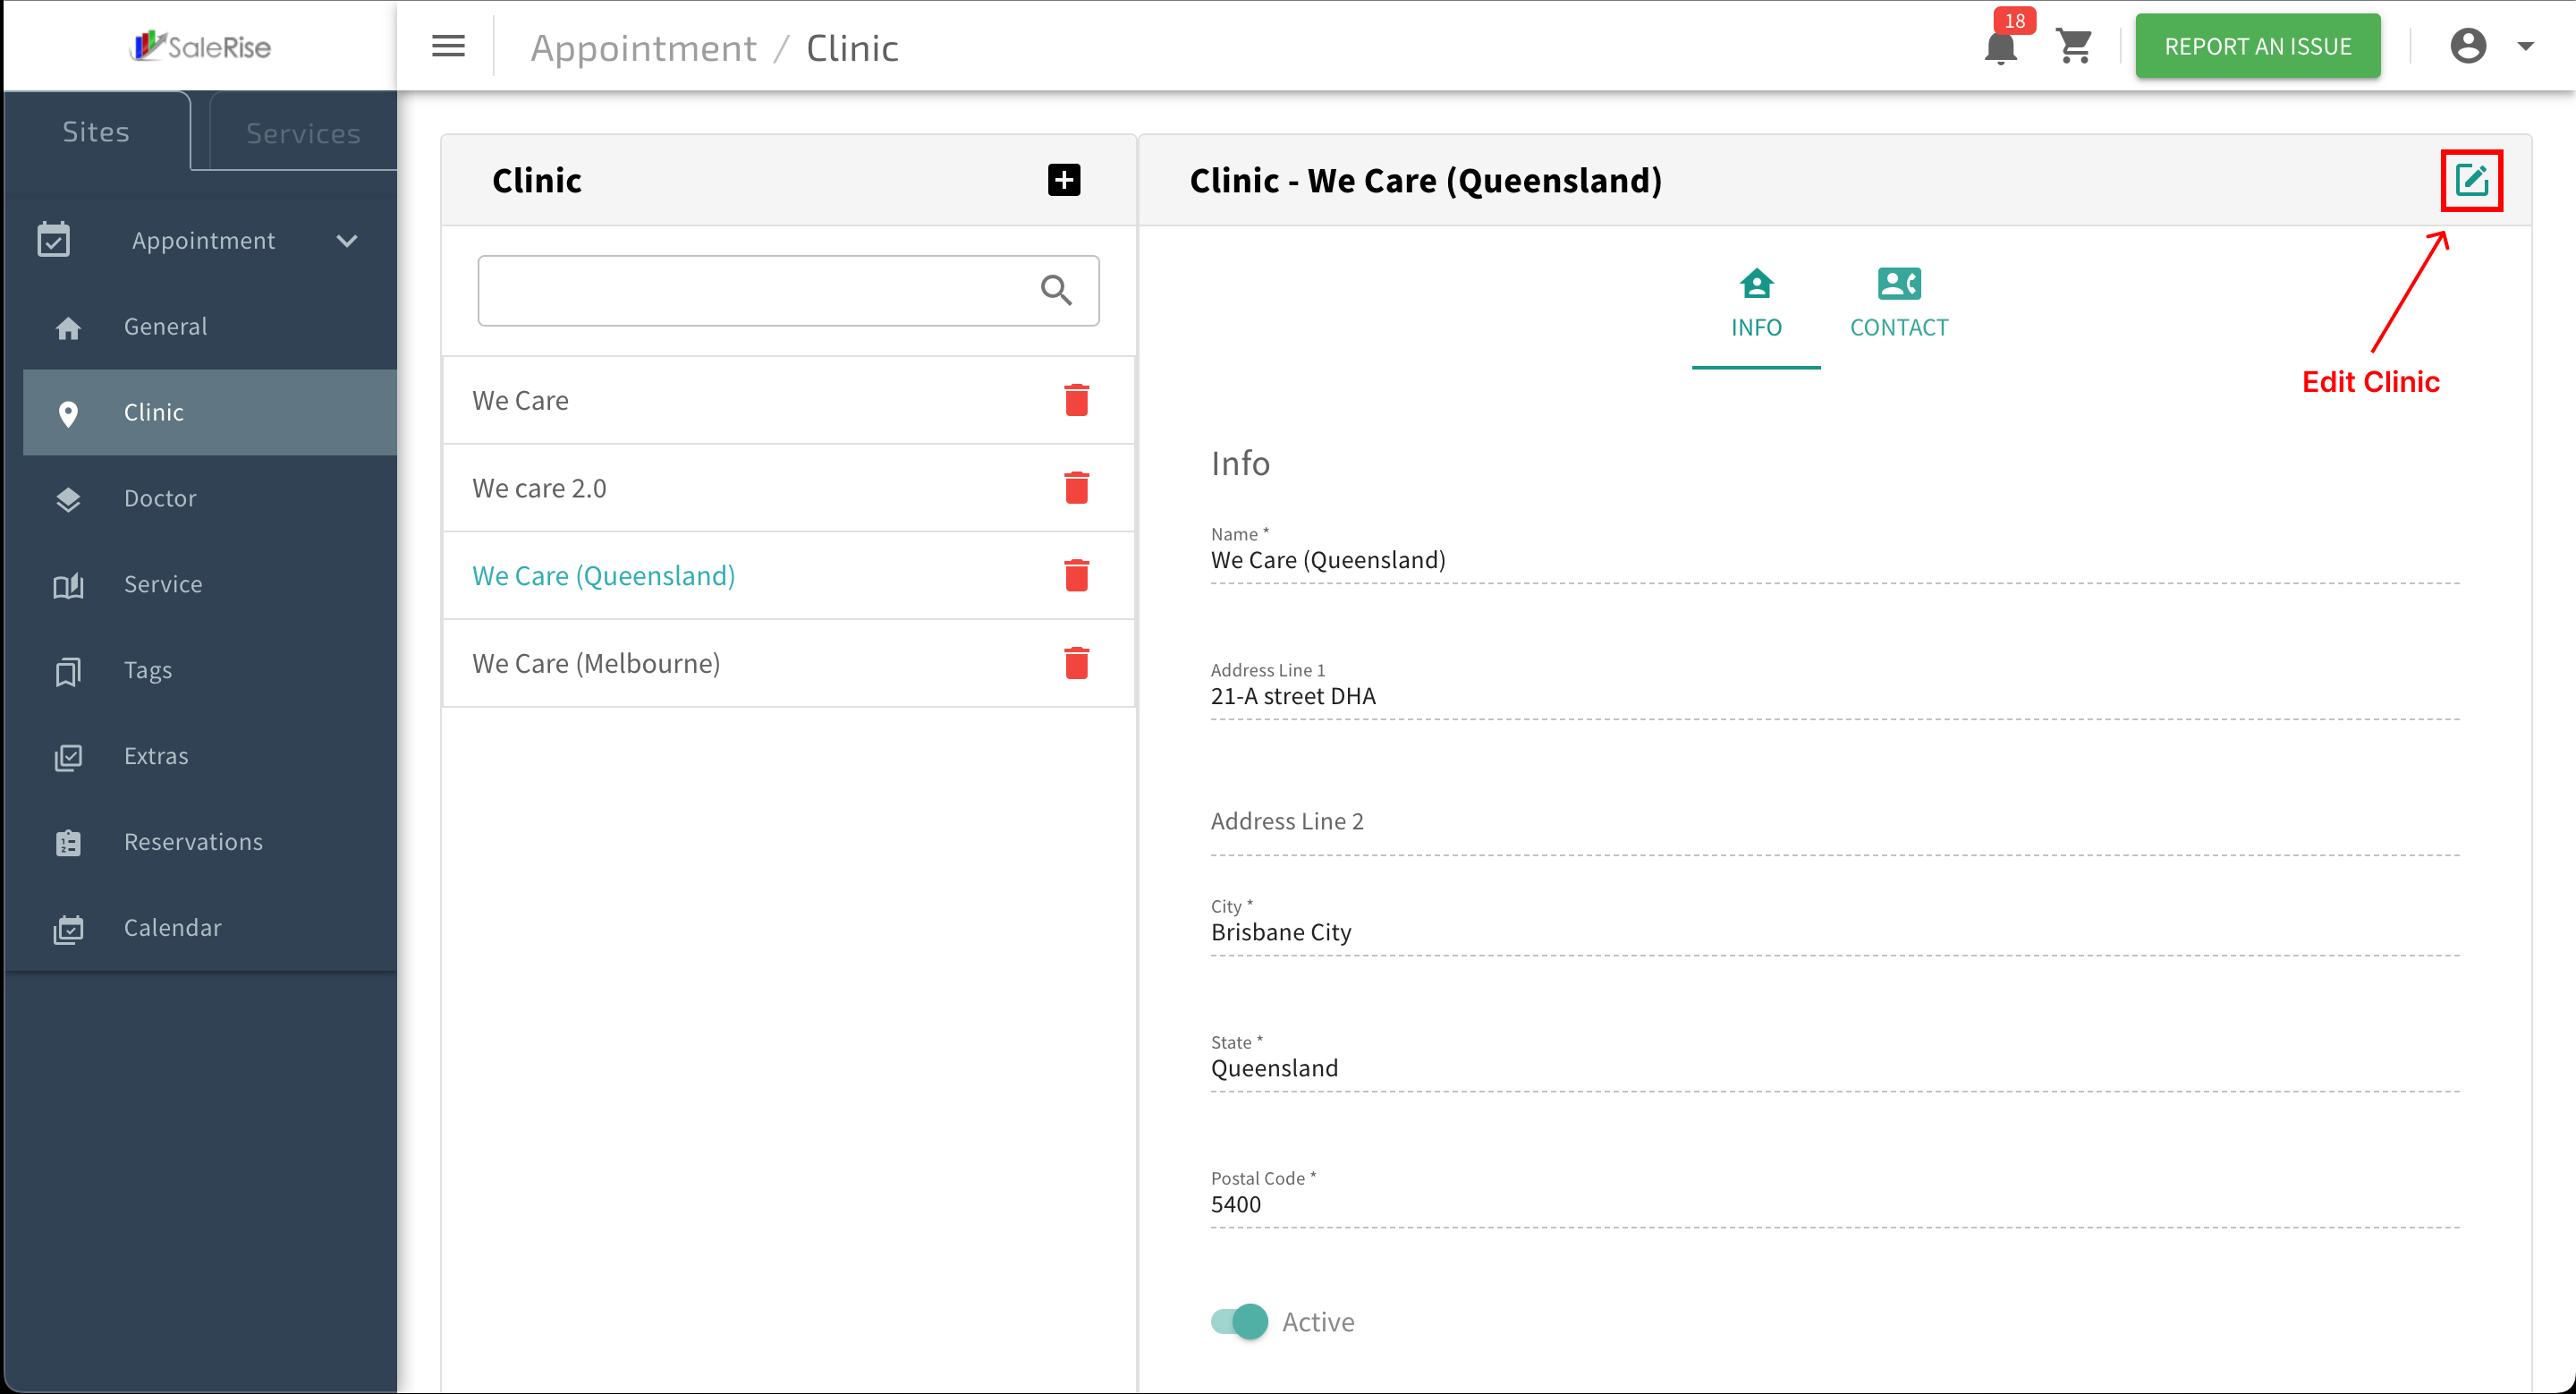
Edit Clinic Details:
- Click on the edit button to modify clinic information.

- Click on the edit button to modify clinic information.
-
Deactivate Clinic:
- Temporarily deactivate a clinic when needed.
-
Reactivation:
- Easily reactivate a deactivated clinic.
Doctors Setup
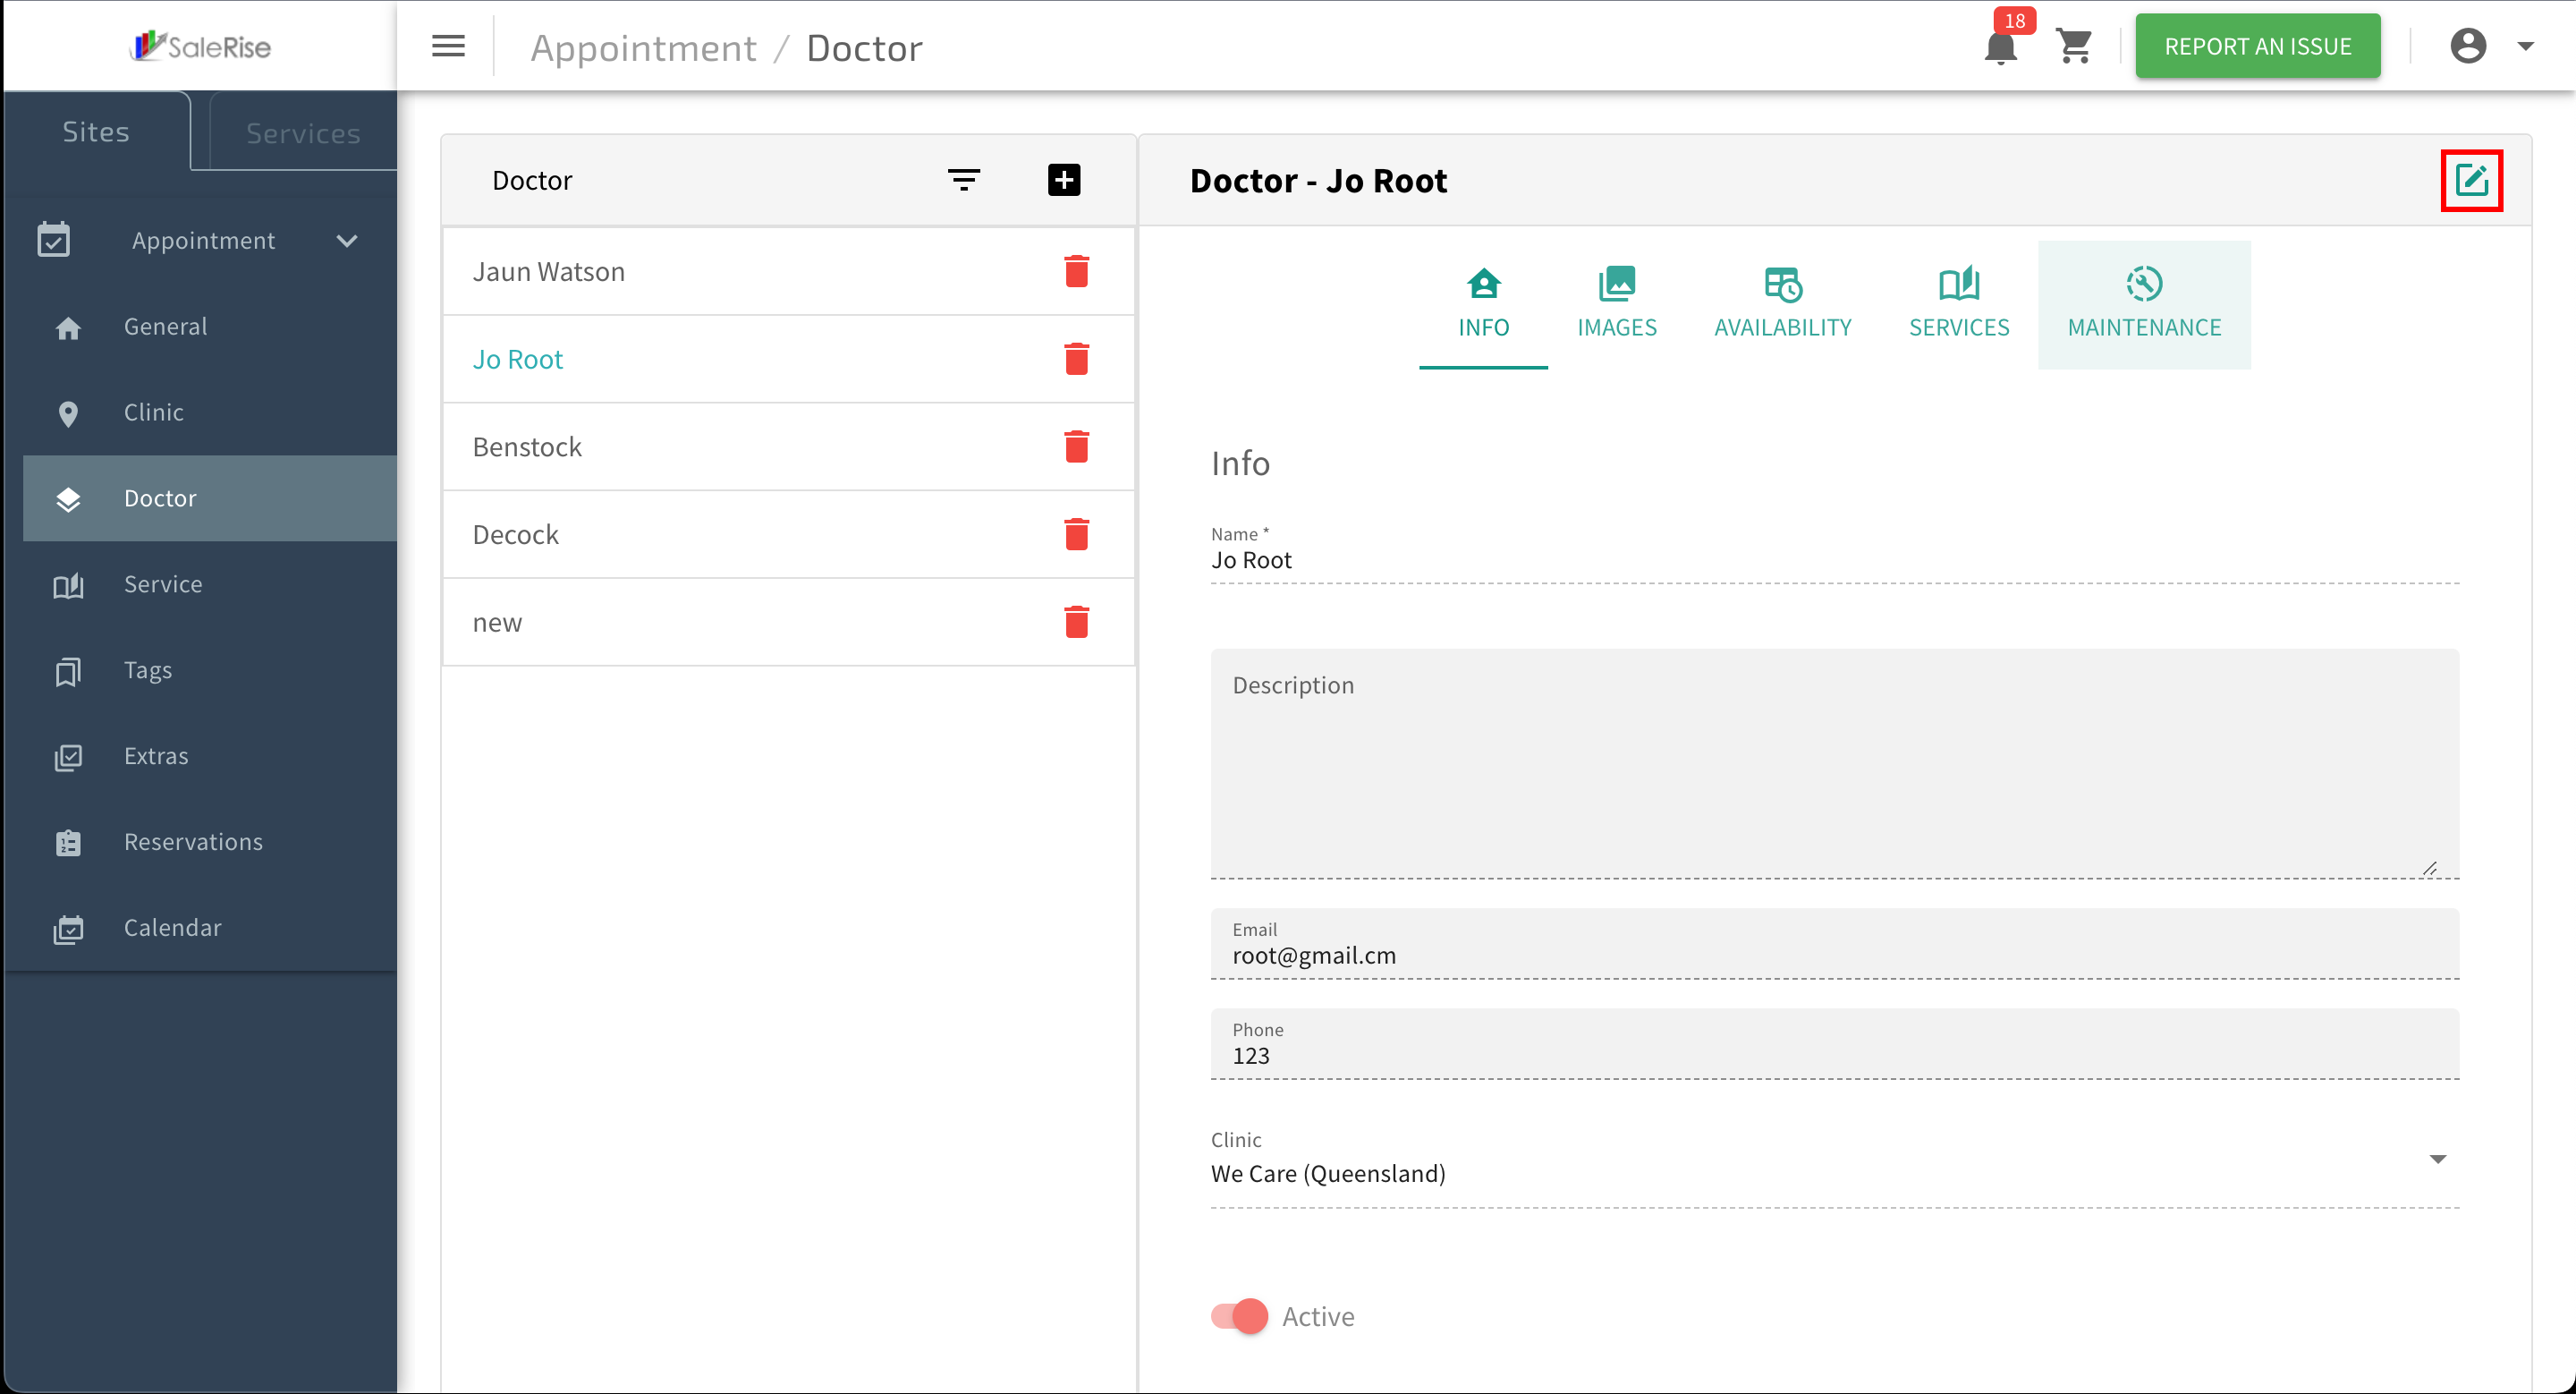
The "Doctors Setup" module allows users to seamlessly create and manage doctors. From basic information to availability, services, tags, and maintenance schedules, this module provides a comprehensive setup for doctor profiles.
Add or Edit Doctors
Overview:
The "Doctors Setup" module allows users to create and manage doctors seamlessly. From basic information to availability, services, tags, and maintenance schedules, this module provides a comprehensive setup for doctor profiles.
-
Access "Doctors Setup":
- Navigate to the "Doctors Setup" module to create or manage doctor profiles.
-
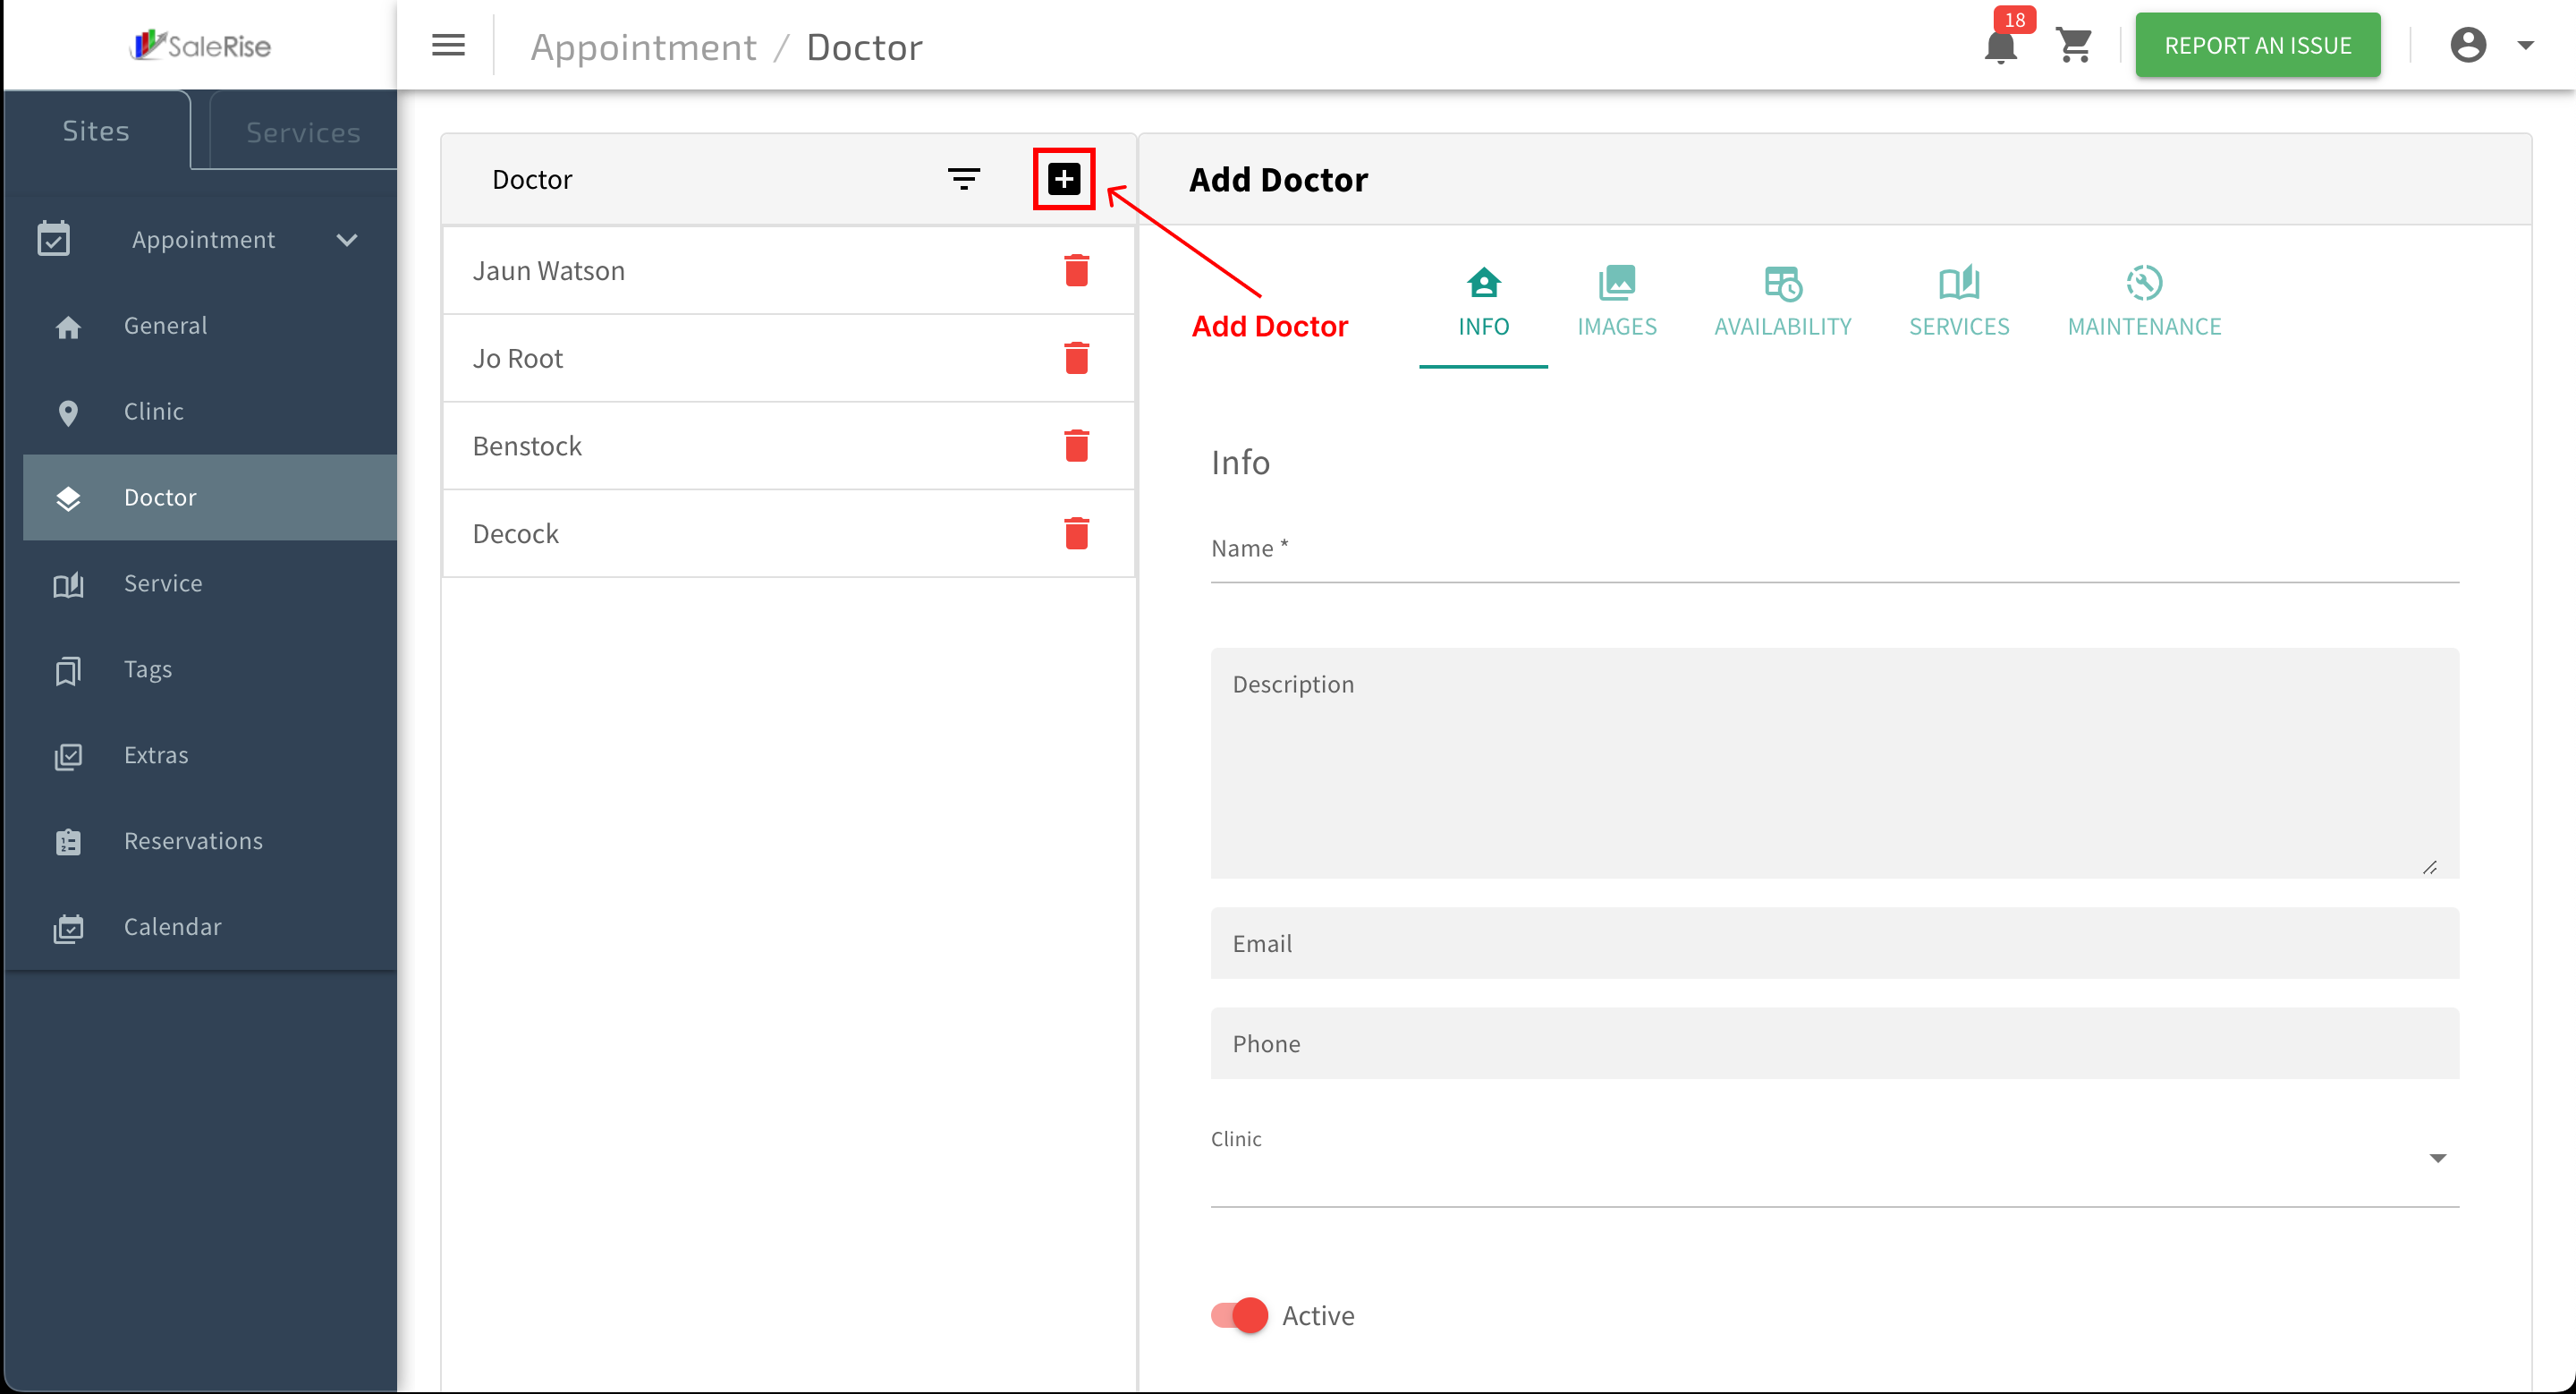
Add New Doctor:
- Click on "Add New Doctor" to initiate the setup process.

- Click on "Add New Doctor" to initiate the setup process.
-
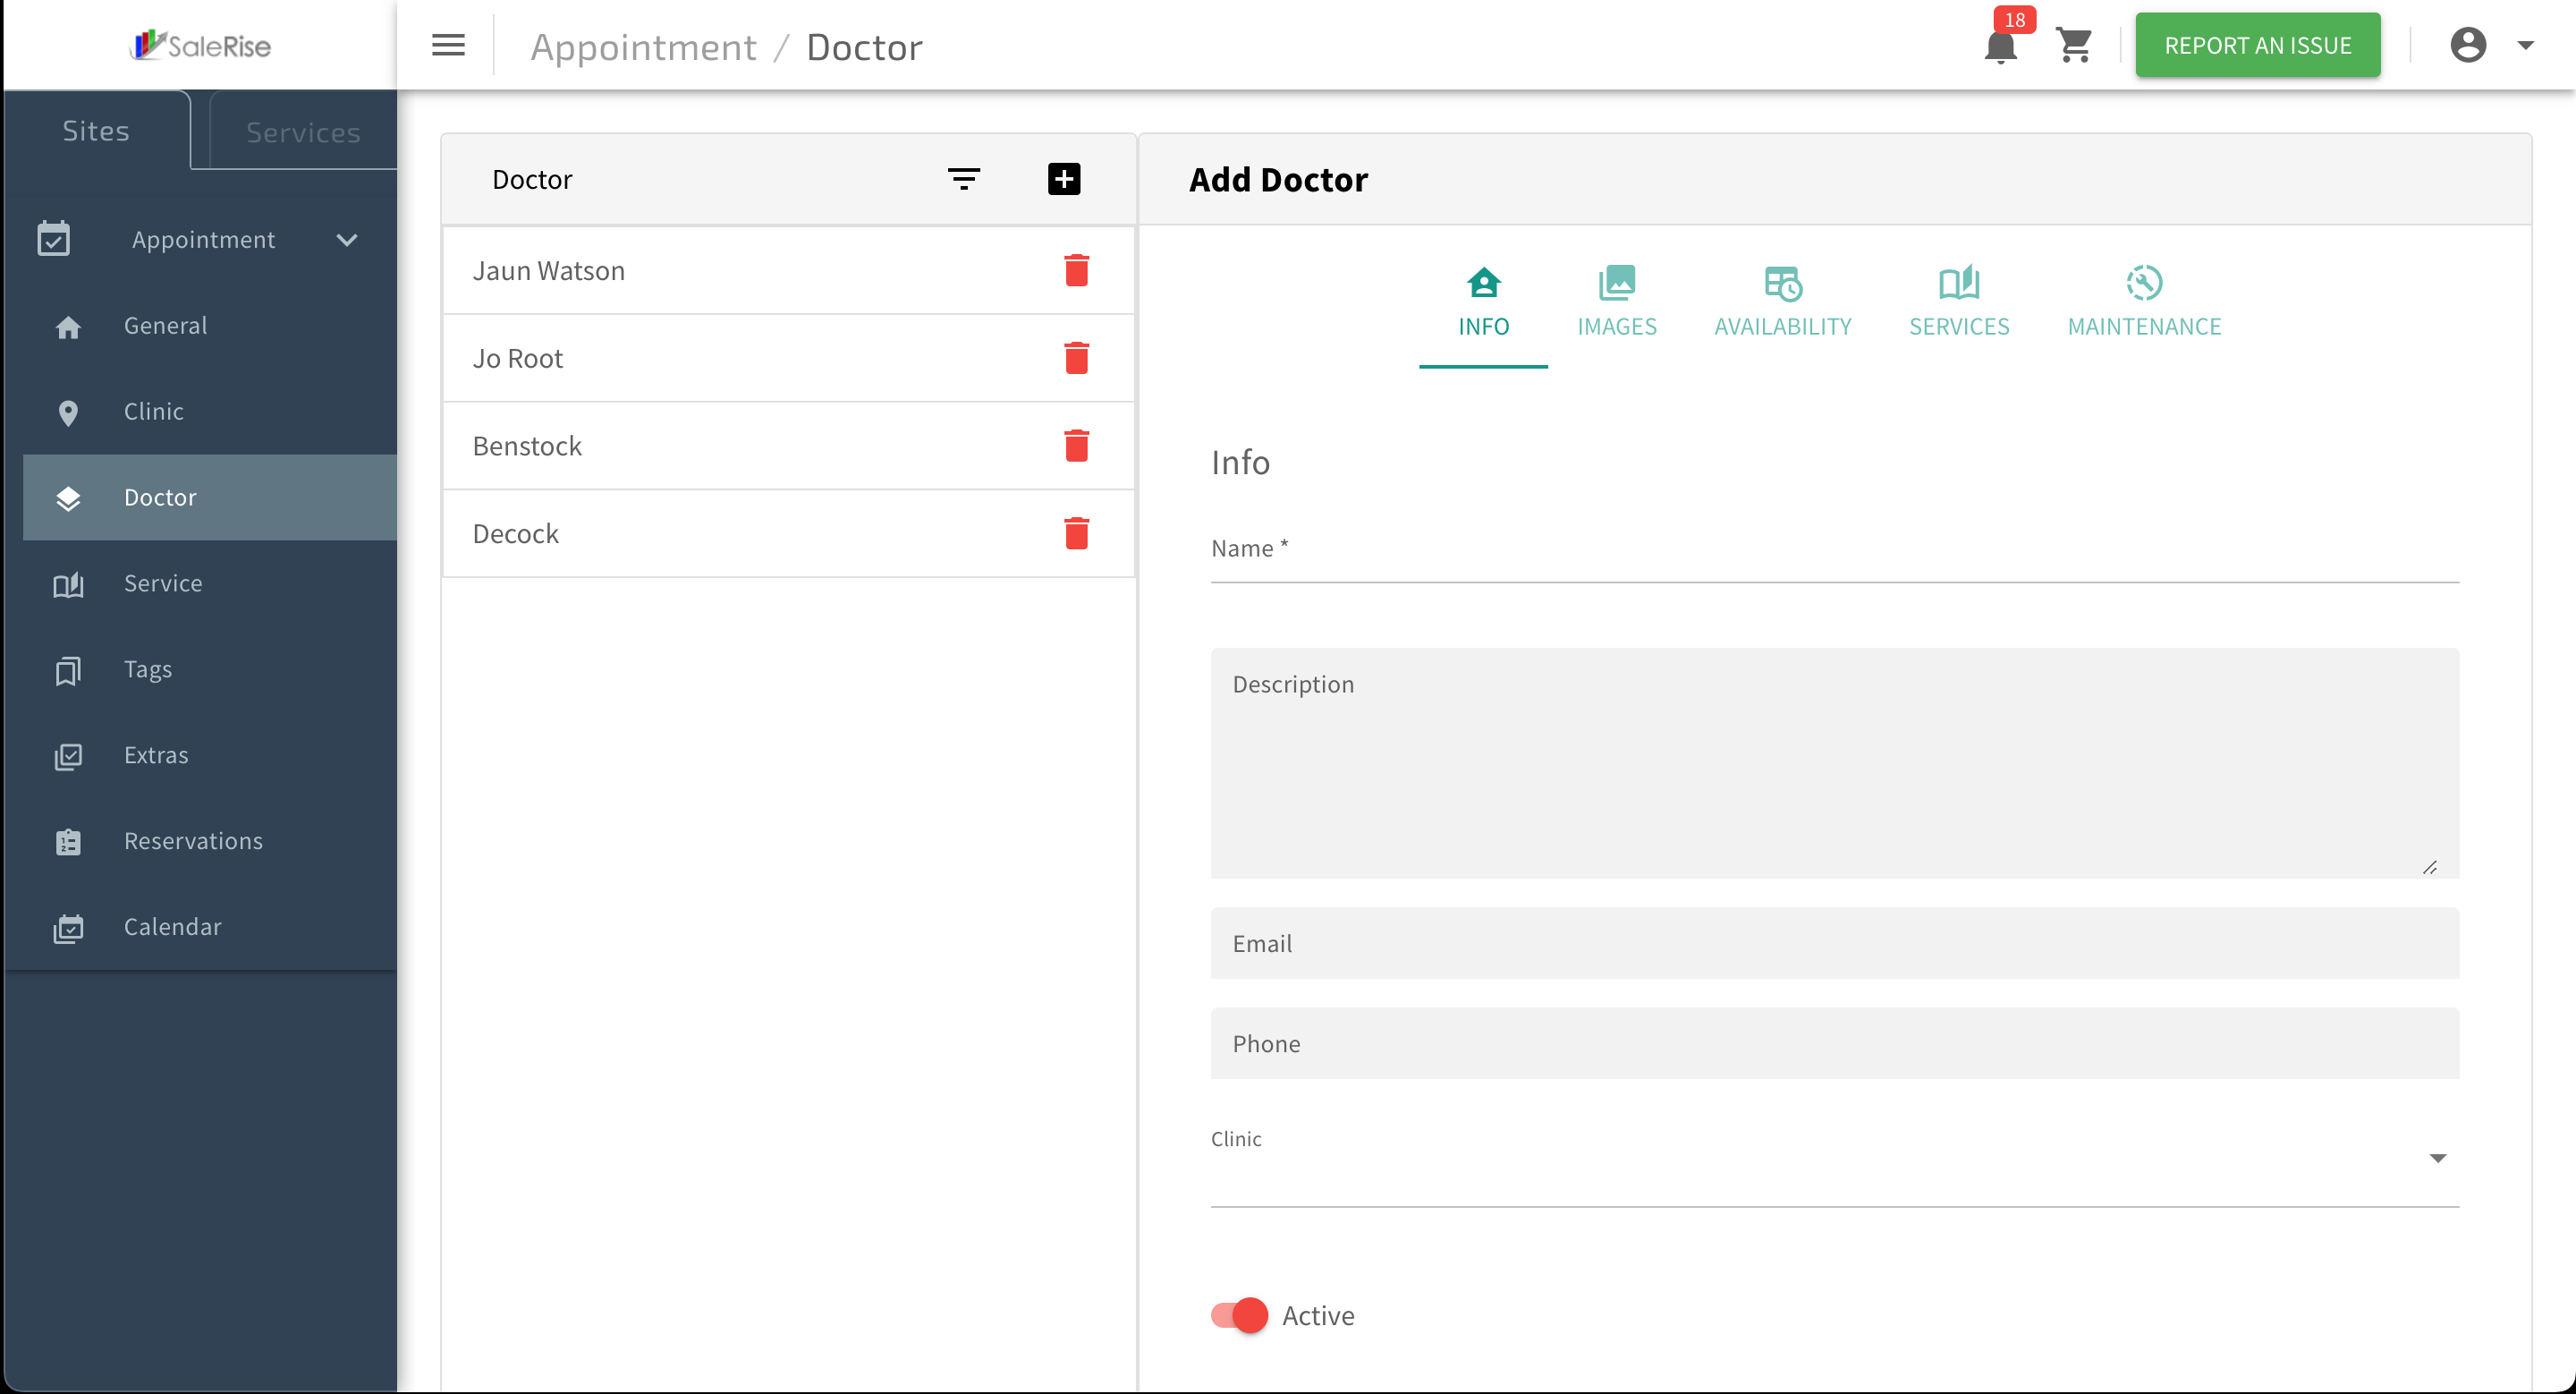
Basic Information:
- Fill in essential details for the doctor.
- Name: Full name of the doctor.
- Description: A brief description of the doctor.
- Email, Phone: Contact details for appointments.
- Clinic: Select the clinic to which the doctor is associated.

- Fill in essential details for the doctor.
-
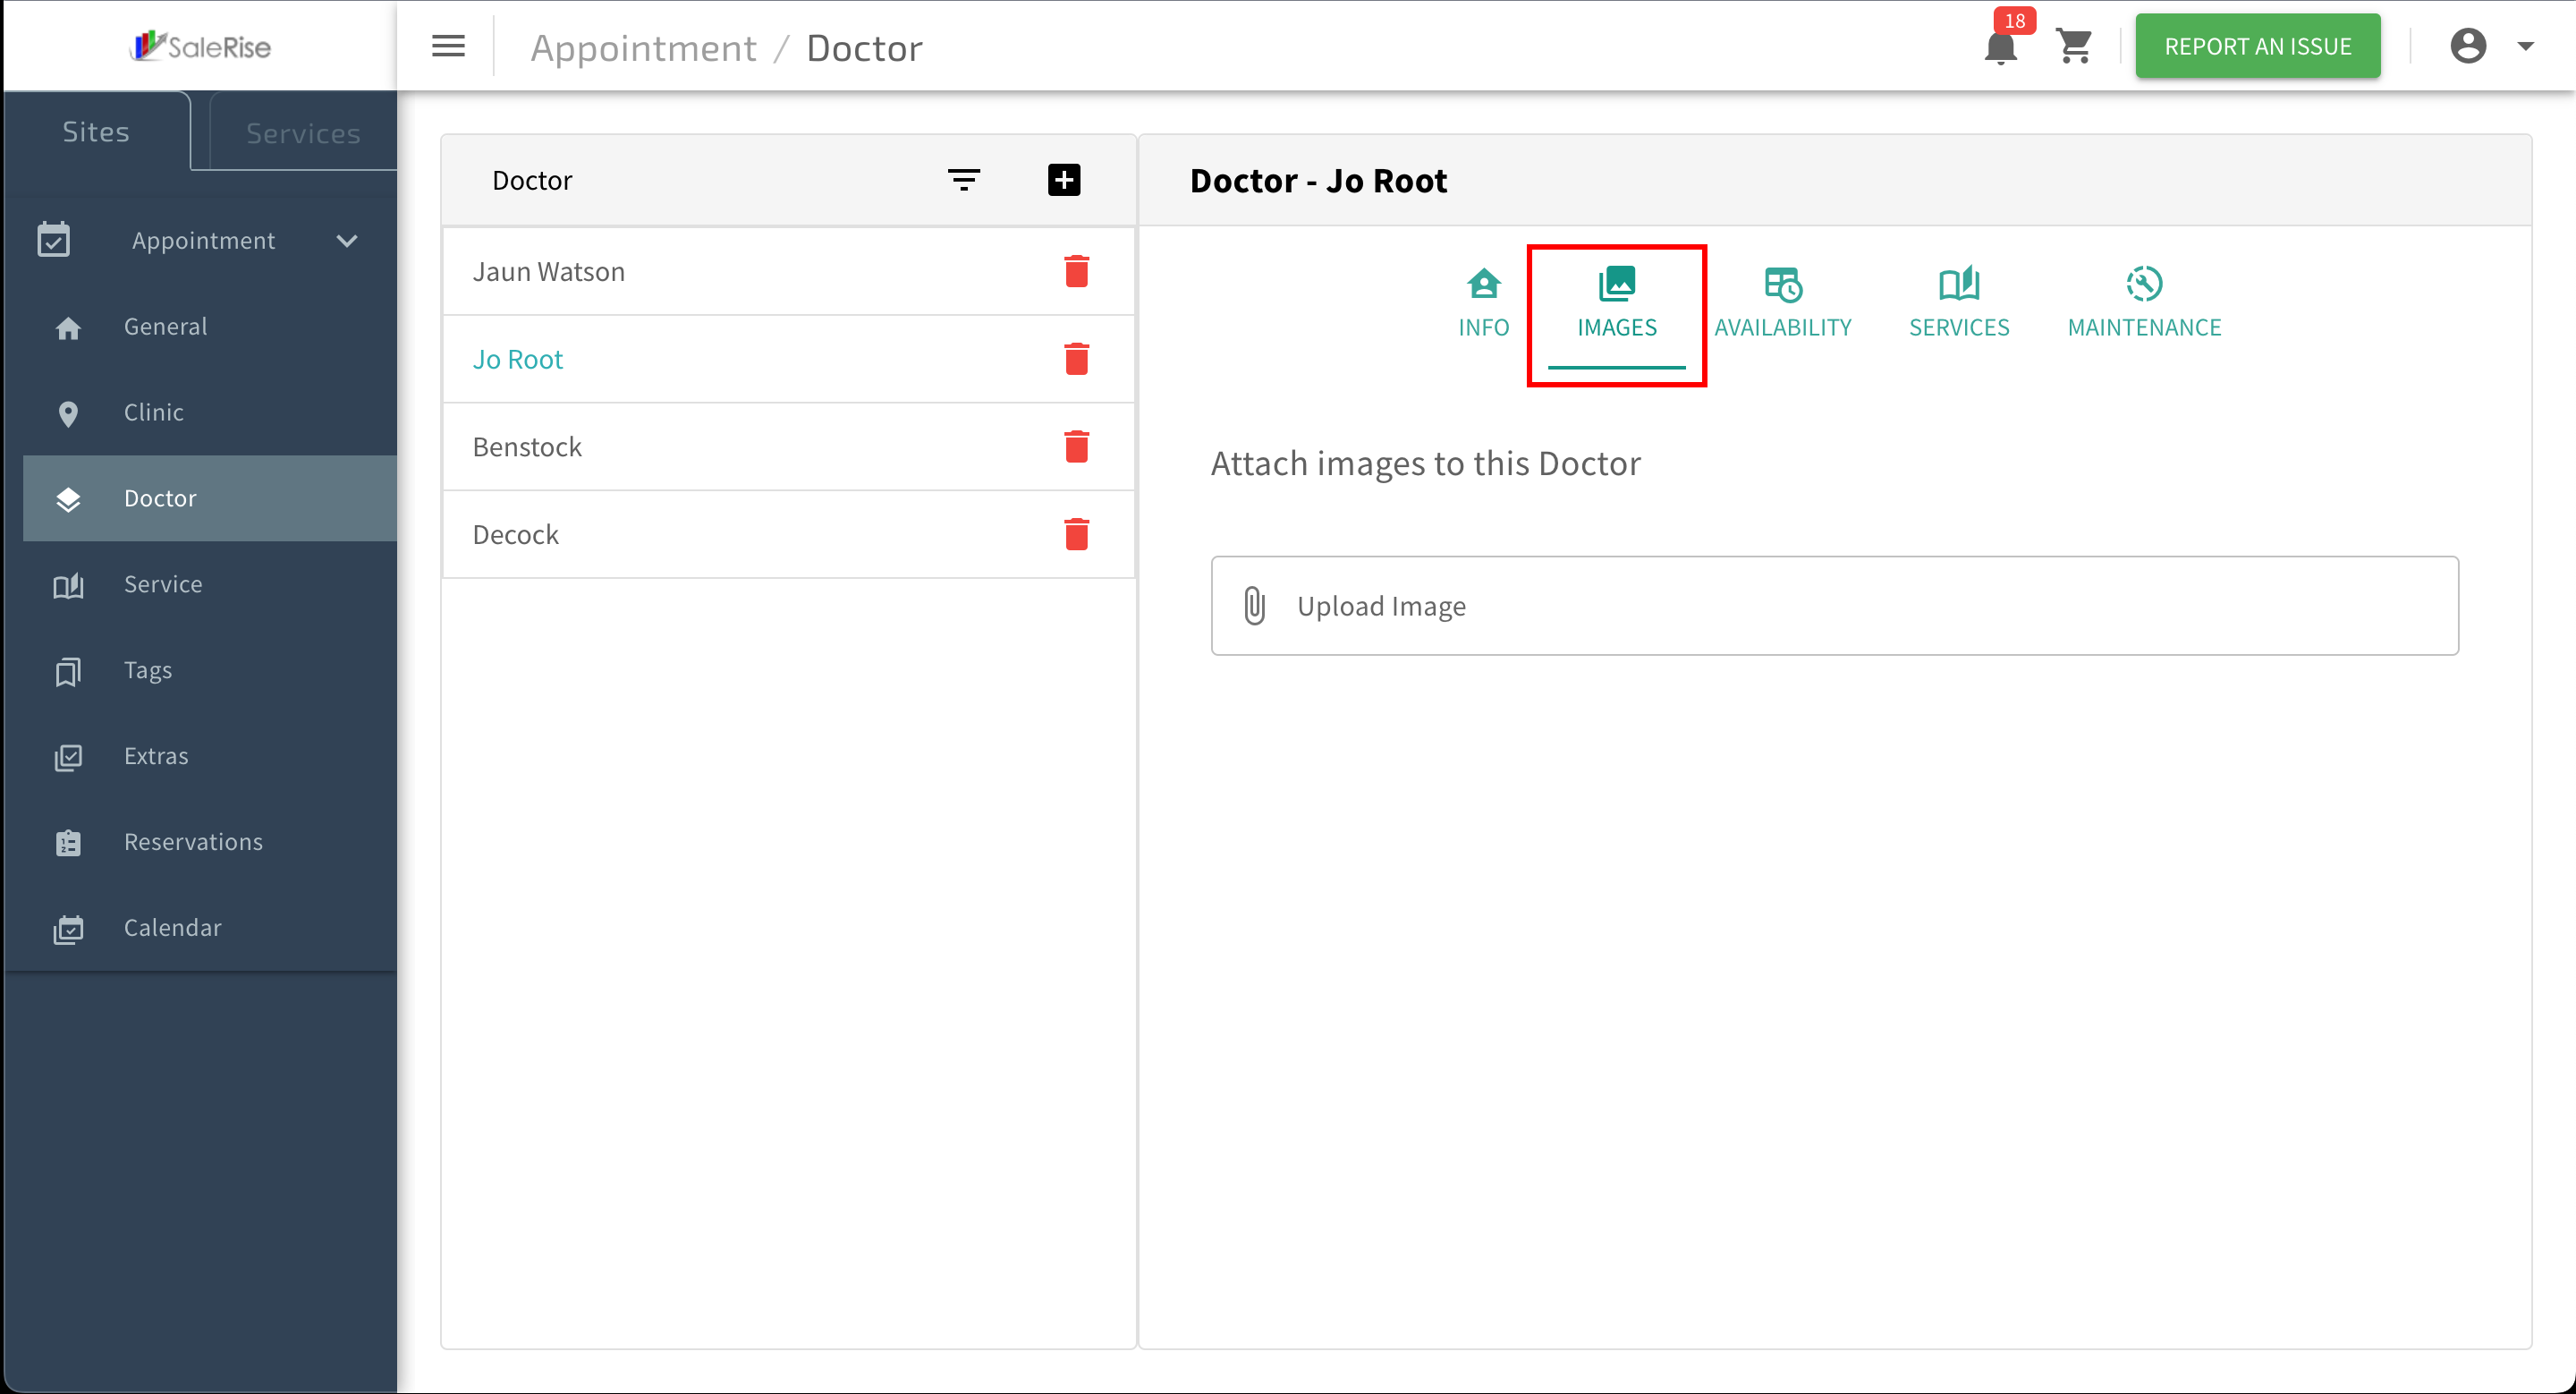
Upload Images:
- Navigate to the "Images" tab to upload doctor images.
- Multiple Images: Allow users to upload multiple images for the doctor.

- Multiple Images: Allow users to upload multiple images for the doctor.
- Navigate to the "Images" tab to upload doctor images.
-
Access "Availability" Tab:
- Navigate to the "Availability" tab within the doctor setup.
-
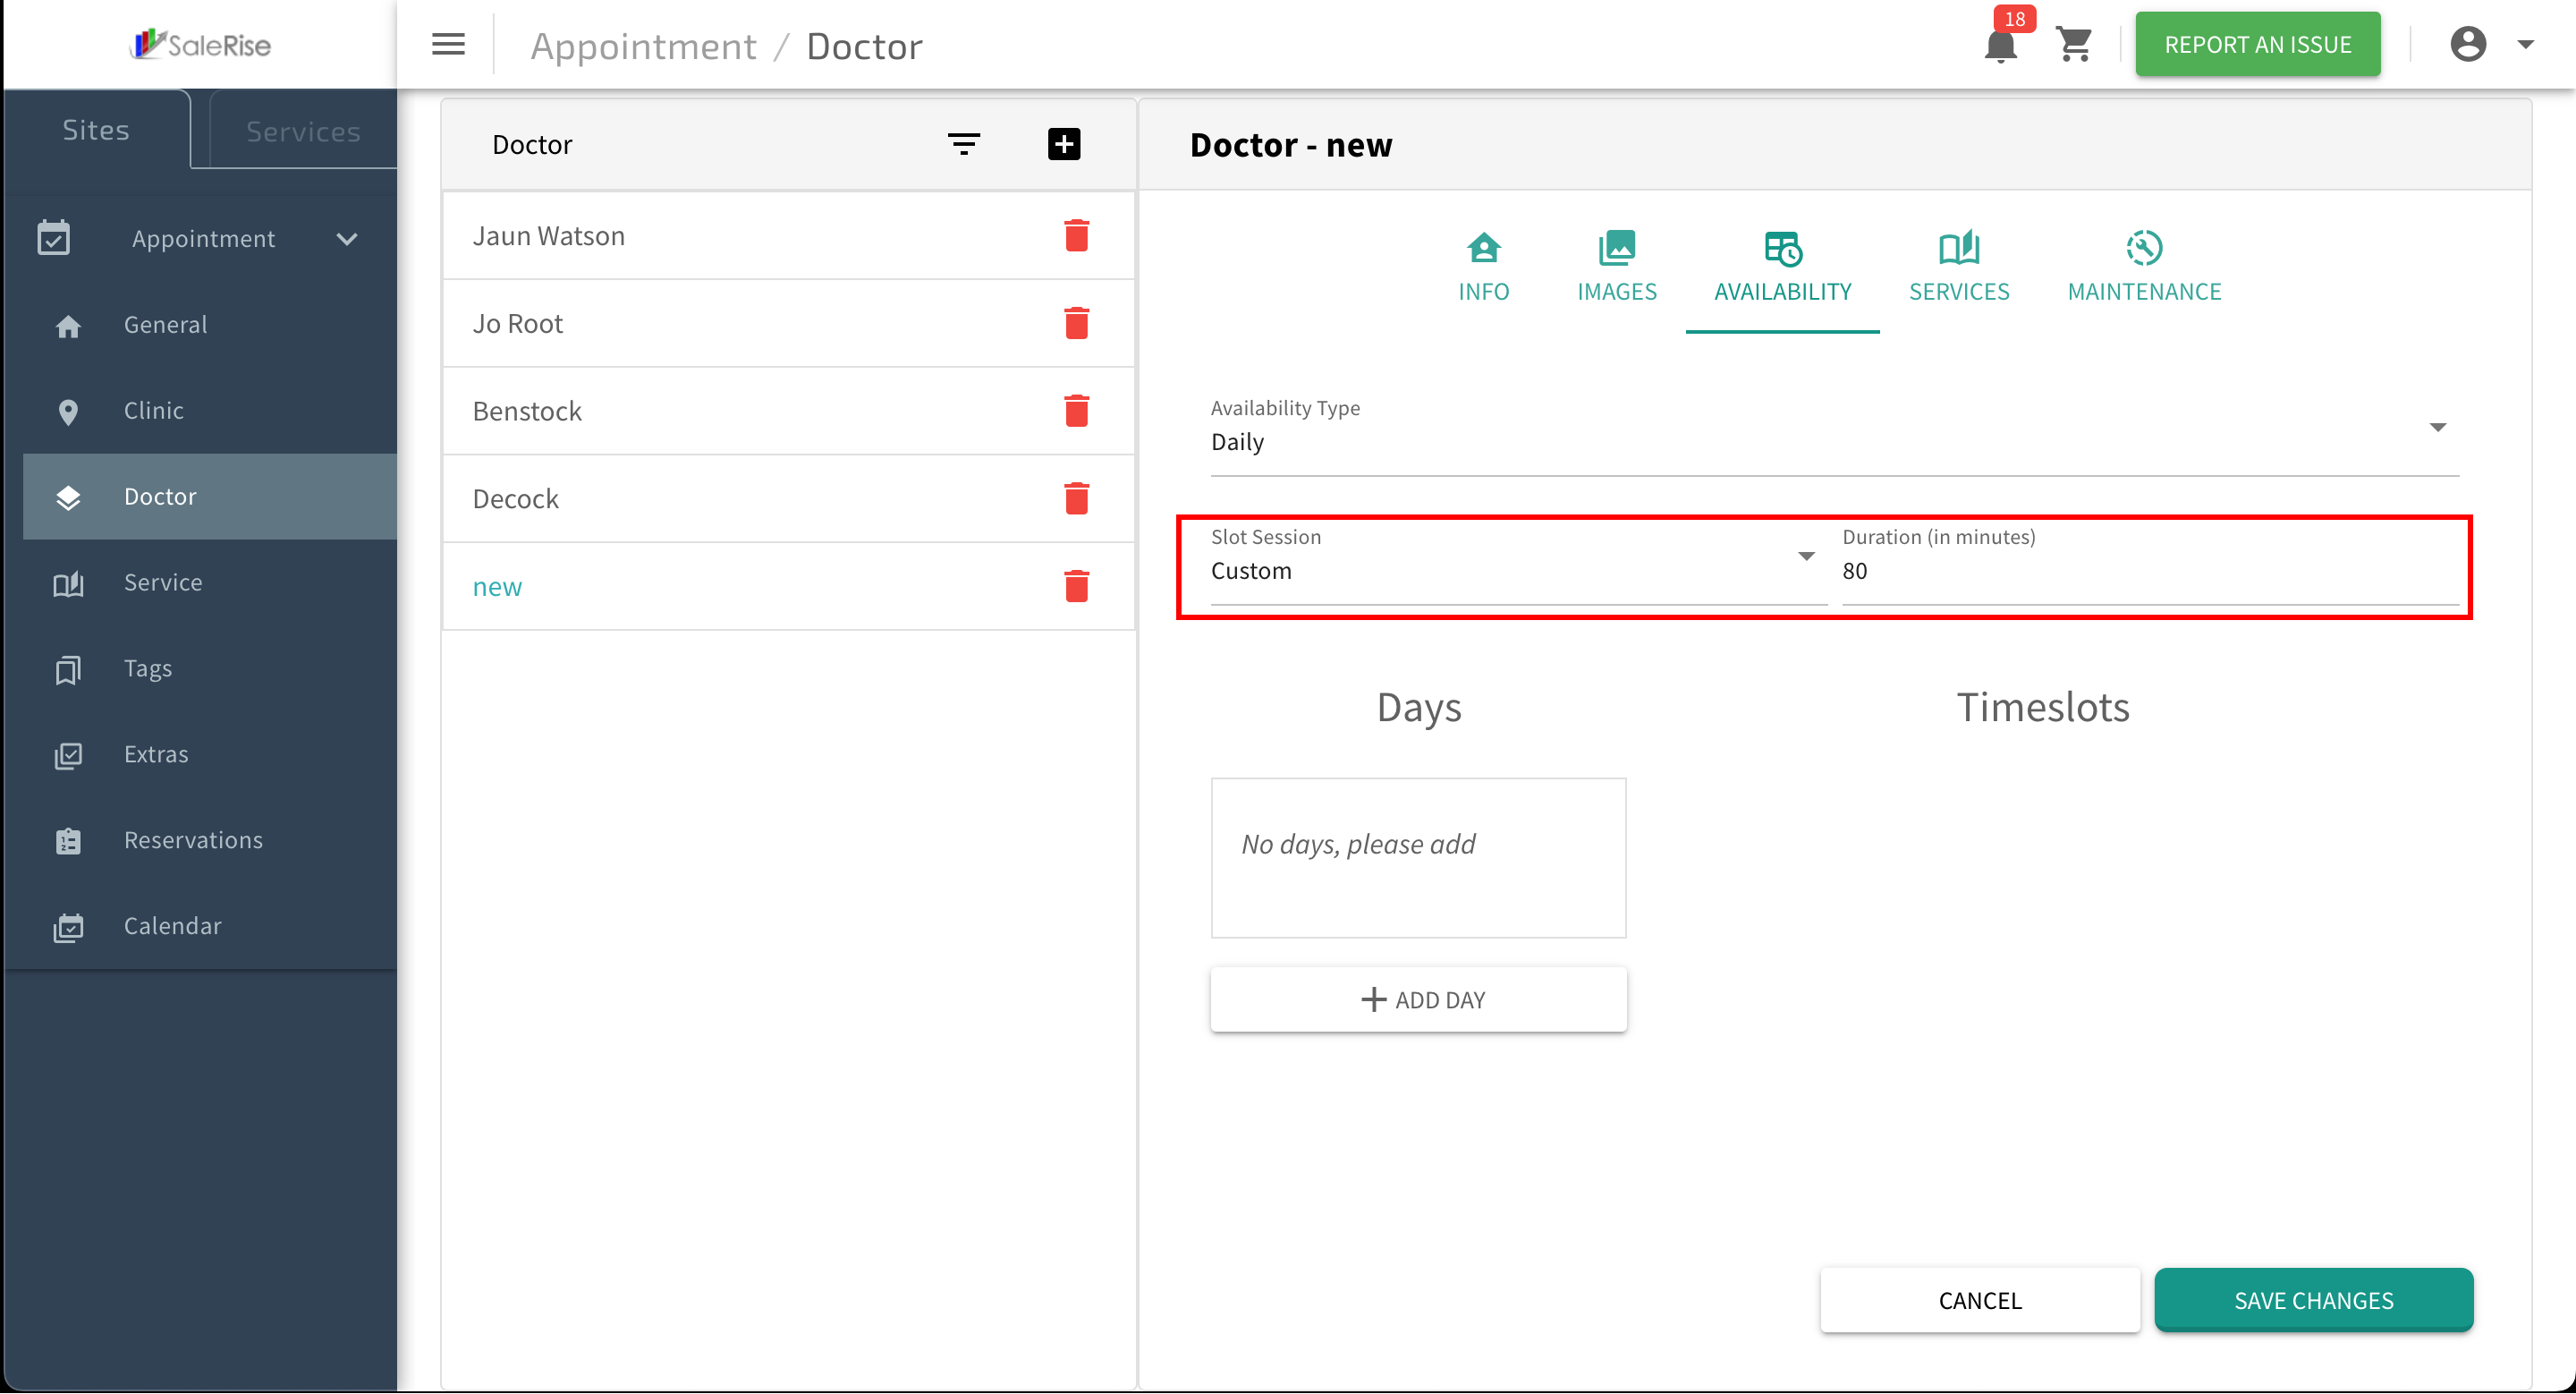
Slot Time Configuration:
- Choose between "Custom Slot Time" or "By Services."
- Custom Slot Time:
- Specify the duration of each appointment slot (e.g., 60 minutes for a 1-hour slot).
- Example: If a custom slot time is set to 60 minutes, each slot represents a one-hour appointment.

- By Services:
- Create slots based on the time associated with each service.
- Example: If a service takes 30 minutes, slots will be generated accordingly.

- Custom Slot Time:
- Choose between "Custom Slot Time" or "By Services."
-
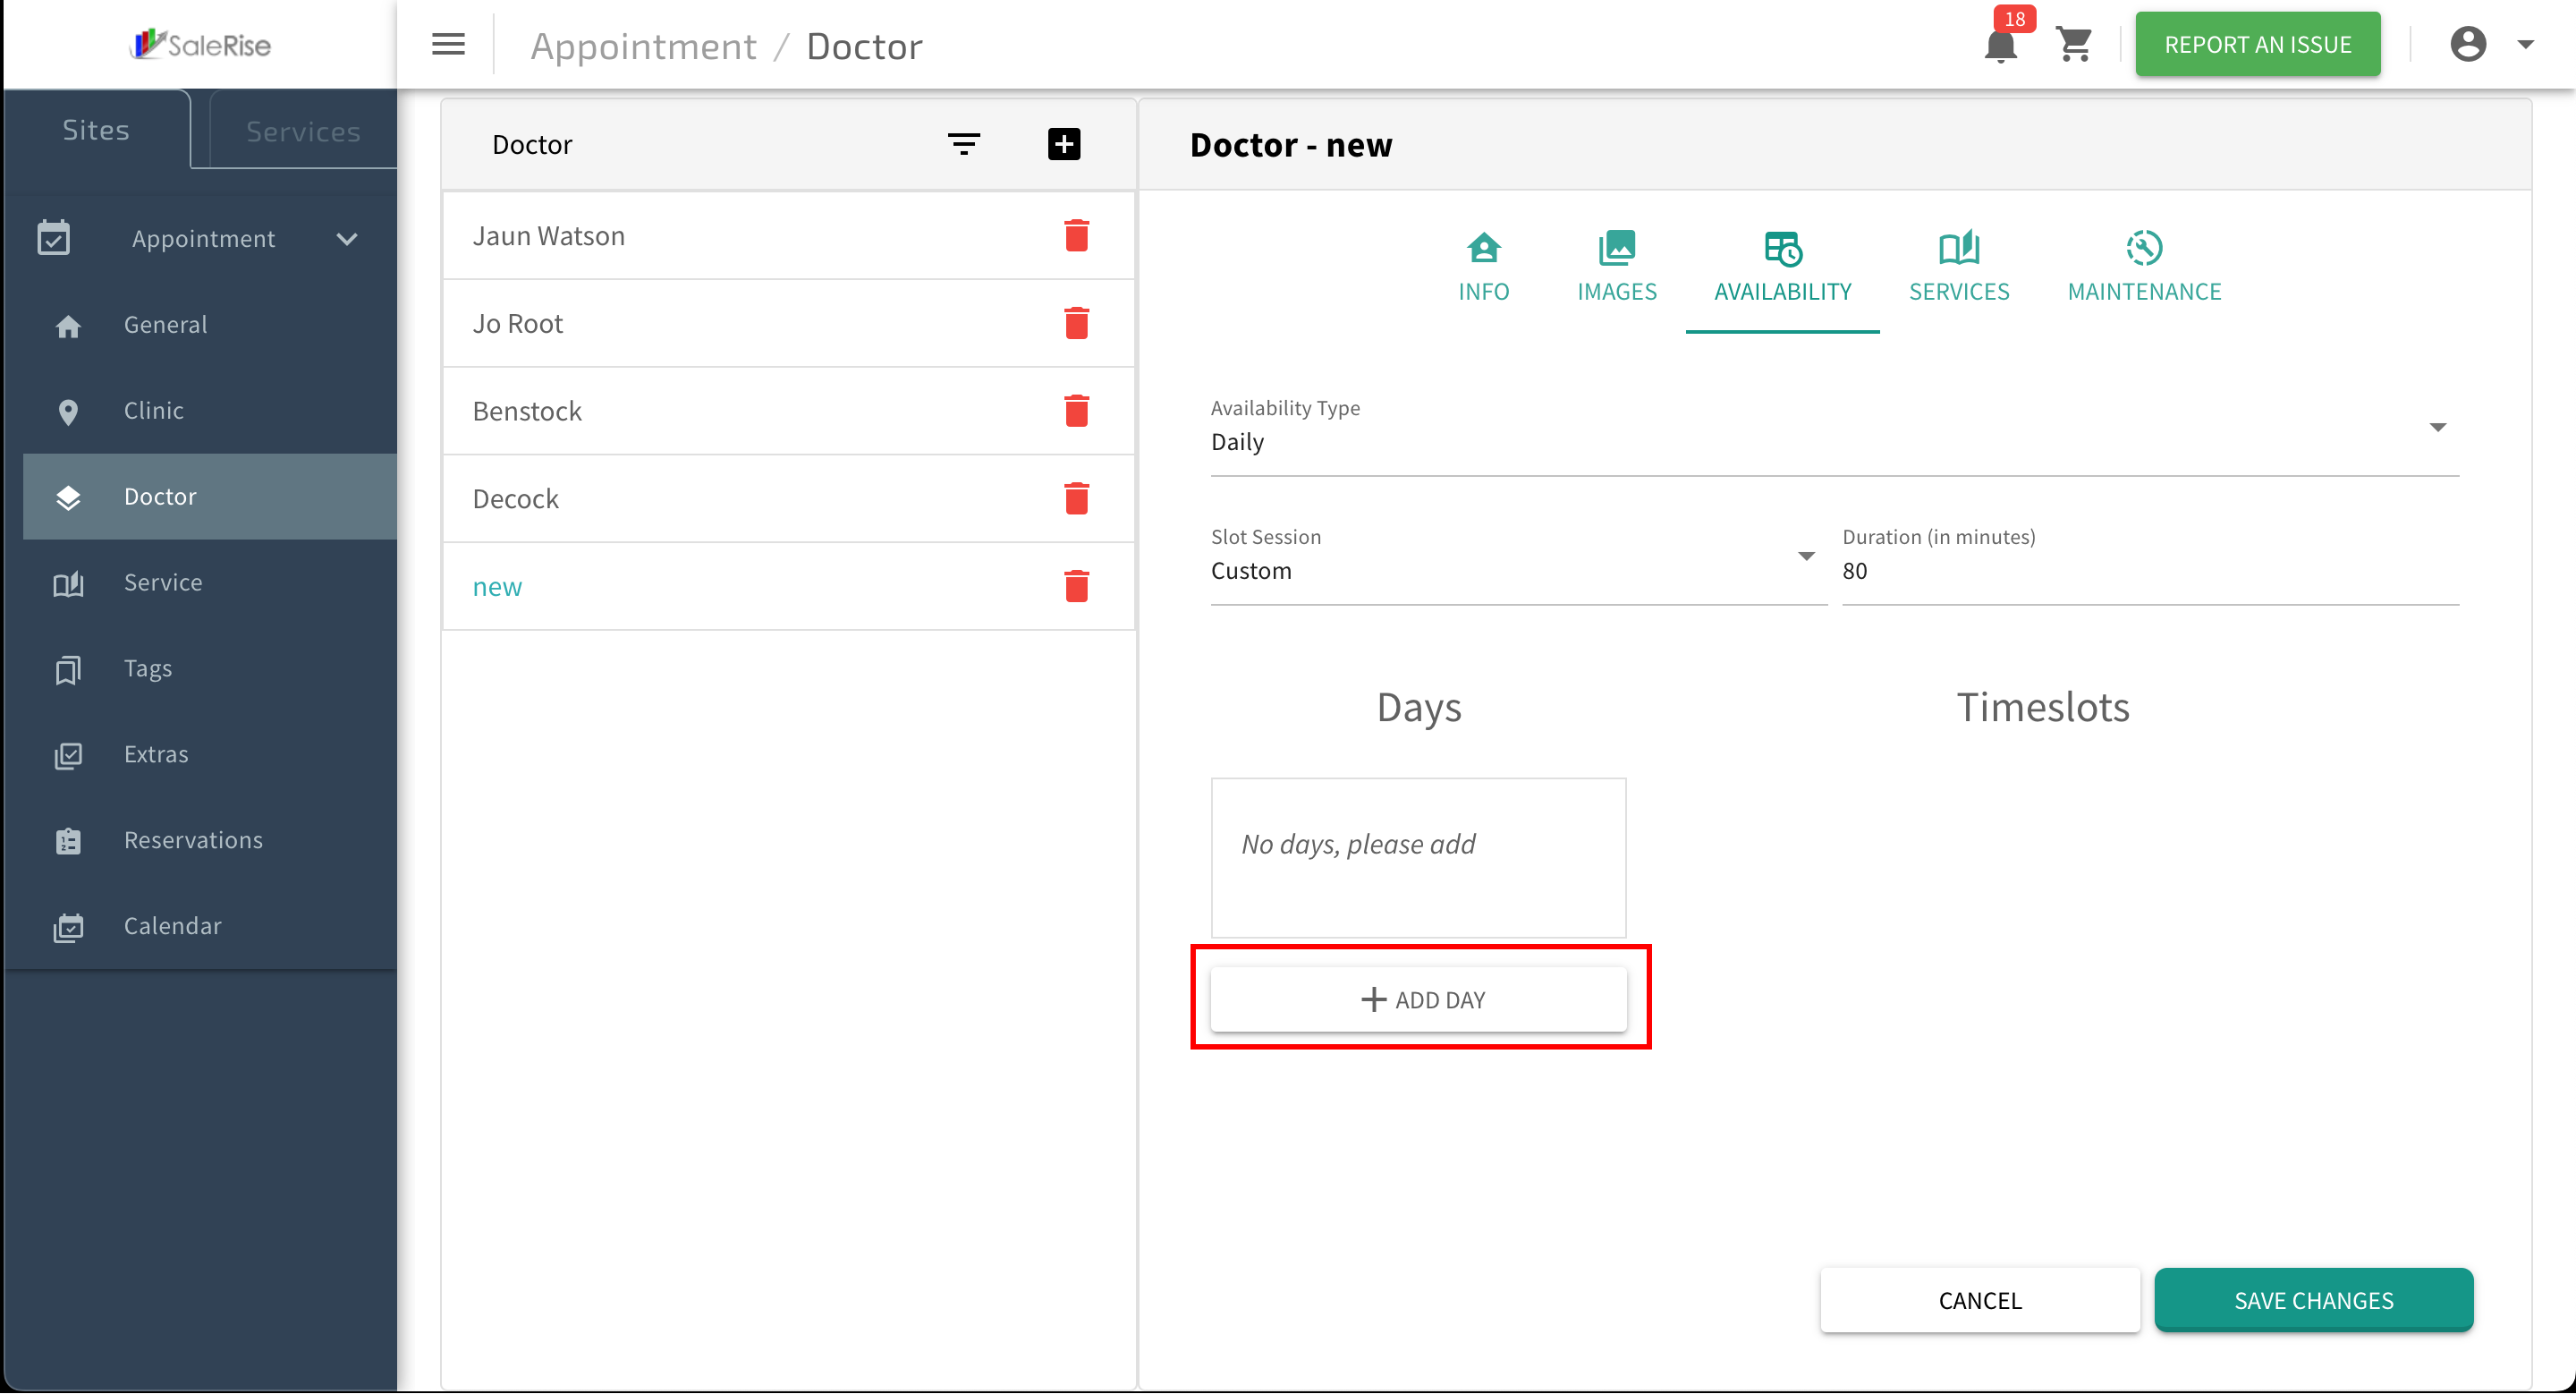
Add Days of Availability:
- Click on "Add Days" to specify the days the doctor is available.
- Select Days: Choose the days the doctor will be available for appointments.

- Example: Select these days if a doctor is available on Mondays and Wednesdays.
- Select Days: Choose the days the doctor will be available for appointments.
- Click on "Add Days" to specify the days the doctor is available.
-
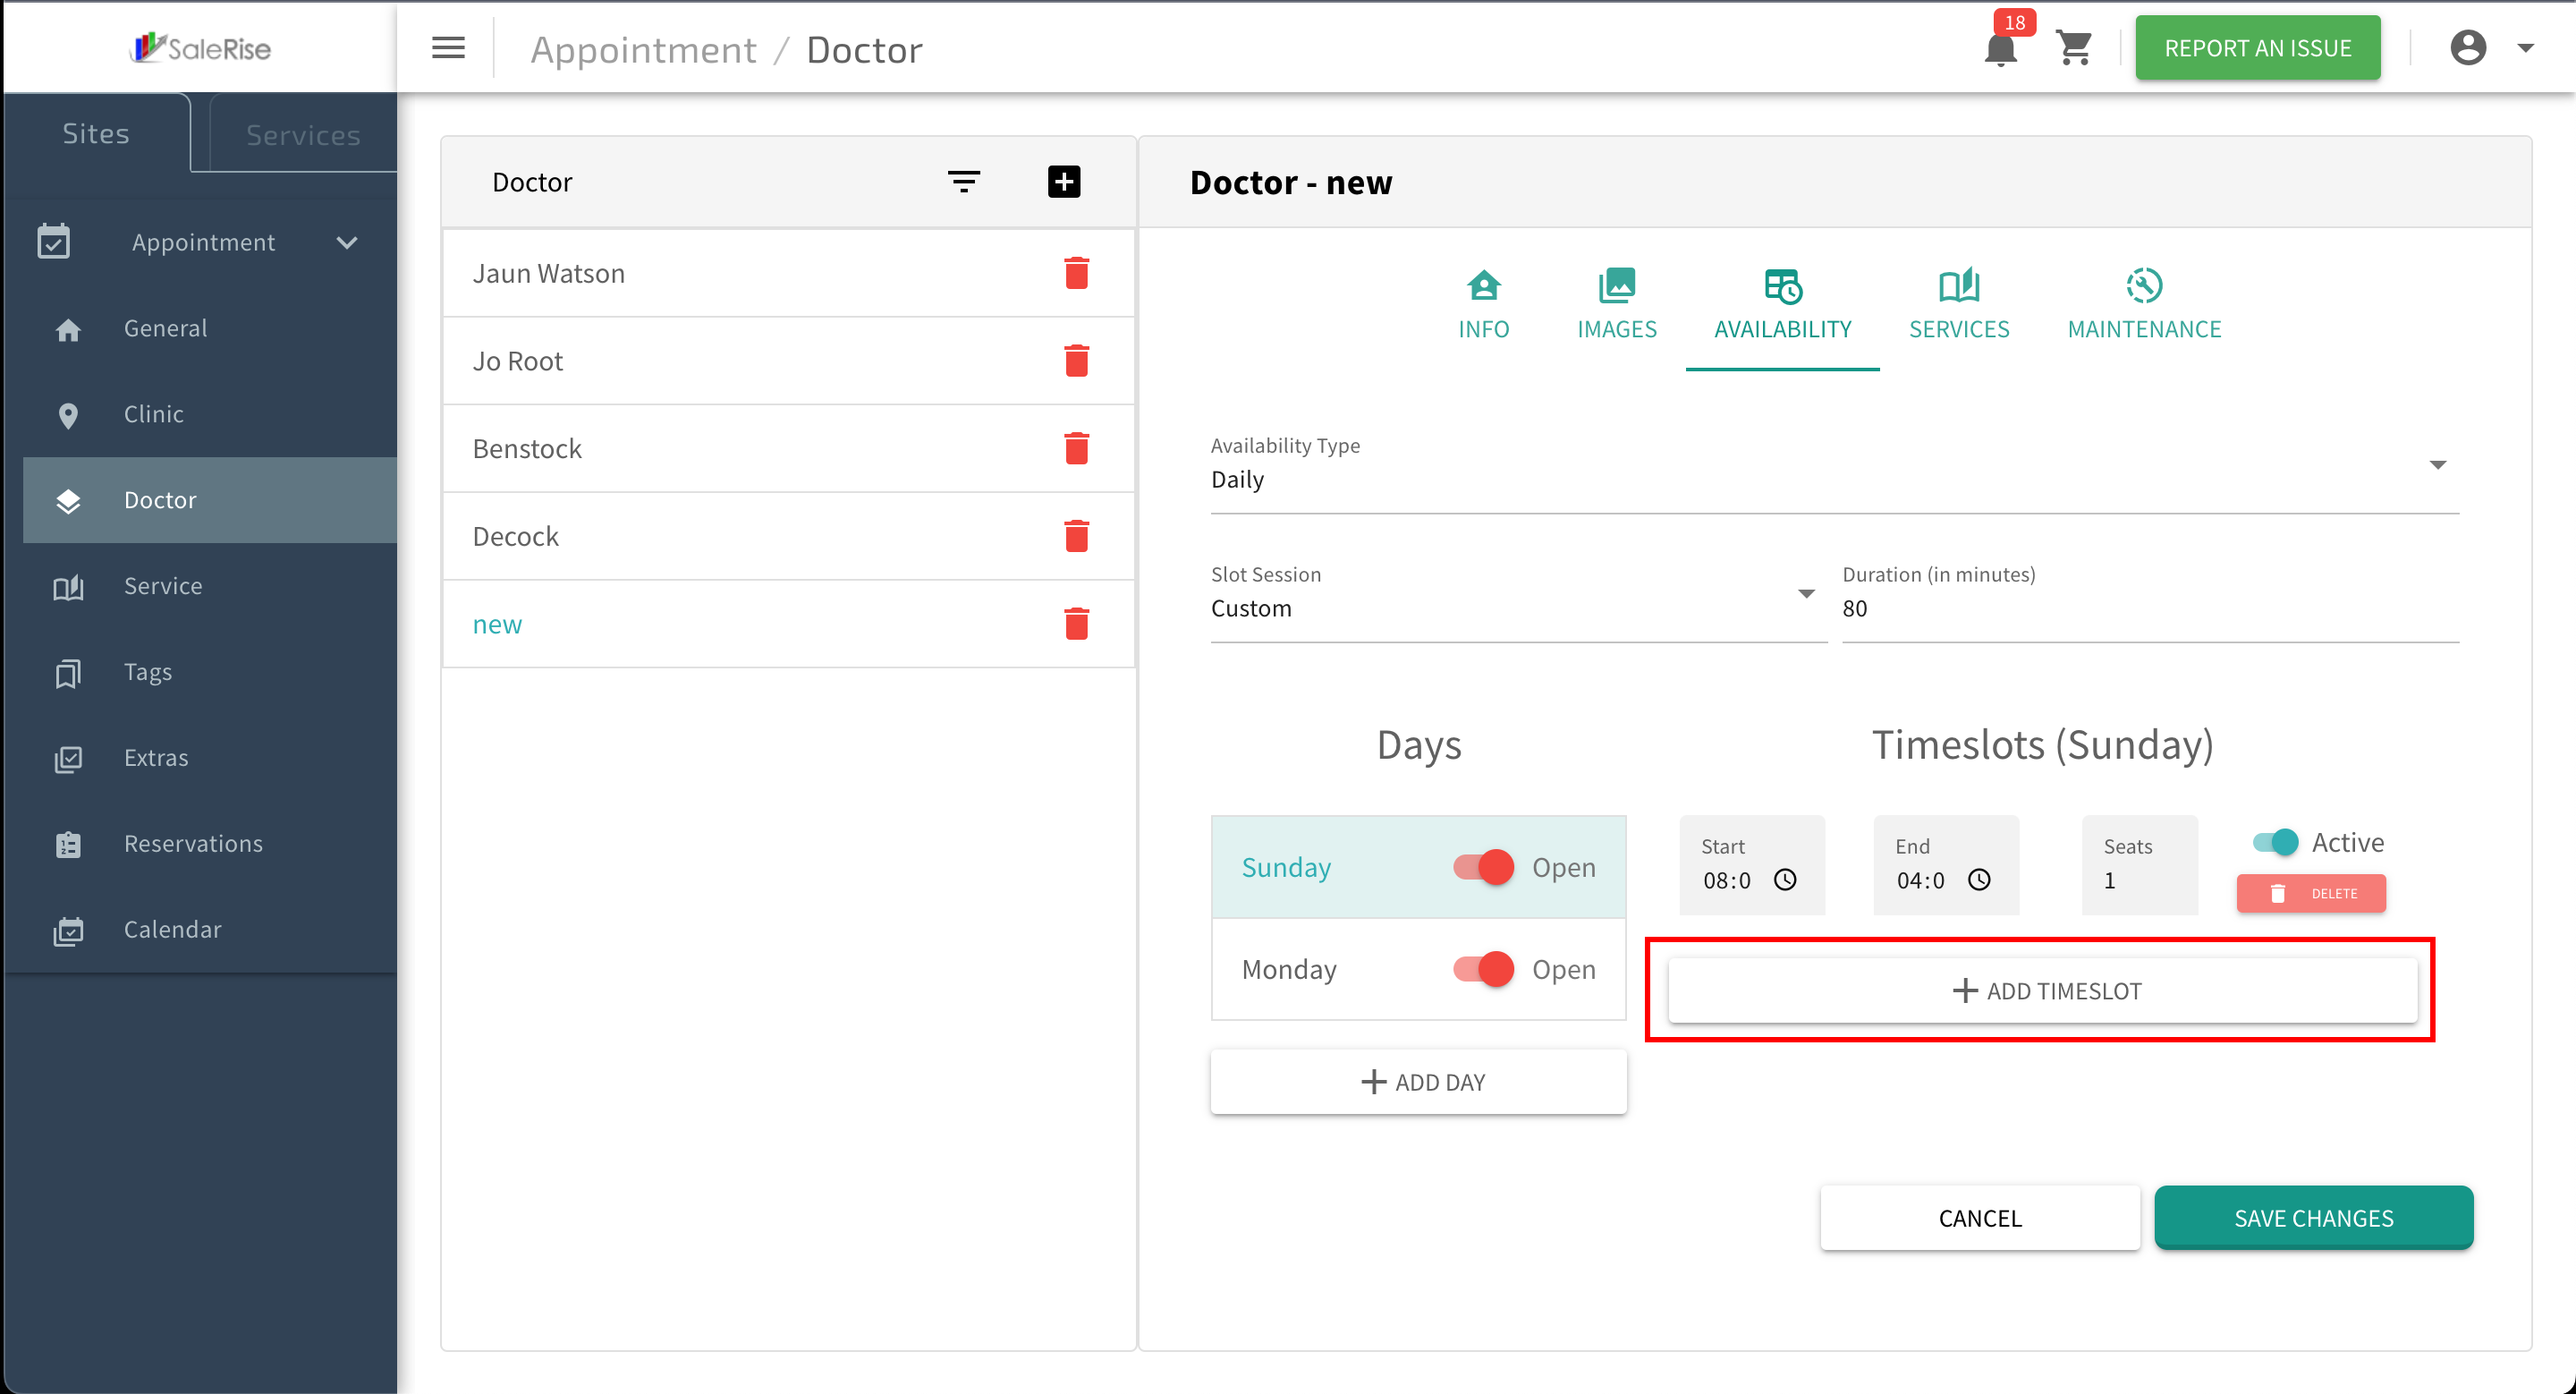
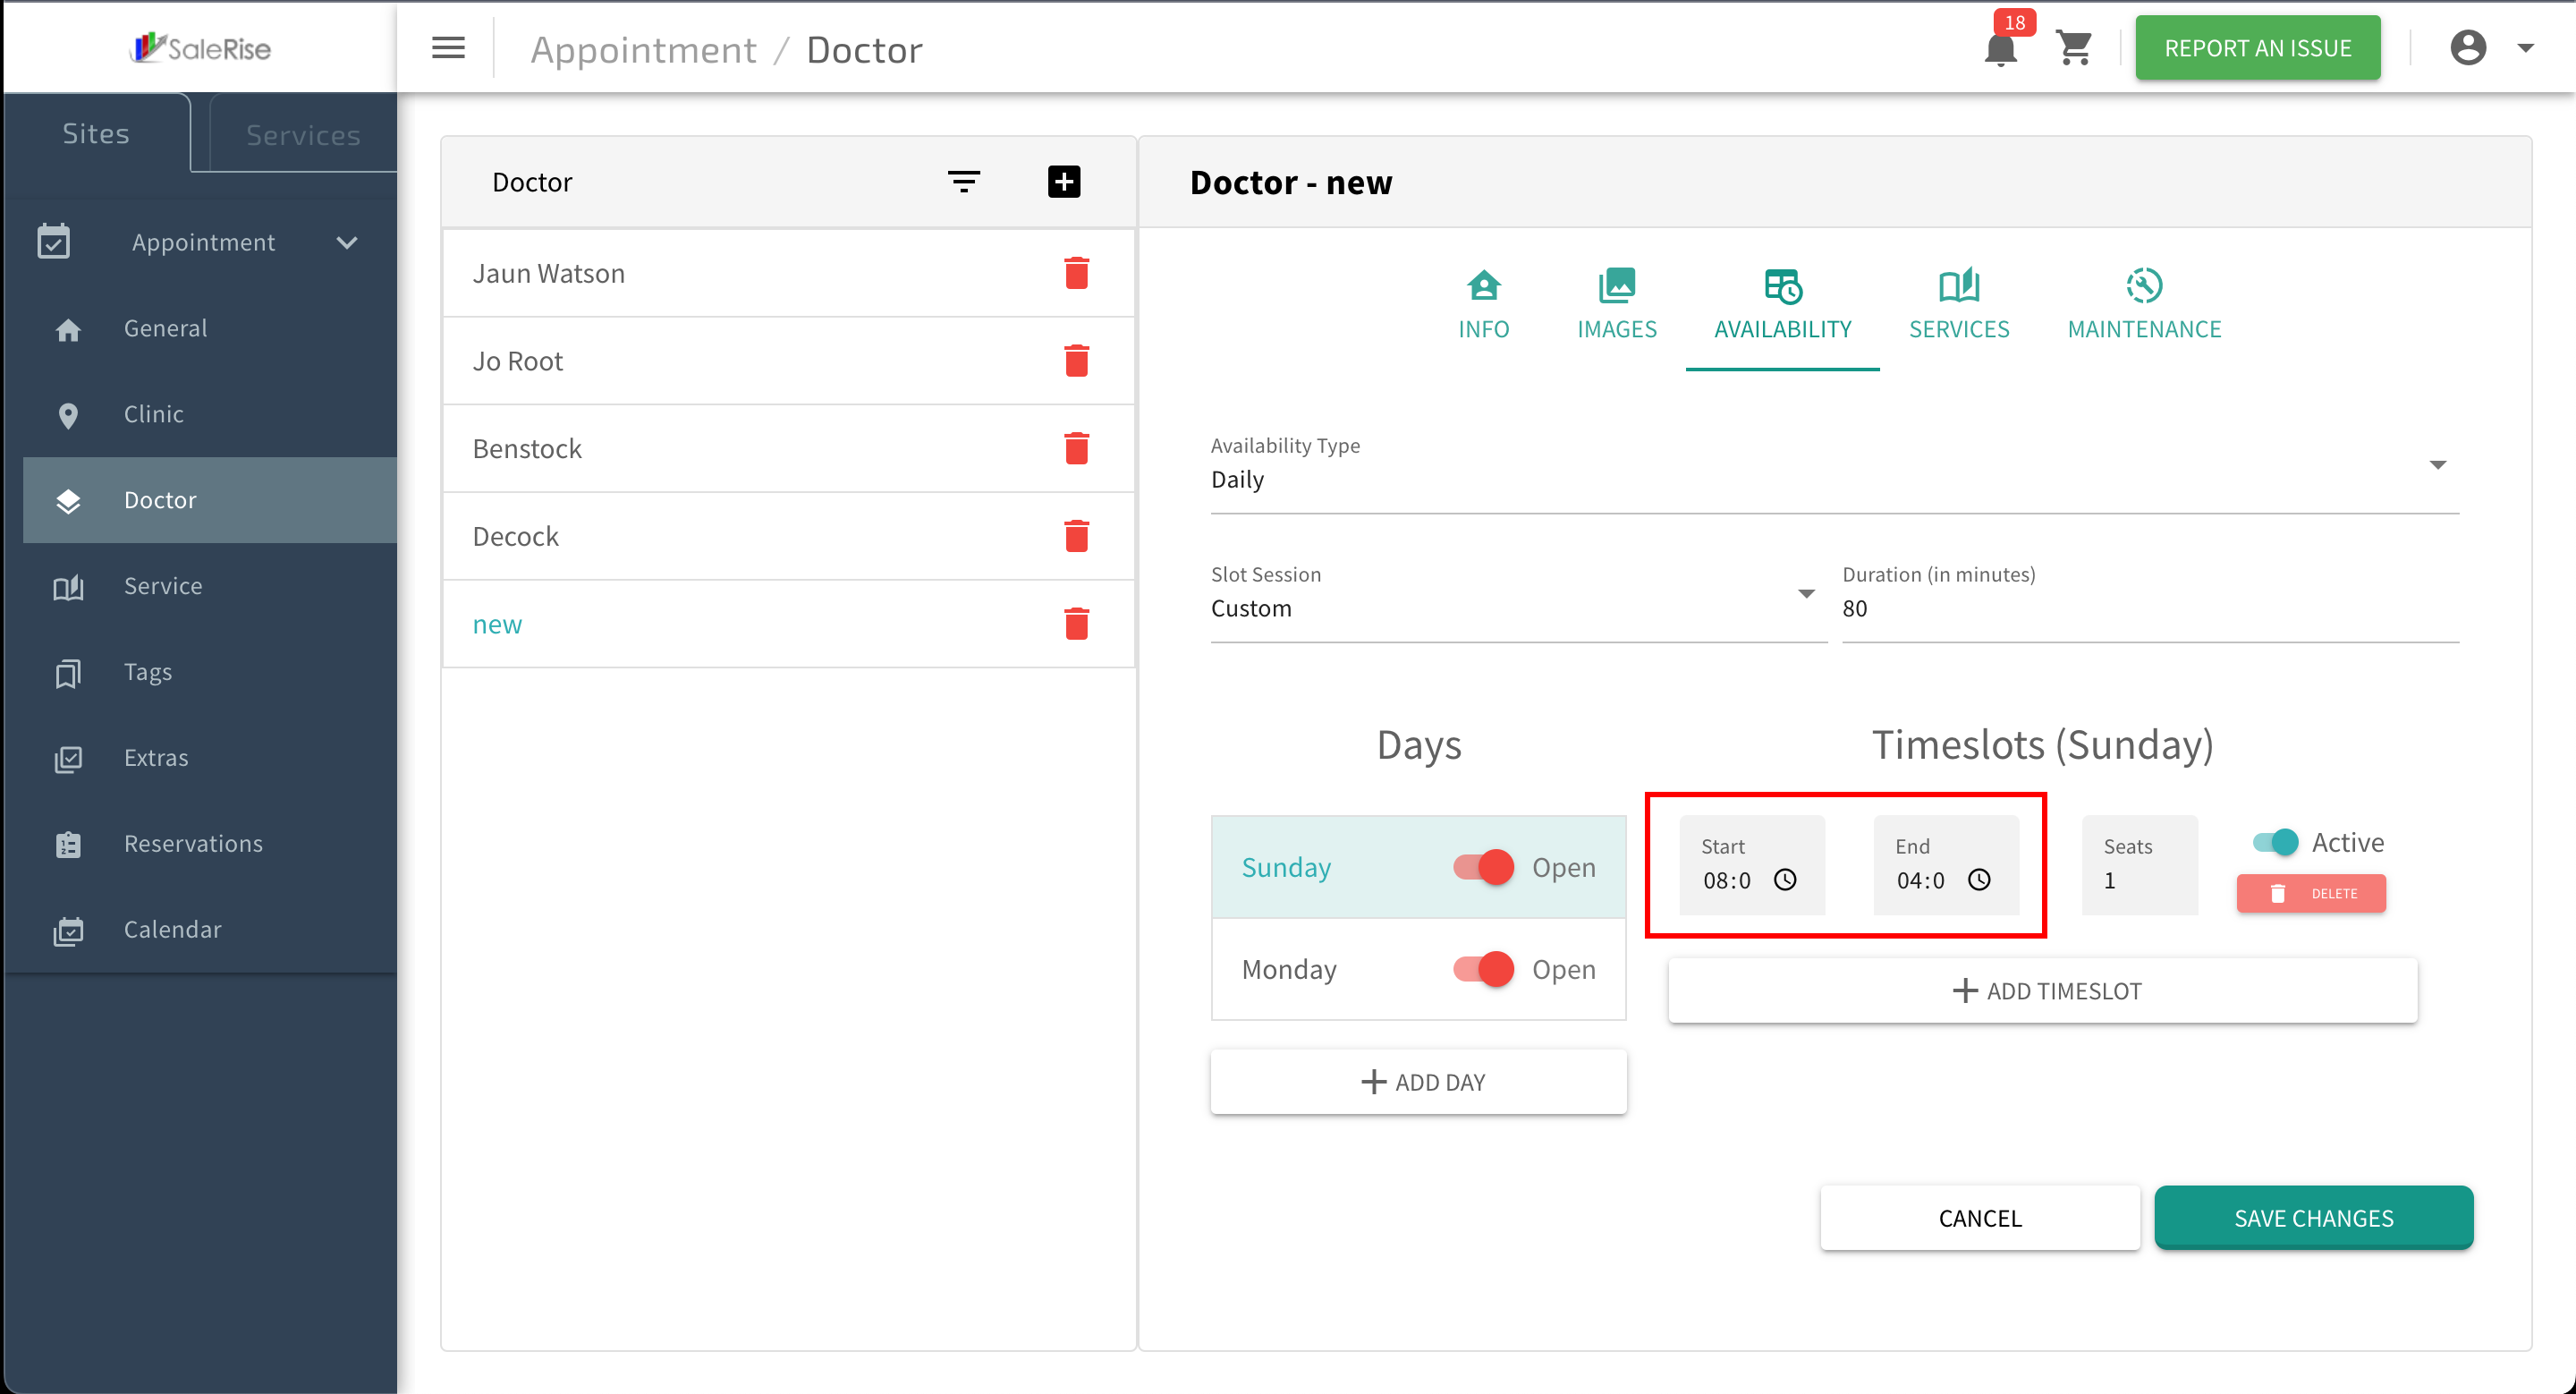
Time Slot Configuration:
- For each selected day, add multiple time slots:

- Start Time and End Time: Define the beginning and end of the working hours.

- Example: If working hours are from 9:00 AM to 5:00 PM, set the start and end times accordingly.
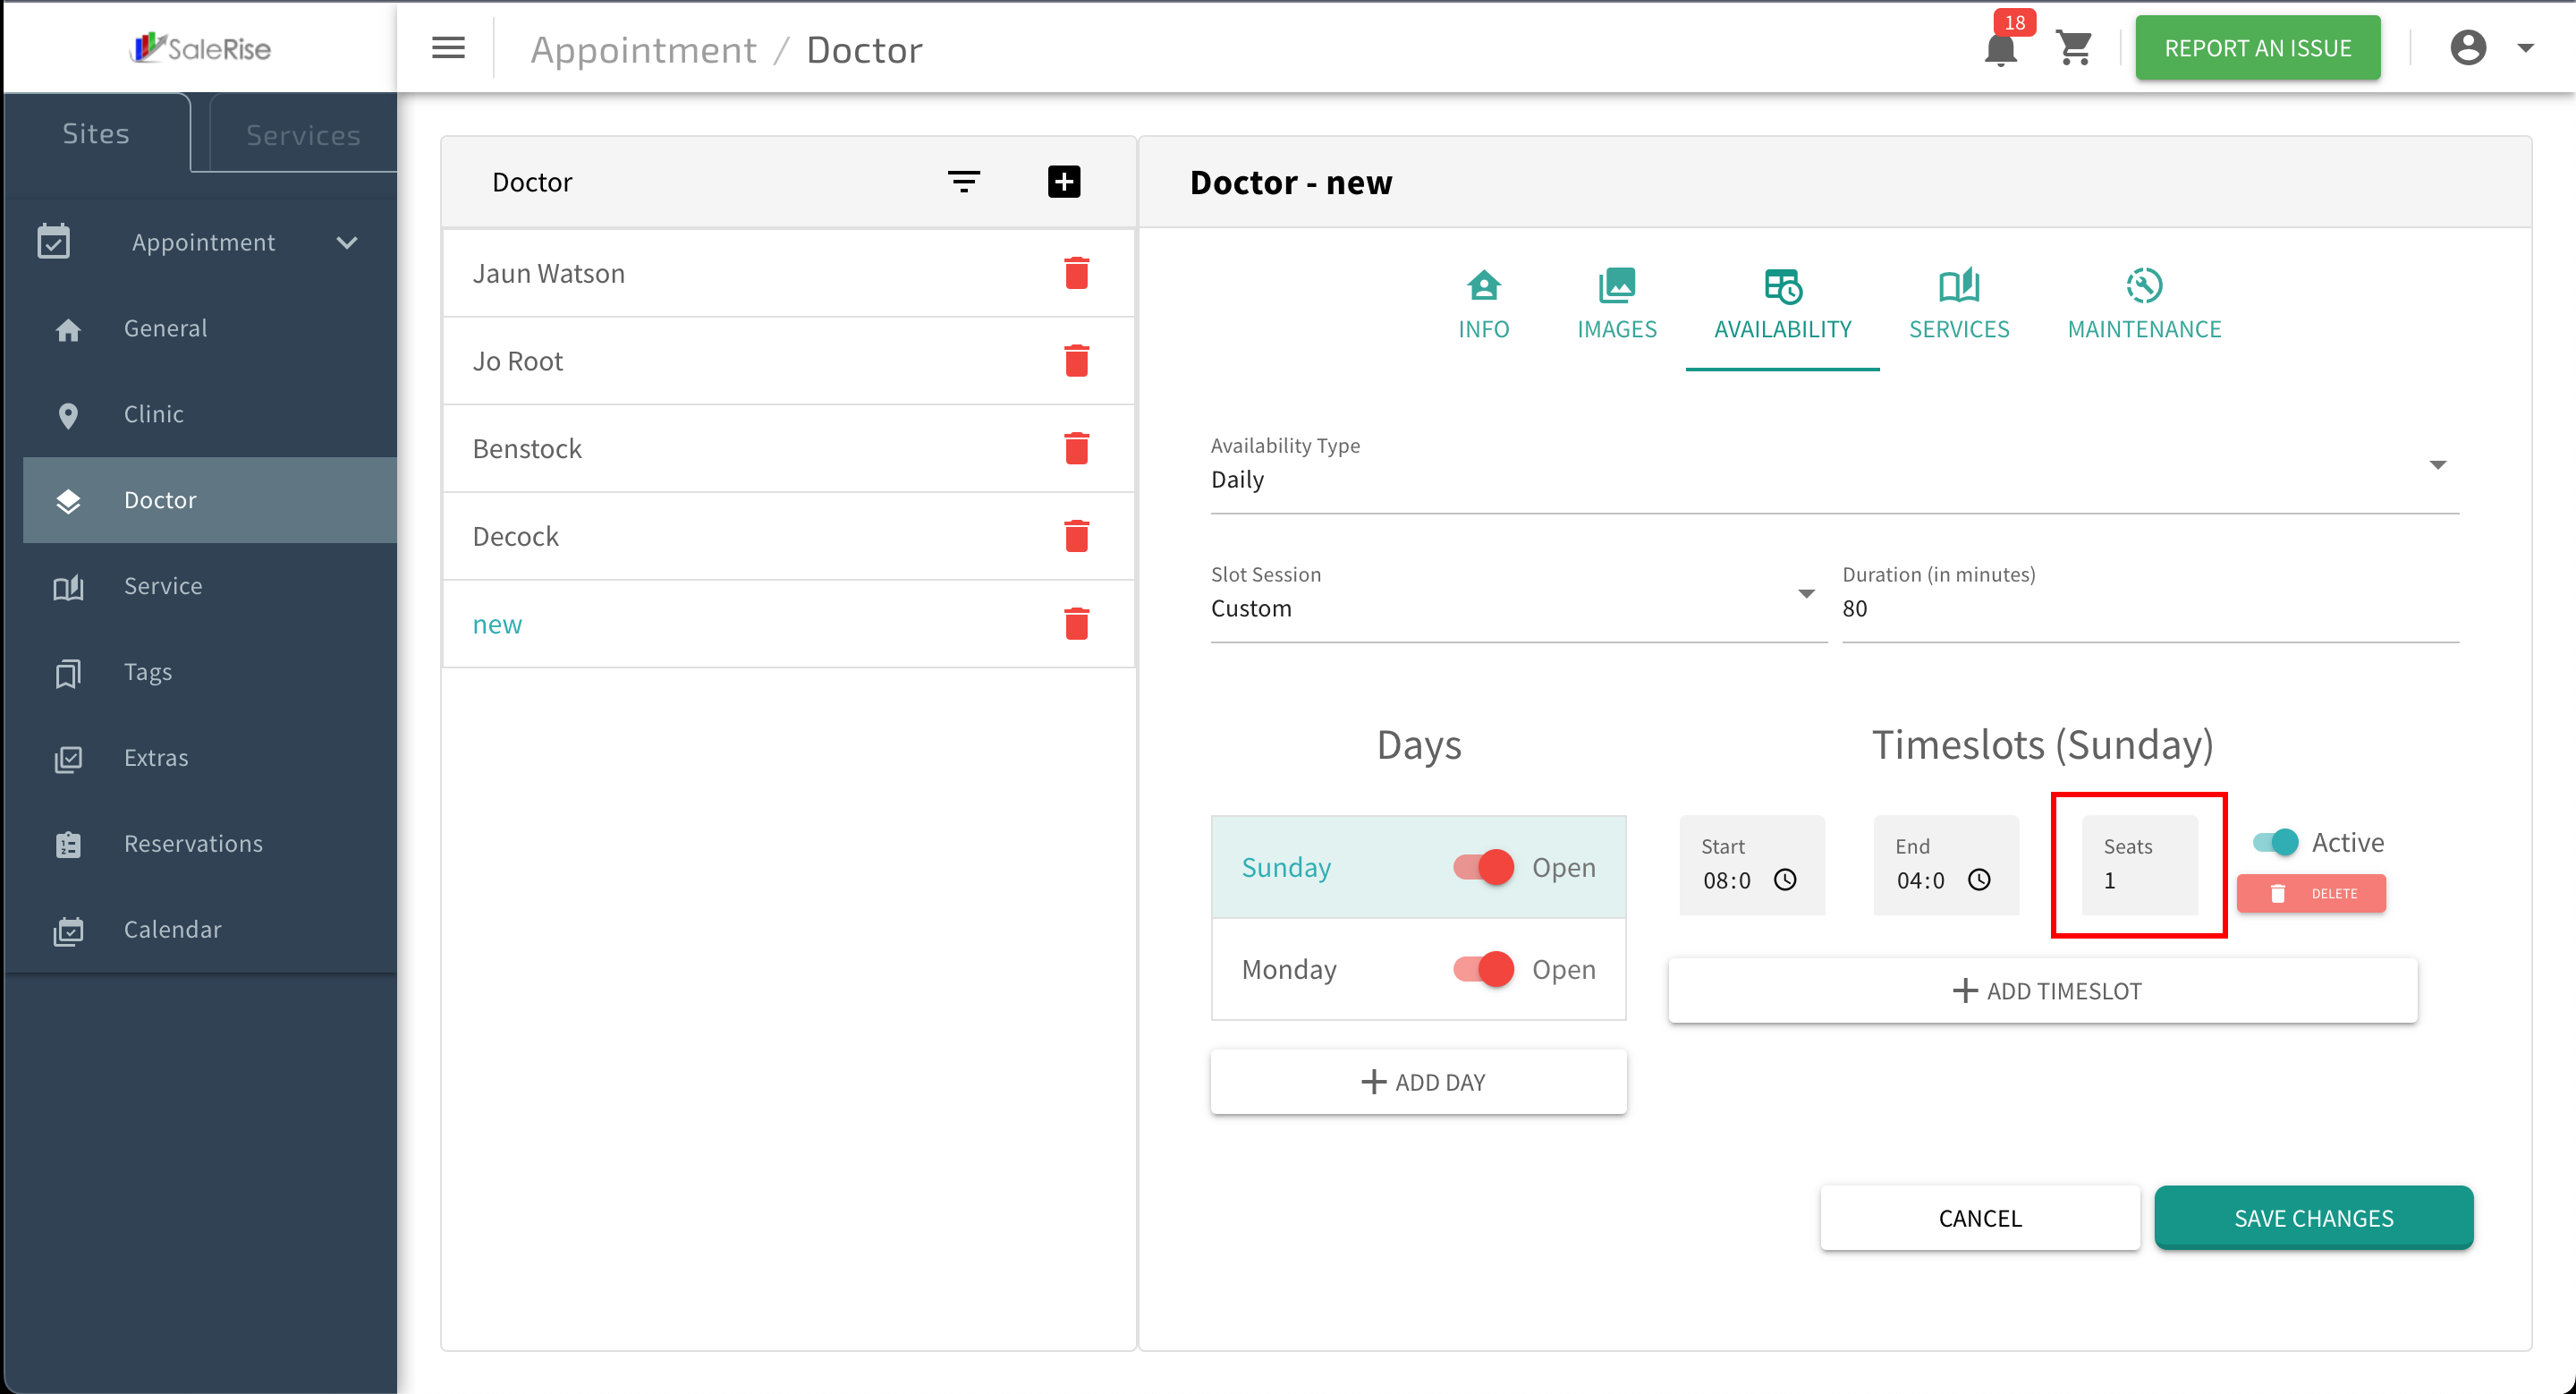
- Seats: Specify the number of bookings allowed in each time slot.

- Example: If there are five seats, five patients can book appointments in that time slot.
- Start Time and End Time: Define the beginning and end of the working hours.
- For each selected day, add multiple time slots:
-
Save Time Slots:
- Click "Save" to confirm the configured time slots.
- Example: After saving, the system generates slots based on the specified times for each selected day.
- Click "Save" to confirm the configured time slots.
-
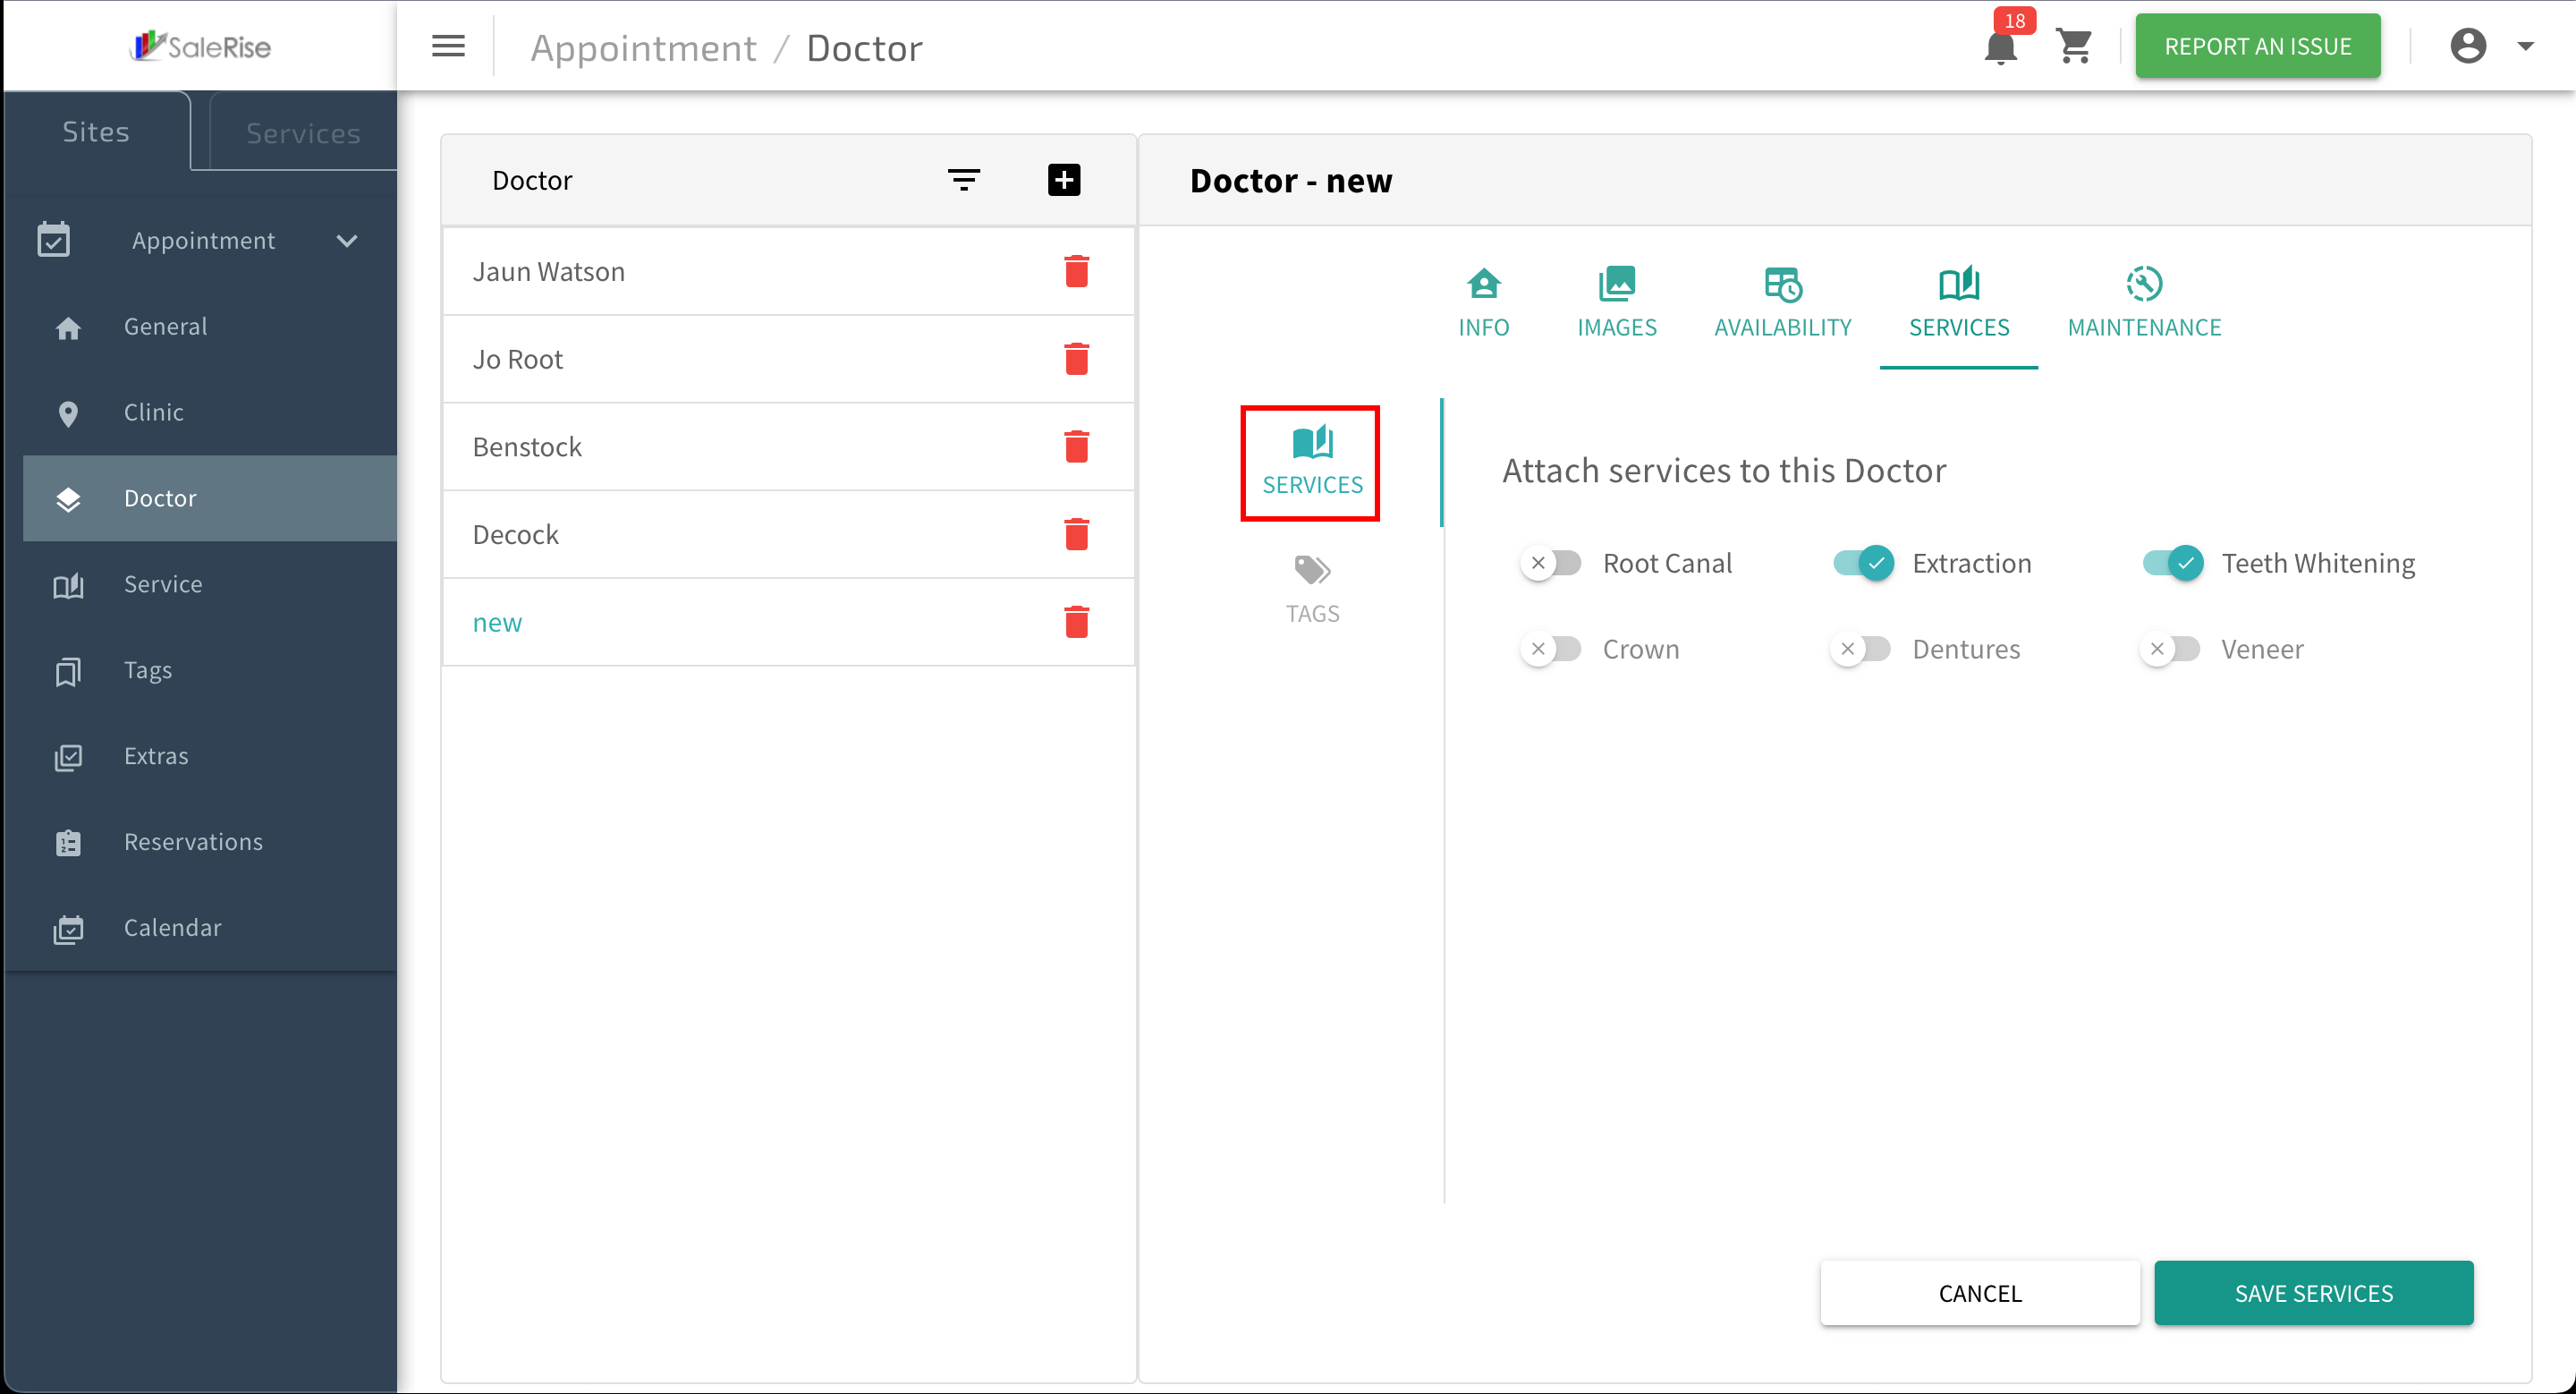
Services Assignment:
- In the "Services" tab, assign services to the doctor.
- Assign Multiple Services: Link various services to the doctor.

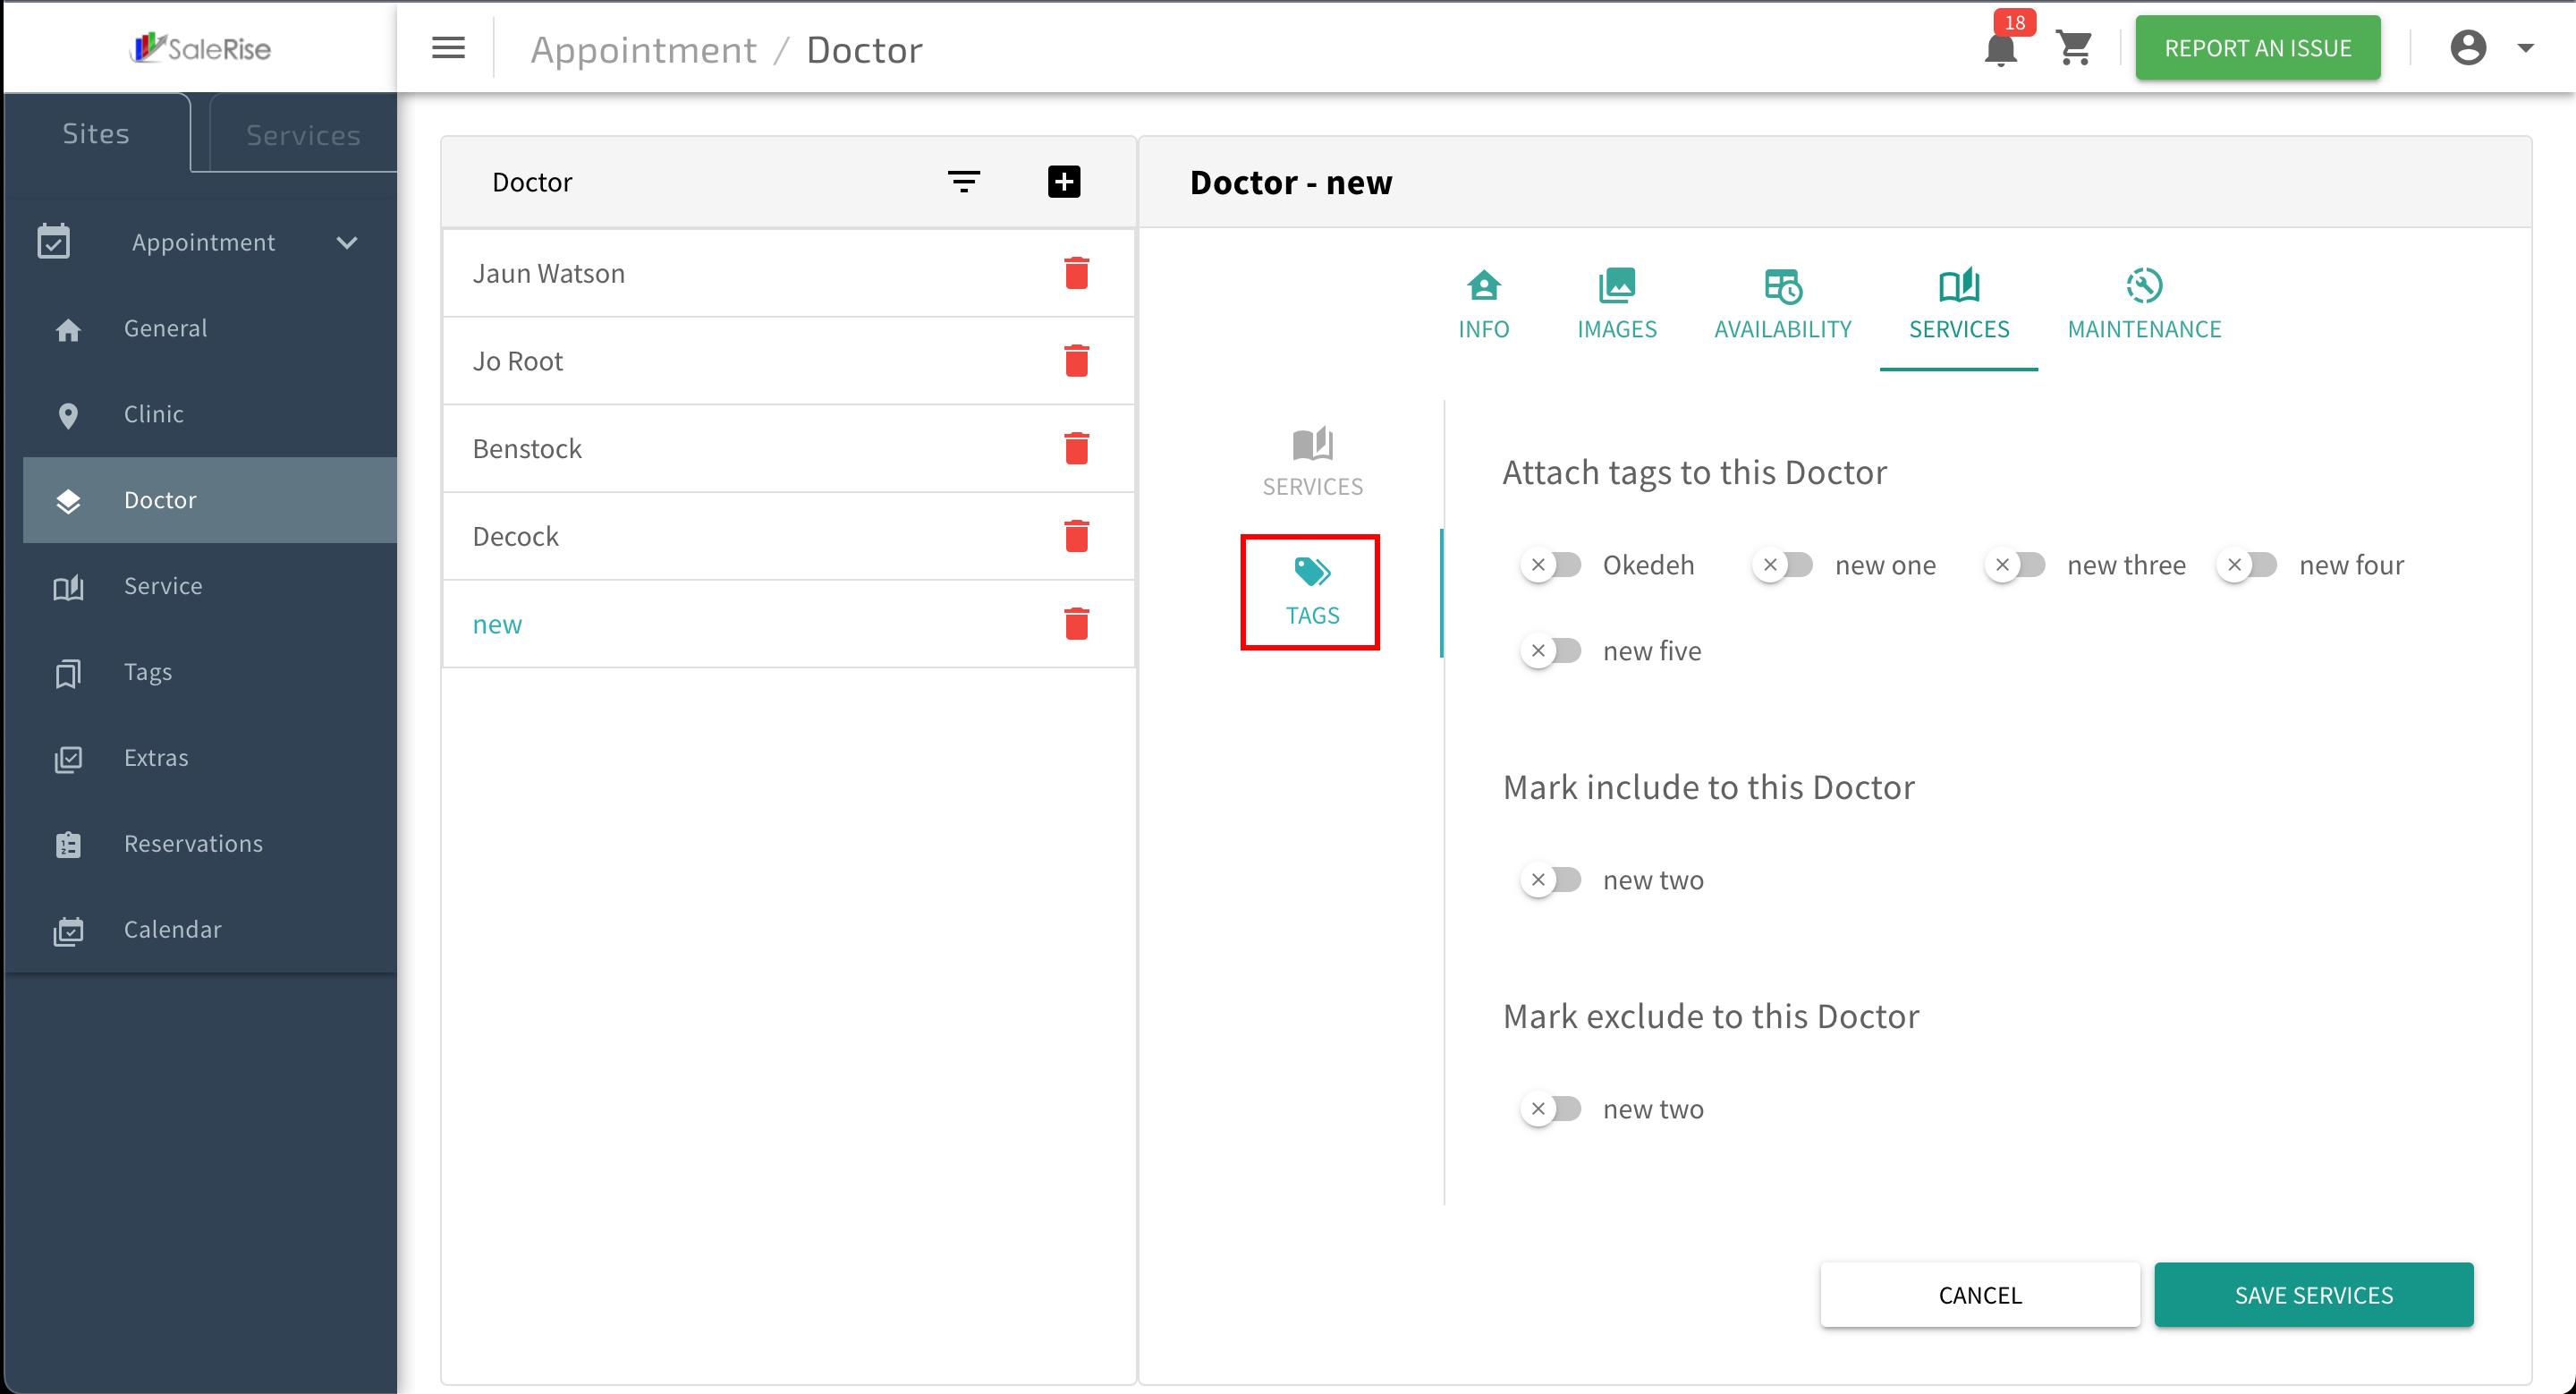
- Tags: Add tags to categorize services (e.g., free, not included).

- Assign Multiple Services: Link various services to the doctor.
- In the "Services" tab, assign services to the doctor.
-
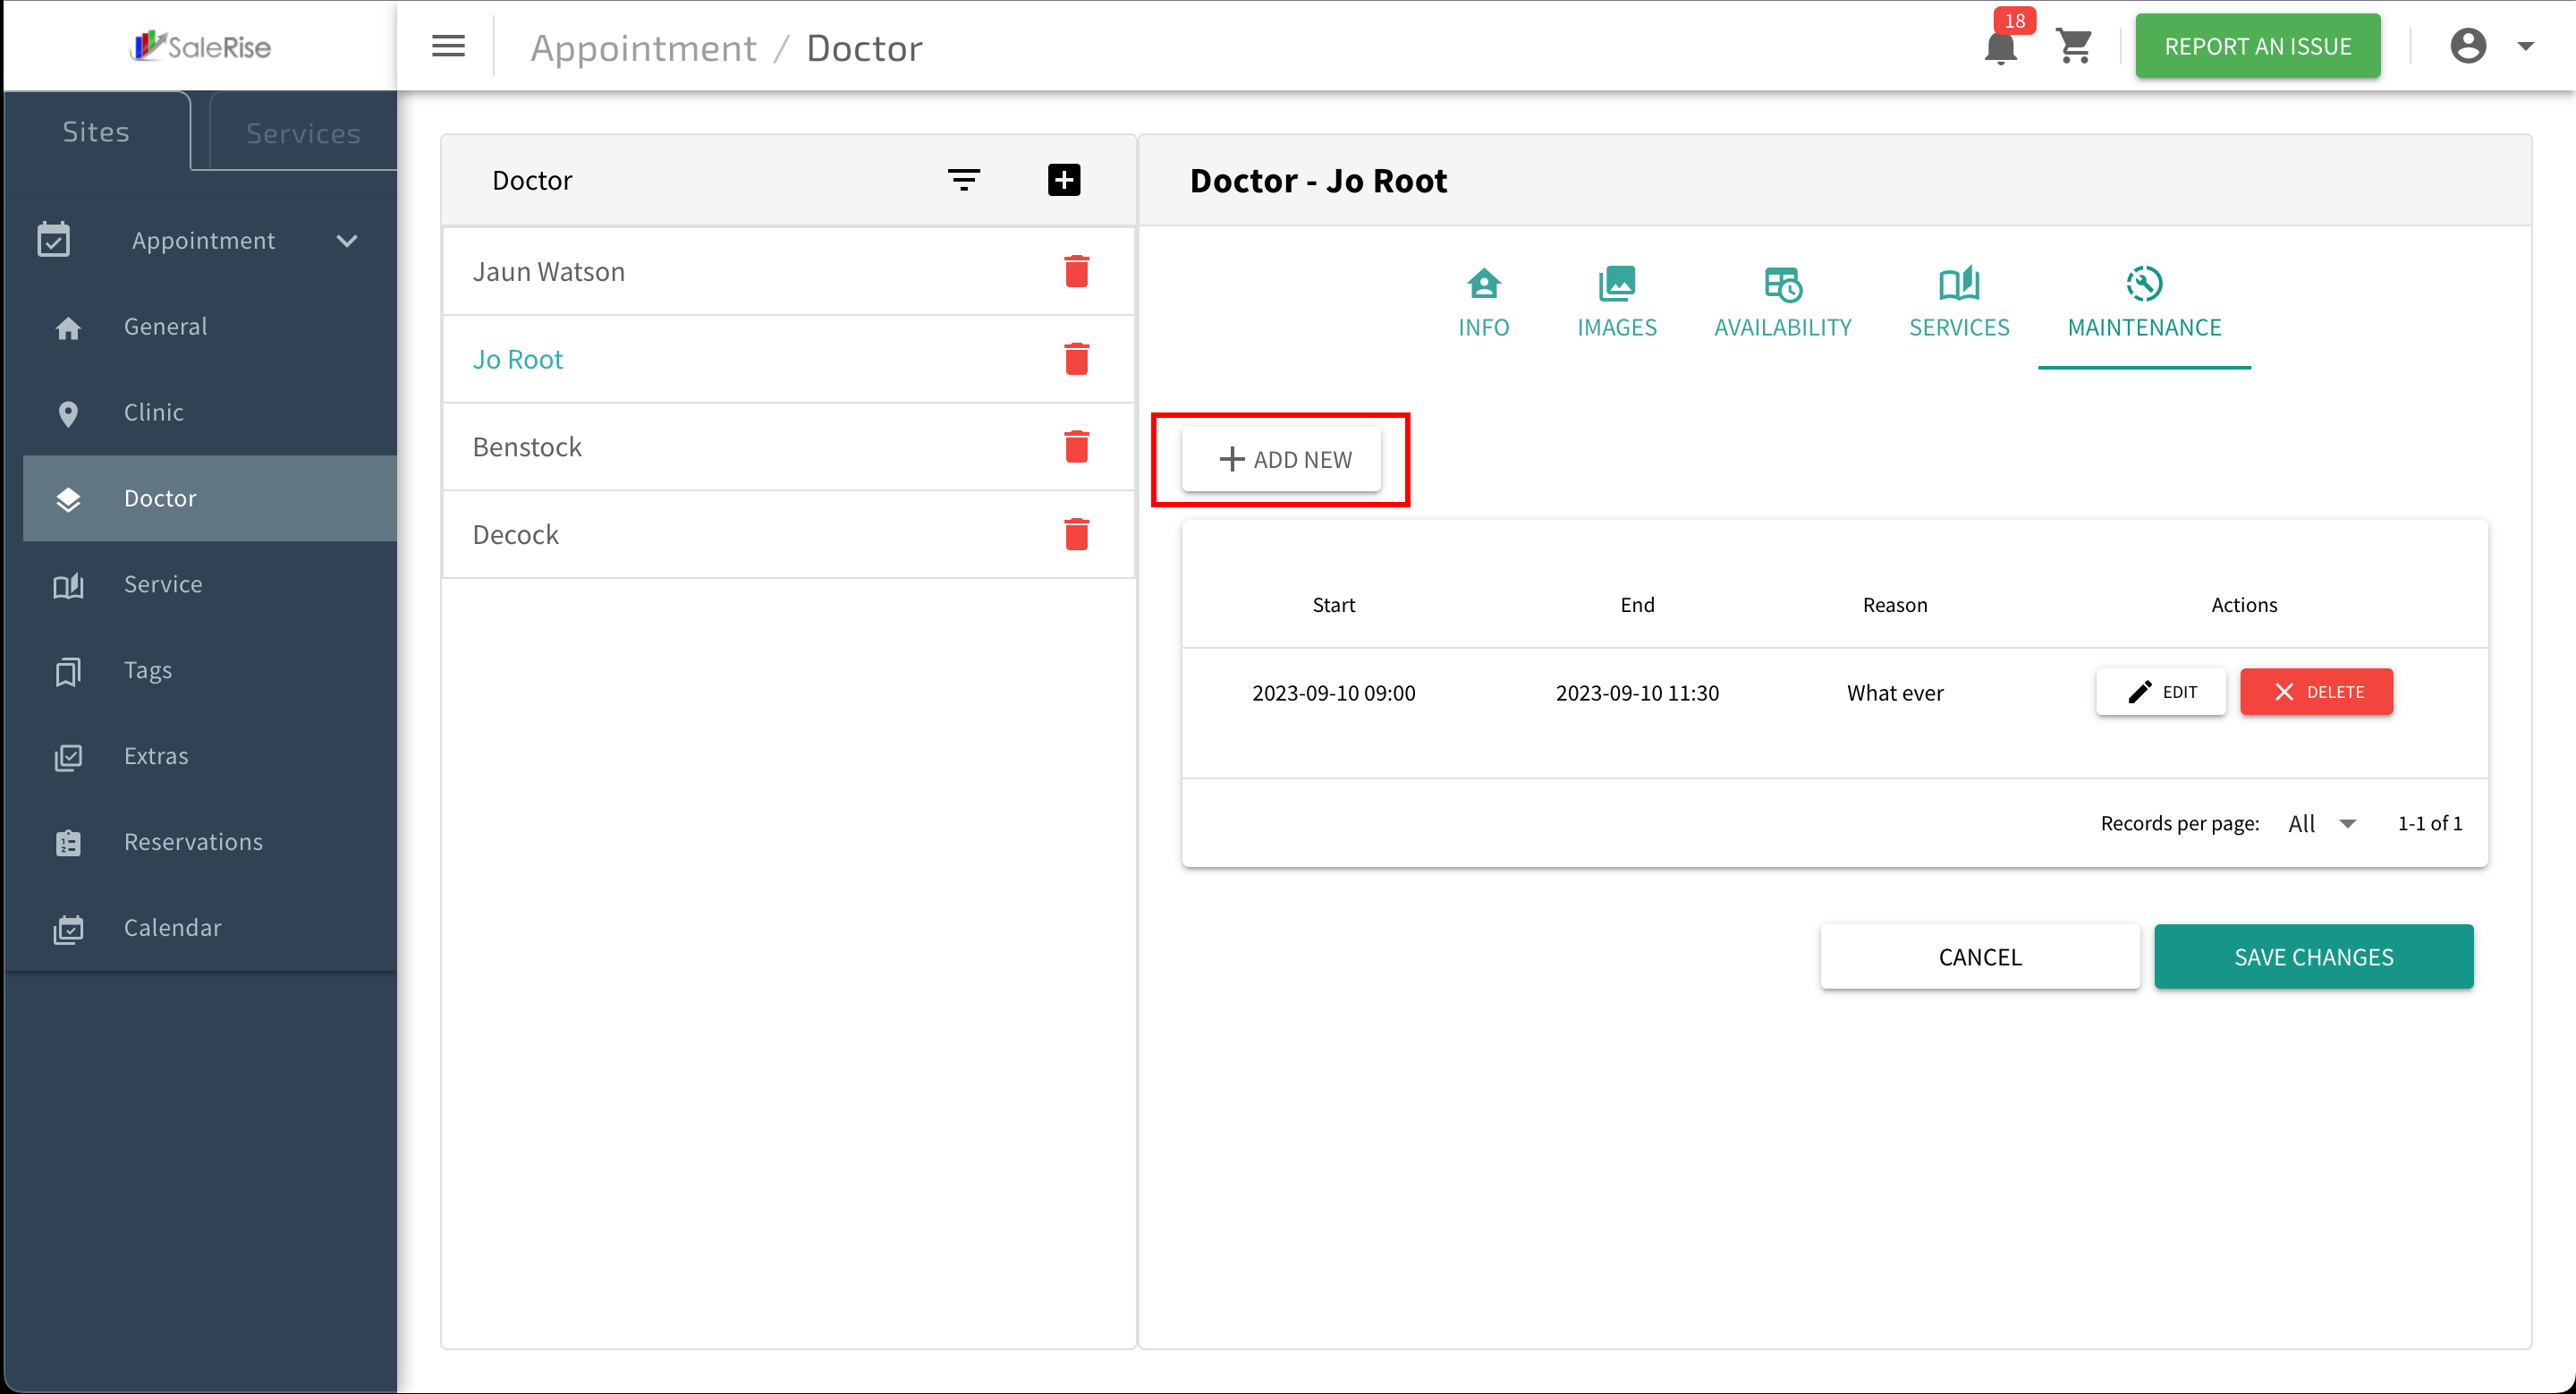
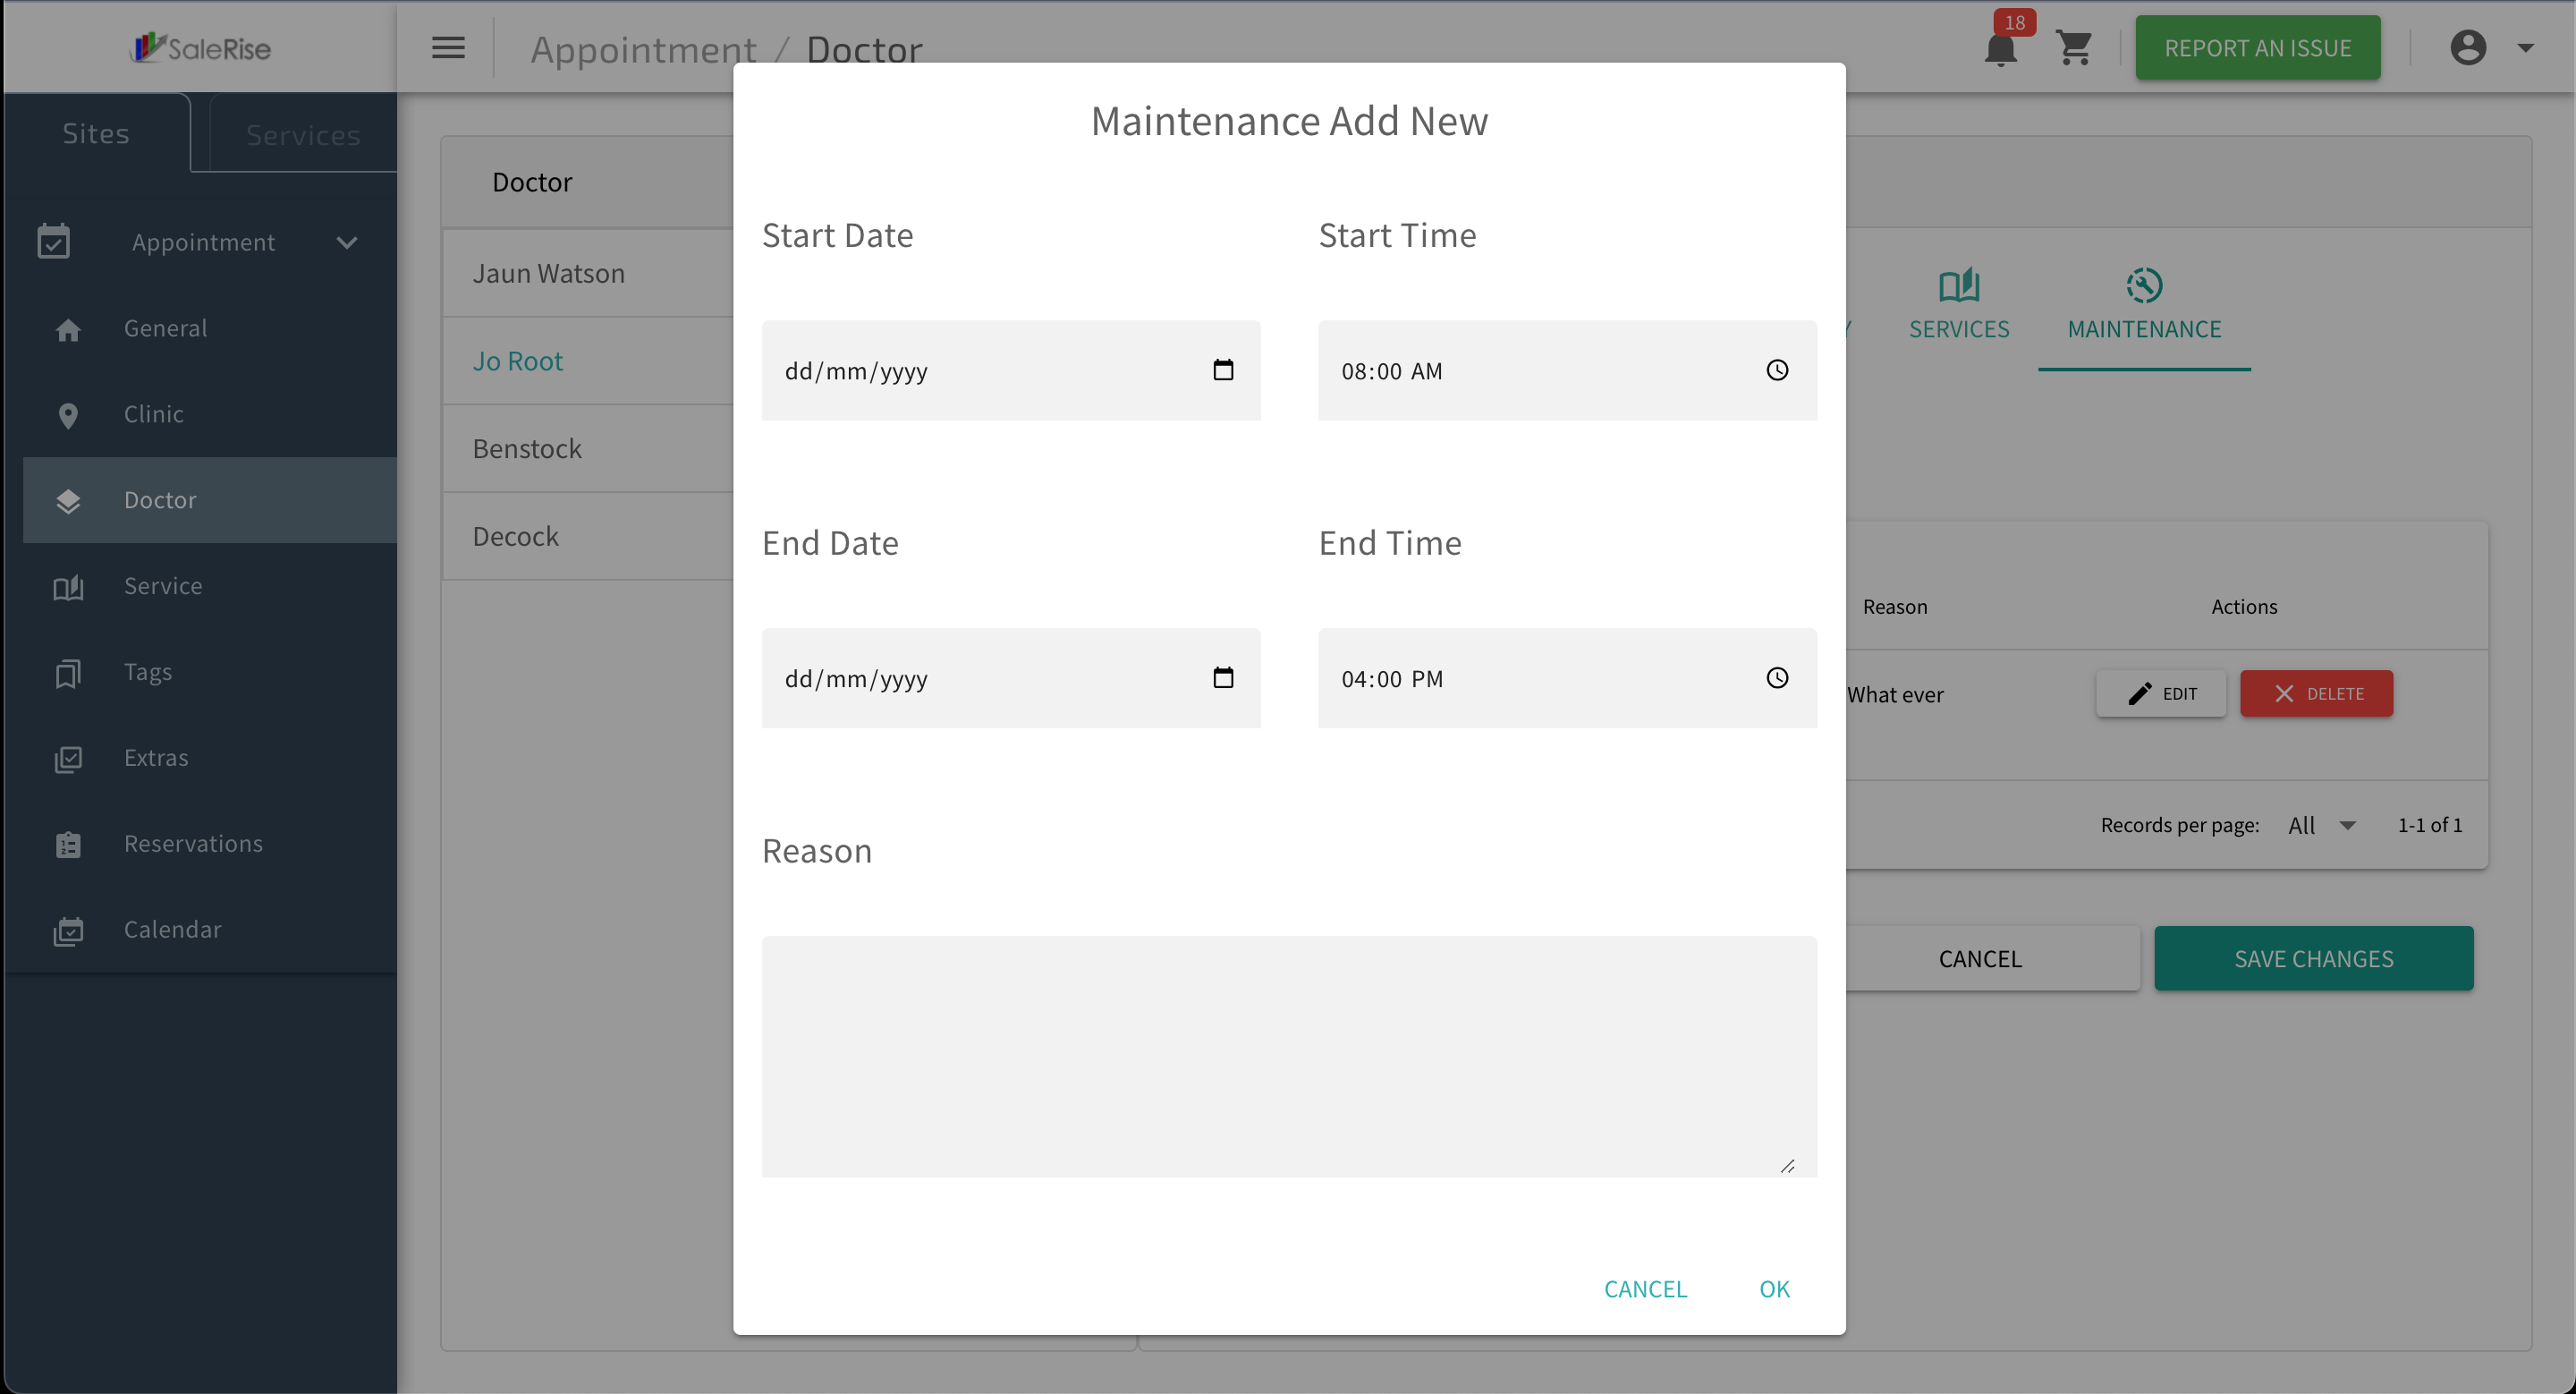
Maintenance Schedules:
- Access the "Maintenance" tab to manage doctor unavailability.
- Add New Maintenance: Specify start and end dates, times, and reasons.


- Table View: Display a table view of past and upcoming maintenance schedules.
- Edit or Delete Maintenance: Allow users to modify or remove maintenance entries.
- Add New Maintenance: Specify start and end dates, times, and reasons.
- Access the "Maintenance" tab to manage doctor unavailability.
-
Save and Review:
- Click "Save" to confirm the doctor setup.
- Review the doctor's profile and make any necessary edits.
-
View and Manage Doctors:
- Access the list of doctors with options to edit or deactivate.
-
Edit Doctor Details:
- Click on the edit button to modify the doctor's information.

- Click on the edit button to modify the doctor's information.

Services Setup
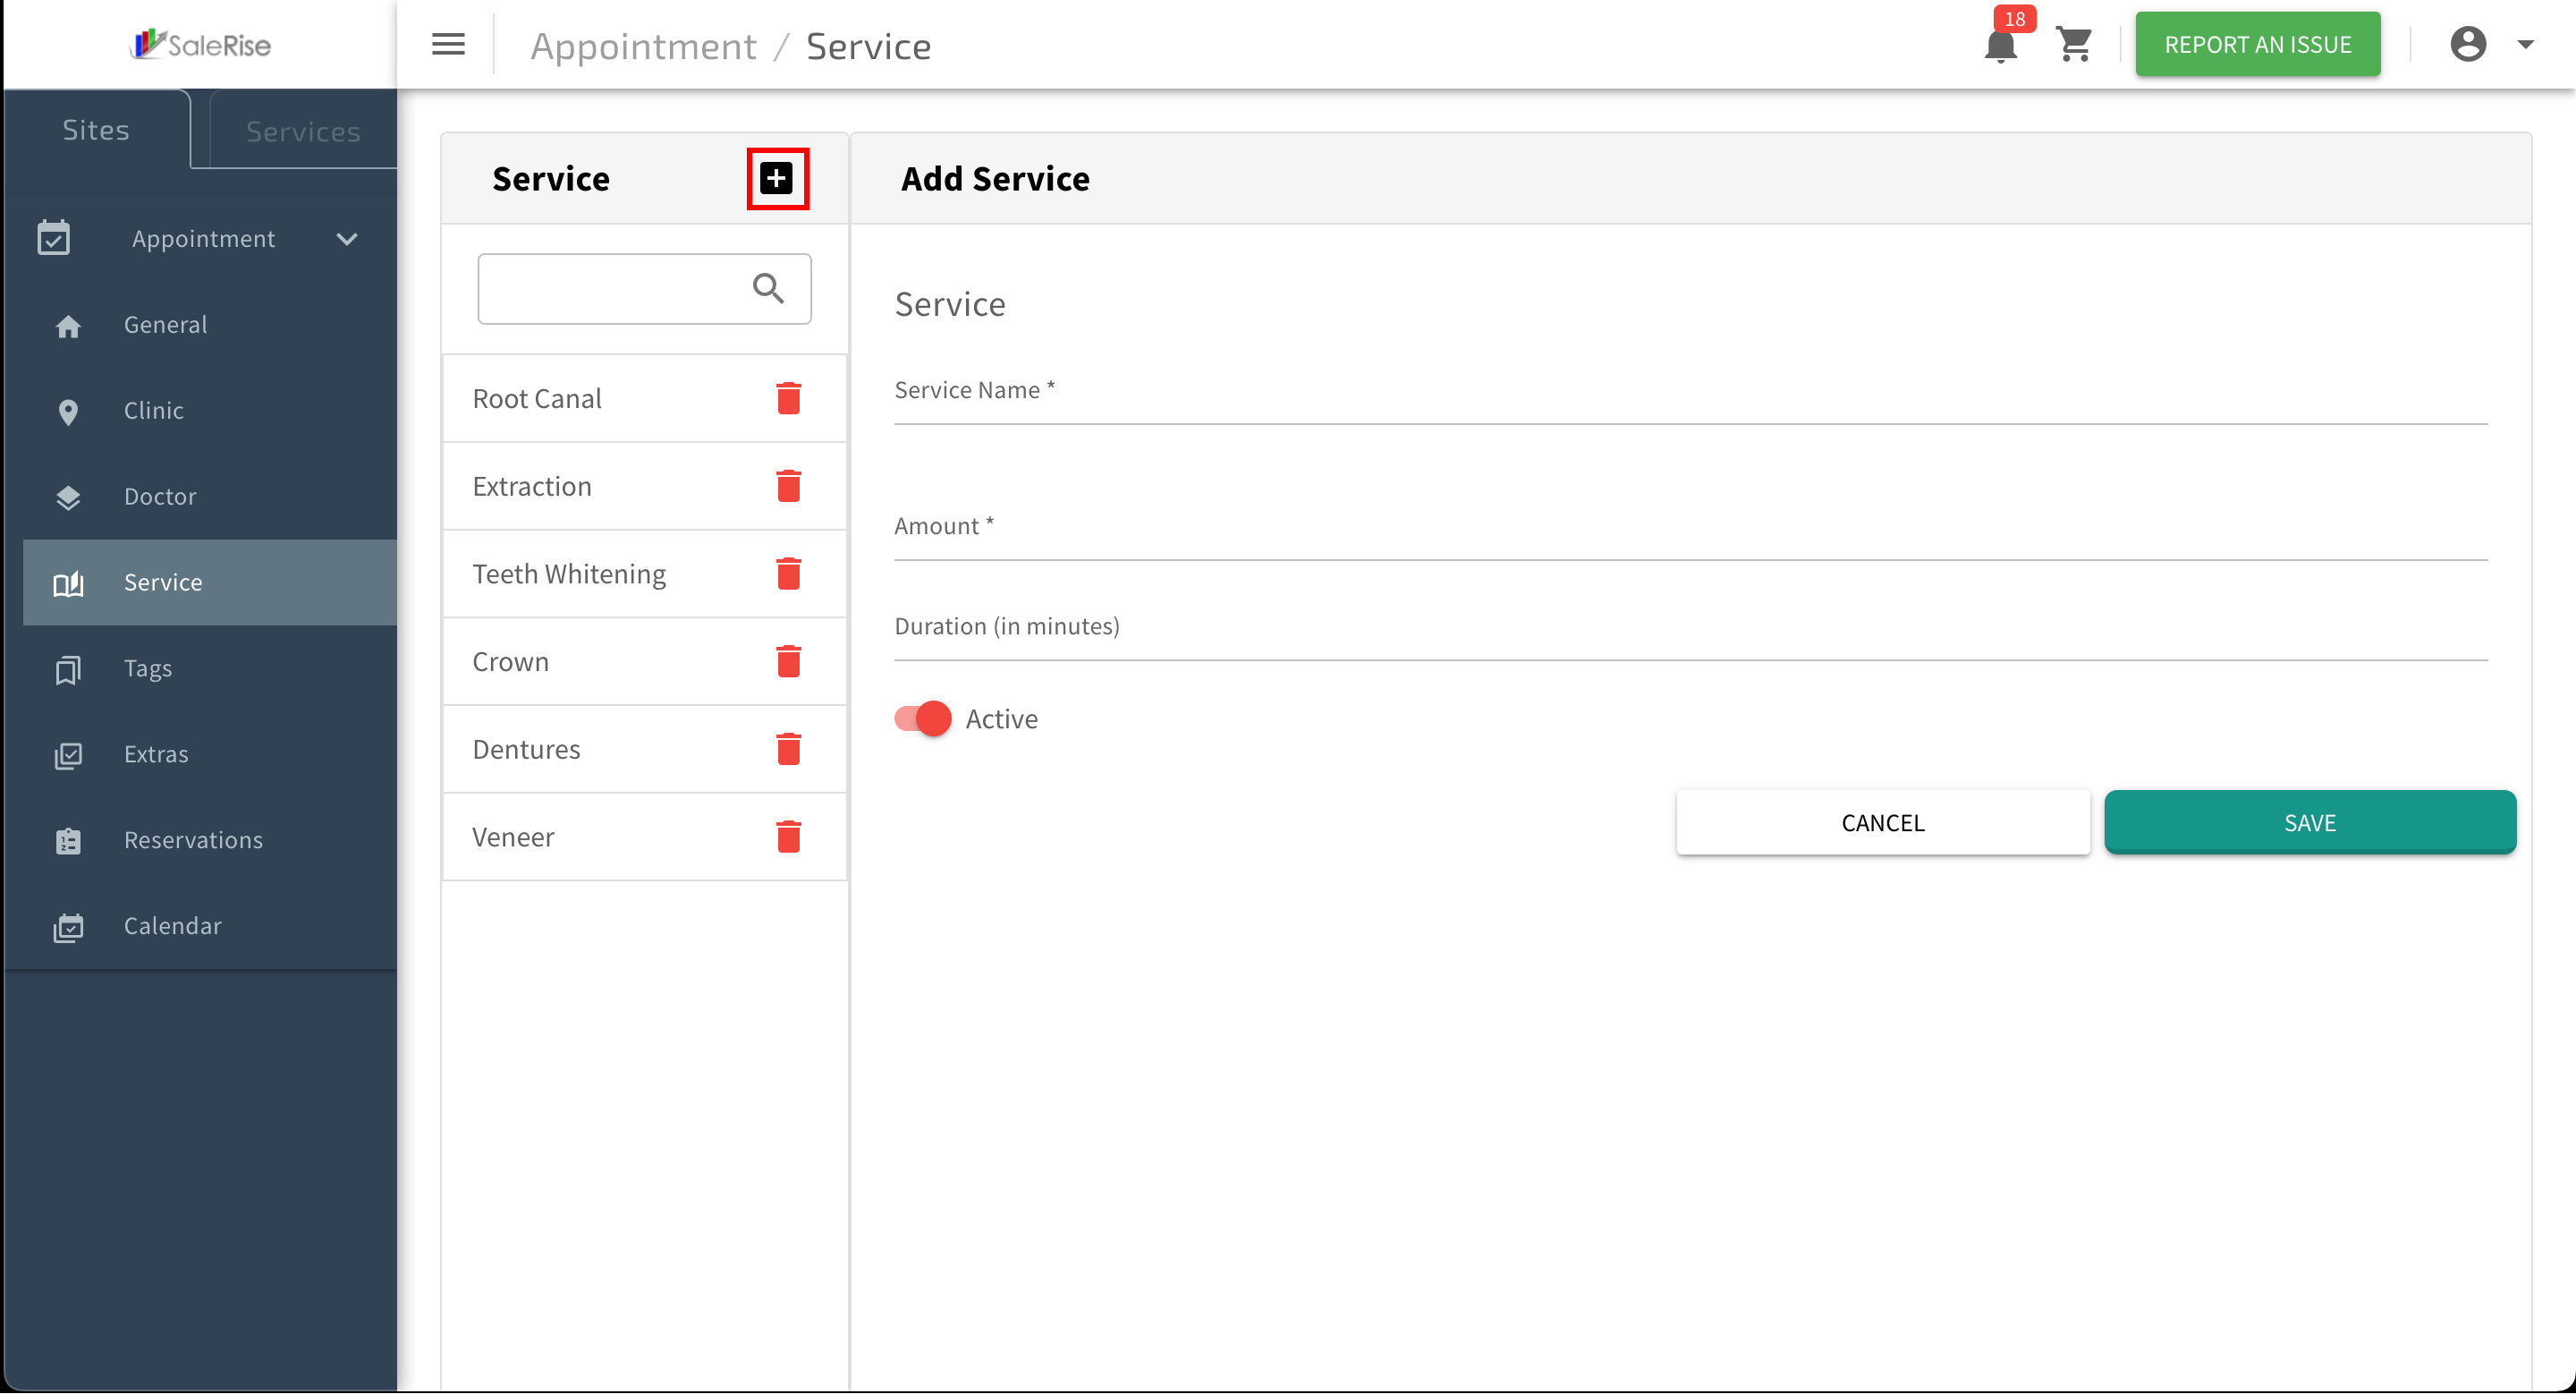
The "Services Setup" module allows users to create and manage services offered by the clinic or doctor. Users can define the service name, set the service amount, specify the duration, and choose to activate or deactivate the service.
Add or Edit Services
Overview:
The "Services Setup" module allows users to create and manage services offered by the clinic or doctor. Users can define the service name, set the service amount, specify the duration, and choose to activate or deactivate the service.
-
Access "Services Setup":
- Navigate to the "Services Setup" module to create or manage services.
-
Add New Service:
- Click on "Add New Service" to initiate the setup process.

- Click on "Add New Service" to initiate the setup process.
-
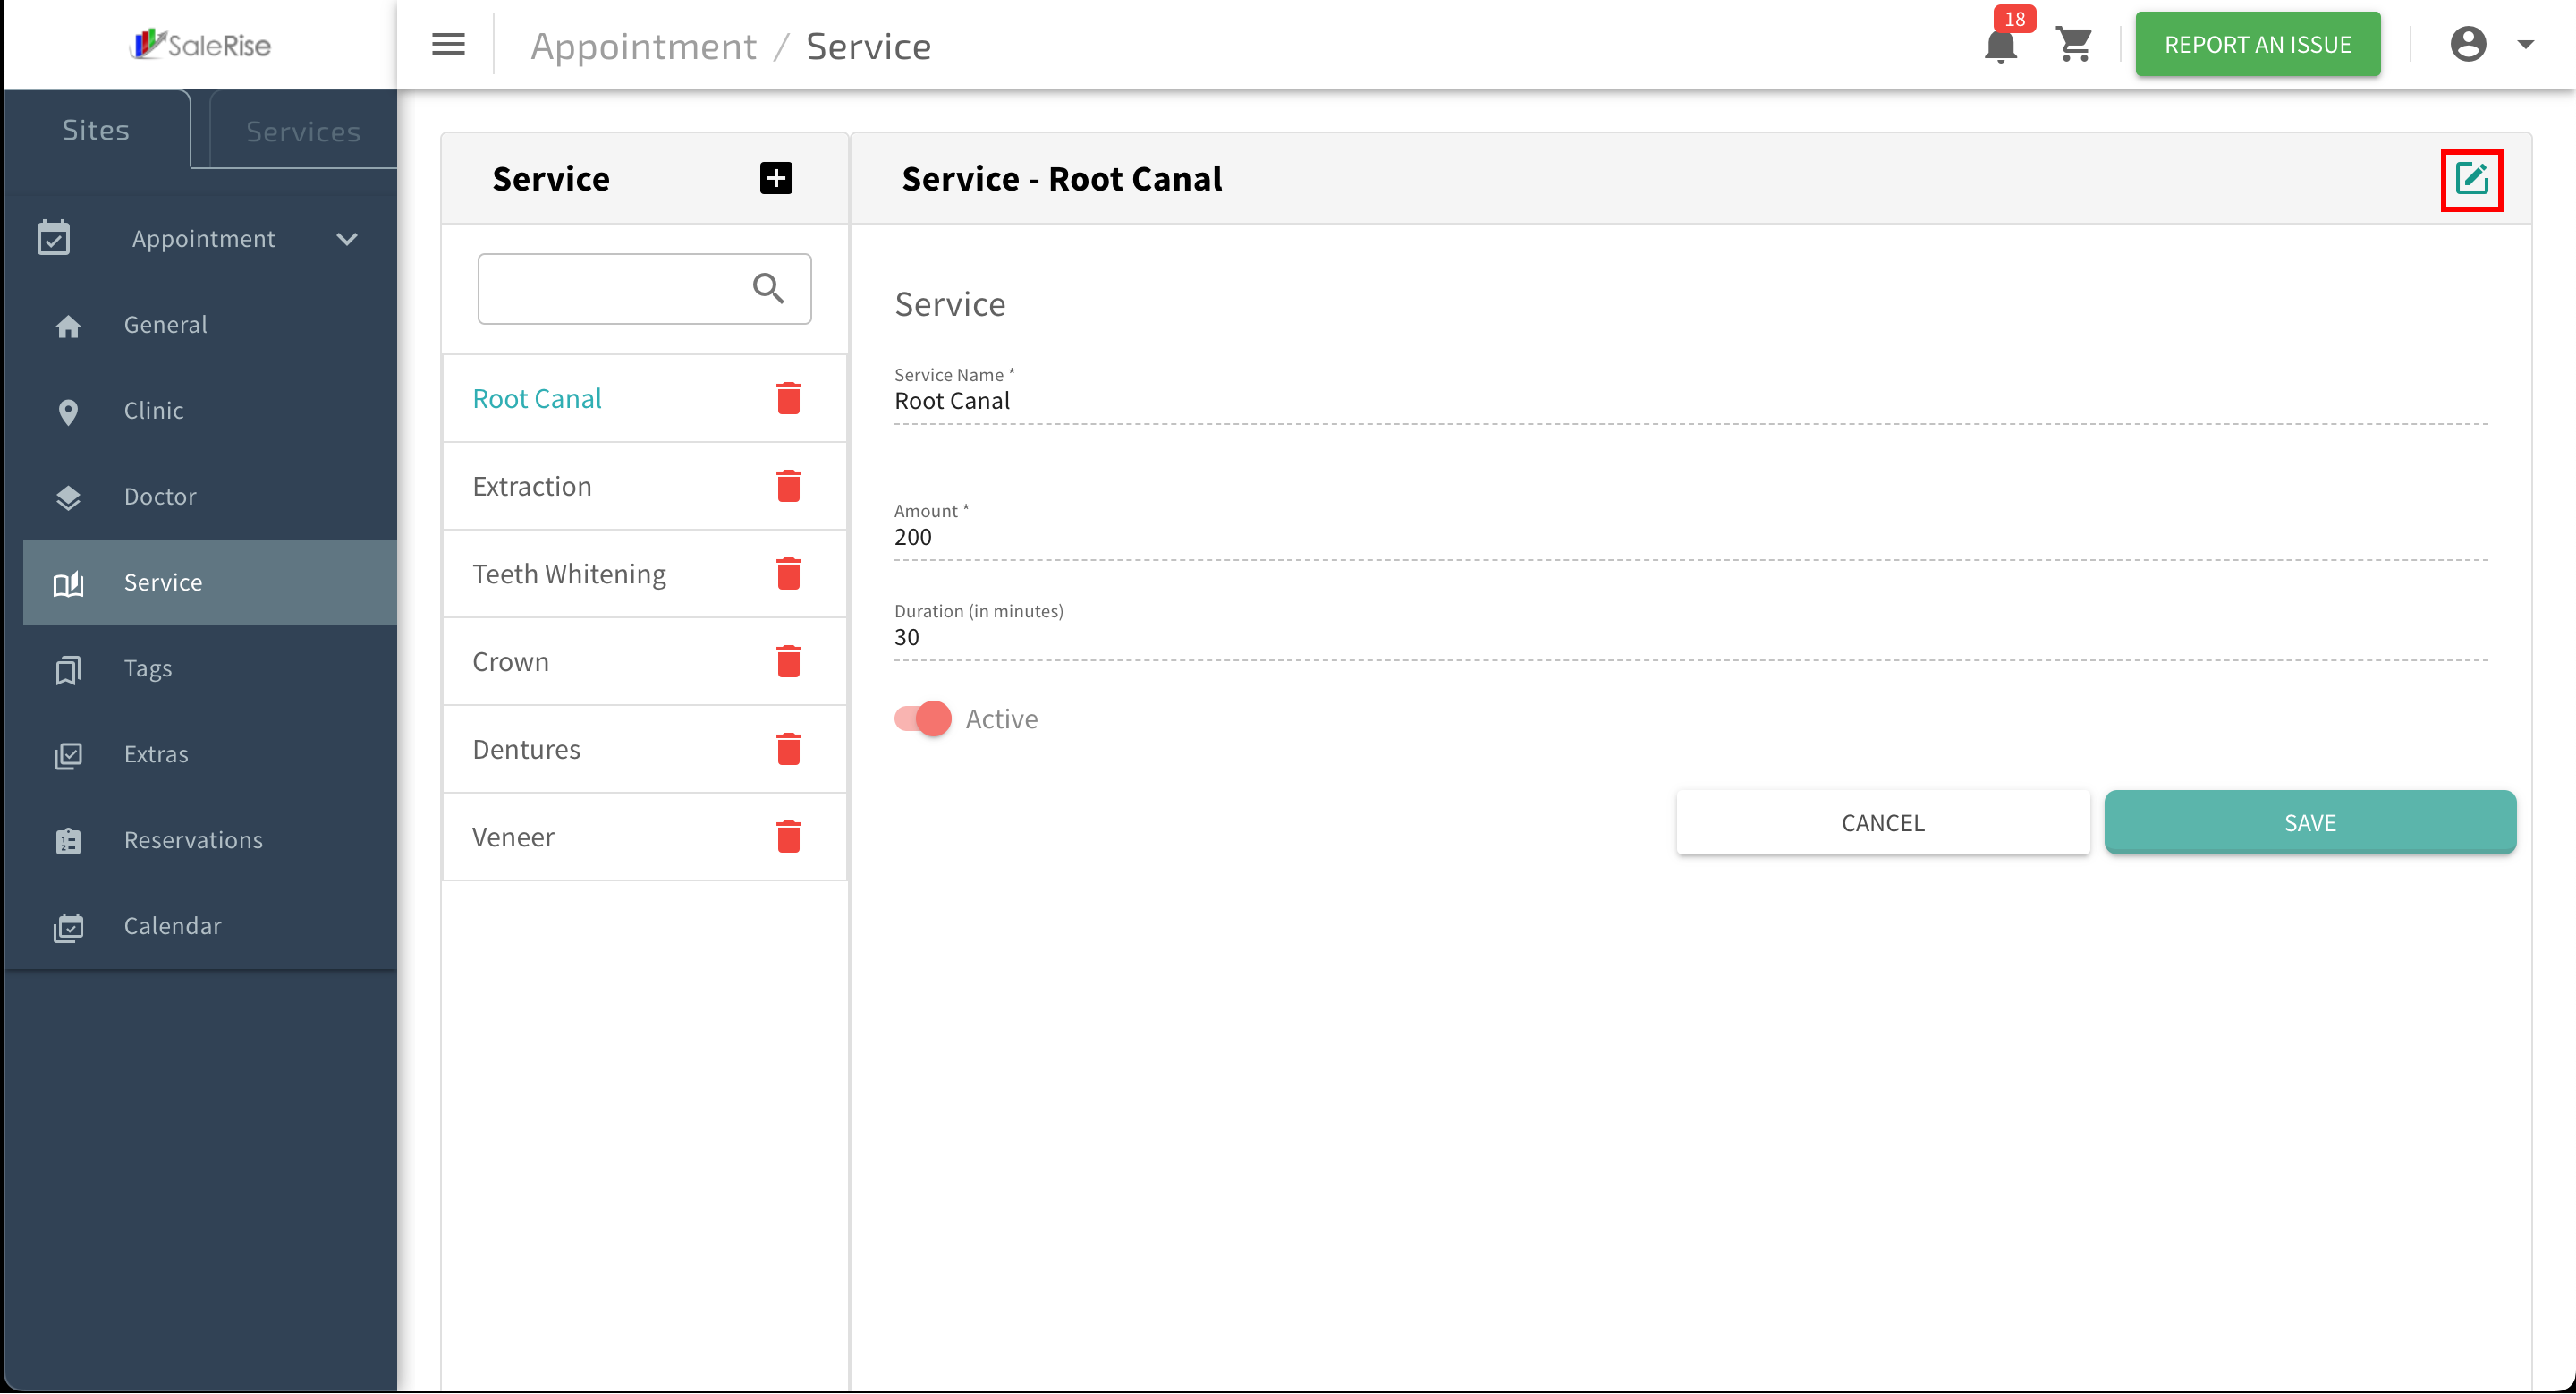
Service Details:
- Fill in the details for the new service.
- Service Name: Provide a descriptive name for the service.
- Amount: Specify the cost or amount associated with the service.
- Duration: Define the time duration of the service (e.g., 30 minutes, 1 hour).
- Active/Deactivate: Choose to activate or deactivate the service.
- Fill in the details for the new service.
-
Save Service Details:
- Click "Save" to confirm the details of the new service.
-
Edit Service Details:
- Click on the edit button to modify service information.

- Click on the edit button to modify service information.
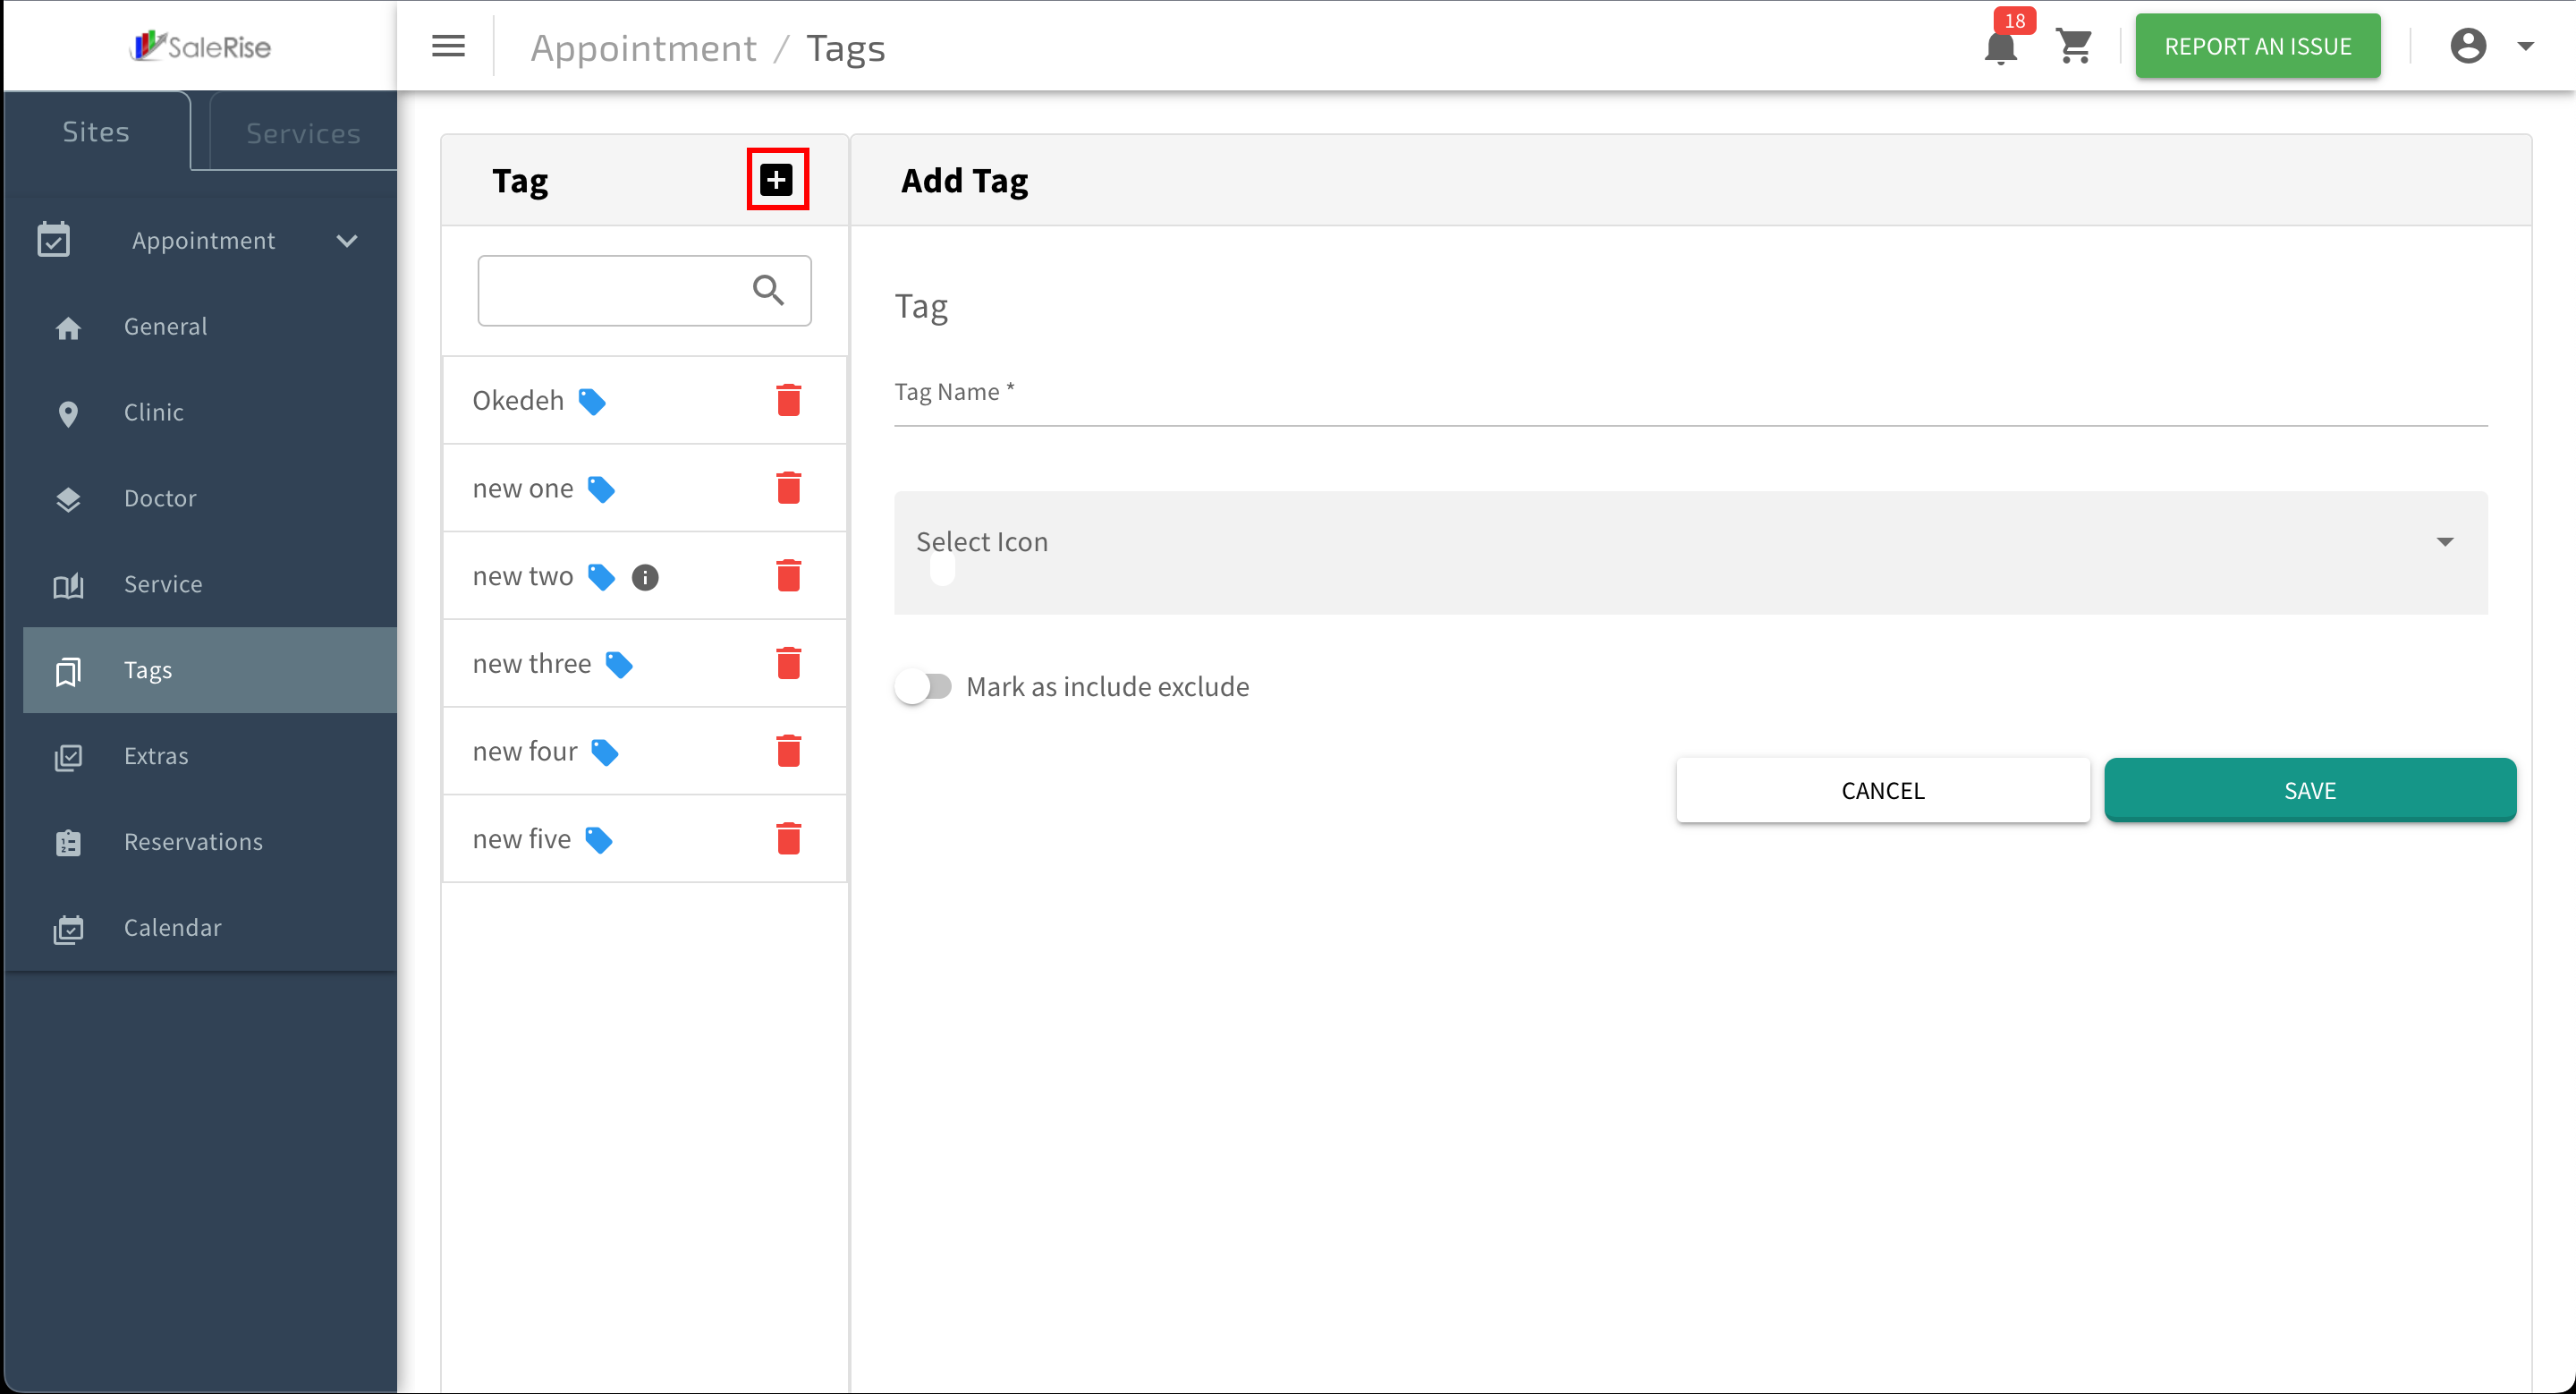
Tags Setup
The "Tags Setup" module allows users to create and manage tags for various purposes. Users can define the tag name, select an icon for the tag, and choose to mark it as include or exclude.
Add or Edit Tags
Overview:
-
Access "Tags Setup":
- Navigate to the "Tags Setup" module to create or manage tags.
-
Add New Tag:
- Click on "Add New Tag" to initiate the setup process.

- Click on "Add New Tag" to initiate the setup process.
-
Tag Details:
- Fill in the details for the new tag.
- Tag Name: Provide a descriptive name for the tag.
- Select Icon: Choose an icon to represent the tag visually.
- Mark as Include/Exclude: Specify whether the tag is to be marked as include or exclude.
- Fill in the details for the new tag.
-
Save Tag Details:
- Click "Save" to confirm the details of the new tag.
-
Edit Tag Details:
- Click on the edit button to modify tag information.
- Click on the edit button to modify tag information.
Extras Setup
The "Extras Setup" module allows users to create and manage additional items (extras) related to health. Users can start by creating groups for extras, adding items to those groups, and managing the items' details.
Add or Edit Extras
Overview:
The "Extras Setup" module allows users to create and manage additional items (extras) related to health. Users can start by creating groups for extras, adding items to those groups, and managing the items' details.
-
Access "Extras Setup":
- Navigate to the "Extras Setup" module to create or manage extras.
-
Create Extra Groups:
- Click on "Create Extra Group" to initiate the setup of a new group.

- Group Name: Provide a name for the group.
- Active/Deactivate: Choose whether the group is active or deactivated.
- Required Option: Specify if items in this group are required.
- Click on "Create Extra Group" to initiate the setup of a new group.
-
Save Group Details:
- Click "Save" to confirm the details of the new extra group.
-
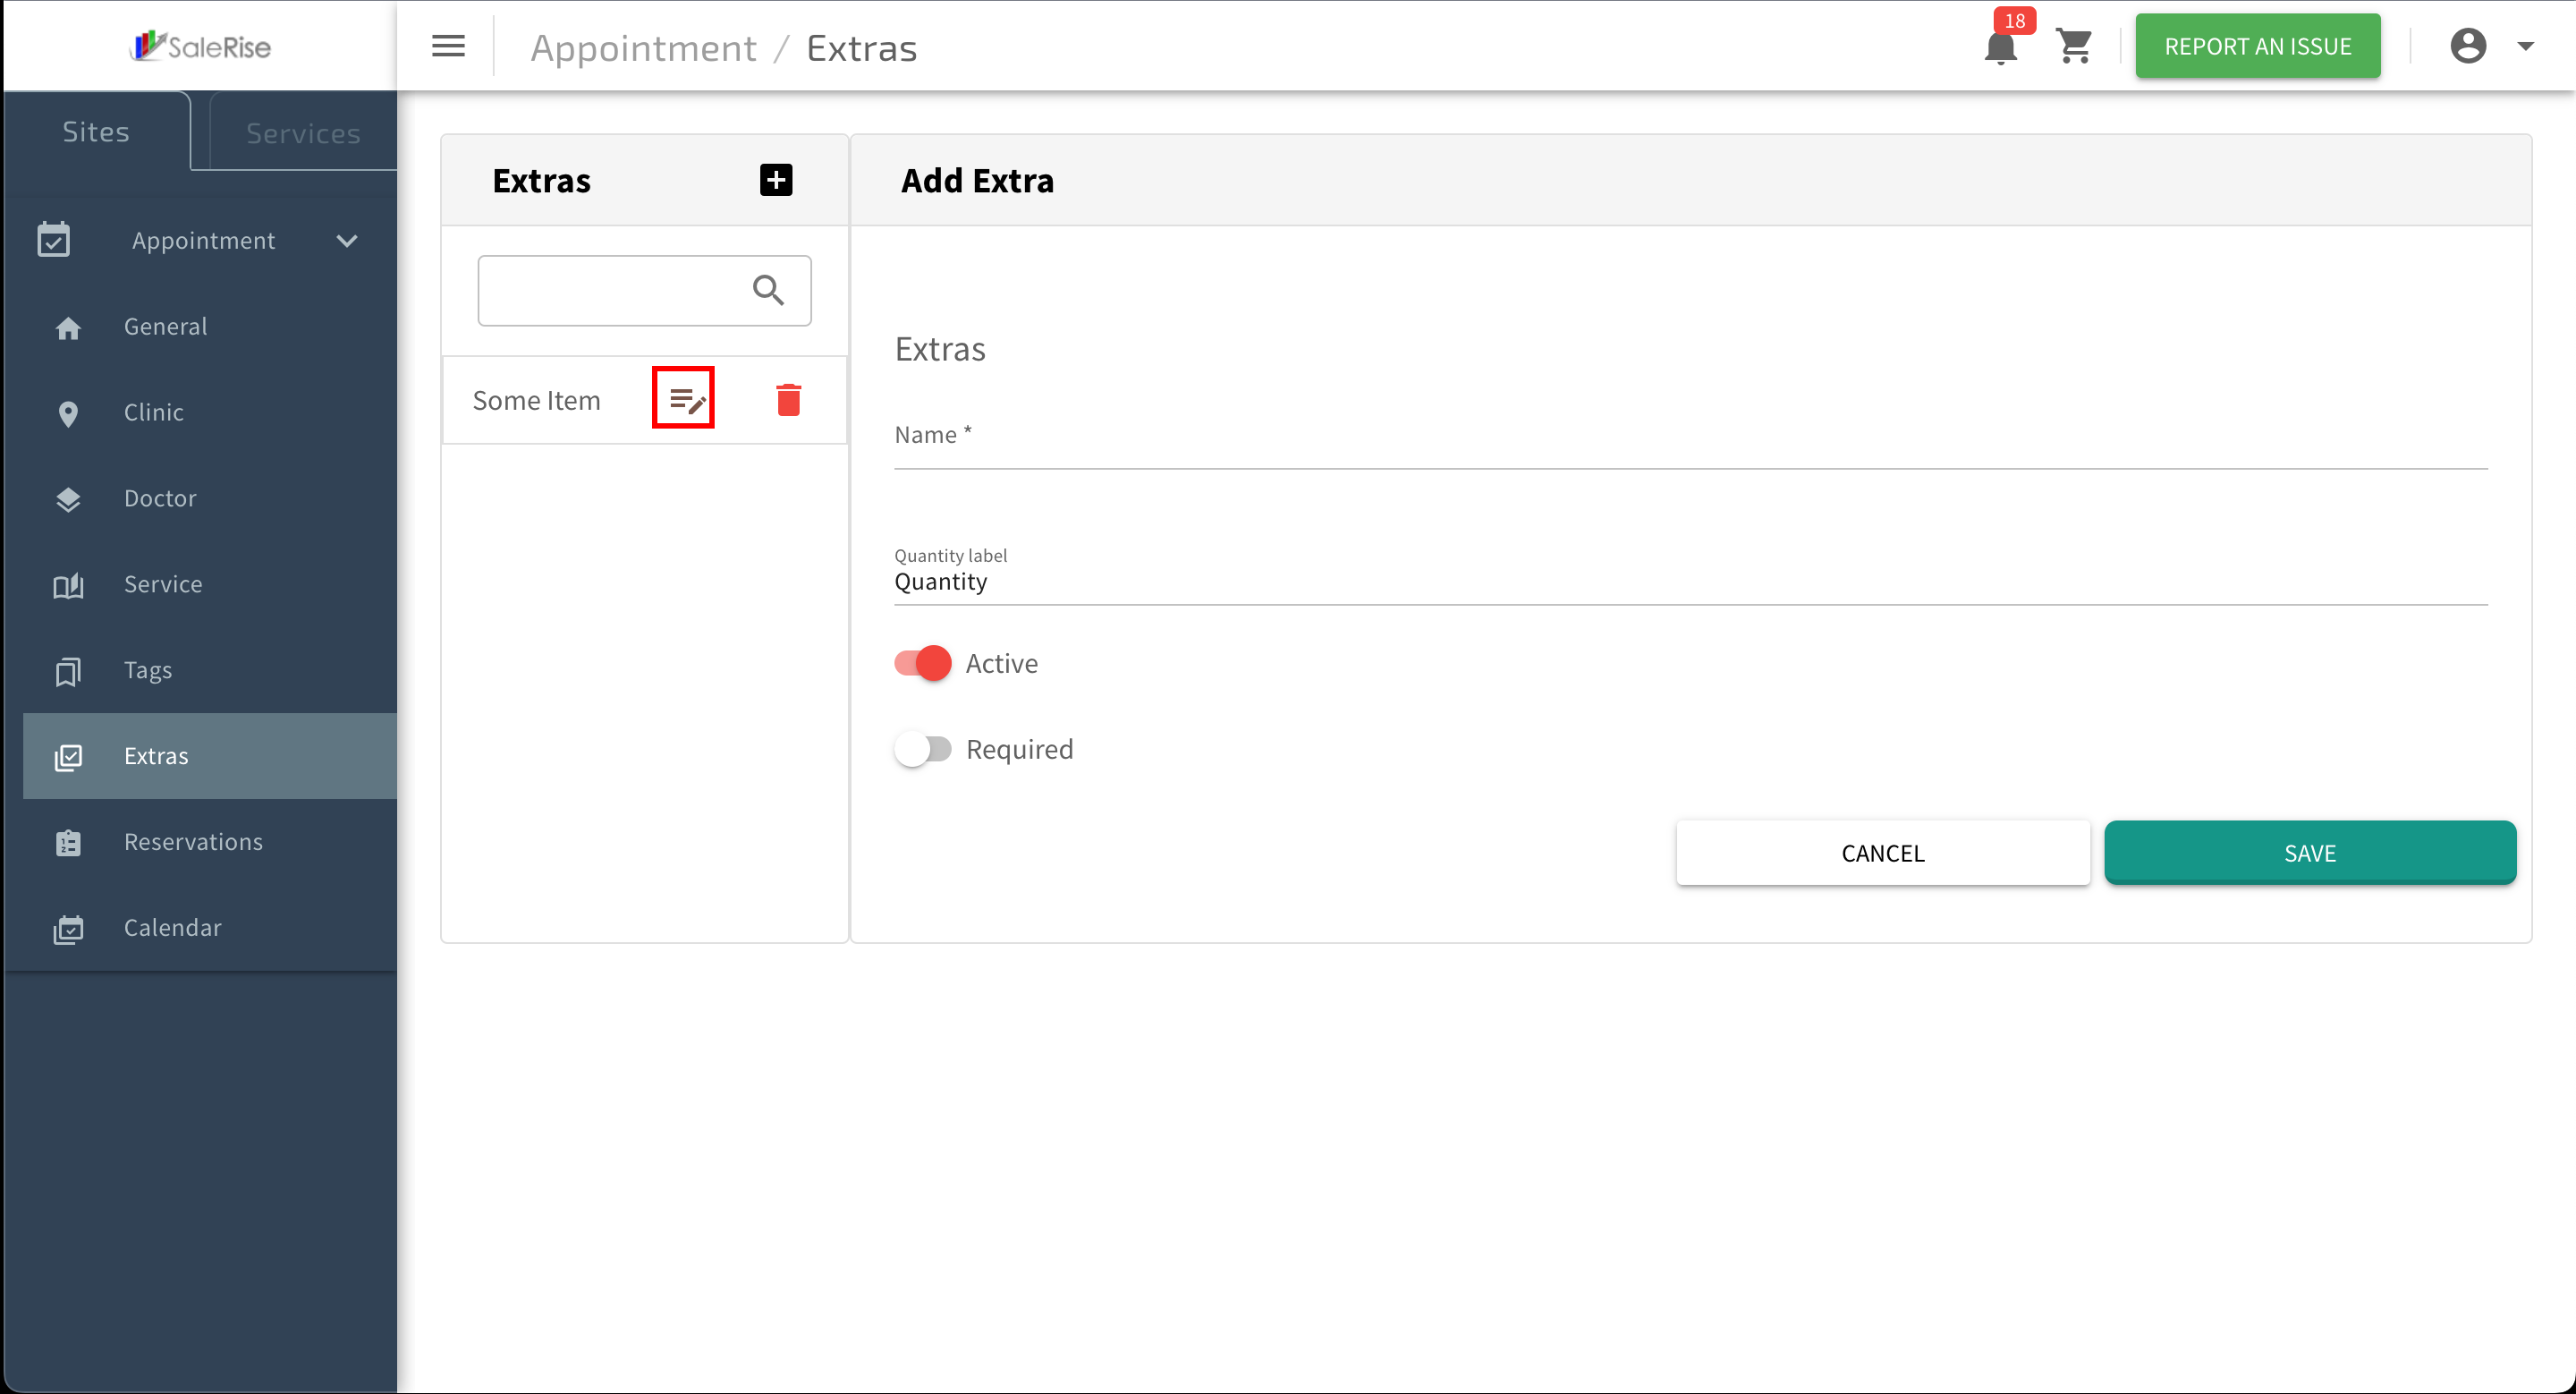
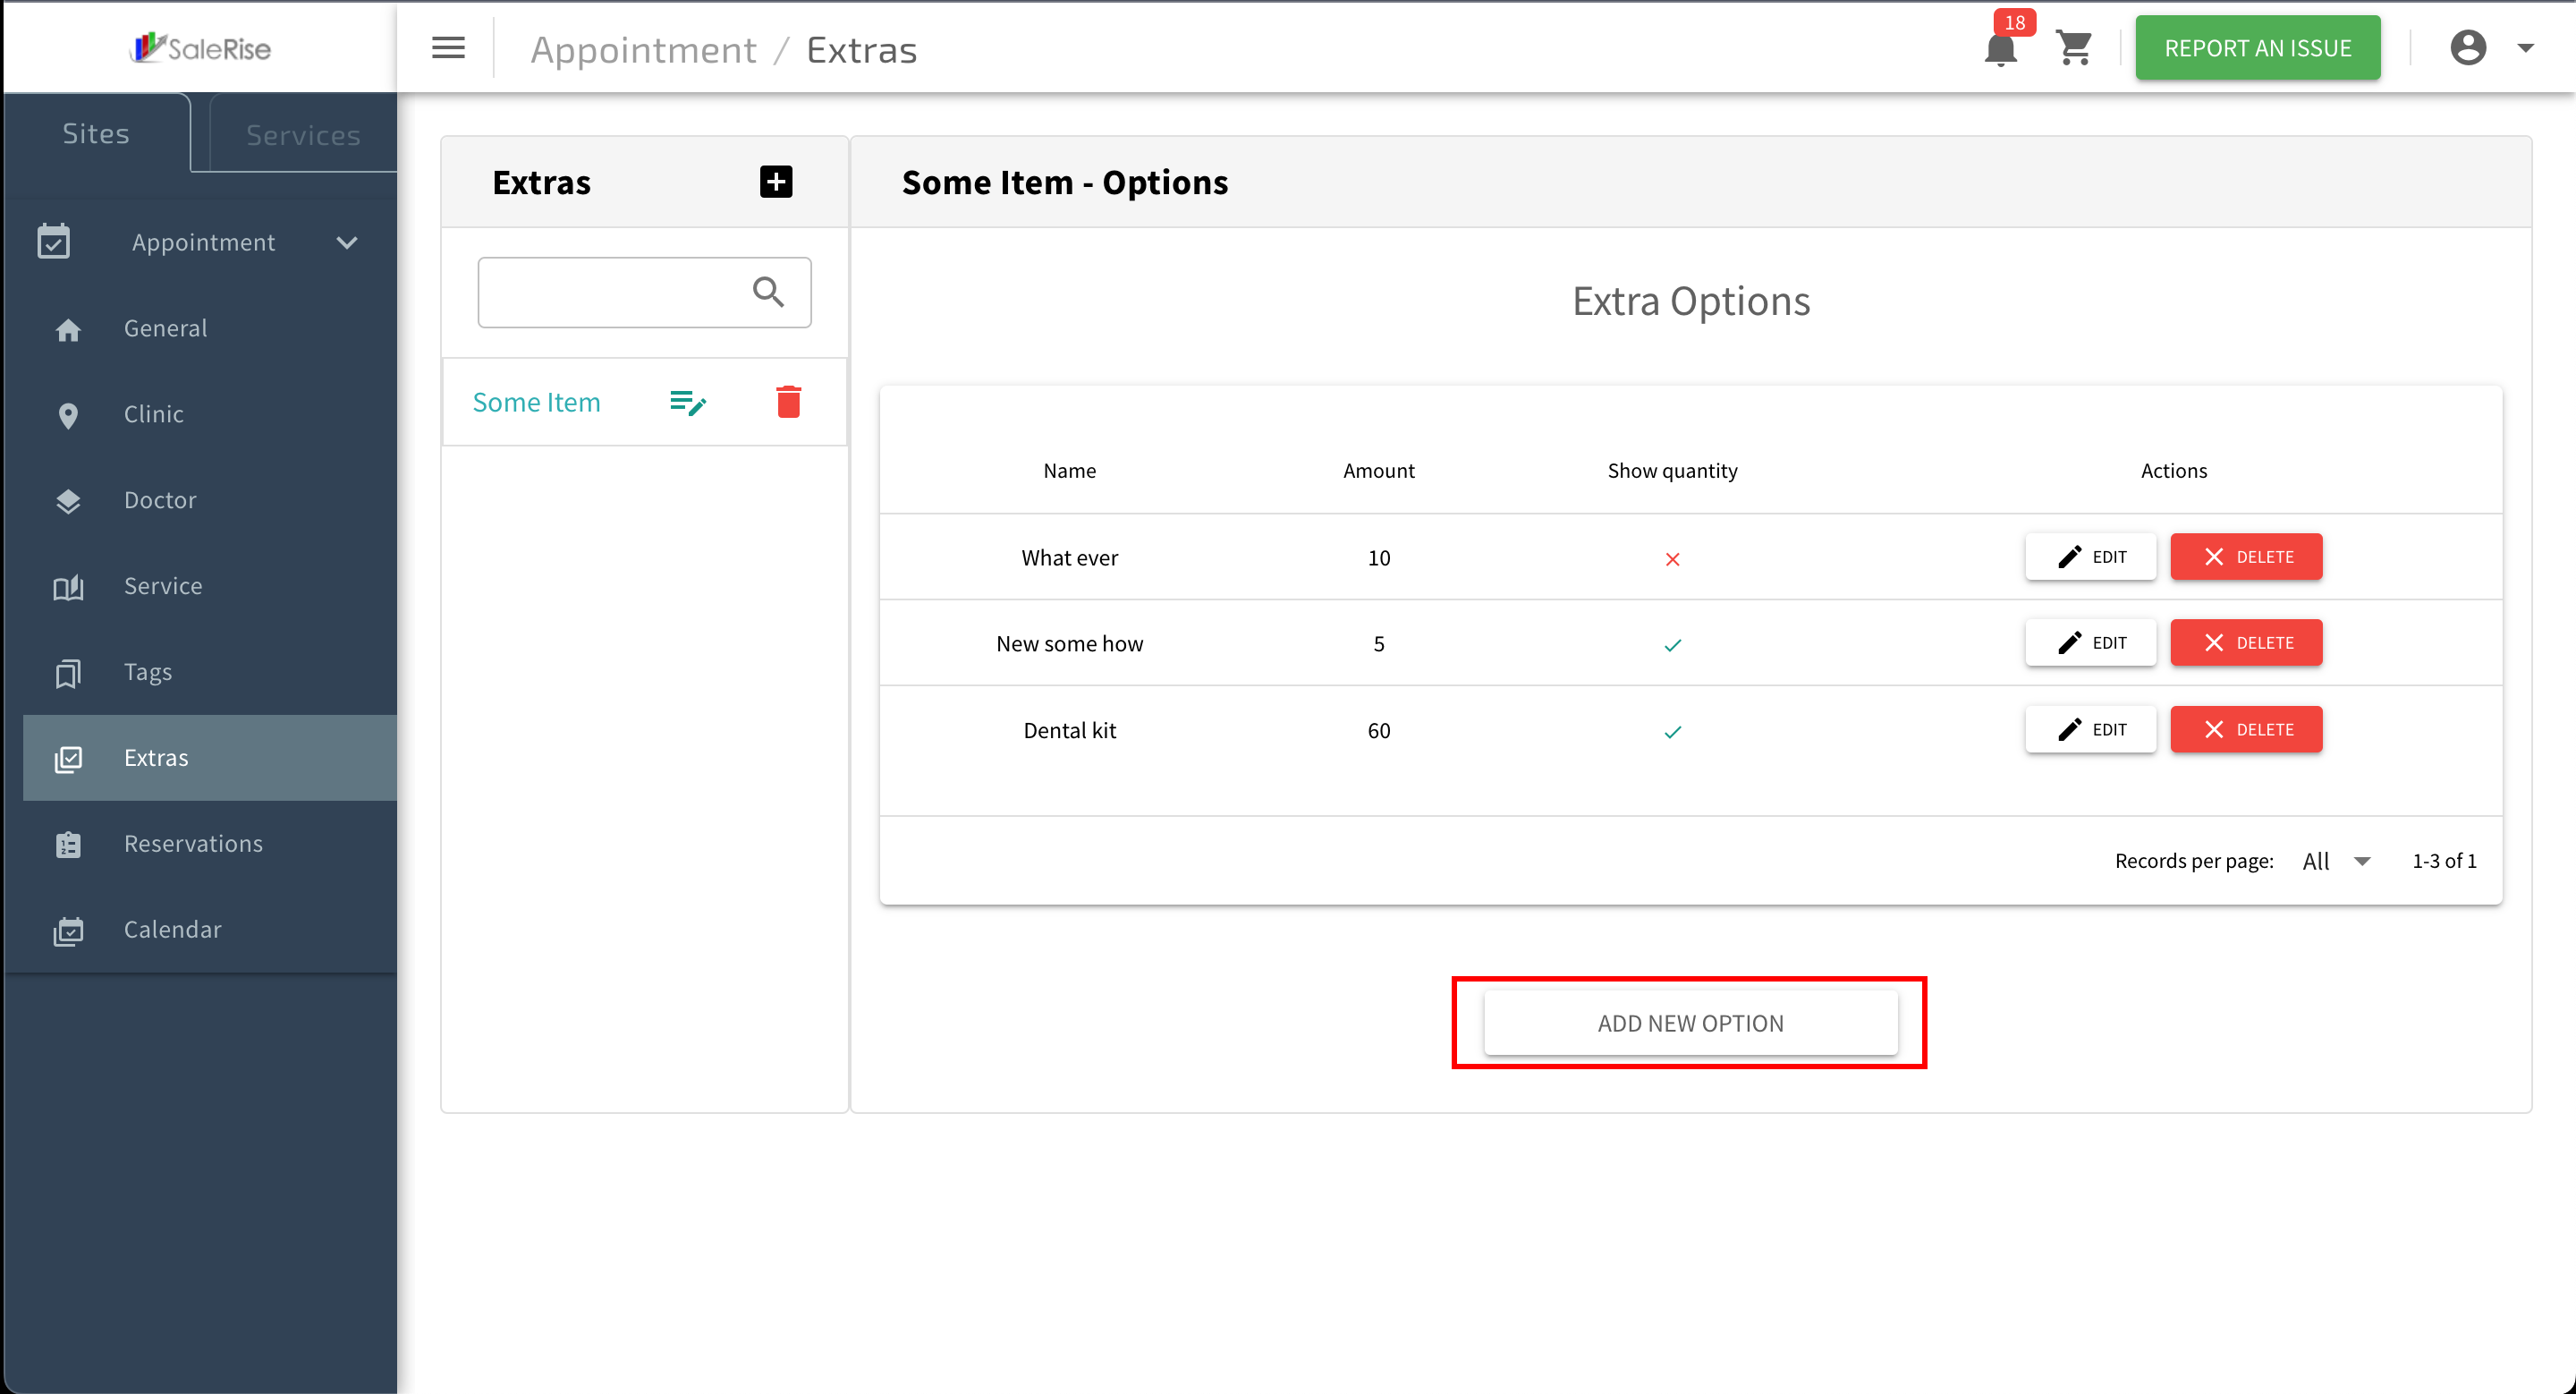
Add, Edit, or Delete Items in a Group:
-
- After creating a group, users can click on the edit button to see a list of items.

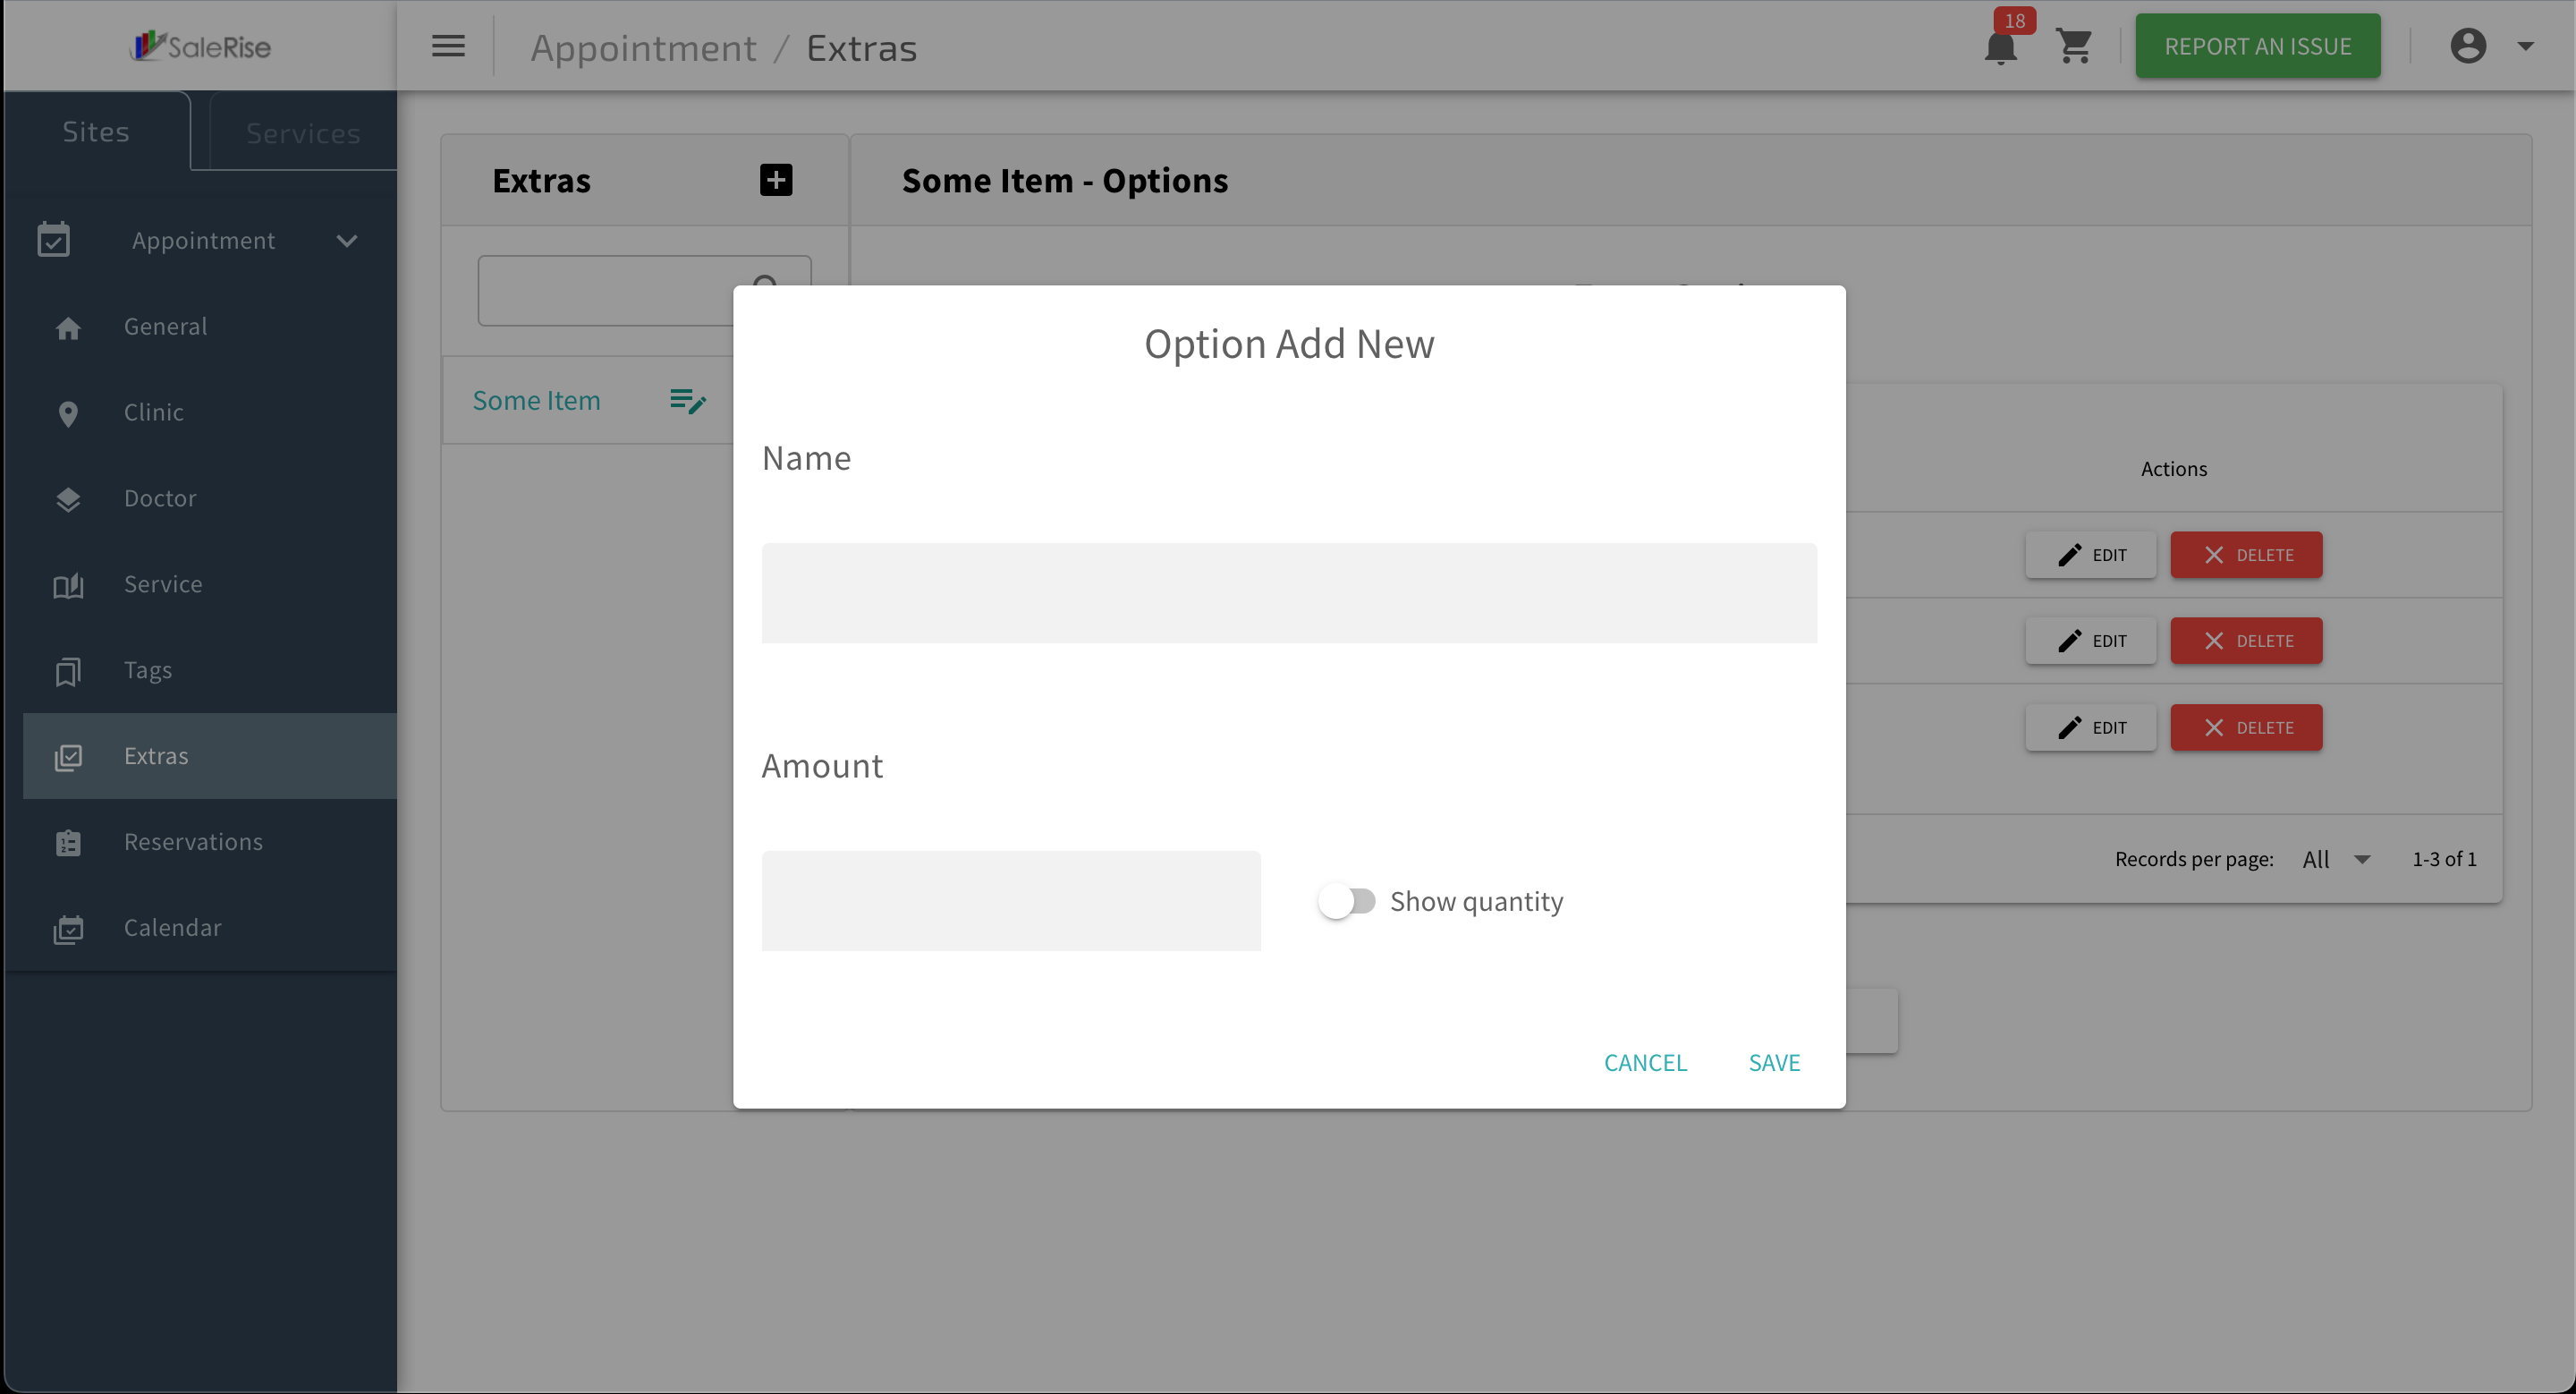
- Add Item: Click on "Add Item" to add a new item to the group.

- Item Name: Provide a name for the item.
- Amount: Specify the cost or amount associated with the item.

- Add Item: Click on "Add Item" to add a new item to the group.
- After creating a group, users can click on the edit button to see a list of items.
-
-
Edit Item Details:
- Users can edit existing items in the group.
- Modify the item name or amount as needed.
- Users can edit existing items in the group.

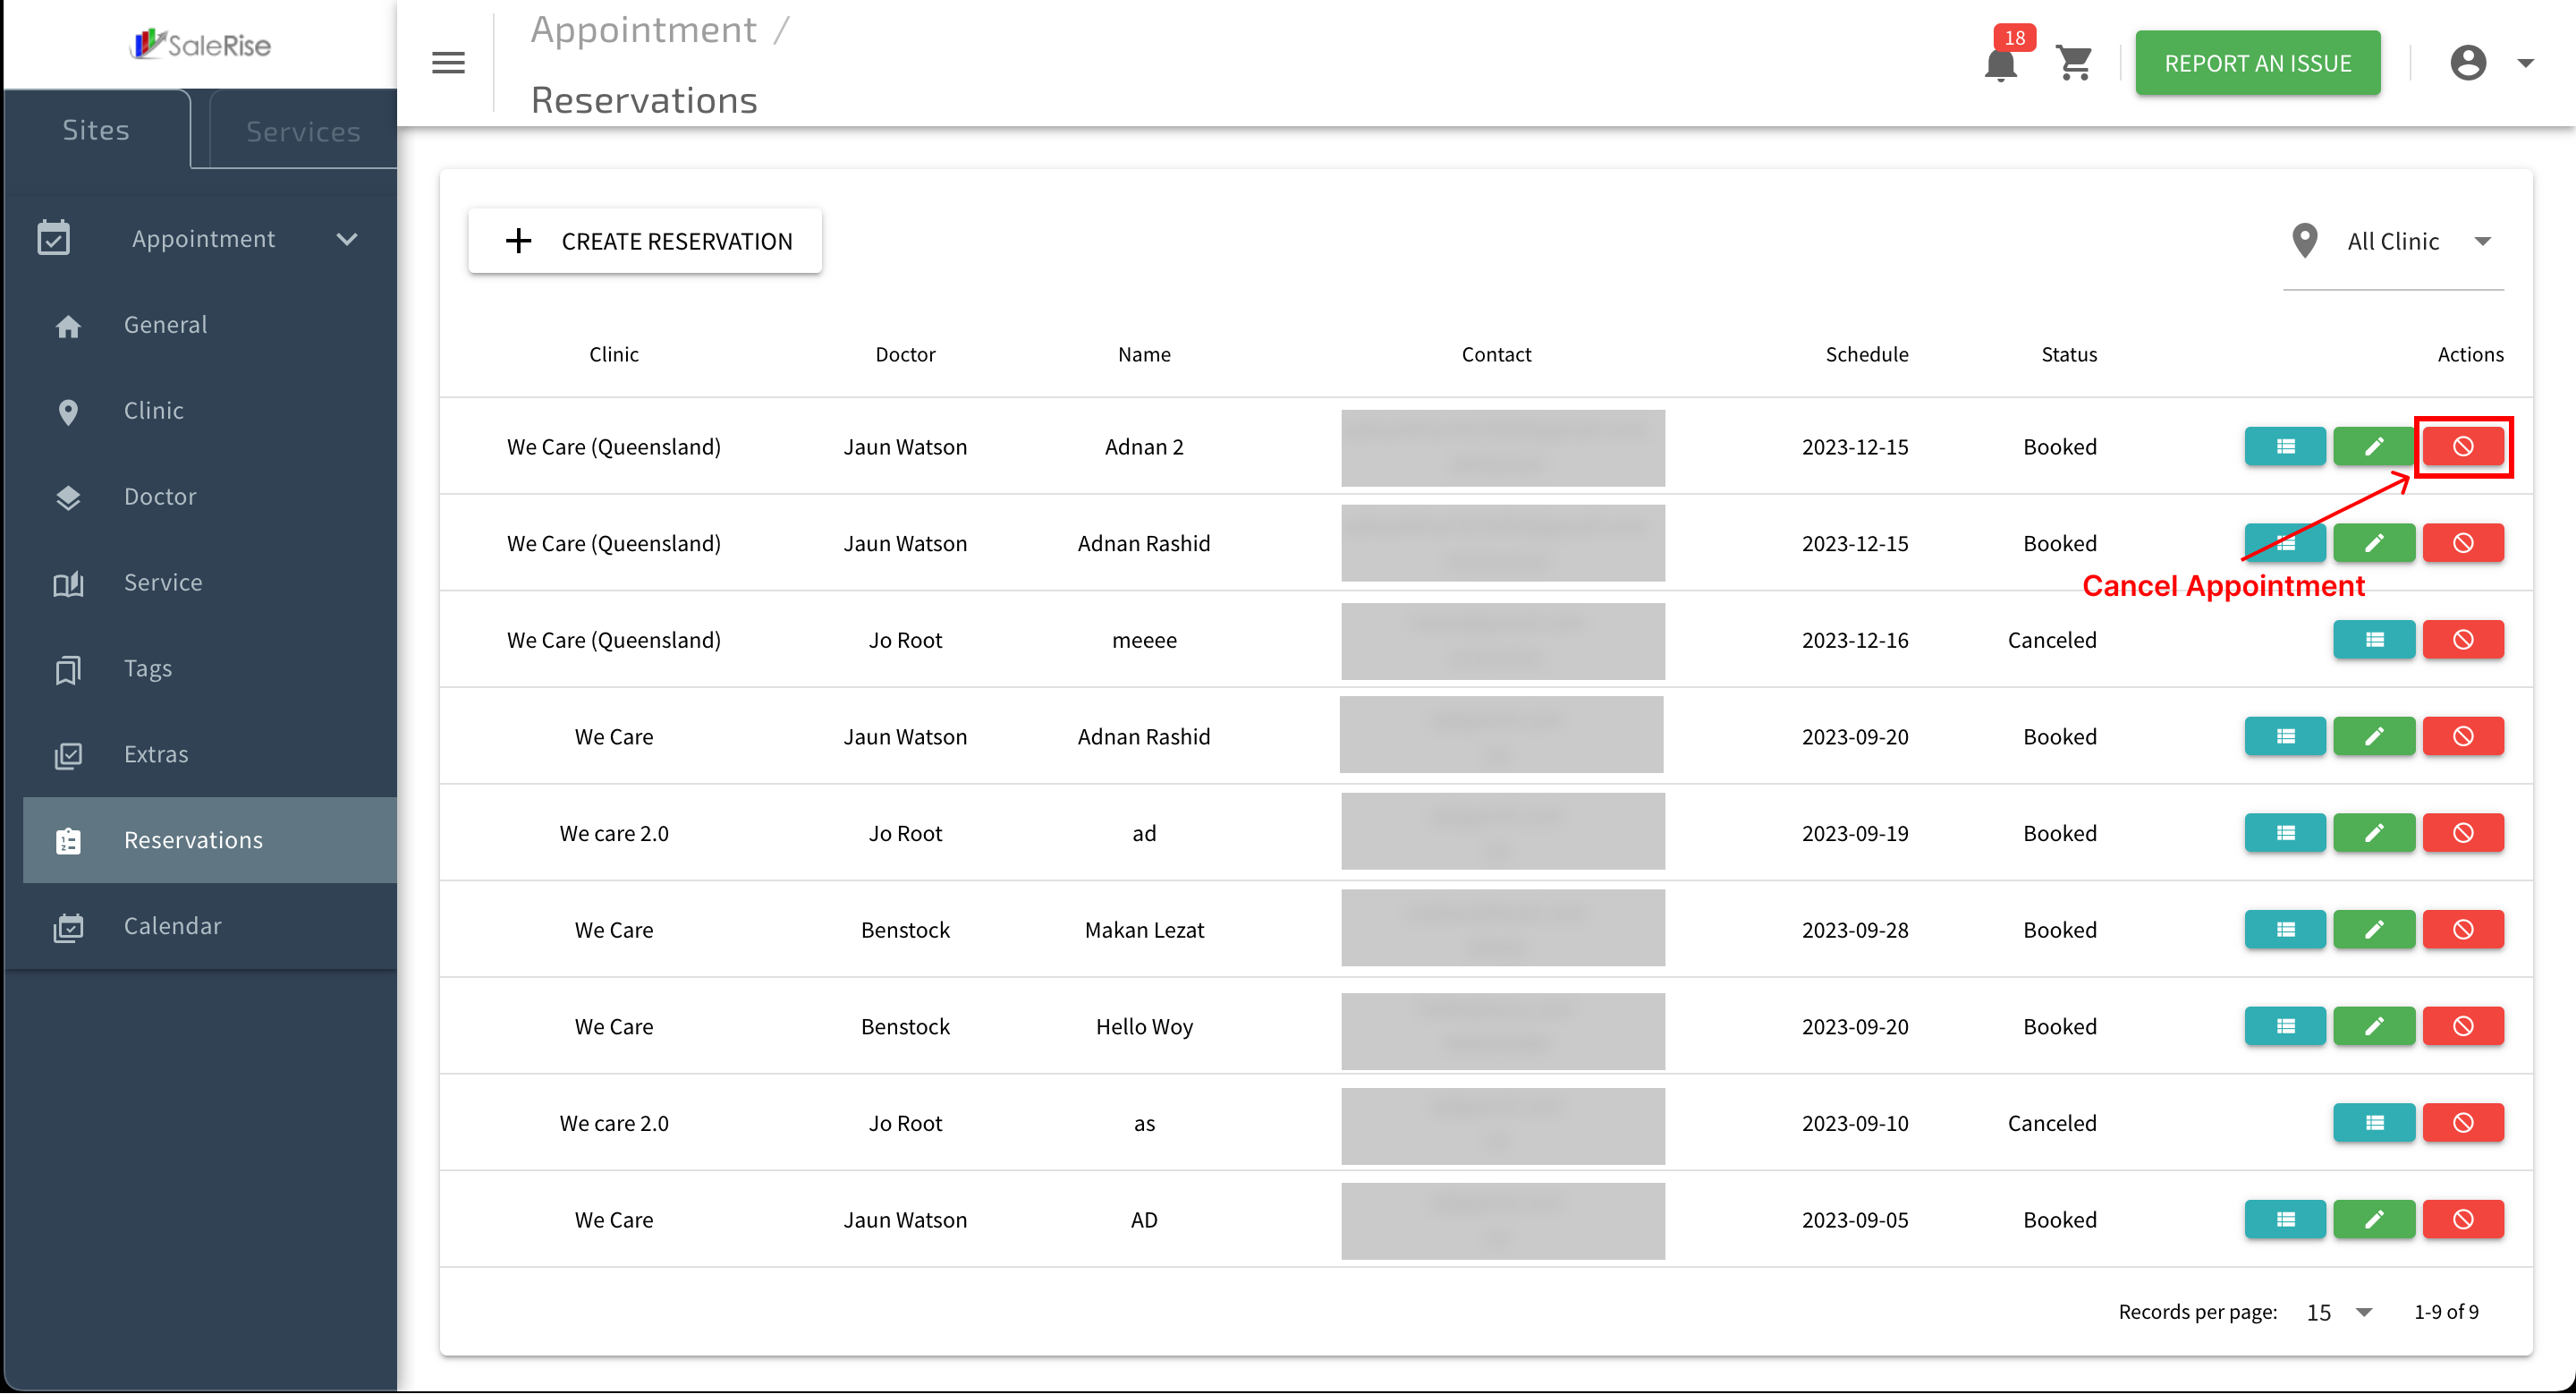
Reservations View
The "Reservations View" module provides users with a comprehensive view of both old and new reservations. Users can manage reservations by editing, canceling, viewing details, and even creating manual reservations when needed.
Edit, Create, or Cancel Reservations
Overview:
The "Reservations View" module provides users with a comprehensive view of both old and new reservations. Users can manage reservations by editing, canceling, viewing details, and even creating manual reservations when needed.
-
Access "Reservations View":
- Navigate to the "Reservations View" module to see an overview of all reservations.
-
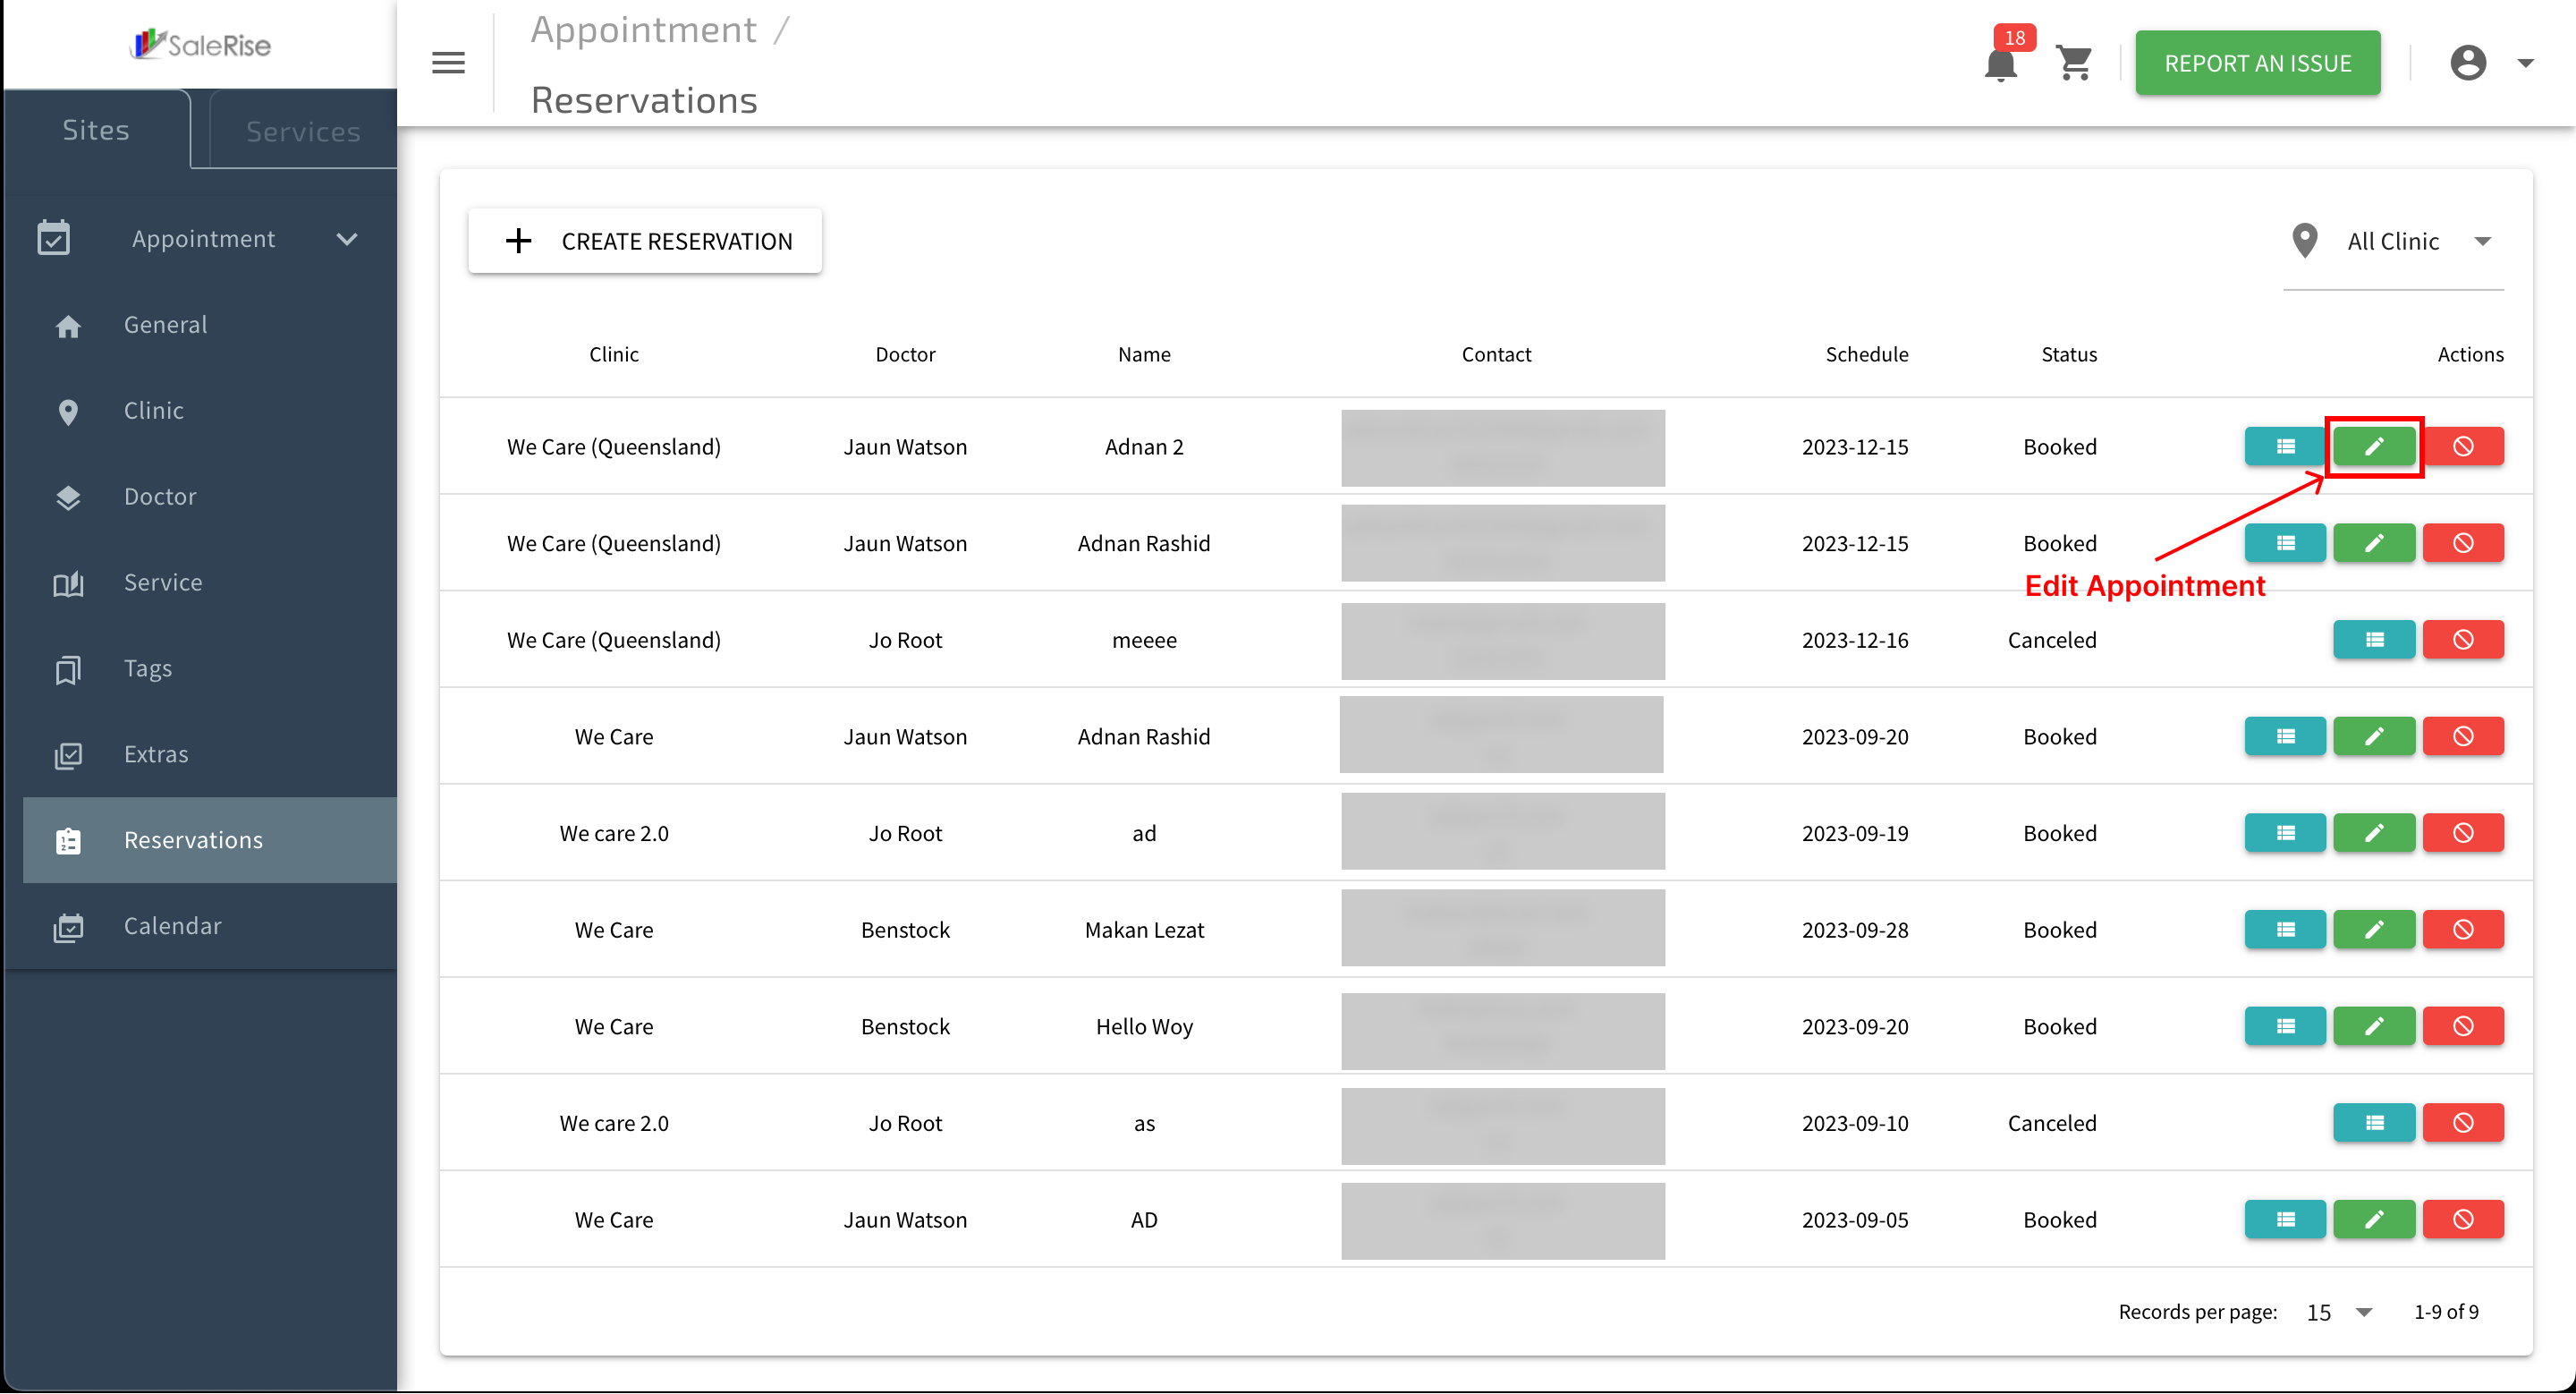
View Reservation List:
- Access a list of both old and new reservations.
-
View Reservation Details:
- Click on a reservation to view detailed information.

- Customer Details: Name, contact information, and any other relevant details.
- Reservation Items: List of services or extras booked.
- Click on a reservation to view detailed information.
-
Edit Reservation:
- Edit reservation details if needed (e.g., change time or services).

- Edit reservation details if needed (e.g., change time or services).
-
Cancel Reservation:
- Cancel a reservation if necessary.

- Cancel a reservation if necessary.
-
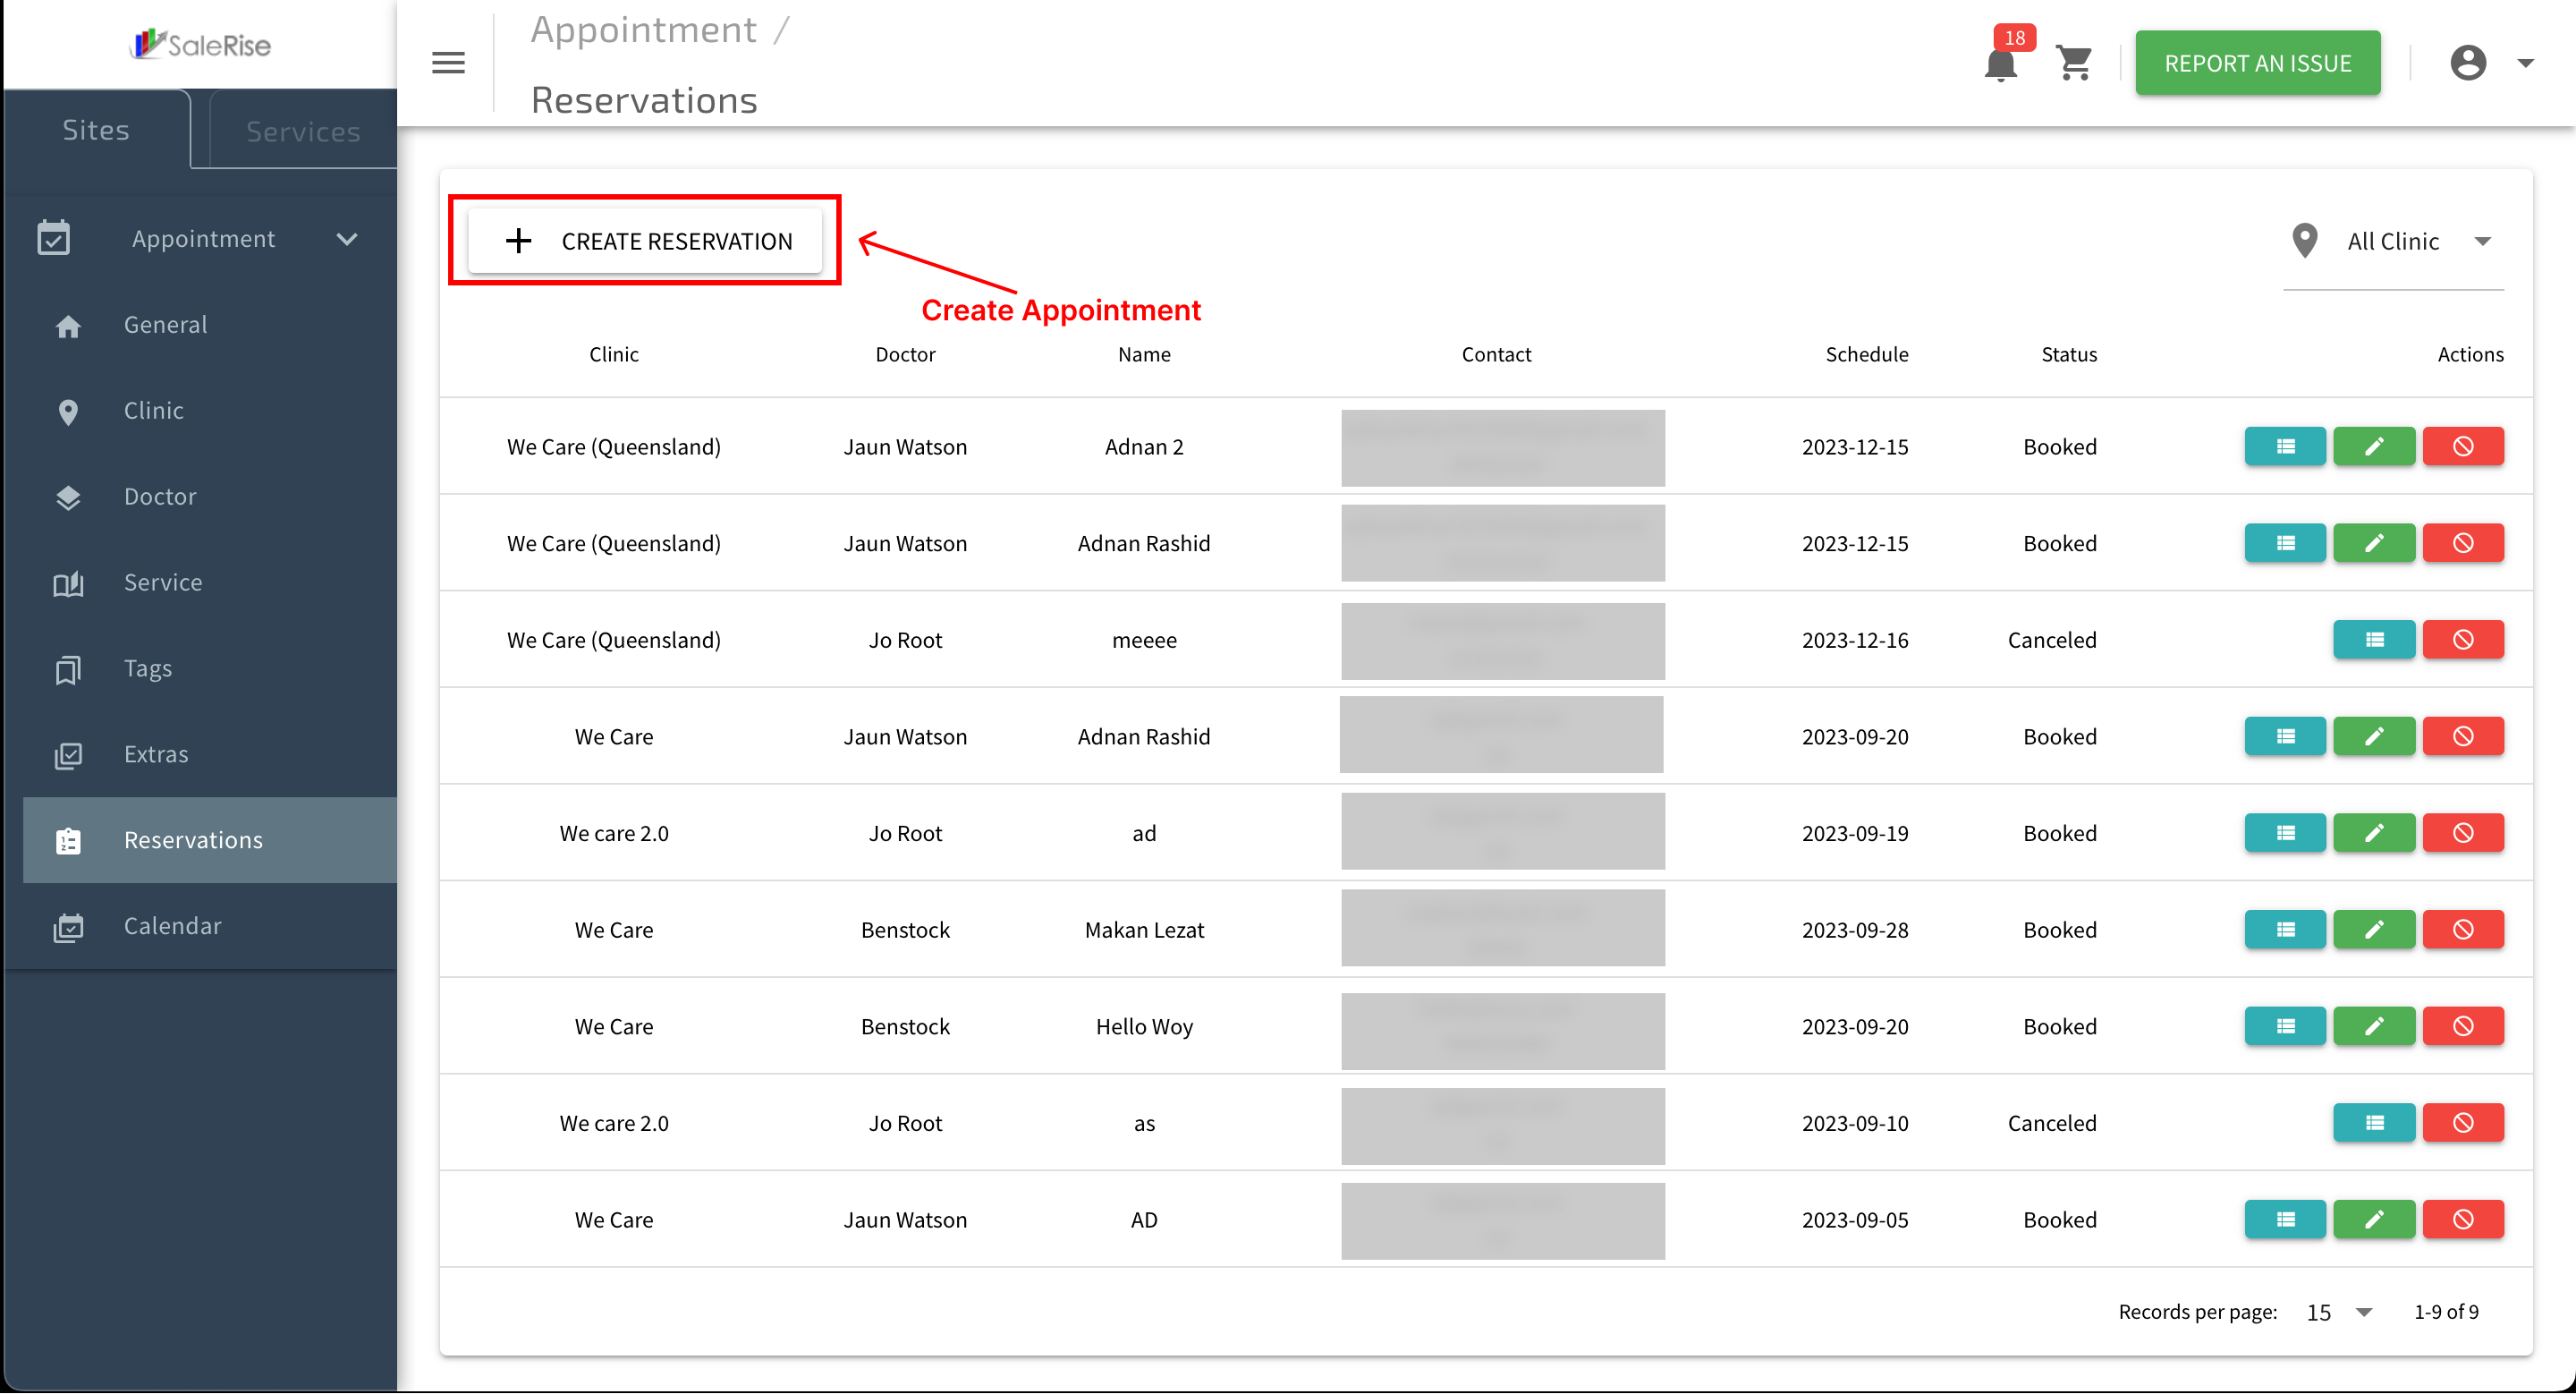
Manual Reservation Creation:
- Click on "Create Manual Reservation" to manually add a reservation.

- Customer Details: Enter customer information.
- Reservation Details: Specify date, time, and services.
- Save Manual Reservation: Confirm the manual reservation details.
- Click on "Create Manual Reservation" to manually add a reservation.

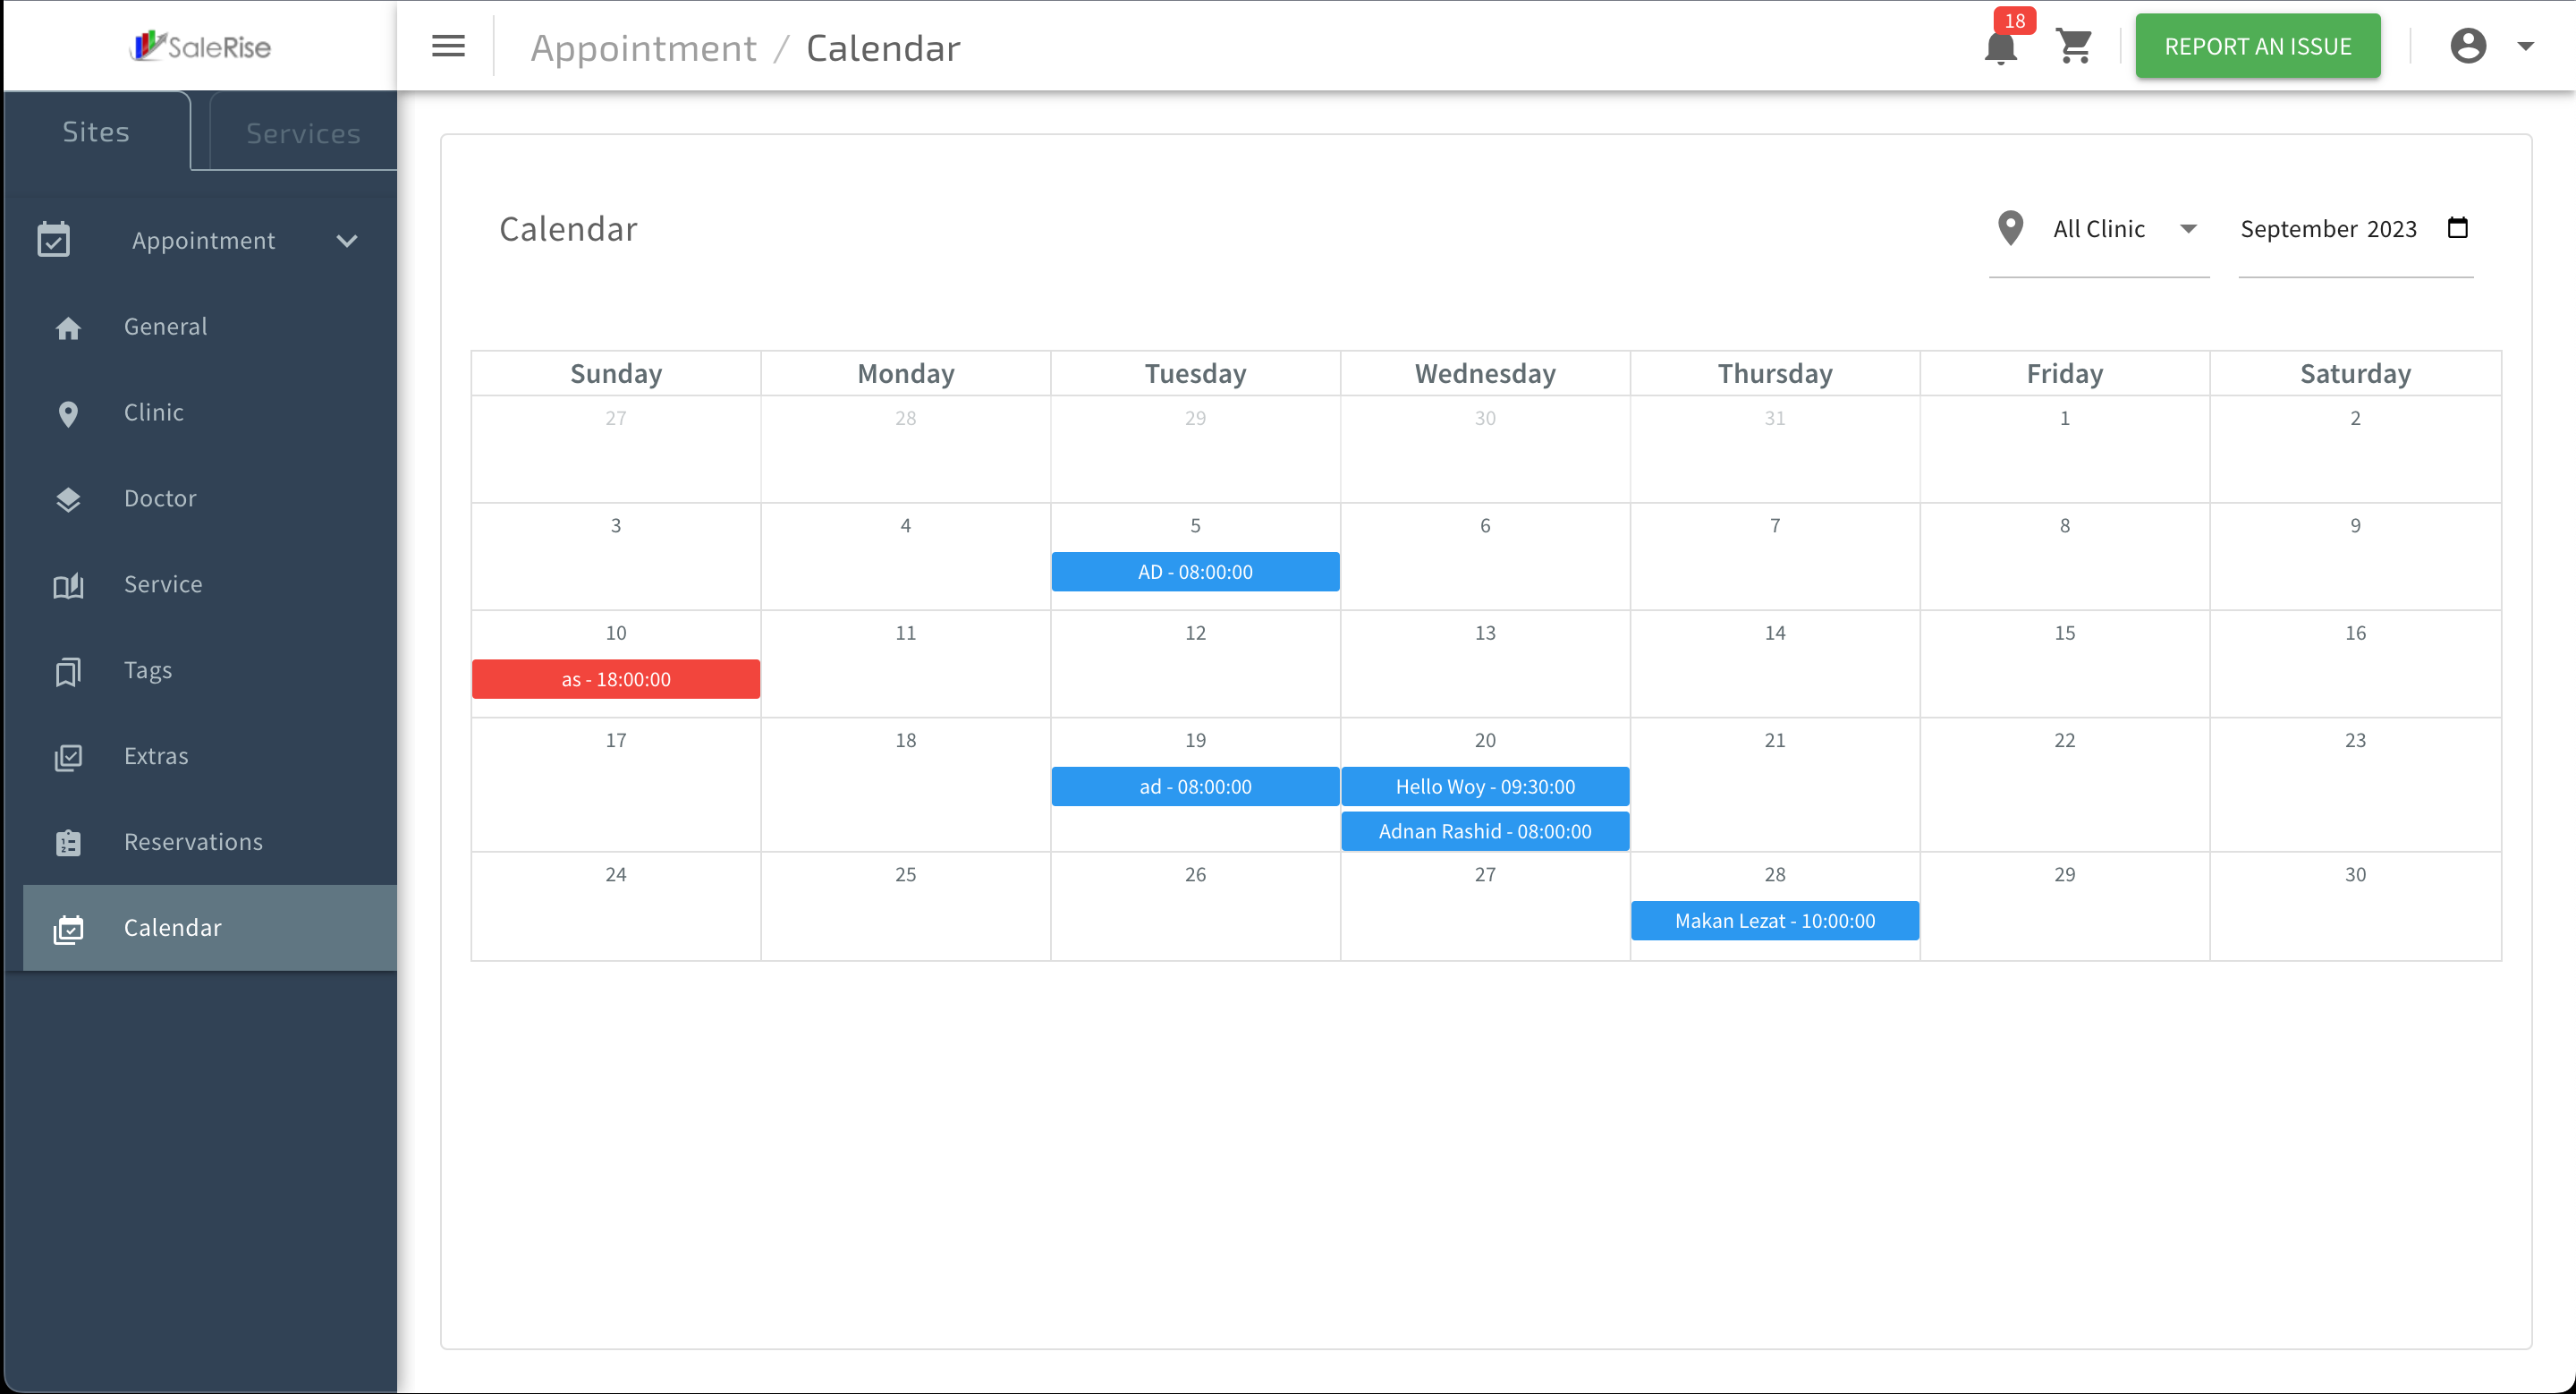
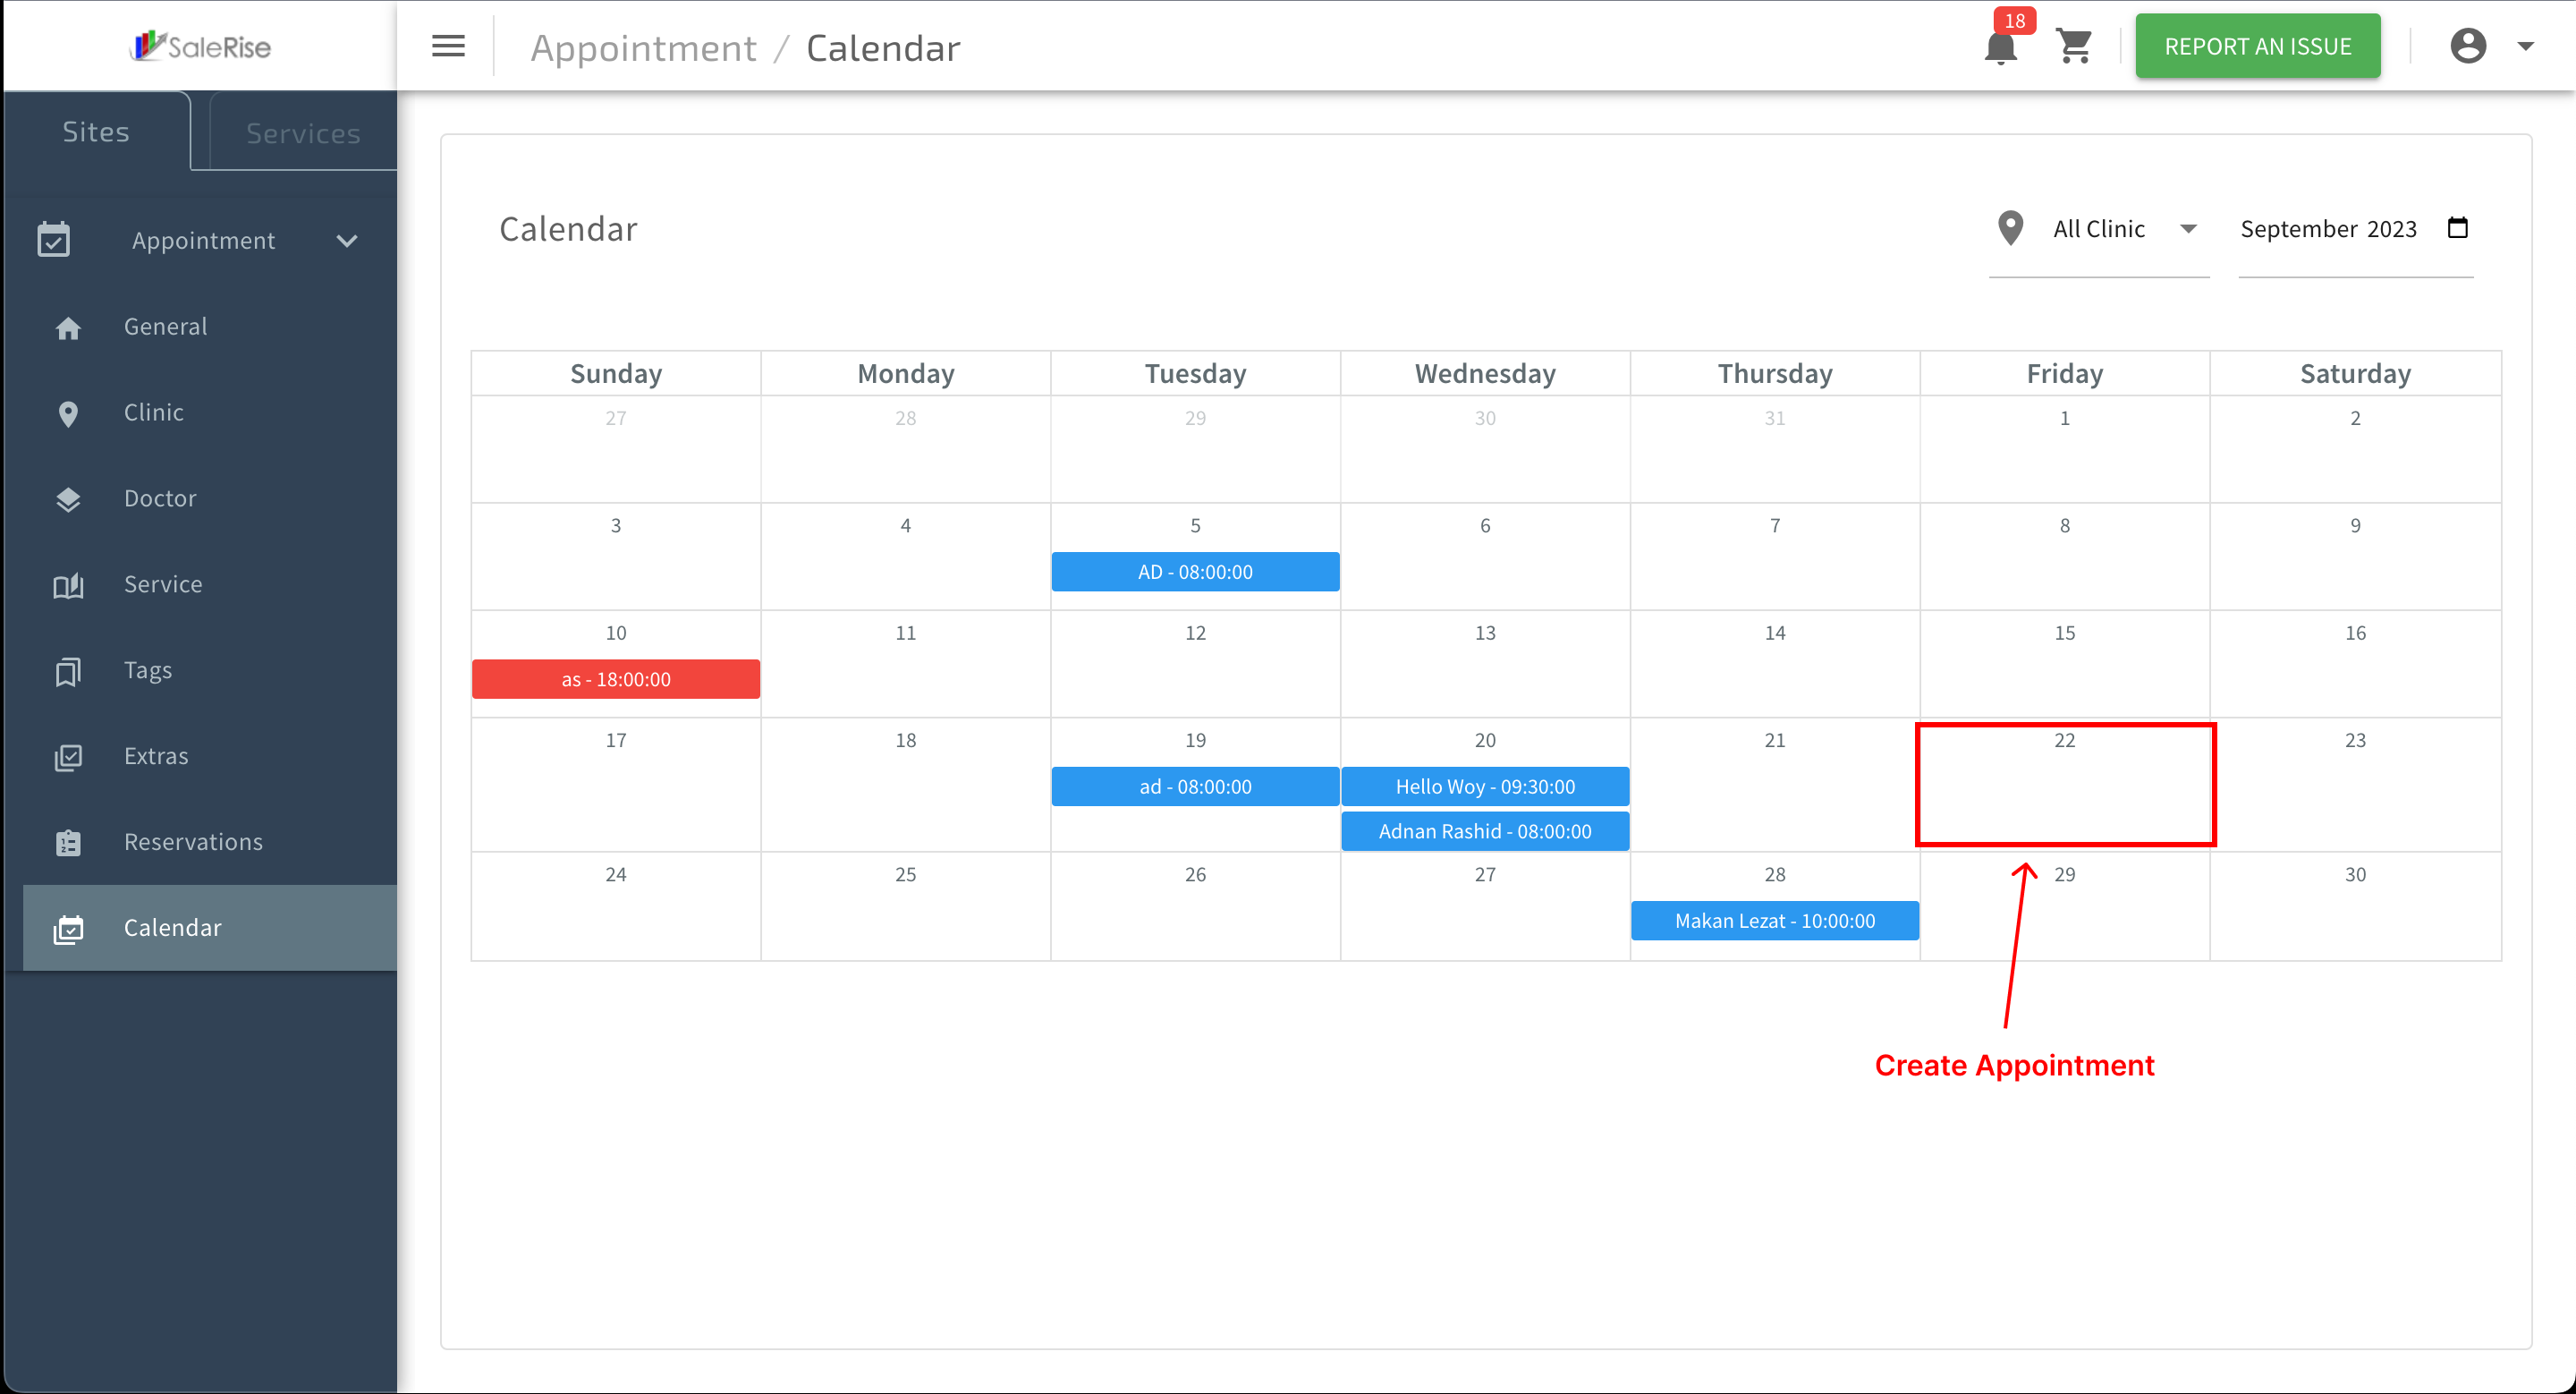
Calendar View for Reservations
The "Calendar View" module offers users a visual representation of reservations, allowing for easy scheduling and management. Users can view and interact with reservations directly on the calendar interface.
Edit, Create, or Cancel Reservations
Overview:
The "Calendar View" module offers users a visual representation of reservations, allowing for easy scheduling and management. Users can view and interact with reservations directly on the calendar interface.
-
Access "Calendar View":
- Navigate to the "Calendar View" module to see an interactive calendar representation of reservations.

- Navigate to the "Calendar View" module to see an interactive calendar representation of reservations.
-
Monthly Overview:
- See a monthly overview of reservations with dates highlighted.
- See a monthly overview of reservations with dates highlighted.
-
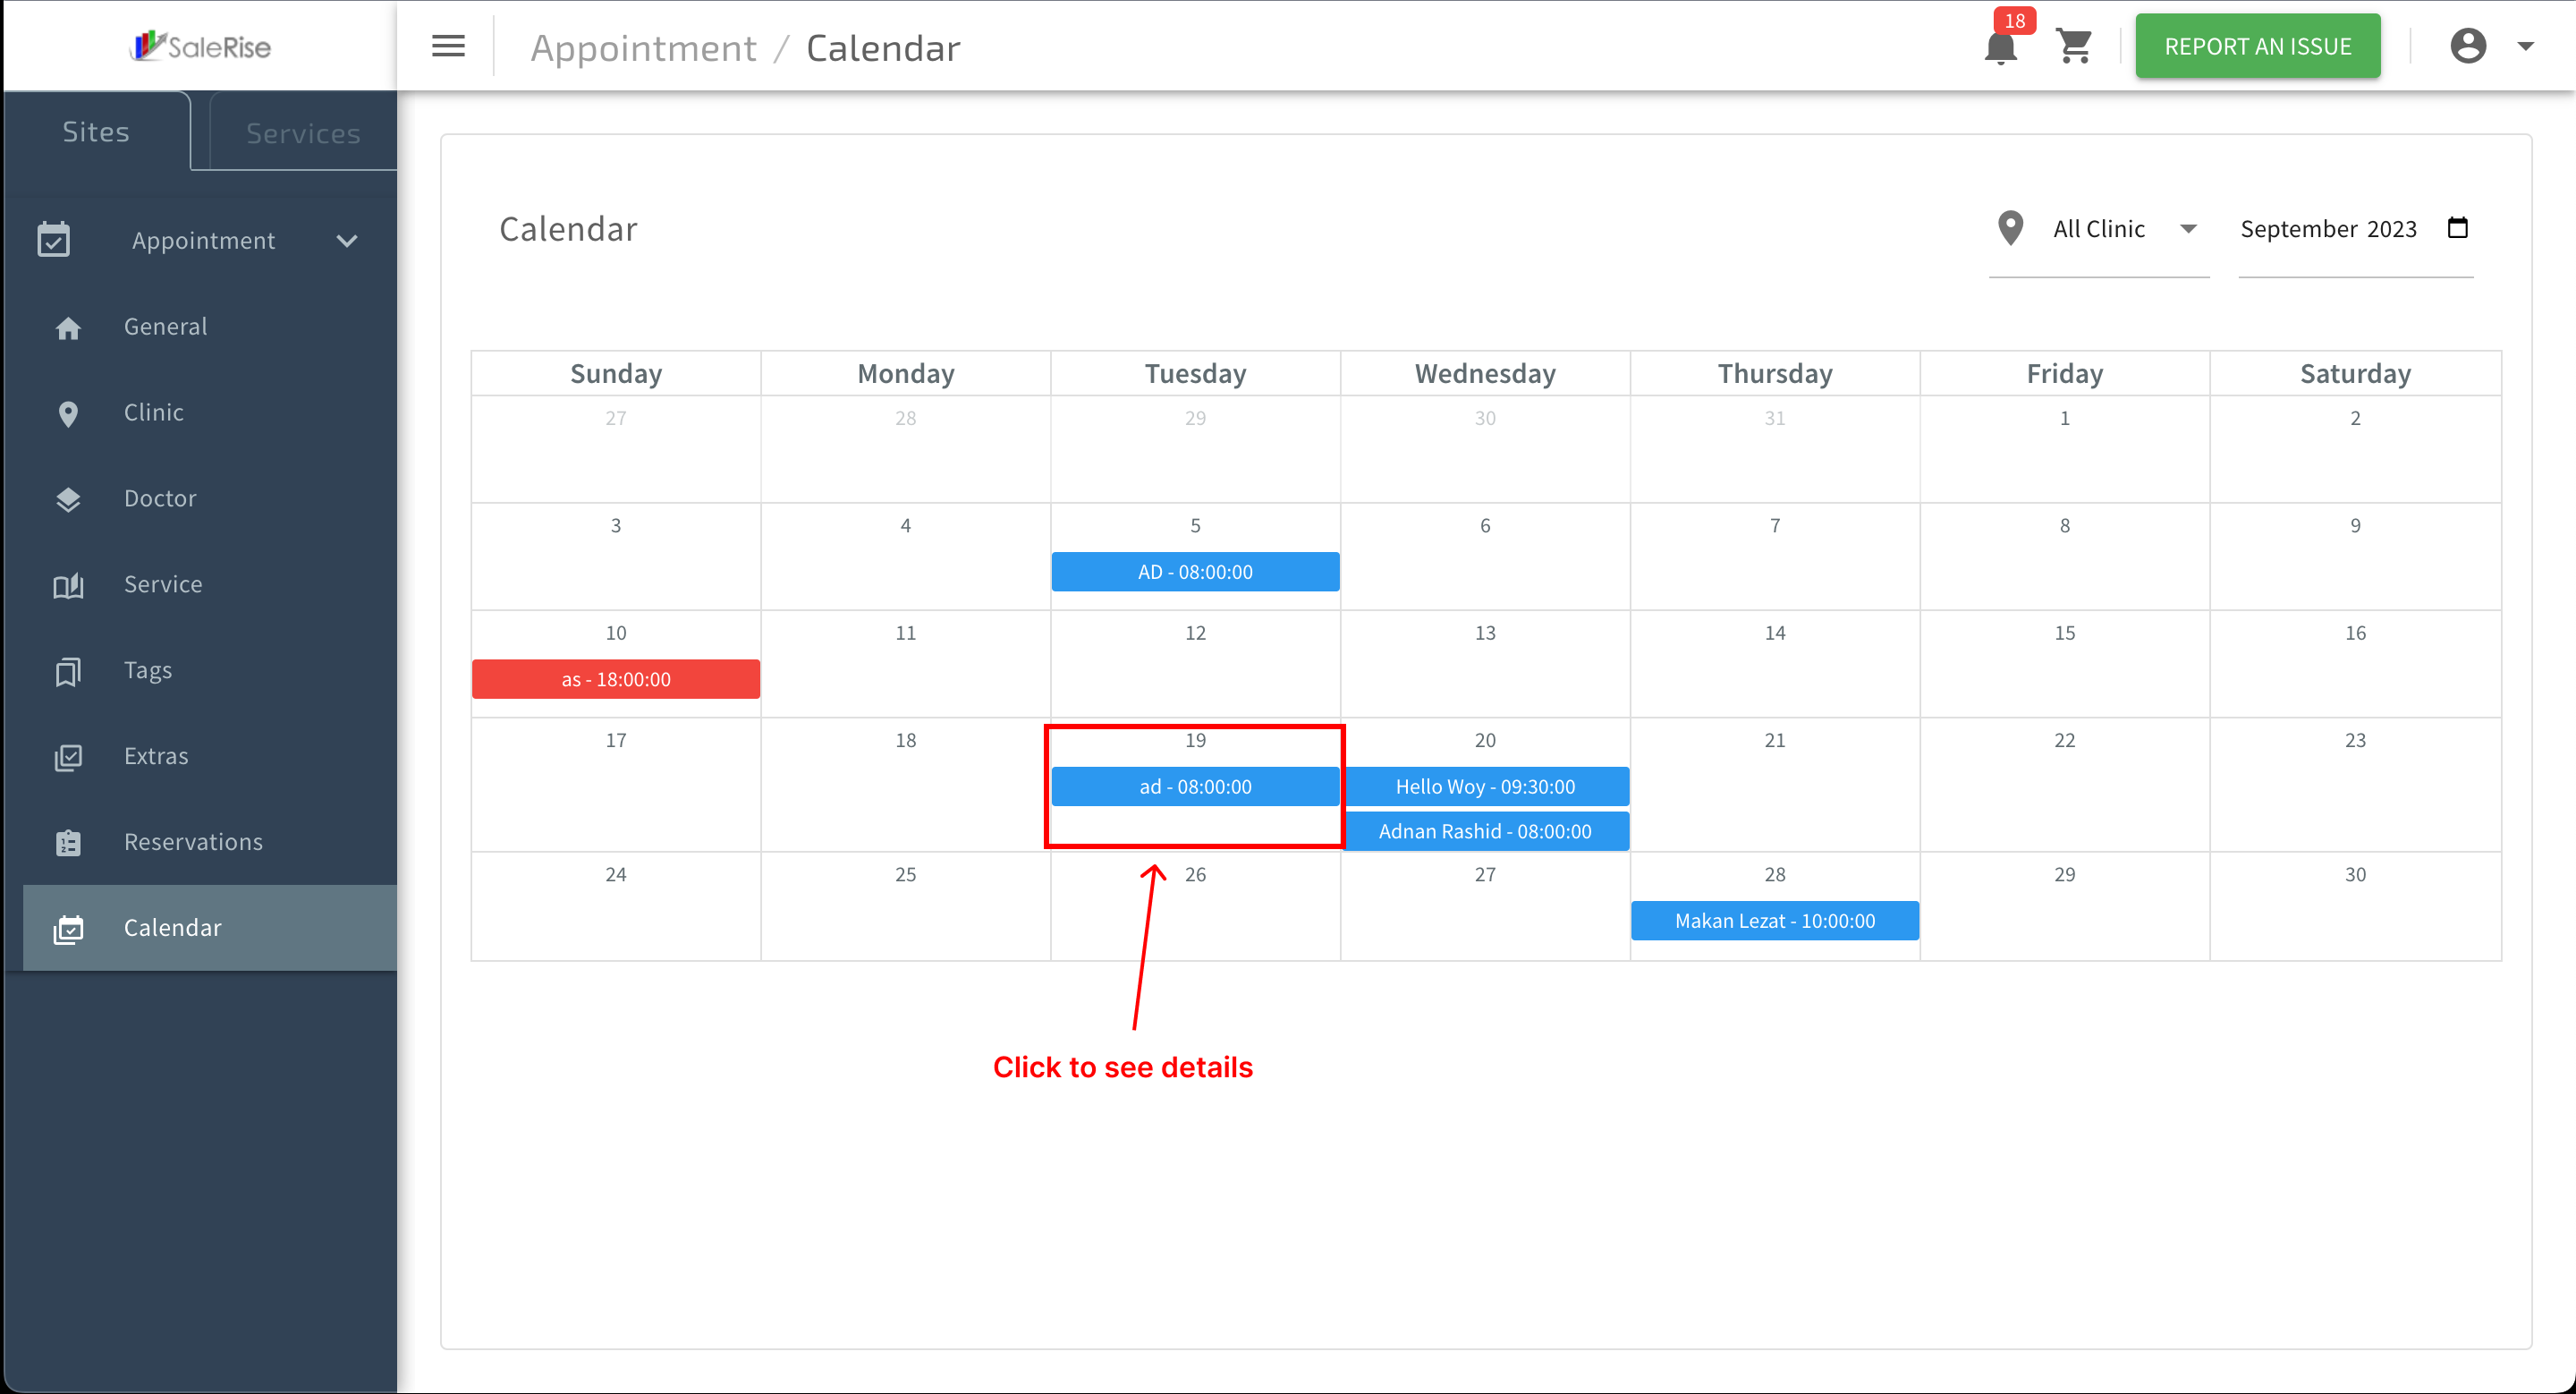
Interactive Calendar:
- Interact with the calendar to view reservations for specific dates.
- Click on a date to see a summary of reservations.

- Click on a date to see a summary of reservations.
- Interact with the calendar to view reservations for specific dates.
-
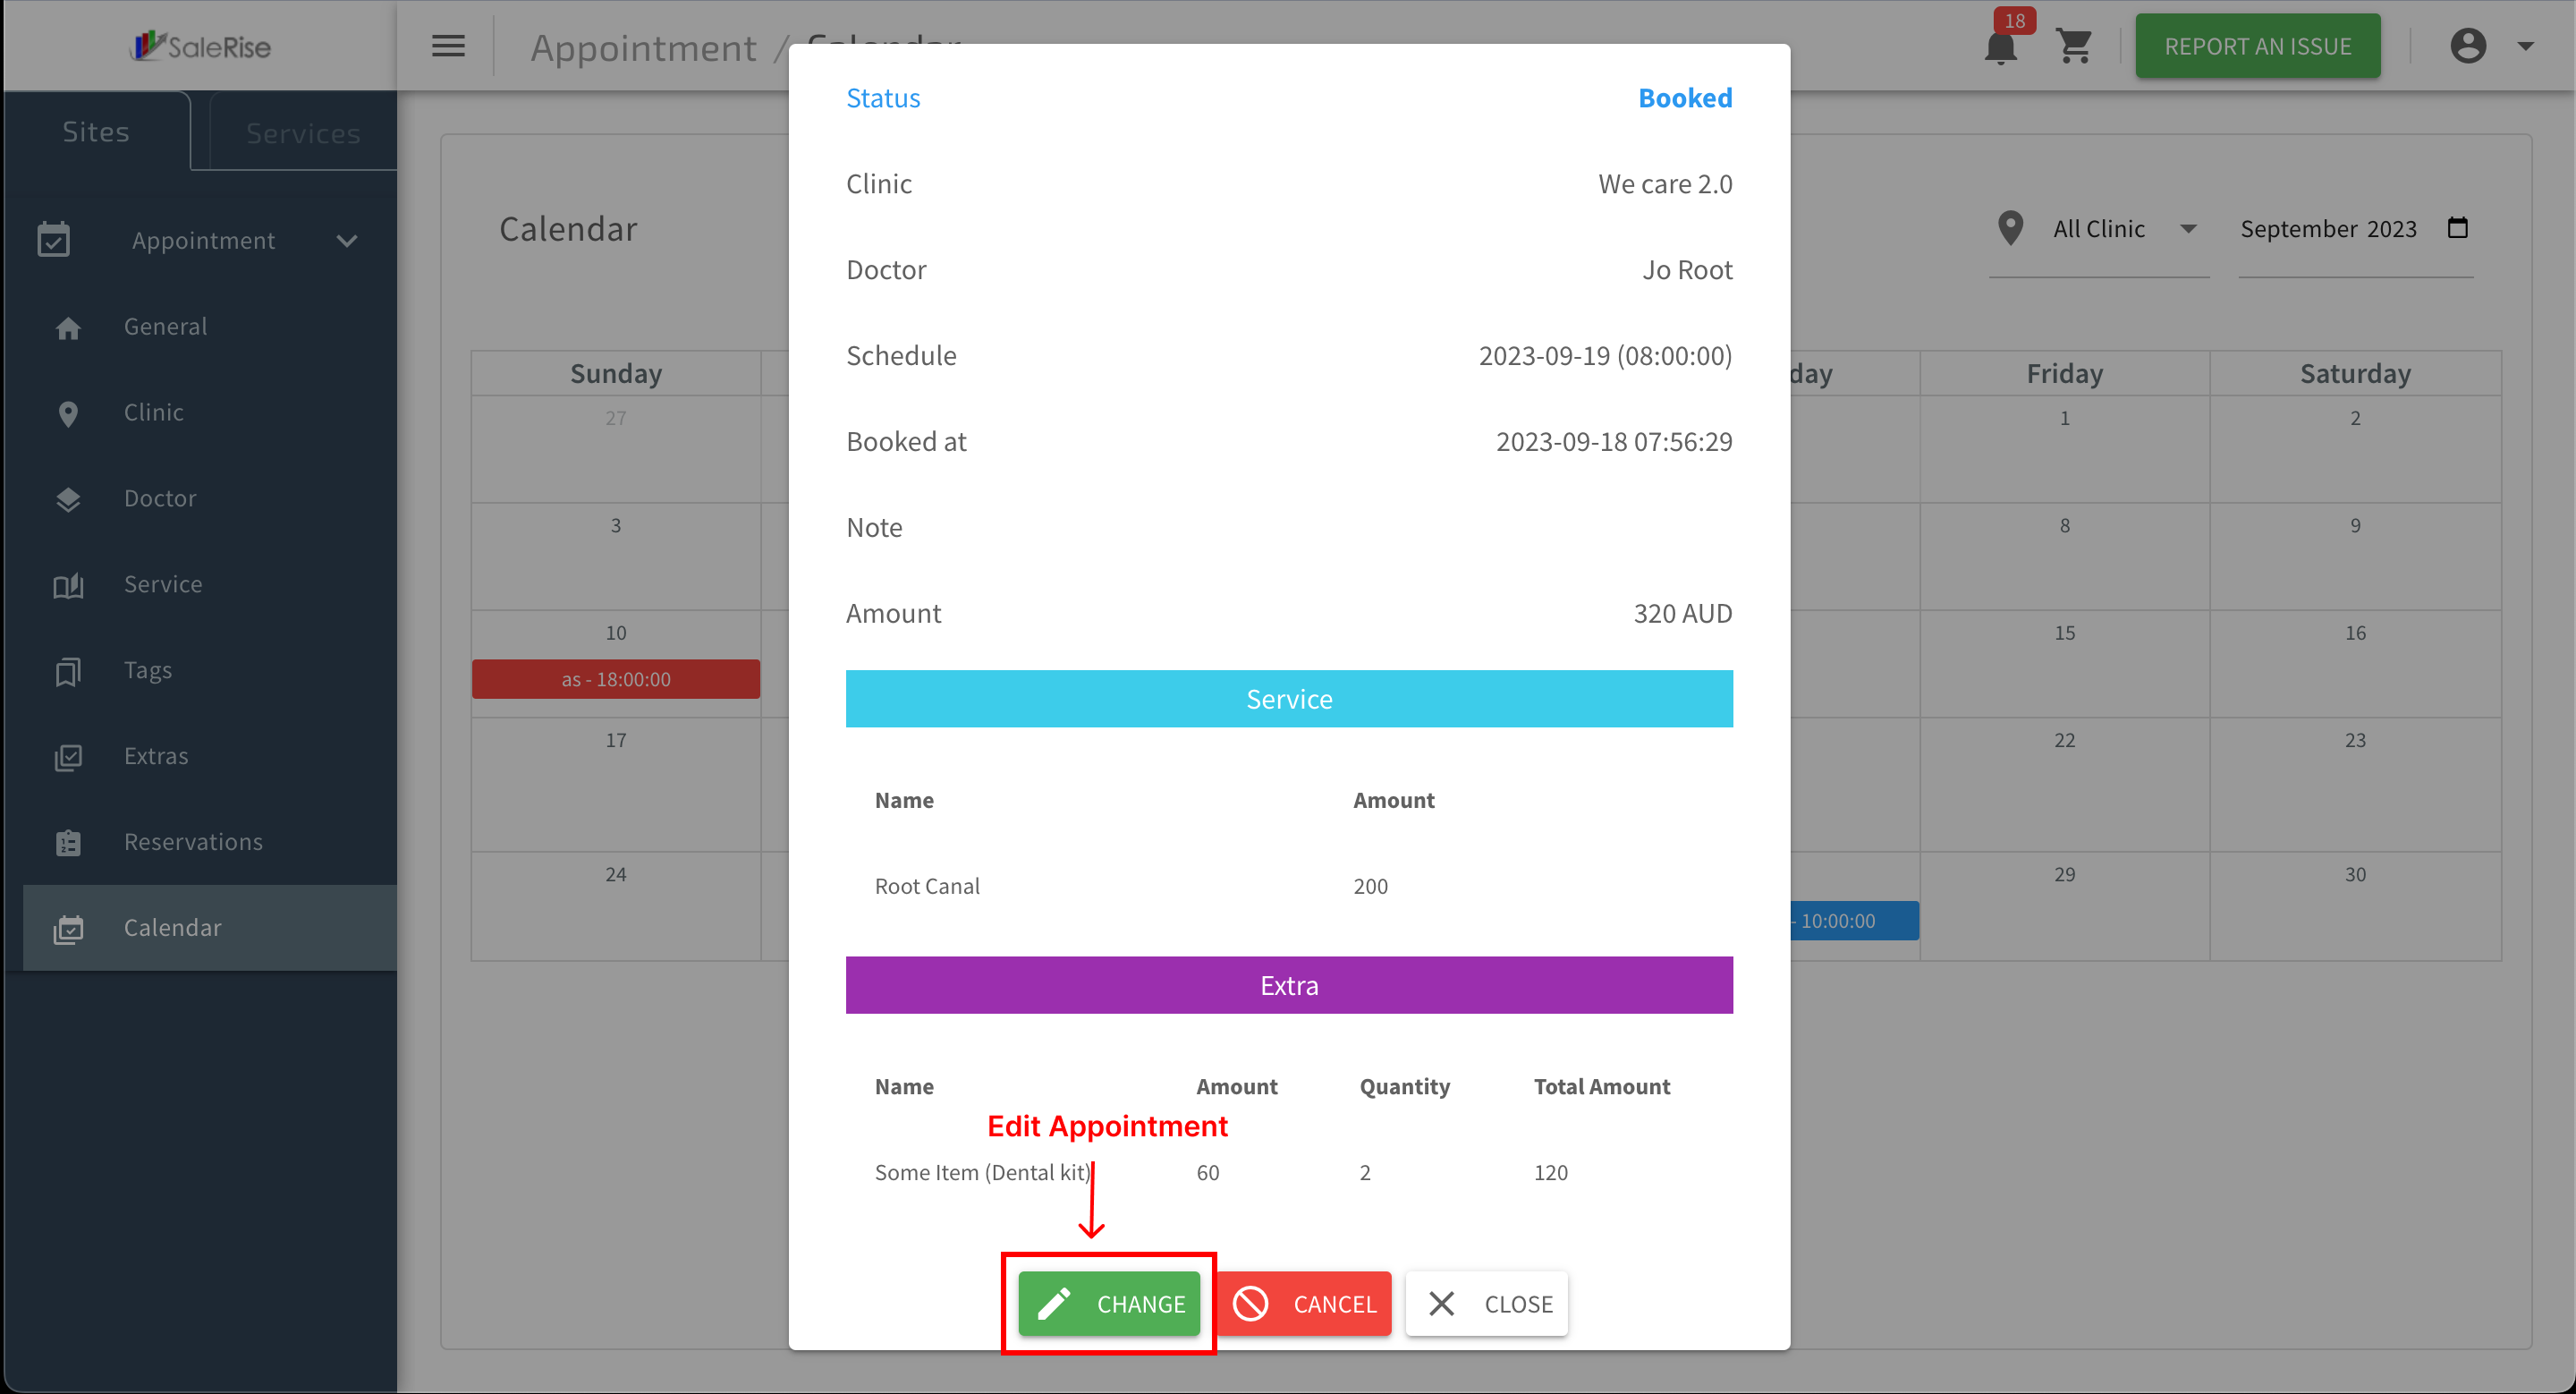
Daily Details:
- View detailed reservation information for a specific date.
- Reservation List: Display a list of reservations for the selected date.
- Customer Details: Access customer information.
- View detailed reservation information for a specific date.
-
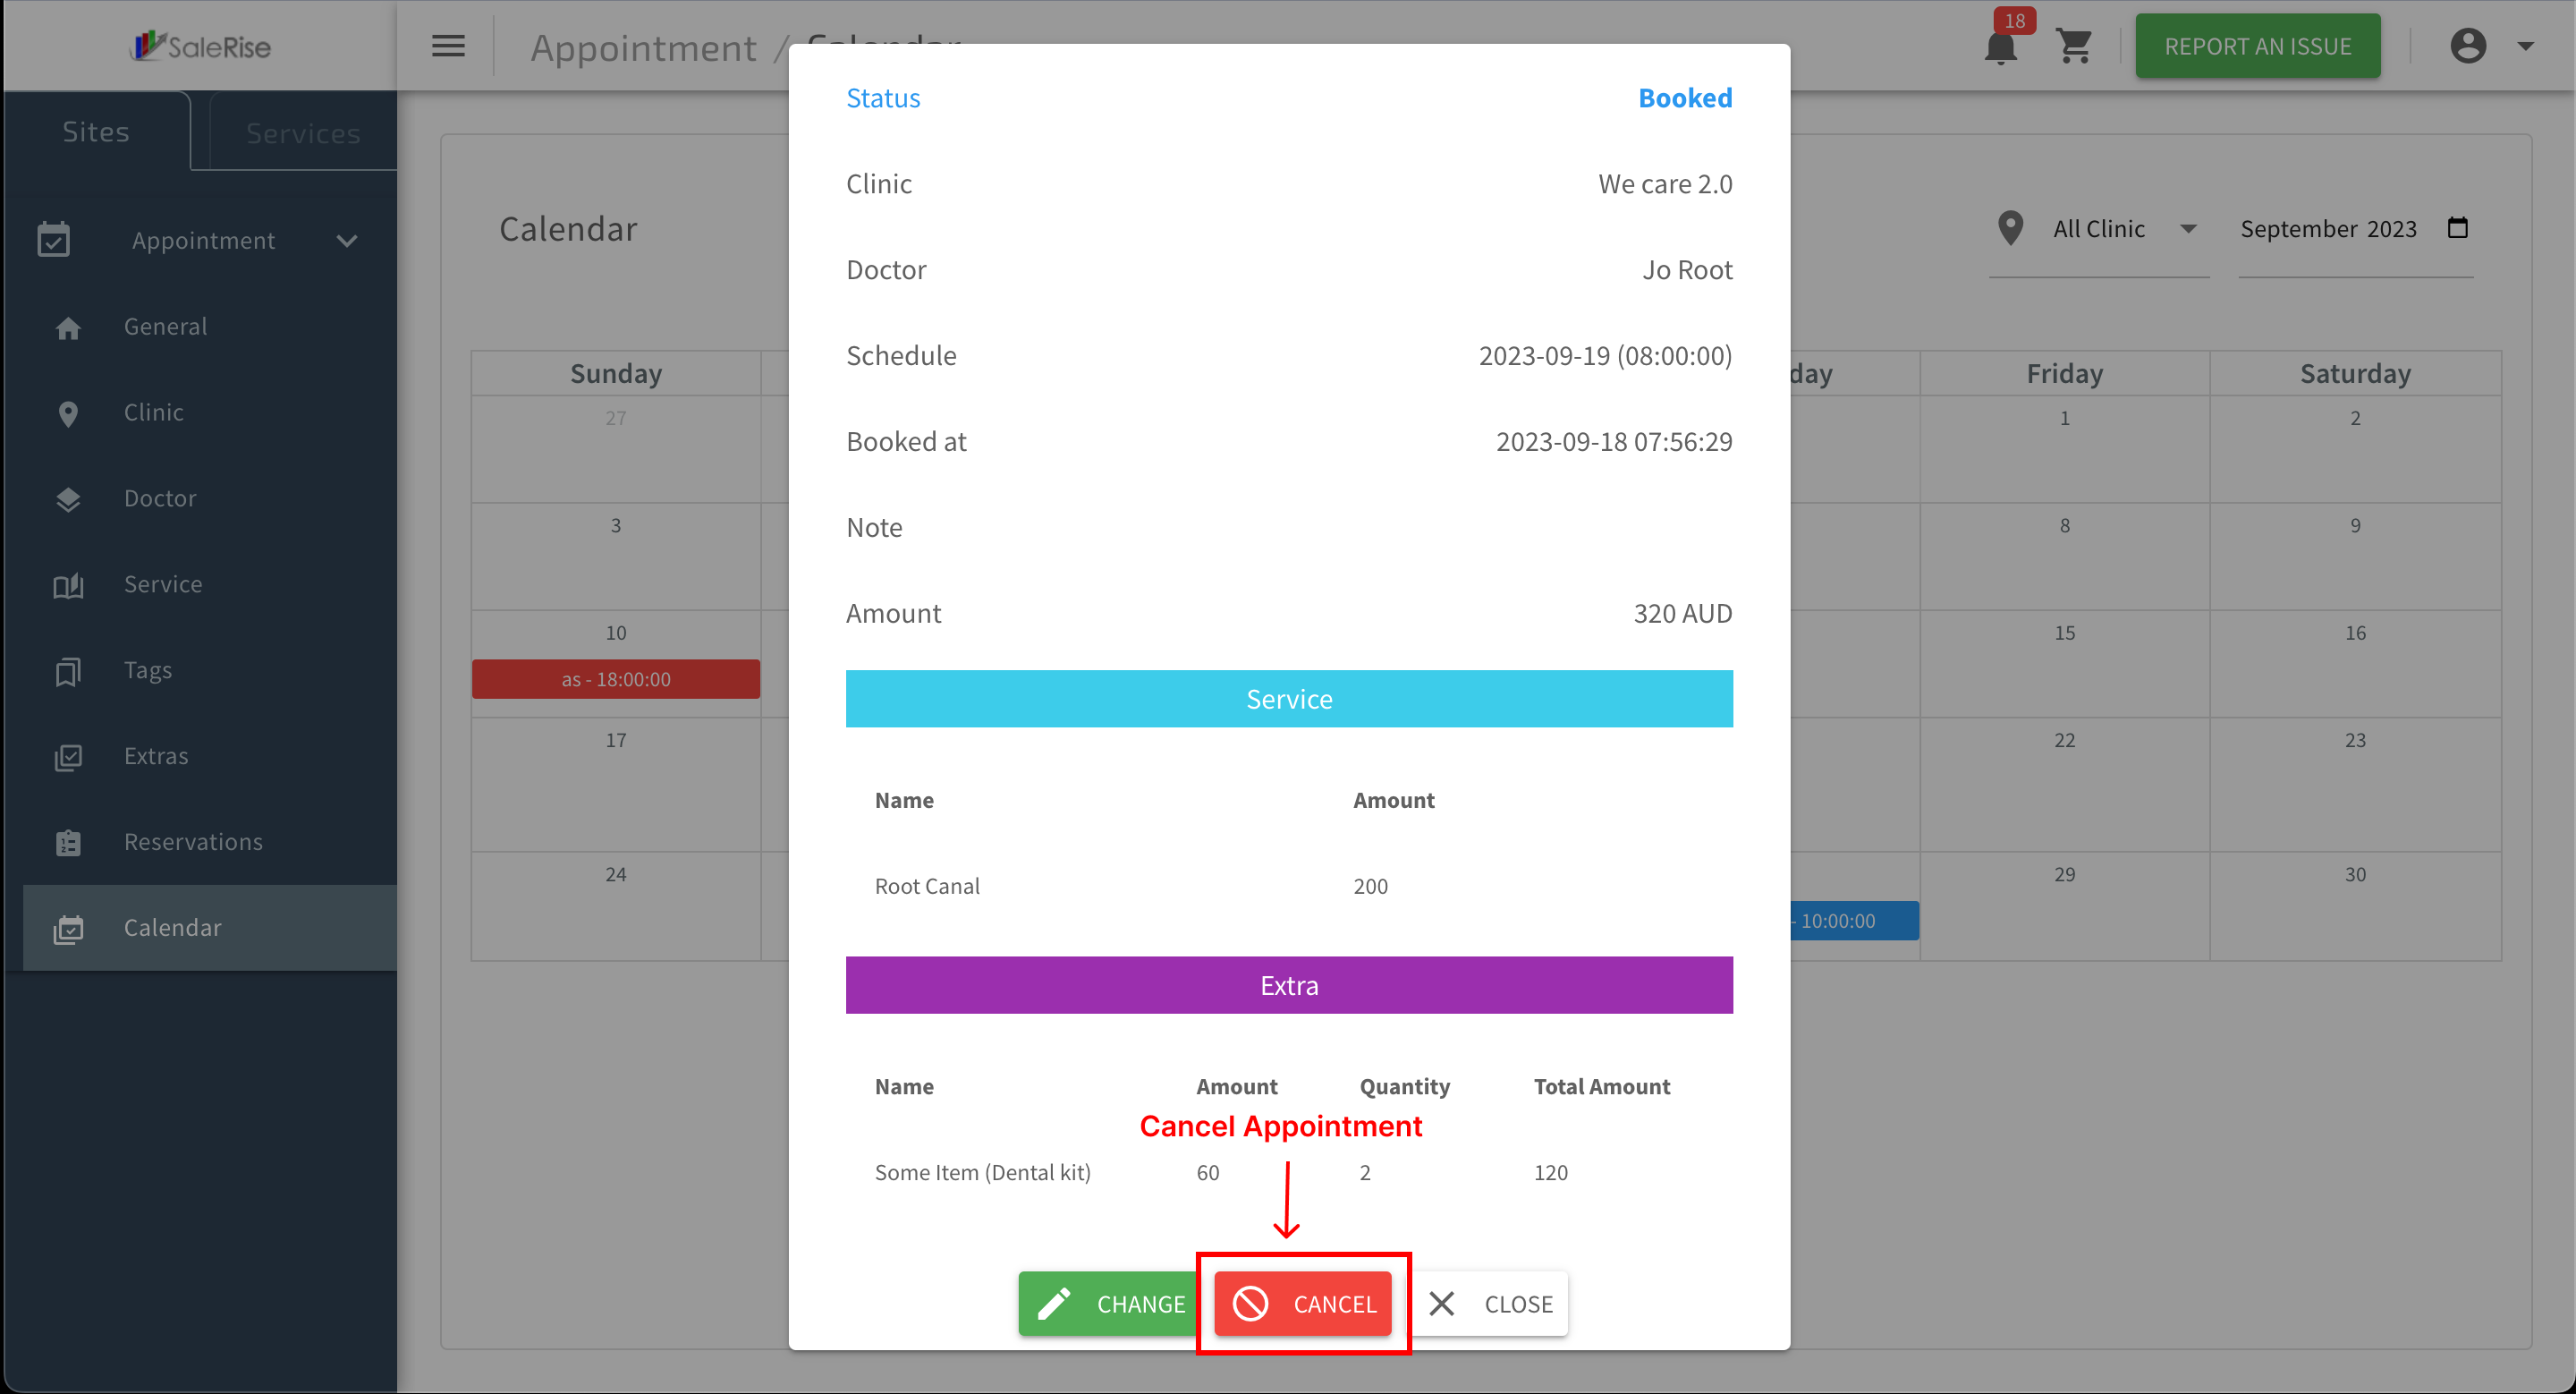
Edit or Cancel Reservations:
- Edit or cancel reservations directly from the calendar view.


- Edit or cancel reservations directly from the calendar view.
-
Create Manual Reservations:
- If needed, create manual reservations directly from the calendar "Click on Date".

- Interactive Form: Enter customer details, reservation date, time, and services.
- If needed, create manual reservations directly from the calendar "Click on Date".
-
Navigate Through Months:
- Easily navigate through different months to plan and manage future reservations.